


前言
本文将使用OpenCV C++ 进行车道检测。
一、获取车道ROI区域
 原图如图所示。
使用下面代码段获取ROI区域。该ROI区域点集根据图像特征自己设定。通过fillPoly填充ROI区域,最终通过copyTo在原图中扣出ROI。
void GetROI(Mat src, Mat &image)
{
	Mat mask = Mat::zeros(src.size(), src.type());

	int width = src.cols;
	int height = src.rows;

	//获取车道ROI区域,只对该部分进行处理
	vector<Point>pts;
	Point ptA((width / 8) * 2, (height / 20) * 19);
	Point ptB((width / 8) * 2, (height / 8) * 7);
	Point ptC((width / 10) * 4, (height / 5) * 3);
	Point ptD((width / 10) * 5, (height / 5) * 3);
	Point ptE((width / 8) * 7, (height / 8) * 7);
	Point ptF((width / 8) * 7, (height / 20) * 19);
	pts = { ptA ,ptB,ptC,ptD,ptE, ptF };

	fillPoly(mask, pts, Scalar::all(255));
	src.copyTo(image, mask);

}

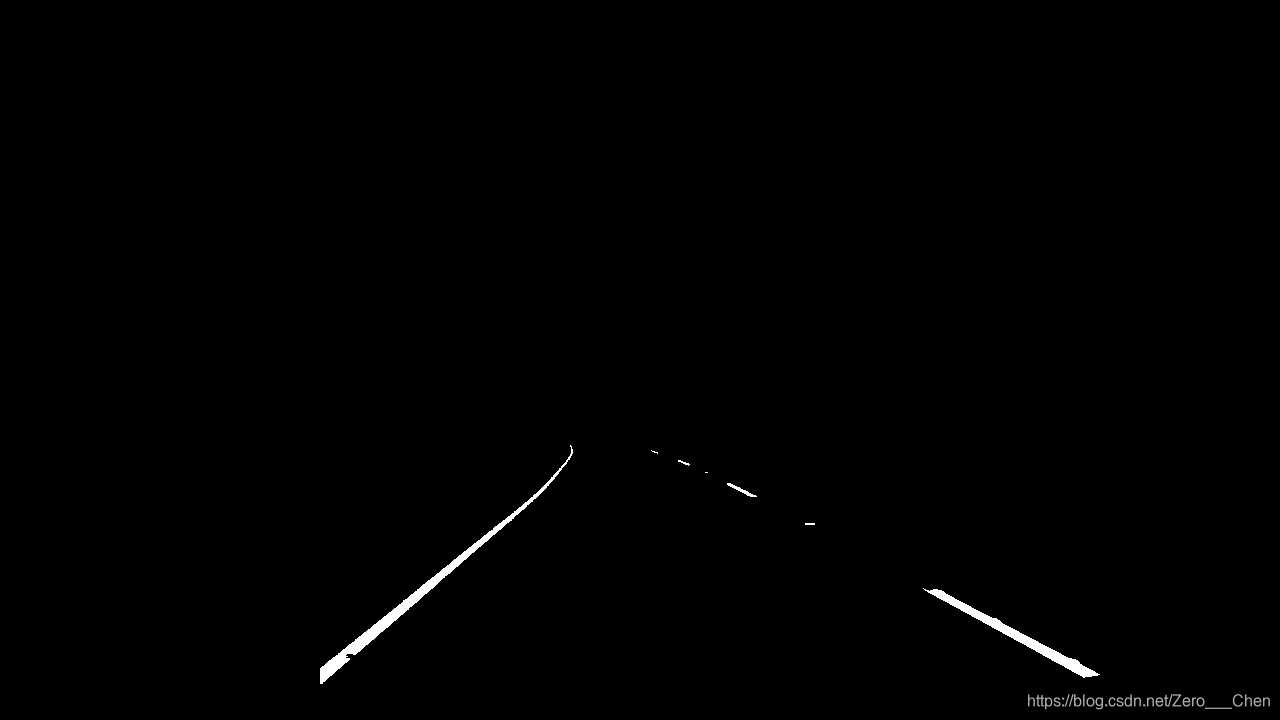
mask图像如图所示。有了mask图像,我们就可以更好的进行后续处理,以检测车道线。
二、车道检测
1.灰度、阈值
	Mat gray;
	cvtColor(image, gray, COLOR_BGR2GRAY);

	Mat thresh;
	threshold(gray, thresh, 180, 255, THRESH_BINARY);
	imshow("thresh", thresh);
经过灰度、阈值后的图像如下图所示。
2.获取非零像素点
我们将图像分为两半。左半边获取左侧车道轮廓点;右半边获取右侧车道轮廓点。
	vector<Point>left_line;
	vector<Point>right_line;

	for (int i = 0; i < thresh.cols / 2; i++)
	{
		for (int j = 0; j < thresh.rows; j++)
		{
			if (thresh.at<uchar>(j, i) == 255)
			{
				left_line.push_back(Point(i, j));

			}
		}
	}

	for (int i = thresh.cols / 2; i < thresh.cols; i++)
	{
		for (int j = 0; j < thresh.rows; j++)
		{
			if (thresh.at<uchar>(j, i) == 255)
			{
				right_line.push_back(Point(i, j));
			}
		}
	}
3.绘制车道线
我们将从left_line、right_line容器中各拿出首尾两个点作为车道线的起始点。
	if (left_line.size() > 0 && right_line.size() > 0)
	{
		Point B_L = (left_line[0]);
		Point T_L = (left_line[left_line.size() - 1]);
		Point T_R = (right_line[0]);
		Point B_R = (right_line[right_line.size() - 1]);

		circle(src, B_L, 10, Scalar(0, 0, 255), -1);
		circle(src, T_L, 10, Scalar(0, 255, 0), -1);
		circle(src, T_R, 10, Scalar(255, 0, 0), -1);
		circle(src, B_R, 10, Scalar(0, 255, 255), -1);

		line(src, Point(B_L), Point(T_L), Scalar(0, 255, 0), 10);
		line(src, Point(T_R), Point(B_R), Scalar(0, 255, 0), 10);

		vector<Point>pts;
		pts = { B_L ,T_L ,T_R ,B_R };
		fillPoly(src, pts, Scalar(133, 230, 238));
	}
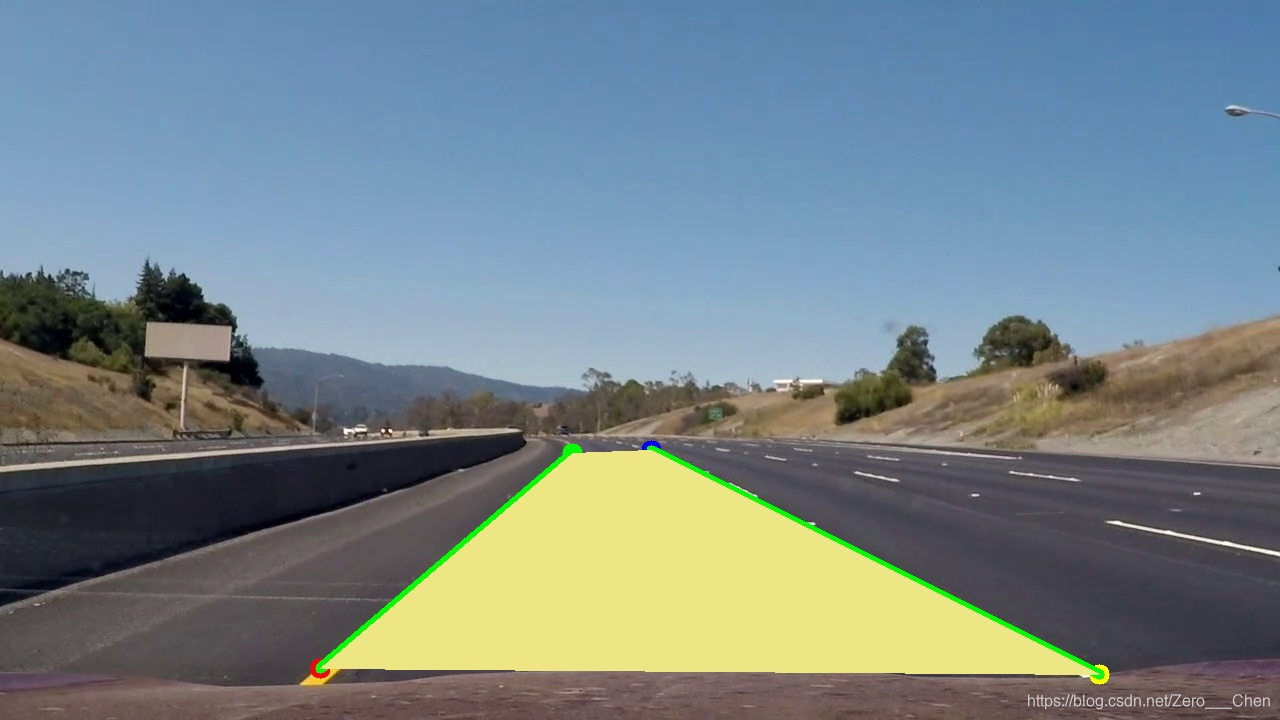
最终效果如图所示。
三、源码
#include<iostream>
#include<opencv2/opencv.hpp>
using namespace std;
using namespace cv;

void GetROI(Mat src, Mat &ROI)
{
	int width = src.cols;
	int height = src.rows;

	//获取车道ROI区域,只对该部分进行处理
	vector<Point>pts;
	Point ptA((width / 8) * 2, (height / 20) * 19);
	Point ptB((width / 8) * 2, (height / 8) * 7);
	Point ptC((width / 10) * 4, (height / 5) * 3);
	Point ptD((width / 10) * 5, (height / 5) * 3);
	Point ptE((width / 8) * 7, (height / 8) * 7);
	Point ptF((width / 8) * 7, (height / 20) * 19);
	pts = { ptA ,ptB,ptC,ptD,ptE, ptF };

	//opencv4版本 fillPoly需要使用vector<vector<Point>>
	vector<vector<Point>>ppts;
	ppts.push_back(pts);

	Mat mask = Mat::zeros(src.size(), src.type());
	fillPoly(mask, ppts, Scalar::all(255));

	src.copyTo(ROI, mask);
}

void DetectRoadLine(Mat src,Mat &ROI)
{
	Mat gray;
	cvtColor(ROI, gray, COLOR_BGR2GRAY);

	Mat thresh;
	threshold(gray, thresh, 180, 255, THRESH_BINARY);

	vector<Point>left_line;
	vector<Point>right_line;

	//左车道线
	for (int i = 0; i < thresh.cols / 2; i++)
	{
		for (int j = thresh.rows/2; j < thresh.rows; j++)
		{
			if (thresh.at<uchar>(j, i) == 255)
			{
				left_line.push_back(Point(i, j));
			}
		}
	}
	//右车道线
	for (int i = thresh.cols / 2; i < thresh.cols; i++)
	{
		for (int j = thresh.rows / 2; j < thresh.rows; j++)
		{
			if (thresh.at<uchar>(j, i) == 255)
			{
				right_line.push_back(Point(i, j));
			}
		}
	}

	//车道绘制
	if (left_line.size() > 0 && right_line.size() > 0)
	{
		Point B_L = (left_line[0]);
		Point T_L = (left_line[left_line.size() - 1]);
		Point T_R = (right_line[0]);
		Point B_R = (right_line[right_line.size() - 1]);

		circle(src, B_L, 10, Scalar(0, 0, 255), -1);
		circle(src, T_L, 10, Scalar(0, 255, 0), -1);
		circle(src, T_R, 10, Scalar(255, 0, 0), -1);
		circle(src, B_R, 10, Scalar(0, 255, 255), -1);

		line(src, Point(B_L), Point(T_L), Scalar(0, 255, 0), 10);
		line(src, Point(T_R), Point(B_R), Scalar(0, 255, 0), 10);

		vector<Point>pts;
		pts = { B_L ,T_L ,T_R ,B_R };
		vector<vector<Point>>ppts;
		ppts.push_back(pts);
		fillPoly(src, ppts, Scalar(133, 230, 238));
	}
}

int main()
{

	VideoCapture capture;
	capture.open("Input_Video.mp4");

	if (!capture.isOpened())
	{
		cout << "Can not open video file!" << endl;
		system("pause");
		return -1;
	}

	Mat frame, image;
	while (capture.read(frame))
	{
		char key = waitKey(10);
		if (key == 27)
		{
			break;
		}
		GetROI(frame, image);

		DetectRoadLine(frame, image);

		imshow("frame", frame);
	}

	capture.release();
	destroyAllWindows();
	system("pause");
	return 0;
}
总结
本文使用OpenCV C++进行车道检测,关键步骤有以下几点。
1、要根据车道所在位置扣出一个ROI区域,这样方便我们后续的阈值操作。
2、根据阈值图像获取左右车道的轮廓点。这里的阈值处理很重要,直接会影响最后的效果。本文做实时视频处理时,也会因为阈值问题导致最后的效果不是特别好。
3、根据获取到的各车道轮廓点拿出首尾Point就可以绘制车道线以及车道区域了。


 1万+
1万+


 被折叠的 条评论
为什么被折叠?
被折叠的 条评论
为什么被折叠?
 到【灌水乐园】发言


