


非阻塞式按钮事件新思路
背景
在蓝桥杯嵌入式组的比赛中,总是会用到按钮操作,一方面需要按钮具有按下、单击、释放、长按等事件,另一方面还需要有消抖的能力。同时又对按钮的响应事件有要求(0.1秒以内)。为什么会有这样的要求呢?
原理
因为常规的消抖都是使用的delay进行消抖,即检测多少秒后是否还是保持同样的状态。常规操作都是阻塞式的,能不能在0.1s内按钮做出正确的响应,就要看个人的逻辑思维能力了,可能就没有办法再使用阻塞式按钮事件。同时主循环中也有一些实时更新的传感器数据,如果阻塞式,可能会造成数据刷新不及时等严重情况。

上图就是按钮事件以及消抖的基本思想:
从检测到被按下开始👉过了一段时间再检测发现还是当前状态👉触发单击事件
思路
按钮事件刷新:
1、记录按下的时间
2、比较放开时与按下时的时间差
3、如果小于很小的阈值,则判定为抖动,不予理睬
4、如果大于单击的阈值,则标记按钮事件为单击事件
5、如果大于长按的阈值,则标记按钮事件为长按事件
按钮事件触发
1、检测到按钮事件为单击事件
2、执行对应的单击事件回调函数
3、将按钮事件标记为无事发生
长按事件同理
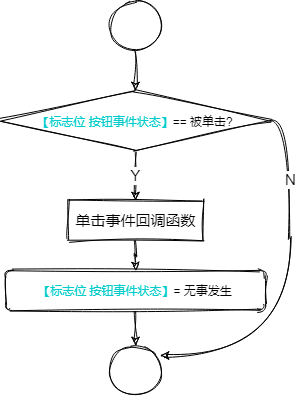
简单的实现流程图
下图为只有单击事件的流程图表示

按钮事件触发流程图表示
C语言简单实现
预知:
digitalRead(pin)    // 读取某引脚的电平信号
millis()            // 读取距离启动设备到现在的毫秒数作为时间参考

#define DOWN HIGH // 定义按下为高电平
#define UP   LOW  // 定义放开为低电平
简单实现
一些常量
enum EBTState {
    Nothing = 0,
    Click = 1,
    LongPress = 2,
};

typedef uint8_t PinType;


const PinType Pin_BT = 7;
以下为按钮状刷新函数
#define OnClickLastTime 20
bool BTIsPressed = false;
long BTStartPressingTime = 0;
EBTState BTState = EBTState::Nothing;

void refresh_button_state() {
    if (BTIsPressed) { // 按钮已被按下
        if (digitalRead(Pin_BT) == UP && millis() - BTStartPressingTime > OnClickLastTime) { // 如果当前按钮松开,并且记录时间大于按钮单击事件的临界时间
            BTState = EBTState::Click; // 触发单击事件
            BTIsPressed = false; // 恢复被按下标志位
        }
    } else { // 如果按钮还没被按下过
        if (digitalRead(Pin_BT) == DOWN) { // 被按下了
            BTIsPressed = true; // 标记按钮被按下过
            BTStartPressingTime = millis(); // 记录起始被按下时间
        }
    }
}
按钮事件被触发后调用回调函数示例
bool is_running = true;

void on_click_event() { // 回调函数
    // 可以在这里进行一些按钮单击事件触发后的操作
    // 比比如可以让主循环停下来:
    is_running = false;
}

int main() {
    while (is_running) {
        refresh_button_state(); // 调用按钮事件刷新函数

        if (BTState == EBTState::Click) { // 如果按钮的事件状态为单击事件
            on_click_event(); // 触发回调函数

            BTState = EBTState::Nothing; // 回复按钮事件状态为“啥事没有”
        }
    }
    return 0;
}
我们可以进行简单的封装,用宏将单击事件封装为一个类似函数闭包的调用形式
#define BTOnclick(Event) do{if(BTState == EBTState::Click){Event BTState = EBTState::Nothing;}}while (0)
这样的话,函数调用就变成了
BTOnclick({
    on_click_event();
});
你甚至可以直接在闭包内直接写业务逻辑代码
BTOnclick({
    int a = 3;
    a = a * 5;
    on_click_event();
});
看起来是不是很优雅呢~
仿真
因为手头里没有单片机用来测试,最近涨价太严重了。
索性写了一个简单的IO模拟器,可以模拟简单的IO行为,并且可以调用简单Arduino的IO相API
源代码放到文末。
在主循环中加入
long t0 = 0;

int main() {
    while (is_running) {
        if (millis() != t0) { //保证每毫秒输出一次,省的画图麻烦
            printf("%d %d %d %d\n", millis(), BTIsPressed, BTState, digitalRead(Pin_BT));
            t0 = millis();
        }
    .........
终端输出结果
第一列为当前事件节点、后面分别为 按钮是否被按下过、按钮事件状态、当前IO状态(按钮状态)
......
123 1 0 1
124 1 0 1
125 1 0 1
126 1 0 1
127 1 0 1
128 1 0 1
129 1 0 1
130 1 0 1
131 1 0 1
132 1 0 1
133 1 0 1
135 1 0 1
135 0 1 0
......
接下来看一下测试的效果
用Excel仿真下绘制下仿真结果

其中
系列一为 【标志位 按钮被按下】
系列二为 【标志位 按钮事件状态】
系列三为 按钮状态 也就是实际的电平变化,按下为高,放开为低
可以看出来,前面的噪声并没有对按钮事件造成影响,直到最后超过20ms的时候才触发了单击事件,触发后当回调函数被执行完成后,按钮事件状态恢复原样。
改进
刚刚写的是一个按钮的时候的按钮事件写法,现在拓展为多个按钮,有两种简单的拓展方案,一种是面向过程的,一种是面向对象进行封装
面向过程
其实也就是把原来
单个的变量👉数组
一次的判断👉循环
就ok了
上代码
以下为按钮状刷新函数(都改成了数组)
#define BTNumber 10
#define OnClickLastTime 20
bool BTIsPressed[BTNumber] = {false};
long BTStartPressingTime[BTNumber] = {0};
EBTState BTState[BTNumber] = {EBTState::Nothing};
const PinType Pin_BT[BTNumber] = {7, 6, 5, 9, 7};

void refresh_button_state() {
    for (int bt_index = 0; bt_index < BTNumber; ++bt_index) {
        if (BTIsPressed[bt_index]) { // 按钮已被按下
            if (digitalRead(Pin_BT[bt_index]) == UP && millis() - BTStartPressingTime[bt_index] > OnClickLastTime) {
                // 如果当前按钮松开,并且记录时间大于按钮单击事件的临界时间
                BTState[bt_index] = EBTState::Click; // 触发单击事件
                BTIsPressed[bt_index] = false; // 恢复被按下标志位
            }
        } else { // 如果按钮还没被按下过
            if (digitalRead(Pin_BT[bt_index]) == DOWN) { // 被按下了
                BTIsPressed[bt_index] = true; // 标记按钮被按下过
                BTStartPressingTime[bt_index] = millis(); // 记录起始被按下时间
            }
        }
    }
}
宏将单击事件封装为一个类似函数闭包的调用形式
#define BTOnclick(BT, Event) do{if(BTState[BT] == EBTState::Click){Event BTState[BT] = EBTState::Nothing;}}while (0)
这样你的代码就变成了这样的画风
int main() {
    while (is_running) {
        refresh_button_state(); // 调用按钮事件刷新函数

        BTOnclick(0, { //按钮0被单击
            int a = 3;
            a = a * 5;
            on_click_event_0();
        });

        BTOnclick(1, { // 按钮1被单击
            int b = 3;
            b ++;
            on_click_event_1();
        });

        BTOnclick(2, { // 按钮2被单击
            int c = 2;
            c ^= c;
            on_click_event_2();
        });
    }
    return 0;
}
仿真结果

面向对象
把所有与按钮有关的变量封装到一个class里,下面我给出其中一种写法
class Button {
    PinType pin;

    void (*onClickCallback)() = nullptr;

    bool BTIsPressed = false;
    long BTStartPressingTime = 0;
    EBTState BTState = EBTState::Nothing;
public:
    explicit Button(PinType pin) : pin(pin) {}

    void update() {
        if (BTIsPressed) { // 按钮已被按下
            if (digitalRead(pin) == UP &&
                millis() - BTStartPressingTime > OnClickLastTime) { // 如果当前按钮松开,并且记录时间大于按钮单击事件的临界时间
                BTState = EBTState::Click; // 触发单击事件
                BTIsPressed = false; // 恢复被按下标志位
            }
        } else { // 如果按钮还没被按下过
            if (digitalRead(pin) == DOWN) { // 被按下了
                BTIsPressed = true; // 标记按钮被按下过
                BTStartPressingTime = millis(); // 记录起始被按下时间
            }
        }
    }

    void bind_onclick(void (*func)()) {
        onClickCallback = func;
    }

    void commit() {
        if (BTState == EBTState::Click) {
            if (onClickCallback)onClickCallback();
            BTState = EBTState::Nothing;
        }
    }
};
调用示例
bool is_running = true;

void on_click_event() { // 回调函数
    is_running = false;
}

int main() {
    Button bt1(Pin_BT1);
    Button bt2(Pin_BT2);
    bt1.bind_onclick(on_click_event);
    bt2.bind_onclick(on_click_event);

    while (is_running) {
        bt1.update();
        bt2.update();

        bt1.commit();
        bt2.commit();
    }
    return 0;
}
当然你也可以将Button对象放到一个数组里面,进行轮询update和commit。比如
void (*callbacks[])() = {on_click_event_1, on_click_event_2, on_click_event_3, on_click_event_4};

int main() {
    Button buttons[] = {
            Button{Pin_BT1},
            Button{Pin_BT2},
            Button{Pin_BT3},
            Button{Pin_BT4}
    };

    for (auto &callback : callbacks)
        buttons->bind_onclick(callback);

    while (is_running) { // 主循环
        cout << millis() << endl;
        for (auto &button : buttons)
            button.update();

        for (auto &button : buttons)
            button.commit();

    }
    return 0;
}
结尾
以上就是所有的内容了,但是博主总感觉着没有把事情说得很明白,哪里有疑问欢迎交流!
附录
简单的Arduino API IO模拟器
#include <ctime>

using namespace std;

#define HIGH 1
#define LOW 0

#define DOWN HIGH // 定义按下为高电平
#define UP   LOW  // 定义放开为低电平

enum EBTState {
    Nothing = 0,
    Click = 1,
    LongPress = 2,
};

typedef uint8_t PinType;


bool digitalRead(PinType pin);

long millis();

/
/

/// 你的代码放到这里👇

    期间可以使用digitalRead、millis函数,这些足够模拟本次博文全部内容。
    如有兴趣可自行扩展

/// 你的代码放到这里👆

/
/

#define between(a, x, b) (a)<=(x) && (x)<(b)
struct TimePinState {
    long t;
    bool state;
};
struct WaveSequence {
    PinType pin;
    int cursor;
    TimePinState *seq;
};

TimePinState seq1[] = {
        {0,   false},
        {50,  true},

        {53,  false},  // noise
        {56,  true},   // noise
        {57,  false},  // noise
        {59,  true},   // noise

        {76,  false},
        {200, false},

        {-1} // STOP frame
};
TimePinState seq2[] = {
        {0,   false},
        {100, true},

        {103, false},  // noise
        {104, true},   // noise
        {107, false},  // noise
        {110, true},   // noise

        {135, false},
        {200, false},

        {-1} // STOP frame
};

TimePinState seq3[] = {
        {0,   false},
        {80,  true},

        {83,  false},  // noise
        {84,  true},   // noise
        {87,  false},  // noise
        {90,  true},   // noise

        {115, false},
        {200, false},

        {-1} // STOP frame
};
WaveSequence WaveSequences[] = {
        {
                .pin = Pin_BT[0], .cursor=1, .seq=seq1
        },
        {
                .pin = Pin_BT[1], .cursor=1, .seq=seq2
        },
        {
                .pin = Pin_BT[2], .cursor=1, .seq=seq3
        }
};


int WaveSequenceNum = sizeof(WaveSequences) / sizeof(WaveSequence);

void updater(bool *pin_table) {
    for (int i = 0; i < WaveSequenceNum; ++i) {
        auto &wave_seq = WaveSequences[i];
        auto &prep_state = wave_seq.seq[wave_seq.cursor - 1];
        auto &cur_state = wave_seq.seq[wave_seq.cursor];
        if (cur_state.t == -1) {
            pin_table[wave_seq.pin] = prep_state.state;
            continue;
        }
        if (between(prep_state.t, millis(), cur_state.t))
            pin_table[wave_seq.pin] = prep_state.state;
        if (millis() >= cur_state.t) wave_seq.cursor++;
    }
}

bool PinsStates[255]{false};

void refreshPinStates(void (*func)(bool *)) {
    func(PinsStates);
}

bool digitalRead(PinType pin) {
    refreshPinStates(updater);
    return PinsStates[pin];
}

long millis() {
    return clock();
}


 612
612


 被折叠的 条评论
为什么被折叠?
被折叠的 条评论
为什么被折叠?
 到【灌水乐园】发言


