


发表时间:2023年11月16
论文地址:https://arxiv.org/pdf/2310.15200
项目地址:https://github.com/xinyu1205/recognize-anything
recognize-anything项目是Open-Set Image Tagging with Multi-Grained Text Supervision论文(RAM++)算法对应的开源项目,其中有RAM++、RAM、Tag2Text 3个算法的运行代码。本博文主要分析RAM++的结构信息、精度信息、推理代码实现、openset能力实现,训练数据结构、forword流程、loss计算等关键步骤实现代码。并提供了少量的RAM++模型使用效果。
RAM++论文的介绍可以参考:https://hpg123.blog.csdn.net/article/details/139721282
1、算法基本信息
1.1 算法结构
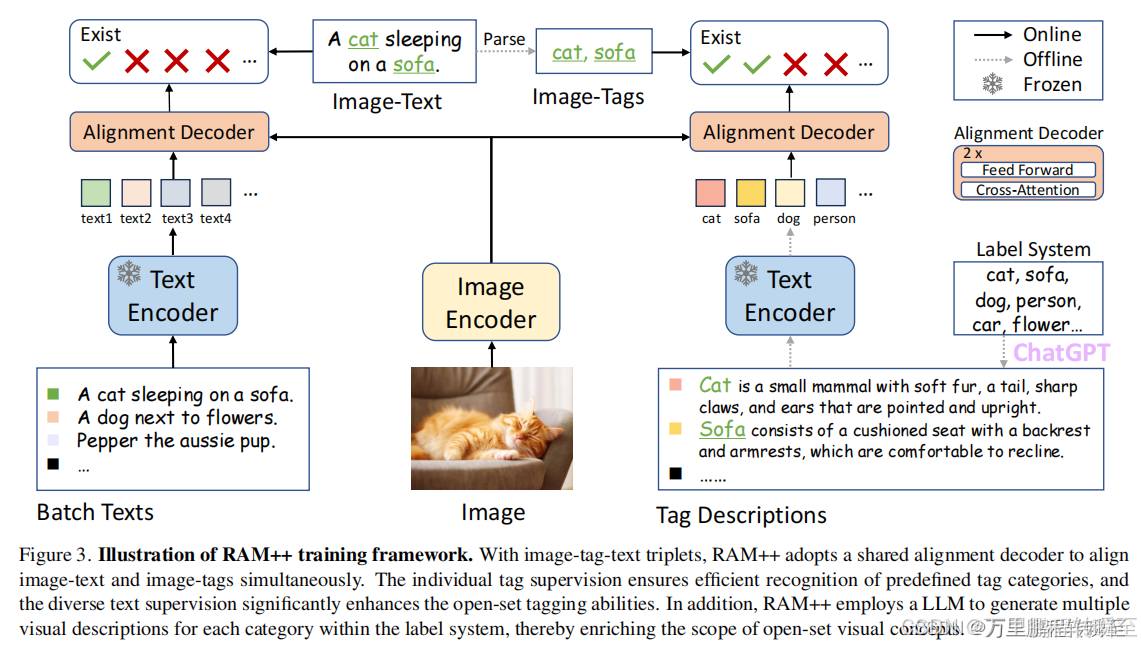
RAM++,是一个基于多粒度文本监督的开放集图像标记模型,包括细节描述文本监督和tag描述监督。如图3所示,RAM++的体系结构包括图像编码器、文本编码器和对齐解码器。训练数据是图像-标签-文本三联体,包括图像-文本对和从文本中解析出的image标记。在训练过程中,模型的输入由包含batch间可变的文本和固定标签描述的图像组成。然后模型输出对应于每个图像标签/文本对的对齐概率分数,通过对齐损失[46]进行优化。

1.2 精度信息
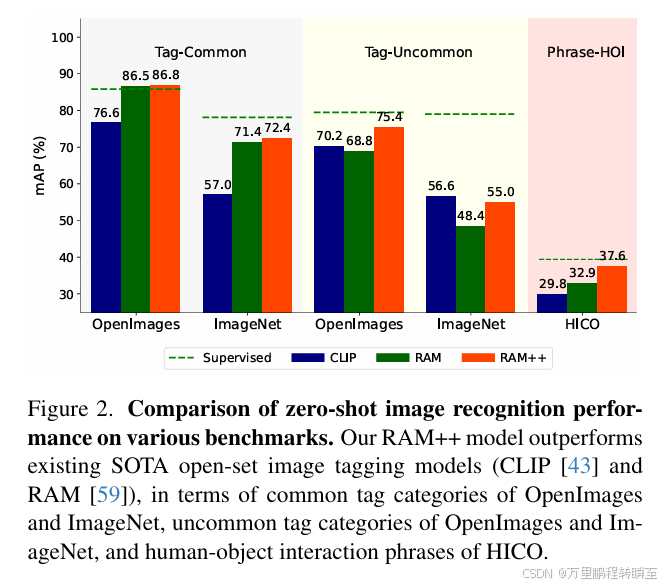
通过图2可以发现RAM++在常见tag中与RAM是相同的能力,不过都比clip模型要高10-15个点;但在open-set(不常见的tag中),RAM不如CLIP,RAM++与CLIP基本相同。
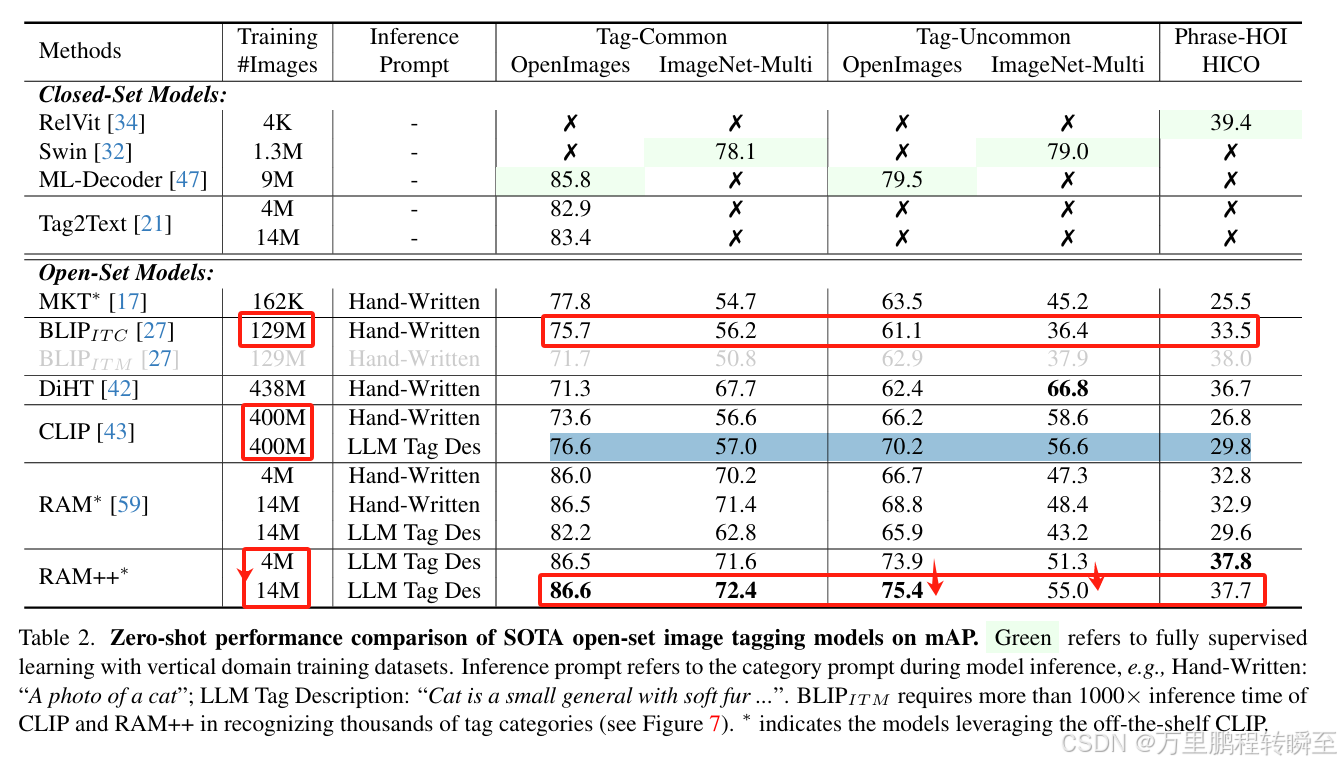
通过表2可以发现RAM++在少量的训练数据上接近了甚至超越了BLIP,RAM++在非常规tag中偶发性不如CLIP只是由于RAM++的训练数据远低于CLIP。而且,RAM++也只是在Image-Net数据上略有差距。
RAM++中的常见tag是214个类型,具体信息如下:
accident,accordion,plane,airport,antelope,apple,art gallery,eggplant,auditorium,autumn,baboon,backpack,bakery,bamboo,banana,barbecue,bed,bedroom,clock,bicycle,bikini,birthday cake,blackberry,blueberry,pig,bookcase,bridge,broccoli,bus,butterfly,calculator,calendar,camping,candle,candy,cannon,canyon,car,carousel,cat,cave,ceiling,cheese,cheetah,chef,chicken,christmas,christmas tree,clover,coral,corn,courtyard,crab,lobster,crocodile,crosswalk,crow,cucumber,cup,currency,dachshund,deer,desert,die,dinosaur,dog,dolphin,doodle,dragonfly,drum,duck,dumbbell,easter egg,egg,elephant,faucet,ferris wheel,fire,fireman,firework,flamingo,flower,football,fountain,fox,fridge,frog,ham,gas stove,giraffe,glacier,glove,goat,goose,gorilla,grape,guitar,gull,gym,halloween,hamburger,hamster,handbag,hedgehog,helicopter,horse,hummingbird,jellyfish,kangaroo,kimono,kite,ladybird,laptop,leg,mailbox,library,lightning,lily,lion,lizard,luggage,mannequin,map,mask,mattress,microphone,microwave,monkey,moon,mosque,mouse,mushroom,nebula,sea,ostrich,palm tree,paper,pasta,patient,pavilion,pear,pebble,penguin,pet,piano,picture frame,pine,pineapple,pizza,police car,pomegranate,poodle,popcorn,stamp,power station,printer,pumpkin,raccoon,rainbow,rat,restroom,ring,run,salad,sandwich,sausage,shark,sheet music,shrine,snowboard,snake,sparrow,squirrel,stage,starfish,statue,steering wheel,stream,street art,street light,submarine,suite,surfboard,sushi,swan,tattoo,teddy,tennis court,tennis racket,tiger,toast,toilet bowl,toy,tractor,train,trampoline,treadmill,truck,tunnel,turkey,vending machine,waffle,walnut,washing machine,water buffalo,waterfall,watermelon,wheat,wheelchair,windmill,winter,wolf,woodpecker,zebra
2、关键推理代码
2.1 基本推理代码
完整推理代码如下所示(对应inference_ram_plus.py文件),先将ram_plus进行实例化,然后调用transform函数将PIL图像转换为tensor,最好调用inference函数传入ram_plus实例与图像tensor即可获取结果。
'''
 * The Recognize Anything Plus Model (RAM++)
 * Written by Xinyu Huang
'''
import argparse
import numpy as np
import random

import torch

from PIL import Image
from ram.models import ram_plus
from ram import inference_ram as inference
from ram import get_transform


parser = argparse.ArgumentParser(
    description='Tag2Text inferece for tagging and captioning')
parser.add_argument('--image',
                    metavar='DIR',
                    help='path to dataset',
                    default='images/demo/xxxx.jpg')
parser.add_argument('--pretrained',
                    metavar='DIR',
                    help='path to pretrained model',
                    default='pretrained/ram_plus_swin_large_14m.pth')
parser.add_argument('--image-size',
                    default=384,
                    type=int,
                    metavar='N',
                    help='input image size (default: 448)')


if __name__ == "__main__":

    args = parser.parse_args()

    device = torch.device('cuda' if torch.cuda.is_available() else 'cpu')

    transform = get_transform(image_size=args.image_size)

    #######load model
    model = ram_plus(pretrained=args.pretrained,
                             image_size=args.image_size,
                             vit='swin_l')
    model.eval()

    model = model.to(device)

    image = transform(Image.open(args.image)).unsqueeze(0).to(device)

    res = inference(image, model)
    print("Image Tags: ", res[0])
    print("图像标签: ", res[1])
代码运行时的输入如下所示
Image Tags:  black | car | cat | gray | hood | ledge | peak | roof | sit | stand | stare | tabby | white | windshield
图像标签:  黑色 | 车  | 猫  | 灰色 | 风帽 | 窗台  | 山峰/尖顶 | 屋顶  | 坐/放置/坐落 | 站/矗立/摊位 | 盯着 | 虎斑 | 白色 | 挡风玻璃
2.2 具体推理流程
代码在ram\models\ram_plus.py中的generate_tag函数中,具体如下所示,
一共包含5个步骤:
步骤一、基于visual_encoder对图片进行嵌入,然后调用image_proj执行图像特征投影
步骤二、对预支持的tag进行编码设置
步骤三、对齐tag特征与图片特征
步骤四、根据阈值选择出满足预测条件的clsId
步骤五、根据clsId选择出对应的label
这里需要注意的是,所谓的tag特征是一个有限集,在加载模型时一并加载
def generate_tag(self,
image
):
#步骤一、基于visual_encoder对图片进行嵌入,然后调用image_proj执行图像特征投影
image_embeds = self.image_proj(self.visual_encoder(image))
image_atts = torch.ones(image_embeds.size()[:-1],
dtype=torch.long).to(image.device)
image_cls_embeds = image_embeds[:, 0, :]
image_spatial_embeds = image_embeds[:, 1:, :]
bs = image_spatial_embeds.shape[0]
des_per_class = int(self.label_embed.shape[0] / self.num_class)
image_cls_embeds = image_cls_embeds / image_cls_embeds.norm(dim=-1, keepdim=True)
reweight_scale = self.reweight_scale.exp()
logits_per_image = (reweight_scale * image_cls_embeds @ self.label_embed.t())
logits_per_image = logits_per_image.view(bs, -1,des_per_class)
weight_normalized = F.softmax(logits_per_image, dim=2)
label_embed_reweight = torch.empty(bs, self.num_class, 512).to(image.device).to(image.dtype)
for i in range(bs):
# 这里对 value_ori 进行 reshape,然后使用 broadcasting
reshaped_value = self.label_embed.view(-1, des_per_class, 512)
product = weight_normalized[i].unsqueeze(-1) * reshaped_value
label_embed_reweight[i] = product.sum(dim=1)
#步骤二、对预支持的tag进行编码设置
label_embed = torch.nn.functional.relu(self.wordvec_proj(label_embed_reweight))
#步骤三、对齐tag特征与图片特征
# recognized image tags using alignment decoder
tagging_embed = self.tagging_head(
encoder_embeds=label_embed,
encoder_hidden_states=image_embeds,
encoder_attention_mask=image_atts,
return_dict=False,
mode='tagging',
)
logits = self.fc(tagging_embed[0]).squeeze(-1)
#步骤四、根据阈值选择出满足预测条件的clsId
targets = torch.where(
torch.sigmoid(logits) > self.class_threshold.to(image.device),
torch.tensor(1.0).to(image.device),
torch.zeros(self.num_class).to(image.device))
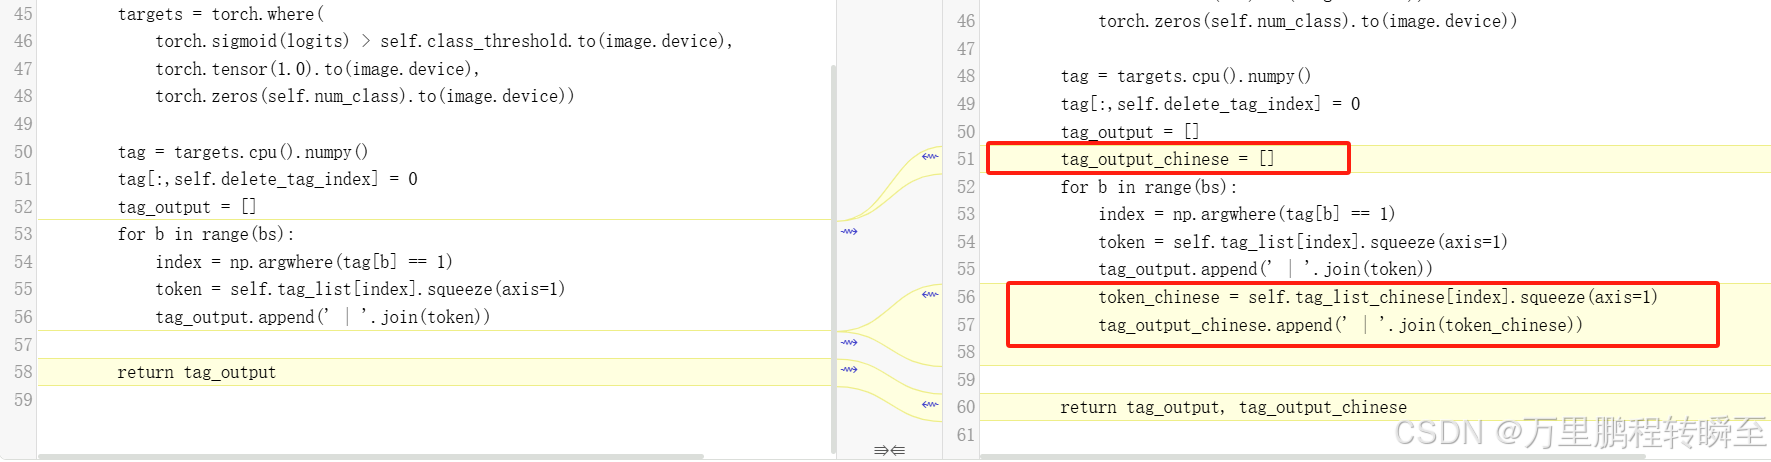
#步骤五、根据clsId选择出对应的label
tag = targets.cpu().numpy()
tag[:,self.delete_tag_index] = 0
tag_output = []
tag_output_chinese = []
for b in range(bs):
index = np.argwhere(tag[b] == 1)
token = self.tag_list[index].squeeze(axis=1)
tag_output.append(' | '.join(token))
token_chinese = self.tag_list_chinese[index].squeeze(axis=1)
tag_output_chinese.append(' | '.join(token_chinese))
return tag_output, tag_output_chinese
2.3 openset能力实现
ram++支持对开集目标的预测能力,i其调用代码在 inference_ram_plus_openset.py 中,具体如下所示,与正常推理代码的效果对比,其多了 目标tag编码、tag特征值赋值给模型
if __name__ == "__main__":

    args = parser.parse_args()

    device = torch.device('cuda' if torch.cuda.is_available() else 'cpu')

    transform = get_transform(image_size=args.image_size)

    #######load model
    model = ram_plus(pretrained=args.pretrained,
                             image_size=args.image_size,
                             vit='swin_l')

    #######set openset interference
	#----目标tag编码-----
    print('Building tag embedding:')
    with open(args.llm_tag_des, 'rb') as fo:
        llm_tag_des = json.load(fo)
    openset_label_embedding, openset_categories = build_openset_llm_label_embedding(llm_tag_des)

	#----将目标tag编码赋值给模型-----
    model.tag_list = np.array(openset_categories)

    model.label_embed = nn.Parameter(openset_label_embedding.float())

    model.num_class = len(openset_categories)
    # the threshold for unseen categories is often lower
    model.class_threshold = torch.ones(model.num_class) * 0.5
    #######

    model.eval()

    model = model.to(device)

    image = transform(Image.open(args.image)).unsqueeze(0).to(device)

    res = inference(image, model)
    print("Image Tags: ", res)
其对应的推理代码与闭集推理代码完全一致,只是在输出信息后处理上没有了对应的中文标签。
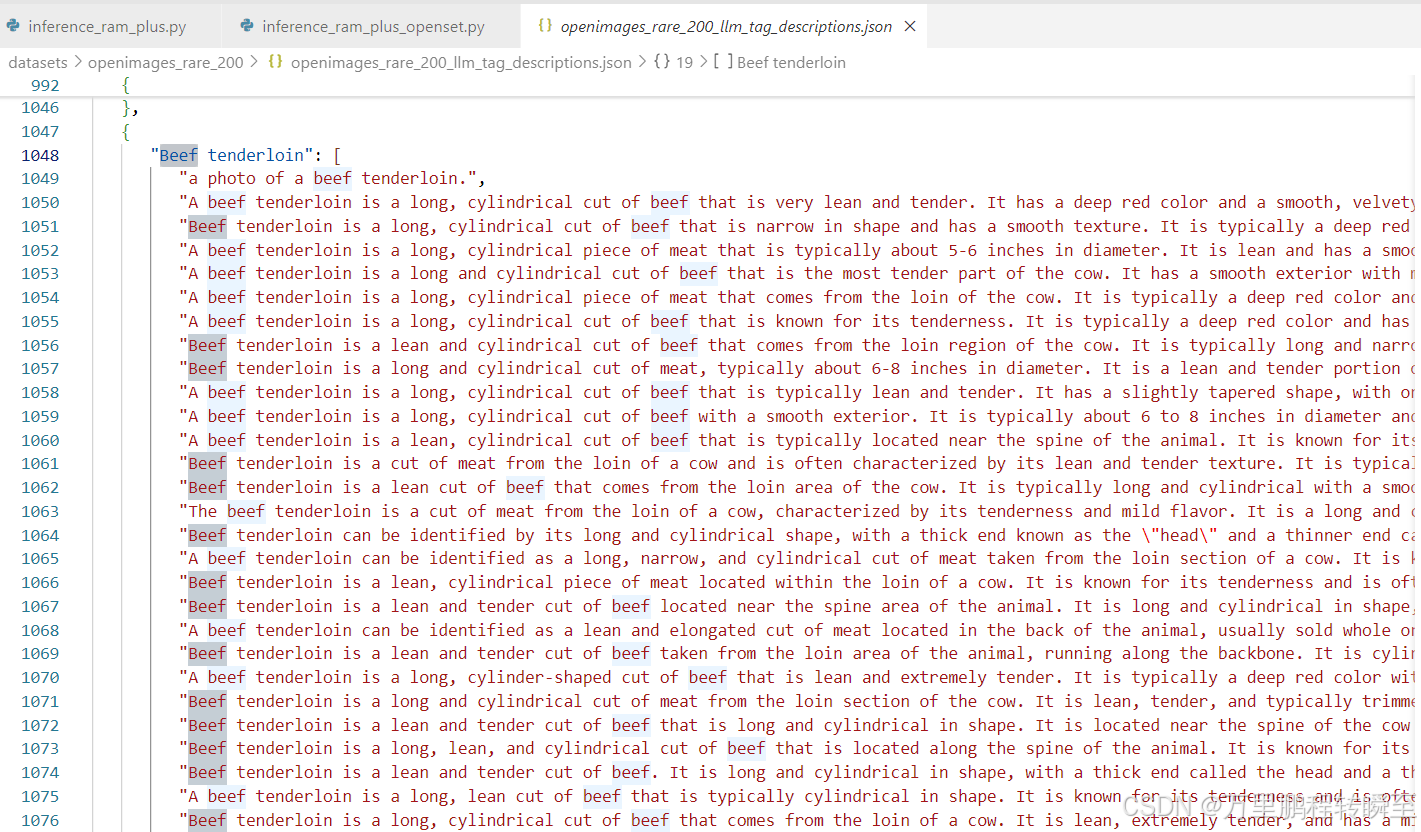
这里的开集类型由build_openset_llm_label_embedding函数实现,其默认处理的tag在datasets\openimages_rare_200\openimages_rare_200_llm_tag_descriptions.json文件中,对应的数据格式如下,是一个json数组,每一个元素的key是要识别的类别(tag),对应的value为list,分别表示tag的具体含义。
build_openset_llm_label_embedding的实现如下所示,其本质就是调用clip,基于tag的各种解释形成编码,最终concat到一起【concat操作可以使特征向量能尽可能的表示tag】。
def build_openset_llm_label_embedding(llm_tag_des):
    print("Creating pretrained CLIP model")
    model, _ = clip.load("ViT-B/16")
    llm_tag_des = llm_tag_des
    categories = []

    run_on_gpu = torch.cuda.is_available()

    with torch.no_grad():
        openset_label_embedding = []
        for item in tqdm(llm_tag_des):
            category = list(item.keys())[0]
            des = list(item.values())[0]

            categories.append(category)

            texts = clip.tokenize(des, truncate=True)  # tokenize
            if run_on_gpu:
                texts = texts.cuda()
                model = model.cuda()
            text_embeddings = model.encode_text(texts)
            text_embeddings /= text_embeddings.norm(dim=-1, keepdim=True)
            # text_embedding = text_embeddings.mean(dim=0)
            # text_embedding /= text_embedding.norm()
            # openset_label_embedding.append(text_embedding)
            openset_label_embedding.append(text_embeddings)
        # openset_label_embedding = torch.stack(openset_label_embedding, dim=1)
        openset_label_embedding = torch.cat(openset_label_embedding, dim=0)
        if run_on_gpu:
            openset_label_embedding = openset_label_embedding.cuda()

    # openset_label_embedding = openset_label_embedding.t()
    return openset_label_embedding, categories
3、关键训练代码
3.1 模型训练输入
训练代码在pretrain.py中,具体对应train_ram_plus函数,具体如下所示。可以发现dataloader的返回为:image, caption, image_tag, parse_tag。同时在数据输入模型前,可以发现先调用了clip将caption【文本】映射成了batch_text_embed ,调用clip将iamge【图片】映射成了clip_image_feature 。为了加速训练、可以将对应图片与文本先使用clip进行特征映射
def train_ram_plus(model, data_loader, optimizer, epoch, device, config, model_clip):
    # train
    model.train()

    metric_logger = utils.MetricLogger(delimiter="  ")
    metric_logger.add_meter('lr', utils.SmoothedValue(window_size=50, fmt='{value:.6f}'))
    metric_logger.add_meter('loss_tag', utils.SmoothedValue(window_size=50, fmt='{value:.4f}'))
    metric_logger.add_meter('loss_dis', utils.SmoothedValue(window_size=50, fmt='{value:.4f}'))
    metric_logger.add_meter('loss_alignment', utils.SmoothedValue(window_size=50, fmt='{value:.4f}'))

    header = 'Train Epoch: [{}]'.format(epoch)
    print_freq = 50

    data_loader.sampler.set_epoch(epoch)

    for i, (image, caption, image_tag, parse_tag) in enumerate(metric_logger.log_every(data_loader, print_freq, header)):

        if epoch==0:
            warmup_lr_schedule(optimizer, i, config['warmup_steps'], config['warmup_lr'], config['init_lr'])

        optimizer.zero_grad()
		#调用clip模型,形成文本特征嵌入
        batch_text_embed = build_text_embed(model_clip,caption)

        image = image.to(device,non_blocking=True)

		#调用clip模型,形成图像特征嵌入
        with torch.no_grad():
            clip_image_feature = model_clip.encode_image(image)

        loss_tag, loss_dis, loss_alignment = model(image, caption, image_tag, clip_image_feature, batch_text_embed)
        loss = loss_tag + loss_dis + loss_alignment

        loss.backward()
        optimizer.step()

        metric_logger.update(loss_tag=loss_tag.item())
        metric_logger.update(loss_dis=loss_dis.item())
        metric_logger.update(loss_alignment=loss_alignment.item())
        metric_logger.update(lr=optimizer.param_groups[0]["lr"])


    # gather the stats from all processes
    metric_logger.synchronize_between_processes()
    print("Averaged stats:", metric_logger.global_avg())
    return {k: "{:.3f}".format(meter.global_avg) for k, meter in metric_logger.meters.items()}
基于算法框架图可以发现image表示输入图片,caption表示图片的文字描述(如:A cat sleeping on a sofa), image_tag表示图像中存在的目标(如:cat、sofa), parse_tag表示对应tag的解释(如:Cat is a small mammal with soft fur, a tail, sharp claws, and ears that are pointed and upright.)。
基于此分析,可以发现parse_tag是一个既定的有限集,具体数量由训练时的tag所指定,该有限集应该是固定的。在论文中,是基于GPT模型对短词生成的名词解释。caption与image_tag是针对图片的,每个图片都有一个caption,然后基于分词工具可以提取出目标tag形成image_tag。
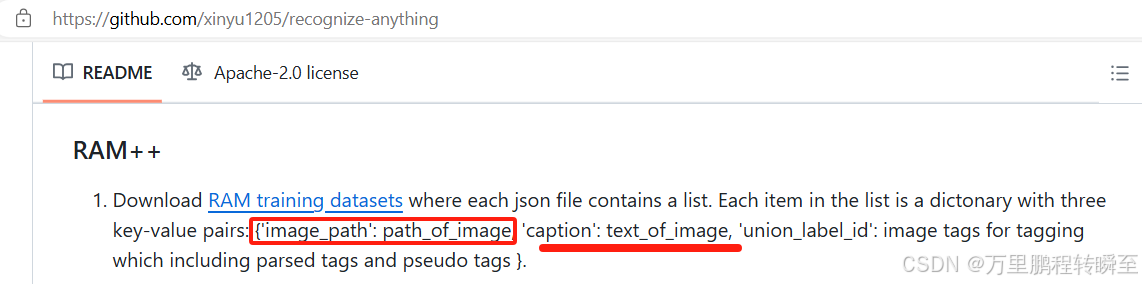
基于项目的描述也可以发现,其数据标注也只有image-catipn对,论文对应的训练数据可以到 https://github.com/xinyu1205/recognize-anything#open_book-training-datasets 下载
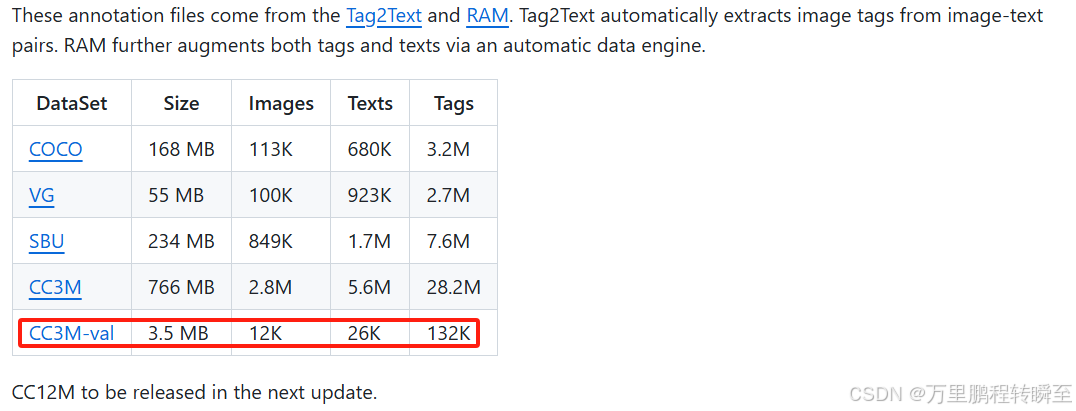
数据详情如下所示,可以拿CC3M-val做一个练手训练。
3.2 模型forward流程
对应的代码在ram\models\ram_plus.py中的forward函数中,可以发现参数列表为image, caption(没有任何作用), image_tag, clip_feature(图片对应的clip编码), batch_text_embed(caption对应的clip编码)。
    def forward(self, image, caption, image_tag, clip_feature, batch_text_embed):
        """
        call function as forward

        Args:
            image: type: torch.Tensor  shape: batch_size * 3 * 384 * 384
            caption: type: list[string]  len: batch_size
            tag: type: torch.Tensor   shape: batch * class_num (e.g. 3429)   value: positive sample is 1.0, negative sample is 0.0

        Returns:
            loss: type: torch.Tensor
        """

        image_embeds = self.image_proj(self.visual_encoder(image))
        image_atts = torch.ones(image_embeds.size()[:-1],
                                dtype=torch.long).to(image.device)

        ##================= Distillation from CLIP ================##
        image_cls_embeds = image_embeds[:, 0, :]
        image_spatial_embeds = image_embeds[:, 1:, :]

        loss_dis = F.l1_loss(image_cls_embeds, clip_feature)

        ###===========multi tag des reweight==============###
        bs = image_embeds.shape[0]

        des_per_class = int(self.label_embed.shape[0] / self.num_class)

        image_cls_embeds = image_cls_embeds / image_cls_embeds.norm(dim=-1, keepdim=True)
        reweight_scale = self.reweight_scale.exp()
        logits_per_image = (reweight_scale * image_cls_embeds @ self.label_embed.t())
        logits_per_image = logits_per_image.view(bs, -1,des_per_class)

        weight_normalized = F.softmax(logits_per_image, dim=2)
        label_embed_reweight = torch.empty(bs, self.num_class, 512).to(image.device).to(image.dtype)

        for i in range(bs):
            reshaped_value = self.label_embed.view(-1, des_per_class, 512)
            product = weight_normalized[i].unsqueeze(-1) * reshaped_value
            label_embed_reweight[i] = product.sum(dim=1)

        label_embed = torch.nn.functional.relu(self.wordvec_proj(label_embed_reweight))

        ##================= Image Tagging ================##

        tagging_embed = self.tagging_head(
            encoder_embeds=label_embed,
            encoder_hidden_states=image_embeds,
            encoder_attention_mask=image_atts,
            return_dict=False,
            mode='tagging',
        )

        logits = self.fc(tagging_embed[0]).squeeze(-1)

        loss_tag = self.tagging_loss_function(logits, image_tag)

        ##================= Image-text Alignment ================##

        batch_text_embed = torch.nn.functional.relu(self.wordvec_proj(batch_text_embed.to(self.label_embed.dtype)))
        batch_text_embed = batch_text_embed.unsqueeze(0).repeat(bs, 1, 1)
        alignment_embedding = self.tagging_head(
            encoder_embeds=batch_text_embed,
            encoder_hidden_states=image_embeds,
            encoder_attention_mask=image_atts,
            return_dict=False,
            mode='tagging',
        )
        alignment_logits = self.fc(alignment_embedding[0]).squeeze(-1)

        with torch.no_grad():
            alignment_targets = torch.zeros(alignment_logits.size()).to(image.device)
            alignment_targets.fill_diagonal_(1)

        loss_alignment = self.text_alignment_loss_function(alignment_logits,alignment_targets)

        return loss_tag, loss_dis, loss_alignment
可以发现,第一步是clip_feature蒸馏visual_encoder模块的输出image_cls_embeds,若使用clip模型的编码器,是否可以略过对visual_encoder的训练
第二步是:multi tag des reweight,即对image_cls_embeds进行映射形成label_embed(图像视角的label编码)
第三步是:Image Tagging,即对label_embed再次进行映射形成logits,与image_tag进行tagging_loss_function操作
第四步是:Image-text Alignment,即基于clip输出的batch_text_embed与模型编码的image_embeds进行对齐操作。
3.3 模型训练的loss
模型训练的loss一共有loss_tag, loss_dis, loss_alignment。
loss_tag的计算代码如下,其中logits为image特征化在映射后得到的值,image_tag为图片对应的tag
loss_tag = self.tagging_loss_function(logits, image_tag)
tagging_loss_function是一个AsymmetricLoss类,
tagging_loss_function = AsymmetricLoss(gamma_neg=7,
                                                    gamma_pos=0,
                                                    clip=0.05)
loss_diss的计算代码如下,可以发现就是简单的使用clip特征蒸馏模型的视觉编码器。
loss_dis = F.l1_loss(image_cls_embeds, clip_feature)
loss_alignment的计算代码如下,alignment_targets是一个对角线为1的矩阵,alignment_logits是图片特征与文本特征对齐后的输出值。text_alignment_loss_function也是一个AsymmetricLoss的实例,其参数为:gamma_neg=4,gamma_pos=0,clip=0.05
        alignment_logits = self.fc(alignment_embedding[0]).squeeze(-1)

        with torch.no_grad():
            alignment_targets = torch.zeros(alignment_logits.size()).to(image.device)
            alignment_targets.fill_diagonal_(1)

        loss_alignment = self.text_alignment_loss_function(alignment_logits,alignment_targets)
3.4 AsymmetricLoss
AsymmetricLoss的实现如下,可以发现是一种类似于sigmoid的多label loss,针对正例要求输出接近1,针对负例要求输出接近0,并应用了交叉熵的形式。最后并实现了对于正例与负例的loss缩放稀疏。
# Tagging loss function
# copy from https://github.com/Alibaba-MIIL/ASL/blob/main/src/loss_functions/losses.py
class AsymmetricLoss(nn.Module):
    def __init__(self, gamma_neg=4, gamma_pos=1, clip=0.05, eps=1e-8, disable_torch_grad_focal_loss=True):
        super(AsymmetricLoss, self).__init__()

        self.gamma_neg = gamma_neg
        self.gamma_pos = gamma_pos
        self.clip = clip
        self.disable_torch_grad_focal_loss = disable_torch_grad_focal_loss
        self.eps = eps

    def forward(self, x, y):
        """"
        Parameters
        ----------
        x: input logits
        y: targets (multi-label binarized vector)
        """

        # Calculating Probabilities
        x_sigmoid = torch.sigmoid(x)
        xs_pos = x_sigmoid
        xs_neg = 1 - x_sigmoid

        # Asymmetric Clipping
        if self.clip is not None and self.clip > 0:
            xs_neg = (xs_neg + self.clip).clamp(max=1)

        # Basic CE calculation
        los_pos = y * torch.log(xs_pos.clamp(min=self.eps))
        los_neg = (1 - y) * torch.log(xs_neg.clamp(min=self.eps))
        loss = los_pos + los_neg

        # Asymmetric Focusing
        if self.gamma_neg > 0 or self.gamma_pos > 0:
            if self.disable_torch_grad_focal_loss:
                torch.set_grad_enabled(False)
            pt0 = xs_pos * y
            pt1 = xs_neg * (1 - y)  # pt = p if t > 0 else 1-p
            pt = pt0 + pt1
            one_sided_gamma = self.gamma_pos * y + self.gamma_neg * (1 - y)
            one_sided_w = torch.pow(1 - pt, one_sided_gamma)
            if self.disable_torch_grad_focal_loss:
                torch.set_grad_enabled(True)
            loss *= one_sided_w

        return -loss.sum()
以上代码有一个关键参数clip,它实现了对xs_neg 值的整体偏移,具体作用预计是抑制负类标签的预测。
4、项目使用
4.1 基本准备
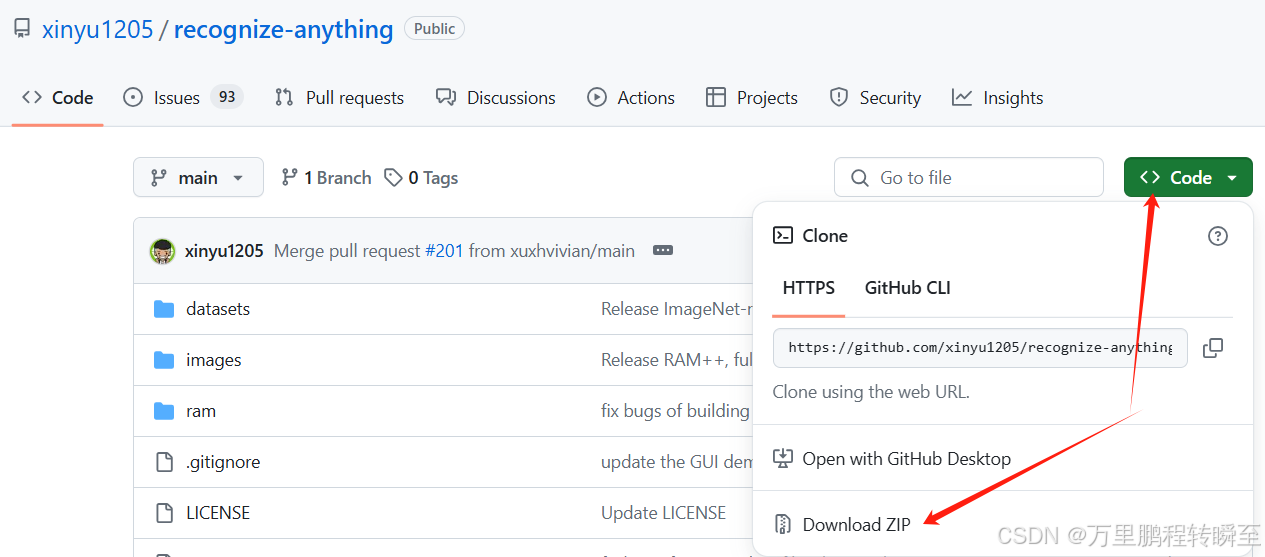
下载代码 https://github.com/xinyu1205/recognize-anything,并解压进入命令执行pip install -e .
或者直接执行:
git clone https://github.com/xinyu1205/recognize-anything.git
cd recognize-anything
pip install -e .
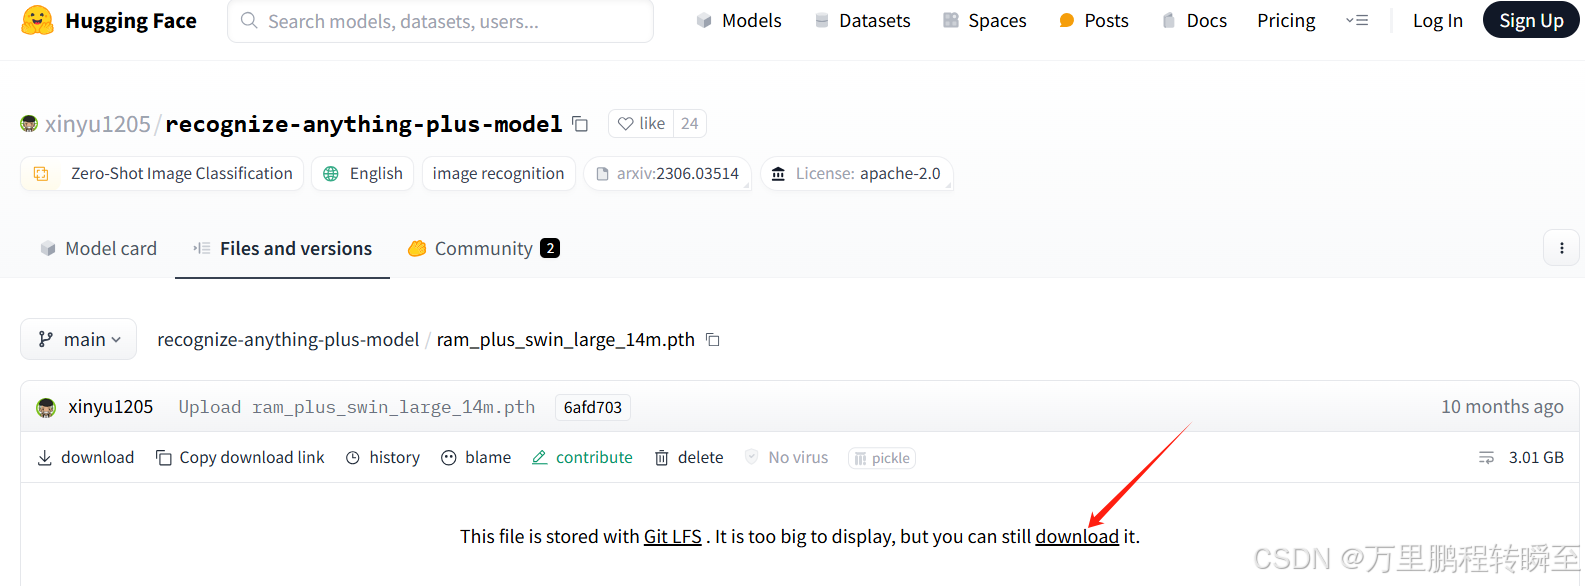
下载预训练模型:https://huggingface.co/xinyu1205/recognize-anything-plus-model/blob/main/ram_plus_swin_large_14m.pth
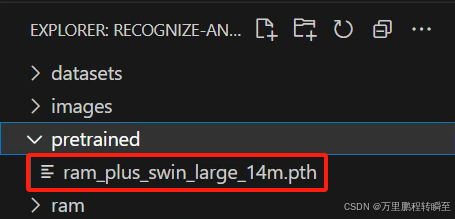
在项目根目录创建pretrained,并放置下载好的ram_plus_swin_large_14m.pth模型,具体如下图所示。
4.2 批量使用代码
将以下代码保存为infer_dir.py,也可以使用 inference_ram_plus.py进行推理
import argparse
import numpy as np
import random,os,time

import torch

from PIL import Image
from ram.models import ram_plus
from ram import inference_ram as inference
from ram import get_transform


parser = argparse.ArgumentParser(
    description='Tag2Text inferece for tagging and captioning')
parser.add_argument('--pretrained',
                    metavar='DIR',
                    help='path to pretrained model',
                    default='pretrained/ram_plus_swin_large_14m.pth')
parser.add_argument('--image-size',
                    default=384,
                    type=int,
                    metavar='N',
                    help='input image size (default: 448)')


if __name__ == "__main__":

    args = parser.parse_args()

    device = torch.device('cuda' if torch.cuda.is_available() else 'cpu')

    transform = get_transform(image_size=args.image_size)

    #######load model D:\datasets\coco128\images\train2017\000000000009.jpg
    model = ram_plus(pretrained=args.pretrained,
                             image_size=args.image_size,
                             threshold=0.8,
                             vit='swin_l')
    model.eval()
    model = model.to(device)

    prex='.jpg'
    root=r'D:\datasets\coco128\images\train2017'
    flist=[os.path.join(root,x) for x in os.listdir(root) if prex in x]
    for path in flist:
        image = transform(Image.open(path)).unsqueeze(0).to(device)
        t0=time.time()
        res = inference(image, model)
        rt=time.time()-t0
        print(f"运行时间:{rt:.4f}, 图片路径:{path}")
        print("Image Tags: ", res[0])
        print("图像标签: ", res[1])
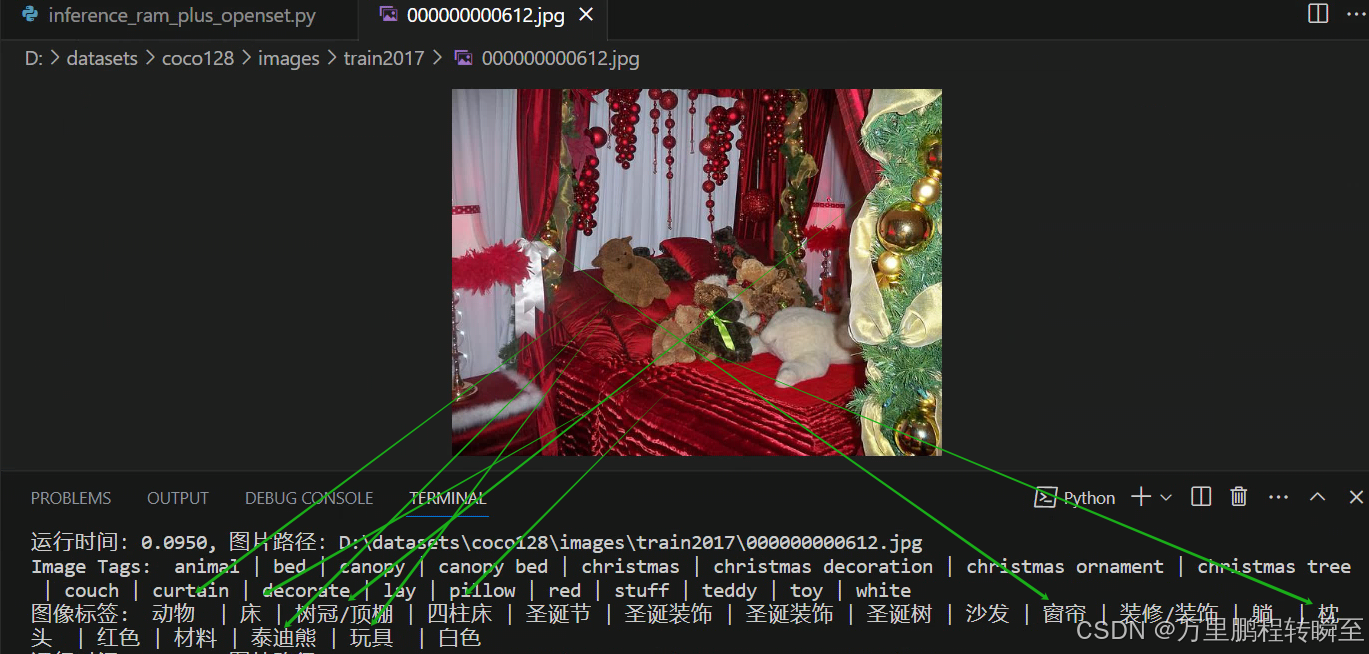
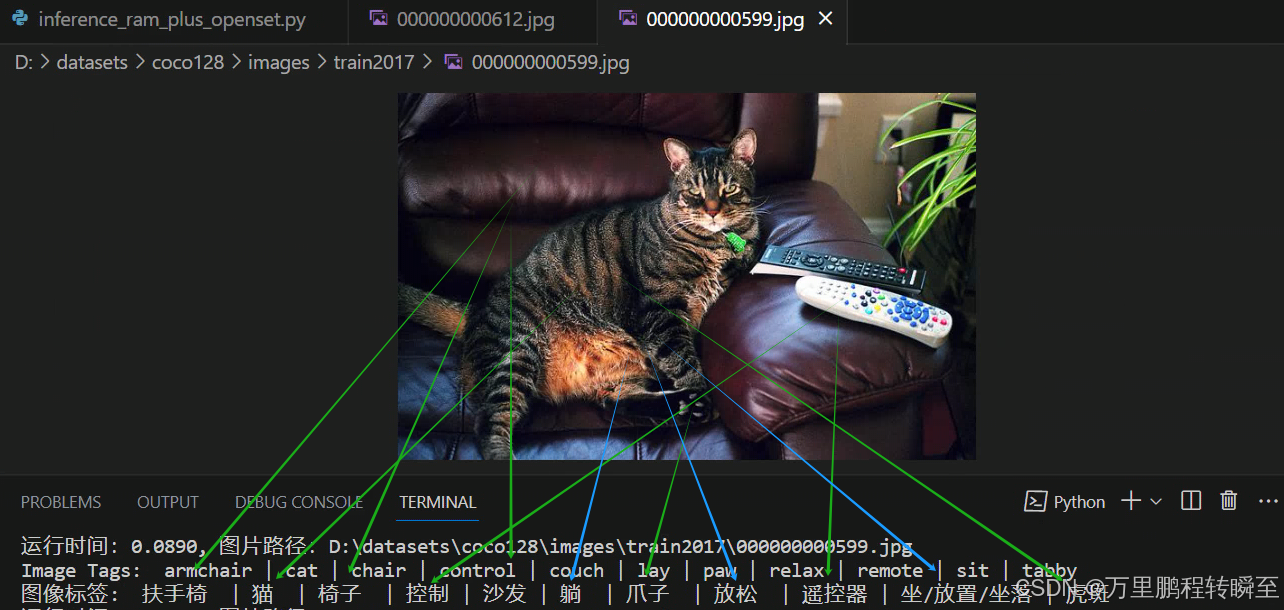
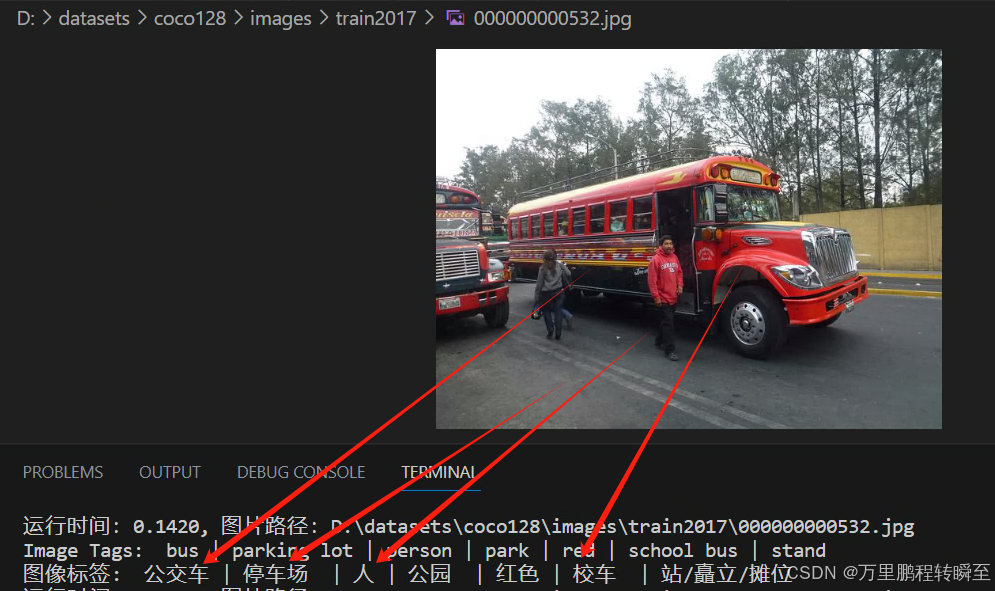
4.3 使用效果
模型预测效果,如下所示,可以发现支持对颜色的识别、对动作的识别,最好是对各类常见物体识别的支持。在3060显卡下,基本上是0.1s一张图。


 1664
1664

 被折叠的 条评论
为什么被折叠?
被折叠的 条评论
为什么被折叠?
 到【灌水乐园】发言


