


目前基于需求,加载InSar滑坡数据,点击显示信息。尝试了以下集中方案:
1.原始数据
在Geoserver中显示,实际上是单个的点,可以看出数据量十分大。

2.通过加载WMS服务,点击返回数据
//加载wms服务
const wmsLoad = (url, layers, options) => {
    try {
        const provider = new Cesium.WebMapServiceImageryProvider({
            url: url,
            layers: layers,
            parameters: options
        })
        const imageryLayer = new Cesium.ImageryLayer(provider)
        viewer.imageryLayers.add(imageryLayer)

        const handler = new Cesium.ScreenSpaceEventHandler(viewer.scene.canvas)
        handler.setInputAction((click) => {
            const pickRay = viewer.camera.getPickRay(click.position)
            const pickPosition = viewer.scene.globe.pick(pickRay, viewer.scene)
            if (pickPosition) {
                const cartographic = Cesium.Cartographic.fromCartesian(pickPosition)
                const longitude = Cesium.Math.toDegrees(cartographic.longitude)
                const latitude = Cesium.Math.toDegrees(cartographic.latitude)
                const bboxSize = 0.001
                const urlParams = new URLSearchParams({
                    service: 'WMS',
                    request: 'GetFeatureInfo',
                    version: options.version || '1.1.1',
                    layers: layers,
                    query_layers: layers,
                    bbox: `${longitude - bboxSize},${latitude - bboxSize},${longitude + bboxSize},${latitude + bboxSize}`,
                    width: 101,
                    height: 101,
                    info_format: 'application/json',
                    x: 50,
                    y: 50,
                    srs: options.srs || 'EPSG:4326',
                    transparent: options.transparent
                })

                const fullUrl = `${url}?${urlParams.toString()}`;
                console.log('GetFeatureInfo URL:', fullUrl);

                fetch(fullUrl)
                    .then(response => {
                        if (!response.ok) {
                            throw new Error('Network response was not ok ' + response.statusText);
                        }
                        return response.json();
                    })
                    .then(data => {
                        console.log('Feature info:', data);
                    })
                    .catch(error => {
                        console.error('Error fetching feature info:', error);
                    });
            }
        }, Cesium.ScreenSpaceEventType.LEFT_CLICK)
    } catch (error) {
        console.error('Error during WMS load:', error)
    }
}
这里可以看到,当我点击时是能够拿到数据的。但是如图,我还加载了倾斜摄影数据,Cesium中的WMS默认贴图在地形数据上,如果要贴在3Dtiles上是更麻烦的事,且显示效果不行,换方案。。。。
3.通过加载WFS服务
WFS服务大家可以看看OGC标准,网上很多资源不在重复。
Cesium没有默认的WFS加载数据格式,这里可以自己构建
const wfsLoad = (url) => {
    axios.get(url)
        .then(async ( res ) => {
            const dataSources = await Cesium.GeoJsonDataSource.load(res.data)
            viewer.dataSources.add(dataSources)
            const entities = dataSources.entities.values
            console.log(entities.length);
            // for (let i = 0; i < entities.length; i++) {
            //    const entity = entities[i] // 获取第i个entity
            //     // entity.name = 'Baimo' // 设置entity的name属性
            //     //设置白膜透明度为0,颜色为白色
            //     // entity.polygon.material =  Cesium.Color.RED  // 设置entity的颜色
            //     // entity.polygon.material.alpha = 0.0     // 设置entity的透明度
            //     // entity.polygon.extrudedHeight = entity.properties.gaodu  // 设置entity的高度
            //     // entity.polygon.extrudedHeight = 40  // 设置entity的高度
            //     // entity.polygon.outlineWidth = 100.0   // 设置entity的轮廓宽度
            //     // entity.billboard = undefined

            //     entity.point = new Cesium.PointGraphics({
            //         color: Cesium.Color.FORESTGREEN,
            //         pixelSize: 10
            //     })
            //     // entity.polygon.outlineColor = Cesium.Color.WHITE // 设置entity的轮廓颜色
            //     entity.point.heightReference = Cesium.HeightReference.CLAMP_TO_GROUND // 设置entity的高度参考
            // }
        })
通过代码可以看到,如果要使用Geosrver,WFS返回的其实就是GeoJSON数据,那为啥不直接用Cesium直接加载?GeoJOSN加载后,转为了entity,到这就G了,数据量太大,直接崩了。这方案适合少量数据。
4.通过Cesium提供的API获取信息
5.17增加
网站:ImageryLayerCollection - Cesium Documentation
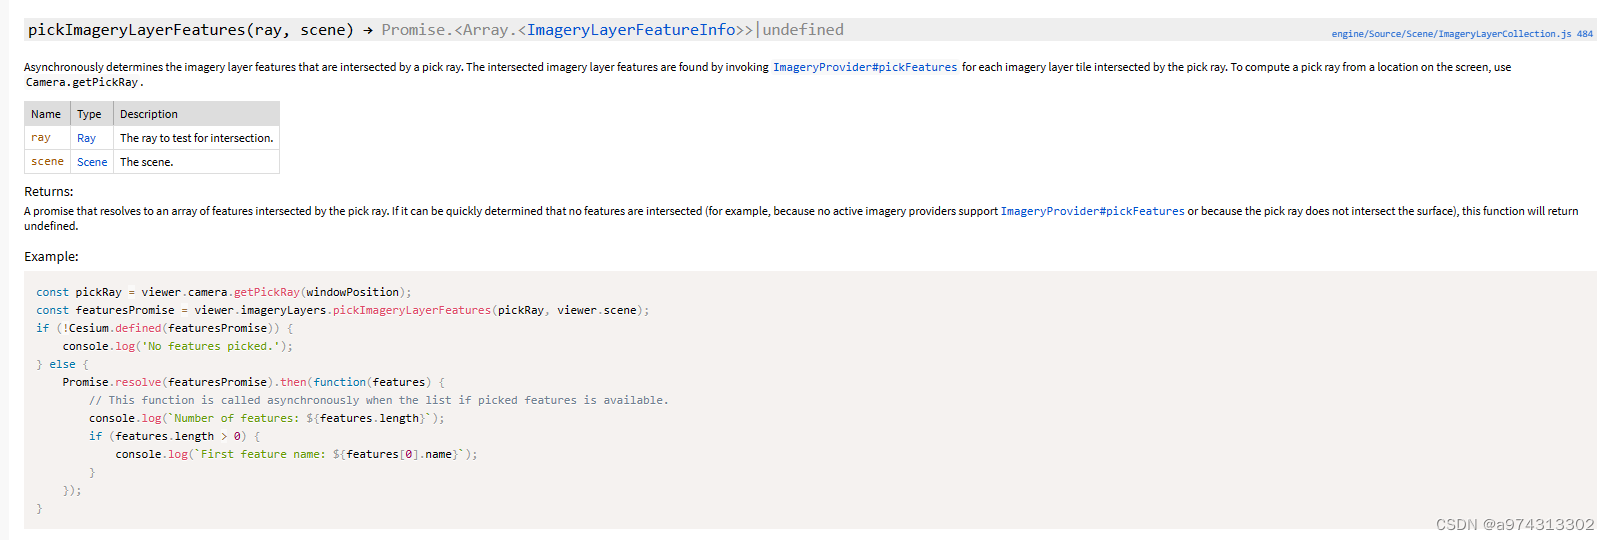
这个是基于ImageryProvider#pickFeatures 封装的,其实WebMapServiceImageryProvider也提供了这个接口
可以看到pickFeatures需要5个参数,四个坐标倒是很好获取,level获取需要处理下。然而ImageryLayerCollection里面的pickImageryLayerFeatures(ray, scene) 只需要两个参数,官方已经封装好了,使用起来更方便,有兴趣的可以研究下源代码。
个人代码:
            viewer.selectedEntity=undefined;
            var pickRay = viewer.camera.getPickRay(click.position);
            var featuresPromise = viewer.imageryLayers.pickImageryLayerFeatures(pickRay, viewer.scene);
            if (!Cesium.defined(featuresPromise)) {
                console.log('No features picked.');
            } else {
                Promise.resolve(featuresPromise).then(function(features) {
                    if (features.length > 0) {
                        console.log(features[0].data.properties)
                    }
                });
            }


 7464
7464


 被折叠的 条评论
为什么被折叠?
被折叠的 条评论
为什么被折叠?
 到【灌水乐园】发言


