


Games have characters. Movies have characters. In fact, almost every scene that we point a camera at has a character of some kind, so it isn't surprising that the modeling and animation tools offered by Autodesk are replete with character creation and animation tools. Each new version seems to add to an already large set of features that help build custom characters. But, the real difficulty is understanding these new features and using them to create characters. Everyone in the industry knows that creating and rigging characters is tough. It is a long, laborious task that continually gets revamped through the whole production pipeline. There is a legitimate reason why character modelers are at the top of the modeling food chain.
Imagine for a second that you are a producer. How would you like a product that completely jumps over the whole character modeling process, or at least that gives you a huge head-start? Well, it's time to rejoice because Autodesk's latest inspiration addresses this critical production step. The geniuses at Autodesk have recently announced the Autodesk Character Generator and you can get production-quality characters out of it in just a few hours.
One of the first notable features of this product is that it exists in the cloud, which means it can be accessed by all the various Digital Entertainment Creation (DEC) packages regardless of which one it is or its version number. Another huge benefit of the Autodesk Character Generator is that the resulting character is delivered in a supported format (either Maya .mb or FBX) that is easily imported into your favorite package and the delivered character includes all the animation rigs. The character is also fully accessible and includes textures and can be customized to meet your specific needs.
To make this service available to the widest possible number of users, Autodesk includes both Free and Paid levels. Free users have access to the entire library of features and are only restricted in their ability to use the Artistic Styles feature. Paid users also get an option to export their character meshes to medium or high-quality formats. Paid users also can endow their characters with facial blend shapes or facial bone rigs.
Users that have a subscription to one of the Autodesk products or that are on a pay-as-you-go rental plan will also have access to the Paid features of Character Generator.
All users, including Free users, will need to create a login account in order to access Character Generator. Users will also need to accept the terms of service document before continuing.
The Character Generator loads within a web page using your default system browser. The default page presents pages where your custom designed characters are saved and another page showing all the characters that you've exported. These pages will initially be blank, so the first step is to click the New Character button at the top of the page. You are then presented with a library of character thumbnails. Autodesk has said that there are currently over 100 starting characters to choose from and I'm sure many more will be added to this library over time.
Clicking on one of the thumbnails, shown in Figure 1, displays a full representation of the character to the left. Each character is clothed differently and can be customized.
The first page also includes Artistic Styles that you can apply if you are using a paid account. These Artistic Styles change the overall structure of the character to be big and bulky or alien-like. We can expect more styles will be added in the future.
Clicking the Customize button takes you to another page where you can select specific character details. The customization options include separate panels for the Face, Skin, Eye Color, Hair, Body, and Clothes.
Within the Face panel, the face for the selected character is shown up-close, but you can change the current face to any in the face library by simply dragging the new face to the top thumbnail. At the top of the Face panel are actually two face thumbnails and a slider control. You can select two different faces from a library and blend between them using the slider control. The resulting face is updated on the left. Each face in the library is named so that they can be easily identified. The current selection is also marked by an "In Use" tag to identify which face is being displayed. There are separate libraries for Male and Female faces.
Using the controls above the current face, you can change the angle of the head model to see it from different angles. You can also select a specific head part from a drop-down list to zoom in on specific head parts including Face, Eyes, Ears, Mouth, Chin, Nose, Cheeks and Hair. There are also individual sliders for each of these head parts that you can use to adjust the size of individual head parts. For example, dragging the Ear slider increases or decreases the ear size. Each slider has defined limits so you never have to worry about messing up the model by turning the character's nose inside out or something like that.
The Skin and Eye Color panels show a series of thumbnails that represent the various skin color tones and eye colors. The skin tones including everything from different human ethnicities, as well as aliens and zombies. The eye color panel includes all the standard common eye colors, but there are also rare options including alien green and cat eyes. Each thumbnail gives you a chance to zoom in on the texture to see it up-close. Clicking on a thumbnail applies it to the current character.
The Hair panel includes a large library of different hair colors along with different hair styles, as shown in Figure 2, including unique ones like a green mohawk. There are separate libraries for Male and Female hair styles. The hair thumbnails also include a button for switching to view the back of the head.
The Body panel has a library of common body sizes and shapes including separate Male and Female libraries and just like the Face panel, you can blend between 2 different body thumbnails. The character view shows the whole character and not just the face and lets you rotate around the character's body. There are also menu options to switch to a view of a specific body part.
Each of the different body parts also has two thumbnails and a slider for blending between the two. Using these controls, you can create a customized look and shape for each of the different body parts. The body parts you can change include the left and right arm, upper arm and lower arm, the chest, breasts, stomach, backside, legs and feet.
The Clothes panel has separate sub-panels for selecting shirts, pants and shoes. Each sub-panel has a library of thumbnails that you can select from and the selected clothing articles automatically fit perfectly around the selected character regardless of its customization (Figure 3). Of all the libraries, the clothes libraries are by far the largest including everything from sporty styles to formal wear.
When you're finished customizing the character, simply click the Finish button and you'll be taken to a page where you can export your completed character. You will first be prompted to give the character a name. Named characters are saved as thumbnails in your Character Designs page, which is the first page you see when you sign-in. Beneath the character's thumbnail are icons to Generate Character, Edit or Delete. The Edit button returns you to the Customization panels where you can change any of the custom features.
The Generate Character button lets you export the character. There is an Options page where you can specify the Character's Height in centimeters. The default female height is 172 cm and the default male height is 183 cm. You can also set the Character Orientation to Y-up or Z-Up. For Textures, you can choose to include separate textures for the clothes and for Specular and Normal Maps. The Skeleton Resolution option lets you set the skeleton rig to use a Biped (which is a common rig for 3ds Max), or set the resolution to Medium or High.
You can also set the resolution of the character mesh to extra low (Crowd), Low, Medium and High. Several export resolutions can be selected to export together. Remember that Medium and High resolution characters are reserved for paid accounts. There is also an option to output the mesh geometry to Triangles or Quads. If you have a paid account, you can select to include Facial Blend Shapes or a Facial Bone Rig for animated facial features.
The final export option is the File Format. The available formats are Maya (.mb file) or FBX for 3ds Max and MotionBuilder. You can also select to output to both file formats at the same time. Once the options are set, all that is left is to click the Generate button and the process is done out in the cloud. Once generated, the character shows up in the Generated Characters page where it can be downloaded and saved to your local system. Downloaded files are compressed as .zip files, which includes the mesh along with its textures.
The final test is to see how the resulting character shows up in its intended package. My custom character was loaded into 3ds Max and came in without any trouble, complete with an animation rig, as shown in Figure 4.
It is great to see that Autodesk is putting the cloud to good work. Rather than inserting these new character building features into each of its products, the new Autodesk Character Generator runs in a web browser and all the magic happens in the cloud. The most amazing part of Character Generator is in its simplicity. With just a few simple intuitive controls and little experimentation, any user can add complex, rigged, fully clothed, custom characters to their scenes. The resulting characters are absolutely amazing and look fantastic.
And don't be fooled by the simplicity of the product. With expandable libraries of body parts, shapes and styles, along with the ability to blend between them, the product offers a limitless number of possibilities. The big winner here is the game studios that can reduce character development and the creation of crowds from a couple of months to less than a day. Kudos to Autodesk.
Imagine for a second that you are a producer. How would you like a product that completely jumps over the whole character modeling process, or at least that gives you a huge head-start? Well, it's time to rejoice because Autodesk's latest inspiration addresses this critical production step. The geniuses at Autodesk have recently announced the Autodesk Character Generator and you can get production-quality characters out of it in just a few hours.
One of the first notable features of this product is that it exists in the cloud, which means it can be accessed by all the various Digital Entertainment Creation (DEC) packages regardless of which one it is or its version number. Another huge benefit of the Autodesk Character Generator is that the resulting character is delivered in a supported format (either Maya .mb or FBX) that is easily imported into your favorite package and the delivered character includes all the animation rigs. The character is also fully accessible and includes textures and can be customized to meet your specific needs.
Options for Free and Paid Users
To make this service available to the widest possible number of users, Autodesk includes both Free and Paid levels. Free users have access to the entire library of features and are only restricted in their ability to use the Artistic Styles feature. Paid users also get an option to export their character meshes to medium or high-quality formats. Paid users also can endow their characters with facial blend shapes or facial bone rigs.
Users that have a subscription to one of the Autodesk products or that are on a pay-as-you-go rental plan will also have access to the Paid features of Character Generator.
All users, including Free users, will need to create a login account in order to access Character Generator. Users will also need to accept the terms of service document before continuing.
Building a Character
The Character Generator loads within a web page using your default system browser. The default page presents pages where your custom designed characters are saved and another page showing all the characters that you've exported. These pages will initially be blank, so the first step is to click the New Character button at the top of the page. You are then presented with a library of character thumbnails. Autodesk has said that there are currently over 100 starting characters to choose from and I'm sure many more will be added to this library over time.
Clicking on one of the thumbnails, shown in Figure 1, displays a full representation of the character to the left. Each character is clothed differently and can be customized.
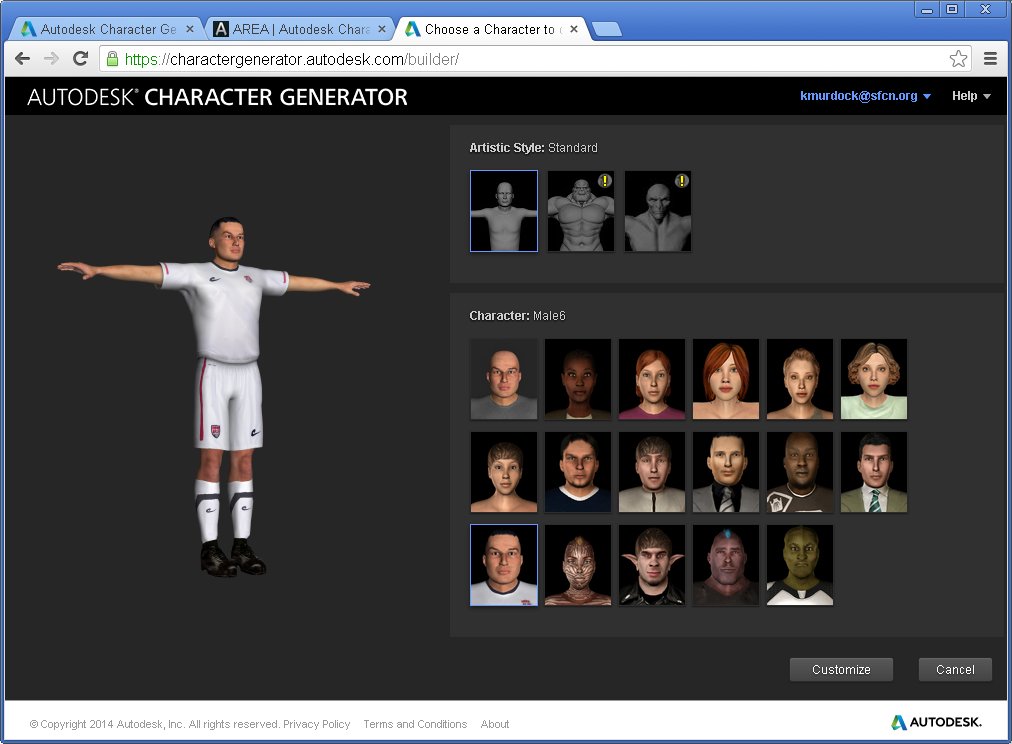
Figure 1: As a starting point, several diverse character thumbnails are available.
The first page also includes Artistic Styles that you can apply if you are using a paid account. These Artistic Styles change the overall structure of the character to be big and bulky or alien-like. We can expect more styles will be added in the future.
Customizing a Character
Clicking the Customize button takes you to another page where you can select specific character details. The customization options include separate panels for the Face, Skin, Eye Color, Hair, Body, and Clothes.
Within the Face panel, the face for the selected character is shown up-close, but you can change the current face to any in the face library by simply dragging the new face to the top thumbnail. At the top of the Face panel are actually two face thumbnails and a slider control. You can select two different faces from a library and blend between them using the slider control. The resulting face is updated on the left. Each face in the library is named so that they can be easily identified. The current selection is also marked by an "In Use" tag to identify which face is being displayed. There are separate libraries for Male and Female faces.
Using the controls above the current face, you can change the angle of the head model to see it from different angles. You can also select a specific head part from a drop-down list to zoom in on specific head parts including Face, Eyes, Ears, Mouth, Chin, Nose, Cheeks and Hair. There are also individual sliders for each of these head parts that you can use to adjust the size of individual head parts. For example, dragging the Ear slider increases or decreases the ear size. Each slider has defined limits so you never have to worry about messing up the model by turning the character's nose inside out or something like that.
The Skin and Eye Color panels show a series of thumbnails that represent the various skin color tones and eye colors. The skin tones including everything from different human ethnicities, as well as aliens and zombies. The eye color panel includes all the standard common eye colors, but there are also rare options including alien green and cat eyes. Each thumbnail gives you a chance to zoom in on the texture to see it up-close. Clicking on a thumbnail applies it to the current character.
The Hair panel includes a large library of different hair colors along with different hair styles, as shown in Figure 2, including unique ones like a green mohawk. There are separate libraries for Male and Female hair styles. The hair thumbnails also include a button for switching to view the back of the head.
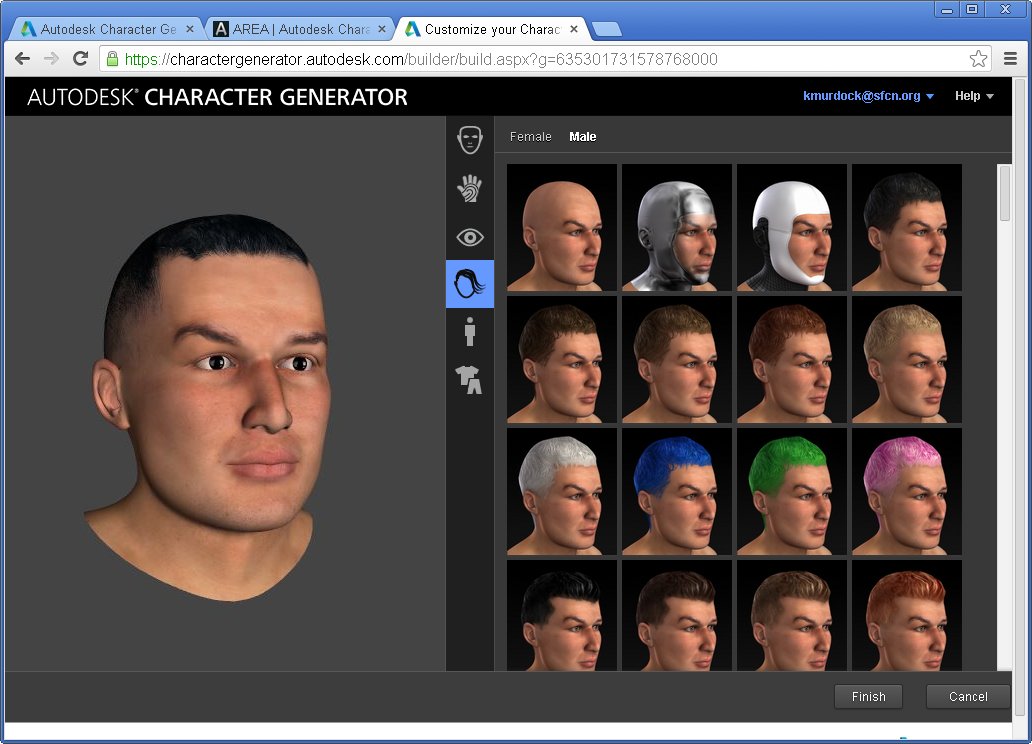
Figure 2: Each customization panel offers an assortment of thumbnail options.
The Body panel has a library of common body sizes and shapes including separate Male and Female libraries and just like the Face panel, you can blend between 2 different body thumbnails. The character view shows the whole character and not just the face and lets you rotate around the character's body. There are also menu options to switch to a view of a specific body part.
Each of the different body parts also has two thumbnails and a slider for blending between the two. Using these controls, you can create a customized look and shape for each of the different body parts. The body parts you can change include the left and right arm, upper arm and lower arm, the chest, breasts, stomach, backside, legs and feet.
The Clothes panel has separate sub-panels for selecting shirts, pants and shoes. Each sub-panel has a library of thumbnails that you can select from and the selected clothing articles automatically fit perfectly around the selected character regardless of its customization (Figure 3). Of all the libraries, the clothes libraries are by far the largest including everything from sporty styles to formal wear.

Figure 3: Applied clothing fit the character regardless of its size and shape.
Exporting a Character
When you're finished customizing the character, simply click the Finish button and you'll be taken to a page where you can export your completed character. You will first be prompted to give the character a name. Named characters are saved as thumbnails in your Character Designs page, which is the first page you see when you sign-in. Beneath the character's thumbnail are icons to Generate Character, Edit or Delete. The Edit button returns you to the Customization panels where you can change any of the custom features.
The Generate Character button lets you export the character. There is an Options page where you can specify the Character's Height in centimeters. The default female height is 172 cm and the default male height is 183 cm. You can also set the Character Orientation to Y-up or Z-Up. For Textures, you can choose to include separate textures for the clothes and for Specular and Normal Maps. The Skeleton Resolution option lets you set the skeleton rig to use a Biped (which is a common rig for 3ds Max), or set the resolution to Medium or High.
You can also set the resolution of the character mesh to extra low (Crowd), Low, Medium and High. Several export resolutions can be selected to export together. Remember that Medium and High resolution characters are reserved for paid accounts. There is also an option to output the mesh geometry to Triangles or Quads. If you have a paid account, you can select to include Facial Blend Shapes or a Facial Bone Rig for animated facial features.
The final export option is the File Format. The available formats are Maya (.mb file) or FBX for 3ds Max and MotionBuilder. You can also select to output to both file formats at the same time. Once the options are set, all that is left is to click the Generate button and the process is done out in the cloud. Once generated, the character shows up in the Generated Characters page where it can be downloaded and saved to your local system. Downloaded files are compressed as .zip files, which includes the mesh along with its textures.
The final test is to see how the resulting character shows up in its intended package. My custom character was loaded into 3ds Max and came in without any trouble, complete with an animation rig, as shown in Figure 4.
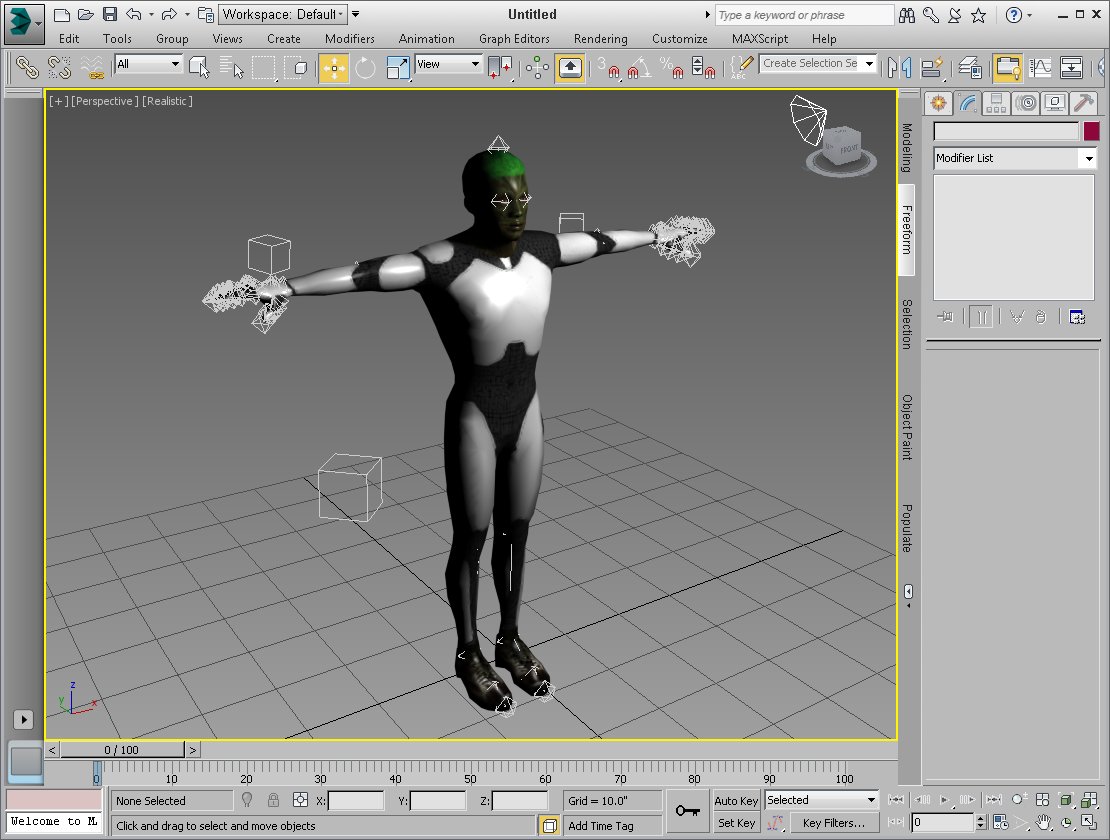
Figure 4: The custom character exported out of Character Generator shows up in 3ds Max complete and ready to animate.
Summary
It is great to see that Autodesk is putting the cloud to good work. Rather than inserting these new character building features into each of its products, the new Autodesk Character Generator runs in a web browser and all the magic happens in the cloud. The most amazing part of Character Generator is in its simplicity. With just a few simple intuitive controls and little experimentation, any user can add complex, rigged, fully clothed, custom characters to their scenes. The resulting characters are absolutely amazing and look fantastic.
And don't be fooled by the simplicity of the product. With expandable libraries of body parts, shapes and styles, along with the ability to blend between them, the product offers a limitless number of possibilities. The big winner here is the game studios that can reduce character development and the creation of crowds from a couple of months to less than a day. Kudos to Autodesk.
About the Author(s)
Kelly L. Murdock works as a freelance consultant and author. He has written extensively on 3D graphics including books on Maya and 3ds Max.
License
GDOL (Gamedev.net Open License)


 3317
3317

 被折叠的 条评论
为什么被折叠?
被折叠的 条评论
为什么被折叠?
 到【灌水乐园】发言


