


Arduino称重传感器和 HX711 放大器(数字秤)
Arduino with Load Cell and HX711 Amplifier (Digital Scale)
In this guide, you’ll learn how to create a digital scale with the Arduino using a load cell and the HX711 amplifier. First, you’ll learn how to wire the load cell and the HX711 amplifier to the Arduino to build a scale. Then, we’ll show you how to calibrate the scale, and a simple example to get the weight of objects. Later, we’ll also add a display to show the measurements and a button to tare the scale.
在本指南中,您将学习通过 Arduino使用称重传感器和 HX711 放大器创建数字秤。首先,您将学习如何将称重传感器和 HX711 放大器连接到 Arduino 以构建秤。然后,将向您展示如何校准秤,以及获取物体重量的简单示例。稍后,我们还将添加一个显示测量值的显示屏和一个用于去皮的按钮。
Table of Contents 目录
In this tutorial, we’ll cover the following topics:
在本教程中,我们将介绍以下主题:
- Introducing Load Cells (Strain Gauges) 介绍称重传感器(应变片)
- HX711 Amplifier (HX711 功放)
- Setting Up Load Cell 设置称重传感器
- Wiring Load Cell and HX711 Amplifier to the Arduino 将称重传感器和 HX711 放大器连接到 Arduino
- Installing HX711 Library 安装 HX711 库
- Calibrating the Scale 校准刻度
- Weighting Objects – Code 加权对象 – 代码
- Digital Scale with Arduino 使用Arduino的数字秤
Introducing Load Cells 称重传感器简介
A load cell converts a force into an electrical signal that can be measured. The electrical signal changes proportionally to the force applied. There are different types of load cells: strain gauges, pneumatic, and hydraulic. In this tutorial, we’ll cover strain gauge load cells.
称重传感器将力转换为可测量的电信号。电信号与施加的力成正比变化。有不同类型的称重传感器:应变片、气动和液压。在本教程中,我们将介绍应变片称重传感器。
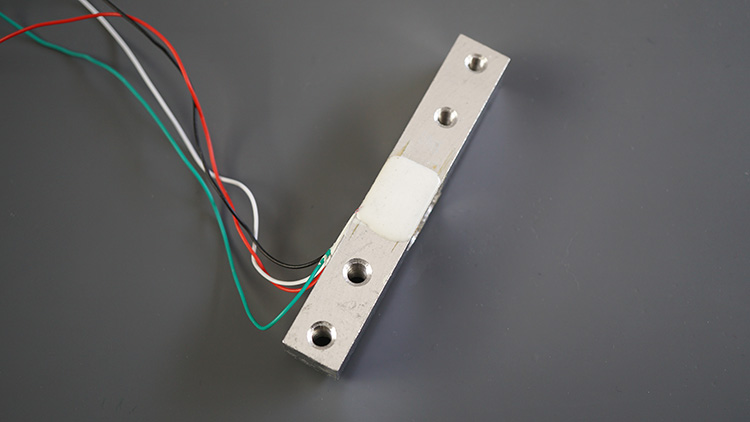
Strain gauge load cells are composed of a metal bar with attached strain gauges (under the white glue in the picture above). A strain gauge is an electrical sensor that measures force or strain on an object. The resistance of the strain gauges varies when an external force is applied to an object, which results in a deformation of the object’s shape (in this case, the metal bar). The strain gauge resistance is proportional to the load applied, which allows us to calculate the weight of objects.
应变片称重传感器由带有应变片的金属棒组成(在上图中的白色胶水下方)。应变片是一种电子传感器,用于测量物体上的力或应变。当外力施加到物体上时,应变片的阻力会发生变化,这会导致物体的形状(在这种情况下是金属棒)变形。应变片电阻与施加的载荷成正比,这使我们能够计算物体的重量。
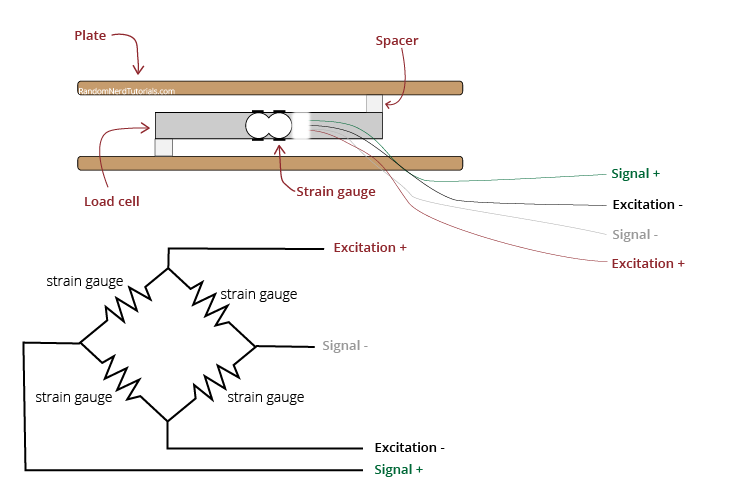
Usually, load cells have four strain gauges hooked up in a Wheatstone bridge (as shown below) that allow us to get accurate resistance measurements. For a more detailed explanation of how strain gauges work, read this article.
通常,称重传感器在惠斯通电桥上连接了四个应变片(如下图所示),使我们能够获得准确的电阻测量值。有关应变片工作原理的更详细说明,请阅读此文。
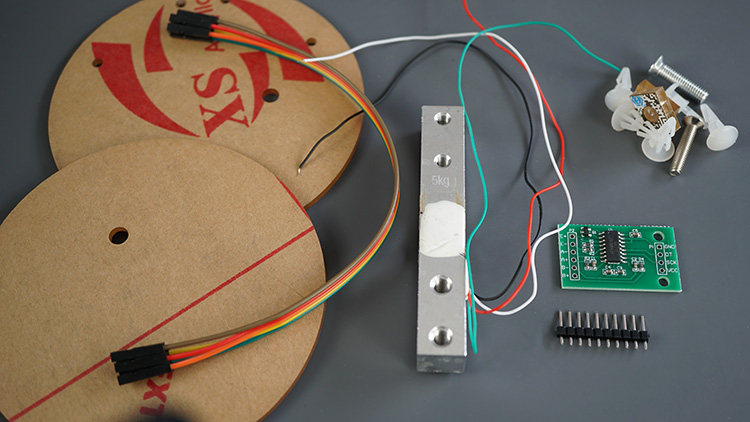
The wires coming from the load cell usually have the following colors:
来自称重传感器的电线通常具有以下颜色:
- Red: VCC (E+) 红色:VCC (E+)
- Black: GND (E-) 黑色:GND(E-)
- White: Output – (A-) 白色:输出 – (A-)
- Green: Output + (A+) 绿色:输出 + (A+)
Applications 应用
Strain gauge load cells can be used in a wide variety of applications. For example:
应变片称重传感器可用于各种应用。例如:
- check if an object’s weight changes over time;
检查物体的重量是否随时间变化; - measure the weight of an object;
测量物体的重量; - detect the presence of an object;
检测物体的存在; - estimate a container’s liquid level;
估计容器的液位; - etc. 等。
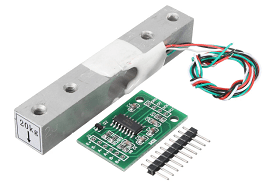
Because the changes in strain when weighting objects are so small, we need an amplifier. The load cell we’re using is usually sold together with an HX711 amplifier. So, that’s the amplifier we’ll use.
因为改变物体重量时的应变变化非常小,所以我们需要一个放大器。我们使用的称重传感器通常与 HX711 放大器一起出售。
(HX711 Amplifier )HX711 功放
The HX711 amplifier is a breakout board that allows you to easily read load cells to measure weight. You wire the load cell wires on one side, and the microcontroller on the other side. The HX711 communicates with the microcontroller using two-wire interface (Clock and Data).
HX711 放大器是一款分线板,可让您轻松读取称重传感器以测量重量。您将称重传感器的电线连接到一侧,微控制器连接到另一侧。HX711 使用双线接口(时钟和数据)与微控制器通信。
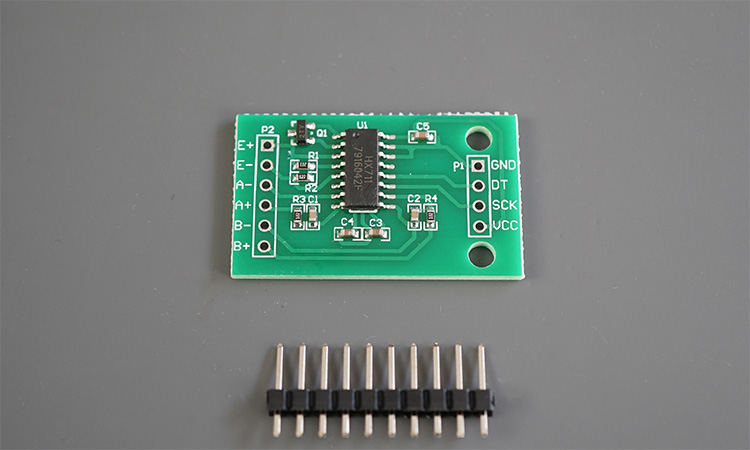
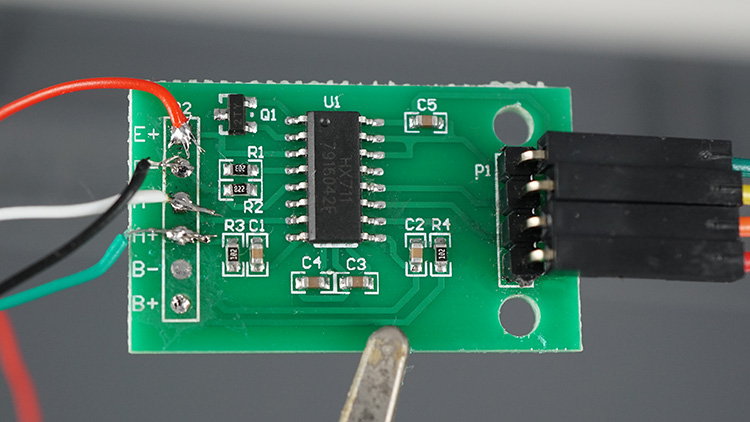
You need to solder header pins on the GND, DT, SCK, and VCC pins to connect to the Arduino. I soldered the load cell wires directly to the E+, E-, A-, and A+ pins. The load cell wires were very thin and fragile, be careful when soldering to not damage the wires.
您需要在 GND、DT、SCK 和 VCC 引脚上焊接接头引脚才能连接到 Arduino。我将称重传感器线直接焊接到 E+、E-、A- 和 A+ 引脚上。称重传感器的电线非常细且易断,焊接时要小心,以免损坏电线。
For more information about the HX711 amplifier, you can consult the HX711 datasheet.
有关 HX711 放大器的更多信息,您可以查阅 HX711 数据表。
(Setting Up the Load Cell )设置称重传感器
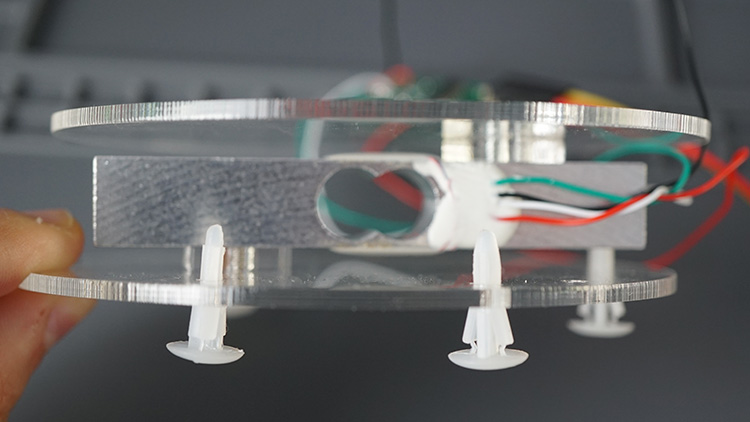
Our load cell kit came with two acrylic plates and some screws to set up the load cell as a scale. You can use wood plates or 3D-print your own plates.
我们的称重传感器套件配有两块亚克力板和一些螺钉,用于将称重传感器设置为秤。您可以使用木板或3D打印自己的板。
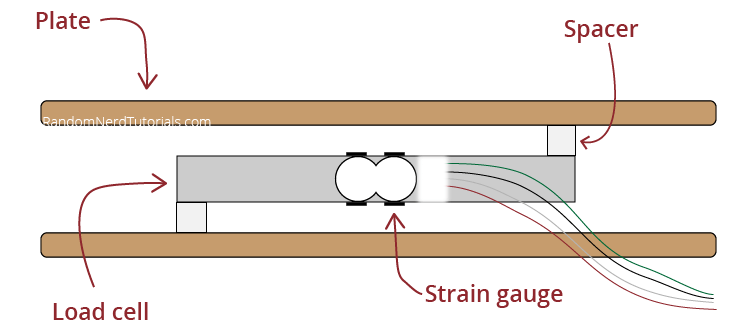
You should attach the plates to the load cell in a way that creates a strain between the opposite ends of the metal bar. The bottom plate holds the load cell, and the upper plate is where you place the objects.
您应该将板连接到称重传感器上,以便在金属棒的两端之间产生应变。底板用于放置称重传感器,上板是放置物体的位置。
The following figure shows what my load cell with the acrylic plates looks like.
下图显示了带有亚克力板的称重传感器的外观。
带有HX711的称重传感器
(Wiring Load Cell and HX711 Amplifier to the Arduino) 将称重传感器和 HX711 放大器连接到 Arduino
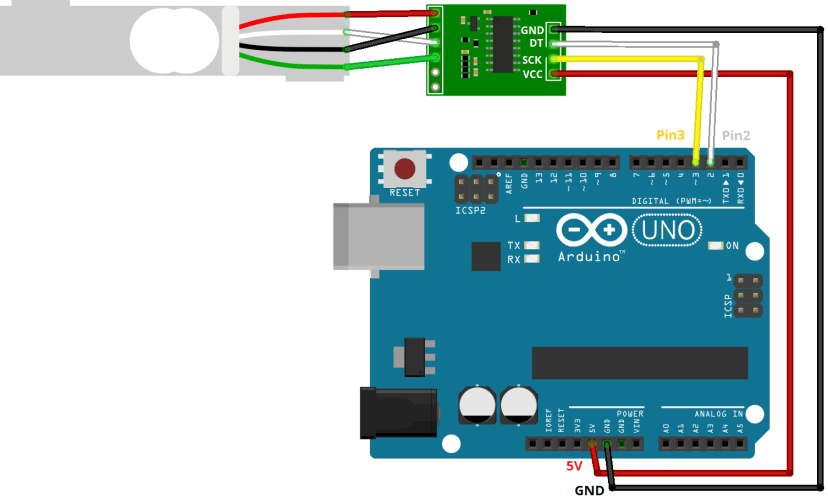
The HX711 amplifier communicates via two-wire interface. You can connect it to any digital pins of your Arduino board. We’re connecting the data pin (DT) to Pin 2 and the clock pin (CLK) to Pin 3.
HX711放大器通过两线接口进行通信。您可以将其连接到Arduino板的任何数字引脚。我们将数据引脚 (DT) 连接到引脚 2,将时钟引脚 (CLK) 连接到引脚 3。
Follow the next table or schematic diagram to wire the load cell to the Arduino board.
按照下表或原理图将称重传感器连接到Arduino板。
| Load Cell 称重传感器 | HX711 | HX711 | Arduino |
|---|---|---|---|
| Red (E+) 红色 (E+) | E+ | GND | GND |
| Black (E-) 黑色(E-) | E- | DT | Pin 2 引脚 2 |
| White (A-) 白色 (A-) | A- | SCK | Pin 3 引脚 3 |
| Green (A+) 绿色 (A+) | A+ | VCC | 5V |
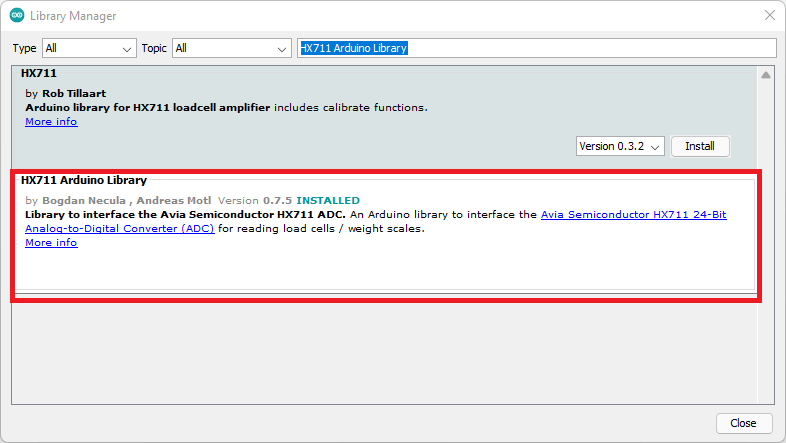
Installing the HX711 Library 安装 HX711 库
There are several different libraries to get measurements from a load cell using the HX711 amplifier. We’ll use the HX711 library by bodge. It is compatible with the ESP32, ESP8266, and Arduino.
有几个不同的库可以使用HX711放大器从称重传感器获得测量值。我们将使用 bodge 的 HX711 库。它与 ESP32、ESP8266 和 Arduino 兼容。
Arduino IDE Arduino IDE集成电路
Follow the next instructions to install the library if you’re using Arduino IDE.
如果您使用的是 Arduino IDE,请按照以下说明安装库。
- Open Arduino IDE and go to Sketch > Include Library > Manage Libraries.
打开Arduino IDE并转到“草图”>“包括库”>“管理库”。 - Search for “HX711 Arduino Library” and install the library by Bogdan Necula.
搜索“HX711 Arduino Library”并安装 Bogdan Necula 的库。
Calibrating the Scale (Arduino with Load Cell) 校准秤(带称重传感器的Arduino)
At this time, we assume you have wired the load cell to the HX711 amplifier and the amplifier to the Arduino board. You should also have your scale set up (two plates wired on opposite ends on the load cell), and have installed the HX711 library.
此时,我们假设您已将称重传感器连接到HX711放大器,并将放大器连接到Arduino板。您还应该设置秤(称重传感器的两端连接两块板),并安装 HX711 库。
Before getting the weight of objects, you need to calibrate your load cell first by getting the calibration factor. Your calibration factor will be different than mine, so you shouldn’t skip this section.
在获得物体的重量之前,您需要先通过获取校准系数来校准称重传感器。您的校准因子将与我的校准因子不同,因此您不应跳过此部分。
1) Prepare an object with a known weight. I used my kitchen scale and weighed a glass with water (107g).
1) 准备一个具有已知重量的物体。我用厨房秤称了一杯水(107克)。
2) Upload the following code to your Arduino board. We wrote the following code taking into account the instructions to calibrate the load cell provided by the library documentation.
2)将以下代码上传到您的Arduino板。我们编写了以下代码,并考虑了库文档提供的校准称重传感器的说明。
/*
  Rui Santos
  Complete project details at https://RandomNerdTutorials.com/arduino-load-cell-hx711/

  Permission is hereby granted, free of charge, to any person obtaining a copy
  of this software and associated documentation files.

  The above copyright notice and this permission notice shall be included in all
  copies or substantial portions of the Software.
*/

// Calibrating the load cell
#include "HX711.h"

// HX711 circuit wiring
const int LOADCELL_DOUT_PIN = 2;
const int LOADCELL_SCK_PIN = 3;

HX711 scale;

void setup() {


  Serial.begin(57600);
  scale.begin(LOADCELL_DOUT_PIN, LOADCELL_SCK_PIN);
}

void loop() {


  if (scale.is_ready()) {


    scale.set_scale();
    Serial.println("Tare... remove any weights from the scale.");
    delay(5000);
    scale.tare();
    Serial.println("Tare done...");
    Serial.print("Place a known weight on the scale...");
    delay(5000);
    long reading = scale.get_units(10);
    Serial.print("Result: ");
    Serial.println(reading);
  }
  else {


    Serial.println("HX711 not found.");
  }
  delay(1000);
}

//calibration factor will be the (reading)/(known weight)
3) After uploading, open the Serial Monitor at a baud rate of 57600 and then press the Arduino on-board RESET button.
3) 上传后,以 57600 的波特率打开串口监视器,然后按下 Arduino 板载 RESET 按钮。
4) Follow the instructions on the Serial Monitor: remove any weights from the scale (it will tare automatically). Then, place an object with a known weight on the scale and wait until you get a value.
4) 按照串行监视器上的说明进行操作:从秤上取下所有砝码(它将自动去皮)。然后,将具有已知权重的物体放在秤上,并等待获得值。
5) Calculate your calibration factor using the formula:
5) 使用以下公式计算校准因子:
calibration factor = (reading)/(known weight)
 最低0.47元/天 解锁文章


 3130
3130

 被折叠的 条评论
为什么被折叠?
被折叠的 条评论
为什么被折叠?
 到【灌水乐园】发言


