


鸿蒙NEXT开发实战往期必看文章:
一分钟了解”纯血版!鸿蒙HarmonyOS Next应用开发!
“非常详细的” 鸿蒙HarmonyOS Next应用开发学习路线!(从零基础入门到精通)
HarmonyOS NEXT应用开发案例实践总结合(持续更新......)
HarmonyOS NEXT应用开发性能优化实践总结(持续更新......)
概述
在办公,创作以及社区交友等类型的应用中,内容发布是用户互动与交流的核心环节,它允许用户创作并分享包含图片、文字等多媒体元素的信息,从而增强用户间的连接与互动。随着手机,平板,2in1等多设备的普及,用户在不同设备间无缝切换和接续编辑内容的需求日益增强。本文介绍如何通过应用接续能力(在不同设备中快速切换)提升内容发布的便利性。
具体功能实现如下:
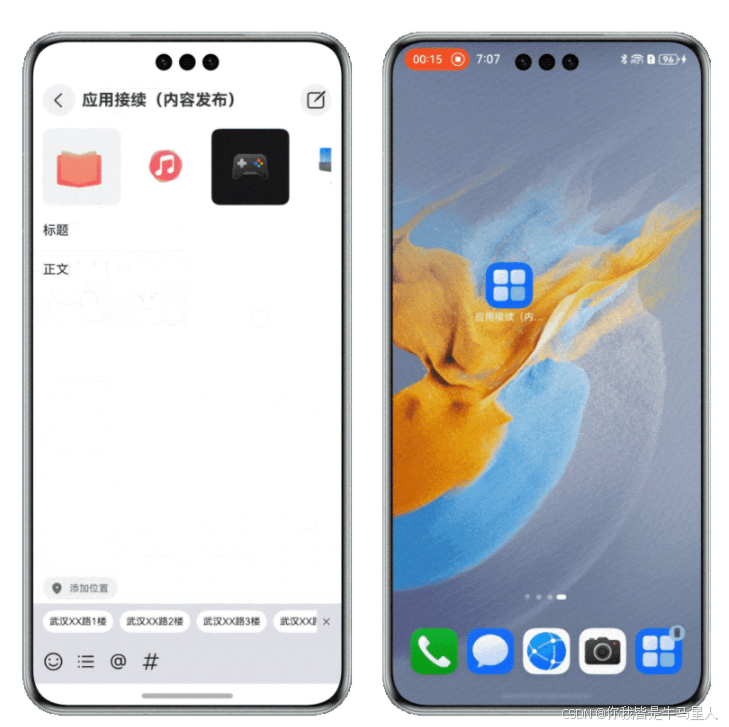
- 用户在A设备编辑页面选择用户照片,并编辑标题、正文等文字信息。
- 用户点击B设备Dock栏图标,在A端输入的图片和文字信息衔接到B设备上。
约束与限制
需同时满足以下条件,才能使用该功能:
- 双端设备需要登录同一华为账号。
- 双端设备需要打开Wi-Fi和蓝牙开关。
条件允许时,建议双端设备接入同一个局域网,可提升数据传输的速度。
- 应用接续只能在同应用(UIAbility)之间触发,双端设备都需要有该应用。
实现原理
场景分析
在以上提到的内容发布的应用接续场景中,可以分为三个步骤:
- 输入数据:用户在A设备的编辑页面上选择照片、输入标题和正文等文字信息。
- 用户点击B设备Dock栏图标后,A设备发起接续,数据进行传输。
- B设备接收接续数据,并显示。
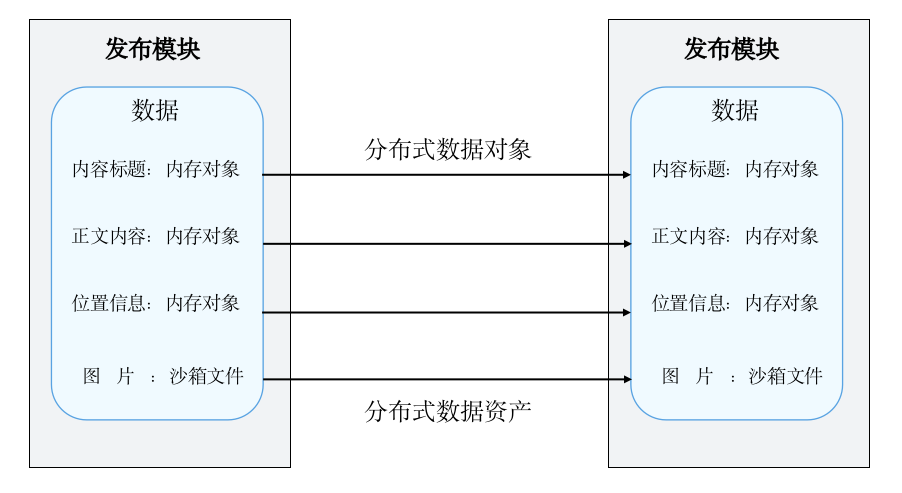
场景核心在于应用接续的过程中如何传递数据。对于文字信息可使用分布式数据对象保存,对于图片可以拷贝到分布式文件目录下,使用Asset资产对象作为分布式数据对象的根属性保存。
关键技术
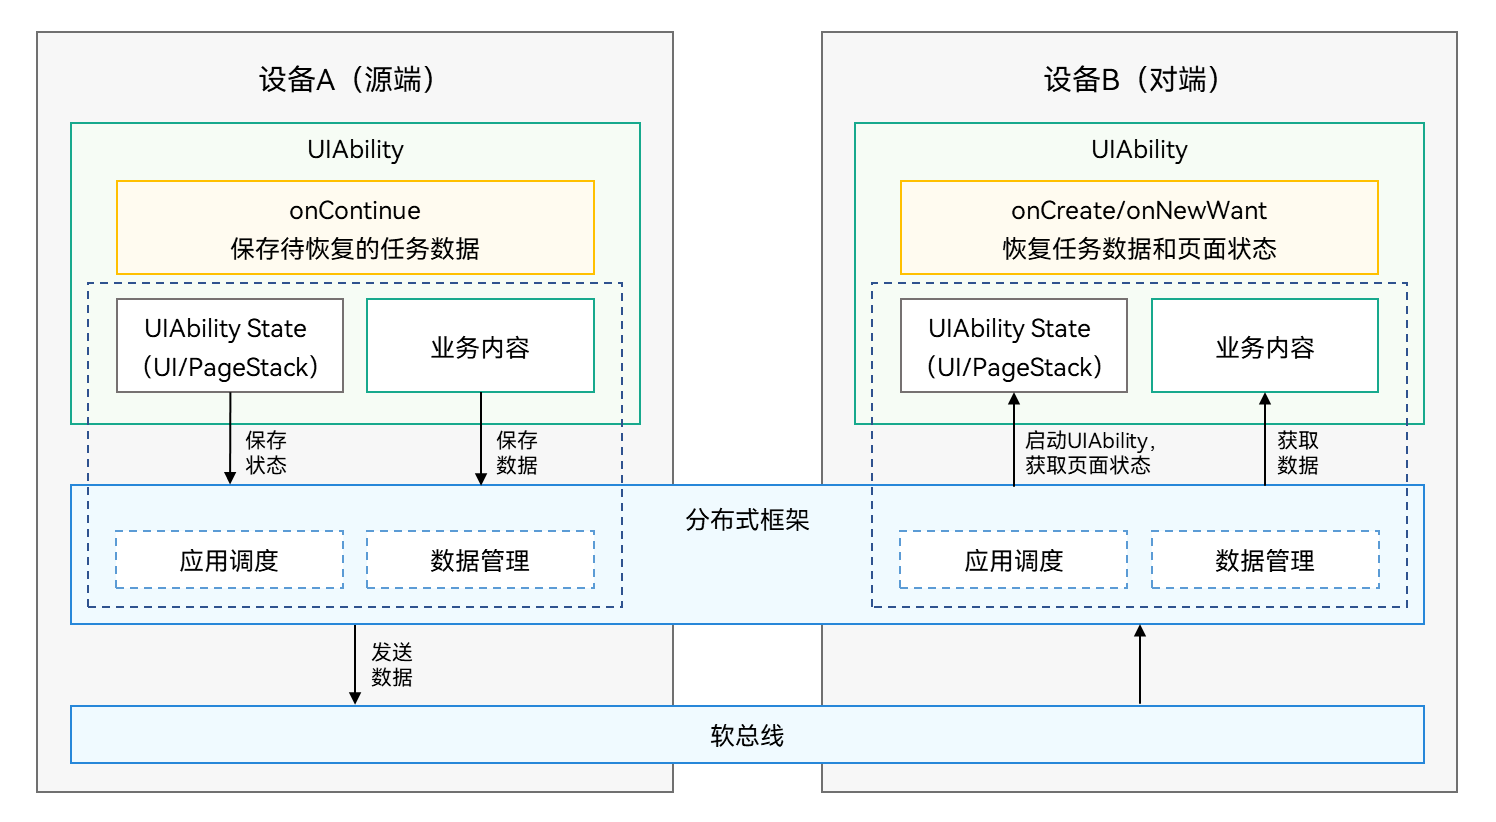
将发起接续的设备称为源端设备(场景中的A设备),接收数据的设备称为对端设备(场景中的B设备),运作机制如图,接续过程底层依赖分布式框架和软总线,开发者不必关注只需要启用接续、保存数据和恢复数据,具体运作机制可参考:运作机制。
开发实现
启用应用接续能力
在module.json5文件的abilities中,将continuable标签配置为“true”,表示该UIAbility可被迁移。配置为false的UIAbility将被系统识别为无法迁移且该配置默认值为false。
// entry/src/main/module.json5
{
  "module": {
    "abilities": [
      {
        "continuable": true
      }
    ]
  }
}
基础数据&文件资产迁移
对于图片、文档等文件类数据,可以转化成ArrayBuffer类型,保存在分布式文件目录下。示例代码如下:
// entry/src/main/ets/view/AddPic.ets
writeDistributedFile(buf: ArrayBuffer, displayName: string): void {
  // 将资产写入分布式文件目录下
  let distributedDir: string = this.context.distributedFilesDir; // 获取分布式文件目录路径
  let fileName: string = '/' + displayName; // 文件名
  let filePath: string = distributedDir + fileName; // 文件路径
  try {
    // 在分布式目录下创建文件
    let file = fs.openSync(filePath, fs.OpenMode.READ_WRITE | fs.OpenMode.CREATE);
    hilog.info(0x0000, '[AddPic]', 'Create file success.');
    // 向文件中写入内容(由于资产为图片,可将图片转换为buffer后写入)
    fs.writeSync(file.fd, buf);
    // 关闭文件
    fs.closeSync(file.fd);
  } catch (error) {
    let err: BusinessError = error as BusinessError;
    hilog.info(0x0000, '[AddPic]',
      `Failed to openSync / writeSync / closeSync. Code: ${err.code}, message: ${err.message}`);
  }
}使用分布式数据对象,需要在源端onContinue()接口中进行数据保存。在源端UIAbility的onContinue()接口中创建分布式数据对象并保存数据,执行流程如下:
- 在onContinue()接口中使用create()接口创建分布式数据对象,将所要迁移的数据填充到分布式数据对象数据中。
- 如果有图片、文档等文件类数据要迁移,需要先将其转换为资产commonType.Asset类型,再封装到分布式数据对象中进行迁移。
- 调用genSessionId()接口生成数据对象组网id,并使用该id调用setSessionId()加入组网,激活分布式数据对象。
- 使用save()接口将已激活的分布式数据对象持久化,确保源端退出后对端依然可以获取到数据。
- 将生成的sessionId通过want传递到对端,供对端激活同步使用。
示例代码如下:
// entry/src/main/ets/entryability/EntryAbility.ets
async onContinue(wantParam: Record<string, Object | undefined>): Promise<AbilityConstant.OnContinueResult> {
  wantParam.imageUriArray = JSON.stringify(AppStorage.get<Array<PixelMap>>('imageUriArray'));
  try {
    // 生成数据对象组网id,激活分布式数据对象
    let sessionId: string = distributedDataObject.genSessionId();
    wantParam.distributedSessionId = sessionId;

    let imageUriArray = AppStorage.get<Array<ImageInfo>>('imageUriArray');
    let assets: commonType.Assets = [];
    if (imageUriArray) {
      for (let i = 0; i < imageUriArray.length; i++) {
        let append = imageUriArray[i];
        let attachment: commonType.Asset = this.getAssetInfo(append);
        assets.push(attachment);
      }
    }

    let contentInfo: ContentInfo = new ContentInfo(
      AppStorage.get('mainTitle'),
      AppStorage.get('textContent'),
      AppStorage.get('imageUriArray'),
      AppStorage.get('isShowLocalInfo'),
      AppStorage.get('isAddLocalInfo'),
      AppStorage.get('selectLocalInfo'),
      assets
    );
    let source = contentInfo.flatAssets();
    this.distributedObject = distributedDataObject.create(this.context, source);
    this.distributedObject.setSessionId(sessionId);
    await this.distributedObject.save(wantParam.targetDevice as string).catch((err: BusinessError) => {
      hilog.info(0x0000, '[EntryAbility]', `Failed to save. Code: ${err.code}, message: ${err.message}`);
    });
  } catch (error) {
    hilog.error(0x0000, '[EntryAbility]', 'distributedDataObject failed', `code ${(error as BusinessError).code}`);
  }
  return AbilityConstant.OnContinueResult.AGREE;
}
基础数据&文件资产恢复
在对端设备UIAbility的onCreate()/onNewWant()中调用restoreDistributedObject()方法,通过加入与源端一致的分布式数据对象组网进行数据恢复。
- 在restoreDistributedObject()方法中创建空的分布式数据对象,用于接收恢复的数据;
- 从want中读取分布式数据对象组网id;
- 注册on()接口监听数据变更。在收到status为restore的事件的回调中,实现数据恢复完毕时需要进行的业务操作。由于恢复的数据中有图片文件,调用fileCopy()方法从分布式文件中读取ArrayBuffer,然后把ArrayBuffer转化成图片类型数据进行存储。
- 调用setSessionId()加入组网,激活分布式数据对象。
- 打开对端设备,点击接续图标,应用打开,页面数据恢复。
示例代码如下:
// entry/src/main/ets/entryability/EntryAbility.ets
onCreate(want: Want, launchParam: AbilityConstant.LaunchParam): void {
  hilog.info(0x0000, '[EntryAbility]', 'Ability onCreate');
  this.restoreDistributedObject(want, launchParam);
}

onNewWant(want: Want, launchParam: AbilityConstant.LaunchParam): void {
  hilog.info(0x0000, '[EntryAbility]', 'Ability onNewWant');
  this.restoreDistributedObject(want, launchParam);
}

/**
 * 对端设备接收数据
 * @param want
 * @param launchParam
 * @returns
 */
async restoreDistributedObject(want: Want, launchParam: AbilityConstant.LaunchParam): Promise<void> {
  if (launchParam.launchReason !== AbilityConstant.LaunchReason.CONTINUATION) {
    return;
  }

  let mailInfo: ContentInfo = new ContentInfo(undefined, undefined, [], undefined, undefined, undefined, undefined);
  this.distributedObject = distributedDataObject.create(this.context, mailInfo);
  // 添加数据变更监听
  this.distributedObject.on('status',
    (sessionId: string, networkId: string, status: 'online' | 'offline' | 'restored') => {
      hilog.info(0x0000, '[EntryAbility]', `status changed, sessionId: ${sessionId}`);
      hilog.info(0x0000, '[EntryAbility]', `status changed, status: ${status}`);
      hilog.info(0x0000, '[EntryAbility]', `status changed, networkId: ${networkId}`);
      if (status === 'restored') {
        if (!this.distributedObject) {
          return;
        }
        // 收到迁移恢复的状态时,可以从分布式数据对象中读取数据
        AppStorage.setOrCreate('mainTitle', this.distributedObject['mainTitle']);
        AppStorage.setOrCreate('textContent', this.distributedObject['textContent']);
        AppStorage.setOrCreate('isShowLocalInfo', this.distributedObject['isShowLocalInfo']);
        AppStorage.setOrCreate('isAddLocalInfo', this.distributedObject['isAddLocalInfo']);
        AppStorage.setOrCreate('selectLocalInfo', this.distributedObject['selectLocalInfo']);
        AppStorage.setOrCreate('attachments', this.distributedObject['attachments']);
        let attachments = this.distributedObject['attachments'] as commonType.Assets;
        hilog.info(0x0000, '[EntryAbility]', `attachments: ${JSON.stringify(this.distributedObject['attachments'])}`);
        for (const attachment of attachments) {
          this.fileCopy(attachment);
        }
        AppStorage.setOrCreate<Array<ImageInfo>>('imageUriArray', this.imageUriArray);
      }
    });
  let sessionId: string = want.parameters?.distributedSessionId as string;
  // 激活分布式数据对象
  this.distributedObject.setSessionId(sessionId);
  this.context.restoreWindowStage(new LocalStorage());
}
接续过来的图片,需要从分布式文件目录路径下读取所需的文件,经处理后,转化成需要的数据类型。示例代码如下:
// entry/src/main/ets/entryability/EntryAbility.ets
/**
 * 恢复图片文件数据
 * @param attachmentRecord
 * @param key
 */
private fileCopy(attachment: commonType.Asset): void {
  let filePath: string = this.context.distributedFilesDir + '/' + attachment.name;
  let savePath: string = this.context.filesDir + '/' + attachment.name;
  try {
    if (fs.accessSync(filePath)) {
      let saveFile = fs.openSync(savePath, fs.OpenMode.READ_WRITE | fs.OpenMode.CREATE);
      let file = fs.openSync(filePath, fs.OpenMode.READ_WRITE);
      let buf: ArrayBuffer = new ArrayBuffer(Number(attachment.size) * 1024);
      let readSize = 0;
      let readLen = fs.readSync(file.fd, buf, {
        offset: readSize
      });
      let sourceOptions: image.SourceOptions = {
        sourceDensity: 120
      };
      let imageSourceApi: image.ImageSource = image.createImageSource(buf, sourceOptions);
      this.imageUriArray.push({
        imagePixelMap: imageSourceApi.createPixelMapSync(),
        imageName: attachment.name
      })
      while (readLen > 0) {
        readSize += readLen;
        fs.writeSync(saveFile.fd, buf);
        readLen = fs.readSync(file.fd, buf, {
          offset: readSize
        });
      }
      fs.closeSync(file);
      fs.closeSync(saveFile);
      hilog.info(0x0000, '[EntryAbility]', attachment.name + 'synchronized successfully.');
    }
  } catch (error) {
    let err: BusinessError = error as BusinessError;
    hilog.error(0x0000, '[EntryAbility]', `DocumentViewPicker failed with err: ${JSON.stringify(err)}`);
  }
}


 2992
2992

 被折叠的 条评论
为什么被折叠?
被折叠的 条评论
为什么被折叠?
 到【灌水乐园】发言


