


本文是关于如何安装tensorflow 1.8.0 GPU版本的教程。 将安装CUDA 9.2和cuDNN 7.1.4以及tensorflow 1.8.0的GPU版本。 本教程用于从源代码构建tensorflow。在撰写此博客文章时,tensorflow的最新稳定版本为1.8.0。与早期版本的Tensorflow相比,使用CUDA 9.2和cuDNN 7.1.4的Tensorflow 1.8的速度提高了37%。
GPU 采用Geforce 1080Ti,作为消费级显卡,基于TESLA Pascal GP102, 和GTX TITAN X同核心,因为市场原因做了性能的差异化。
但是,如果以专业加速卡作为性能基准,三方测试表明,TESLA P100(GP100核心)加速性能仅比Geforce 1080Ti高30%。
Note:
a. Python版本 3.6.5 b. gcc,g++ 版本为 4.8.6 【tensorflow官方推荐】
c.如果安装了anaconda,可以切换到anaconda相应环境下。
--
Step1:更新和升级系统
sudo apt-get update
sudo apt-get upgrade
Step2:检查GPU
lspci | grep -i nvidiaStep3: 检查Linux系统
uname -m && cat /etc/*releaseStep4:安装依赖
sudo apt-get install build-essential
sudo apt-get install cmake git unzip zip
sudo add-apt-repository ppa:deadsnakes/ppa
sudo apt-get update
sudo apt-get install python2.7-dev python3.5-dev python3.6-dev pylint
python2.7-dev python3.5-dev python3.6-dev pylint , 这些和python实际上没有关系了。Step5:安装Linux 新内核 (4.15 kernel有很多问题,所以升级到 4.16kernel)
uname -r

wget http://kernel.ubuntu.com/~kernel-ppa/mainline/v4.16/linux-headers-4.16.0-041600_4.16.0-041600.201804012230_all.deb
wget http://kernel.ubuntu.com/~kernel-ppa/mainline/v4.16/linux-headers-4.16.0-041600-generic_4.16.0-041600.201804012230_amd64.deb
wget http://kernel.ubuntu.com/~kernel-ppa/mainline/v4.16/linux-image-4.16.0-041600-generic_4.16.0-041600.201804012230_amd64.deb
安装并检查 应当是 4.16版
sudo dpkg -i *.deb

uname -sr
Step6:安装 NVIDIA CUDA 9.2
清理以前的安装
sudo apt-get purge nvidia*
sudo apt-get autoremove
sudo apt-get autoclean
sudo rm -rf /usr/local/cuda*
安装新版
sudo apt-key adv --fetch-keys http://developer.download.nvidia.com/compute/cuda/repos/ubuntu1710/x86_64/7fa2af80.pub
echo "deb https://developer.download.nvidia.com/compute/cuda/repos/ubuntu1710/x86_64 /" | sudo tee /etc/apt/sources.list.d/cuda.list
sudo apt-get update
sudo apt-get -o Dpkg::Options::="--force-overwrite" install cuda-9-2 cuda-drivers
注意版本号,否则会出问题。
Step7:Reboot ubuntu加载NVIDIA drivers.
Step8:增加路径
echo 'export PATH=/usr/local/cuda-9.2/bin${PATH:+:${PATH}}' >> ~/.bashrc
echo 'export LD_LIBRARY_PATH=/usr/local/cuda-9.2/lib64${LD_LIBRARY_PATH:+:${LD_LIBRARY_PATH}}' >> ~/.bashrc
-显示NVIDIA信息
source ~/.bashrc
sudo ldconfig
nvidia-smi
Driver Version: 396.26
Step8.1:修复显示问题
create Xorg,
sudo nvidia-xconfigcreate a file a file xorg.conf in path: (etc/X11/xorg.conf). To change resolution you need just reboot your system. And you can go to step 9.
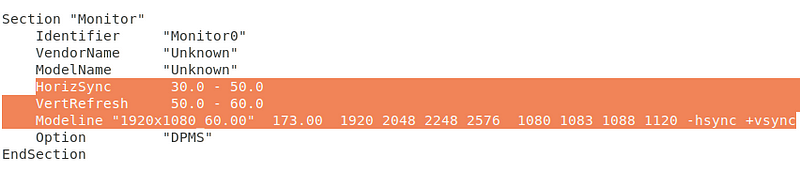
If this not helped change this file (xorg.conf). To do this use this command with parameters of your monitor.
cvt 1920x1200 60复制
Modeline “1920x60_60.00” 9.25 1920 1976 2160 2400 60 63 73 76 -hsync +vsyncsudo -i gedit /etc/X11/xorg.conf拷贝上面的一行,到xorg.conf ,得到下面结果
Reboot系统!
然后。
nvidia-settings显示Nvidia X Server

Step9:安装 cuDNN 7.1.4
VIDIA cuDNN is a GPU-accelerated library of primitives for deep neural networks.
Goto https://developer.nvidia.com/cudnn and download Login and agreement required
After login and accepting agreement. Download the following:
cuDNN v7.1.4 Library for Linux
Goto downloaded folder and in terminal perform following:
tar -xf cudnn-9.2-linux-x64-v7.1.tgz
sudo cp -R cuda/include/* /usr/local/cuda-9.2/include
sudo cp -R cuda/lib64/* /usr/local/cuda-9.2/lib64
Step10:Install NCCL 2.2.13
NVIDIA Collective Communications Library (NCCL) implements multi-GPU and multi-node collective communication primitives that are performance optimized for NVIDIA GPUs
Go to https://developer.nvidia.com/nccl and attend survey to download Nvidia NCCL.
Download following after completing survey.
Download NCCL v2.2.13, for CUDA 9.2 -> NCCL 2.2.13 O/S agnostic and CUDA 9.2
Goto downloaded folder and in terminal perform following:
tar -xf nccl_2.2.13-1+cuda9.2_x86_64.txz
cd nccl_2.2.13-1+cuda9.2_x86_64
sudo cp -R * /usr/local/cuda-9.2/targets/x86_64-linux/
sudo ldconfig
Step11:Install Dependencies
a. libcupti
sudo apt-get install libcupti-dev
echo 'export LD_LIBRARY_PATH=/usr/local/cuda/extras/CUPTI/lib64:$LD_LIBRARY_PATH' >> ~/.bashrc
b.Python related:
sudo apt-get install python3-numpy python3-dev python3-pip python3-wheelStep12:Configure Tensorflow from source:
a.Download bazel (要求 JDK 8 ,OpenJDK 也可以)
cd ~/
wget https://github.com/bazelbuild/bazel/releases/download/0.14.0/bazel-0.14.0-installer-linux-x86_64.sh
chmod +x bazel-0.14.0-installer-linux-x86_64.sh
./bazel-0.14.0-installer-linux-x86_64.sh --user
echo 'export PATH="$PATH:$HOME/bin"' >> ~/.bashrc
b.Reload environment variables
source ~/.bashrc
sudo ldconfigc.Start the process of building TensorFlow by downloading latest tensorflow 1.8.0 .
cd ~/
git clone https://github.com/tensorflow/tensorflow.git
cd tensorflow
git pull
git checkout r1.8
./configure
-
Please specify the location of python. [Default is /usr/bin/python]: /usr/bin/python3
Press enter two times
--
Do you wish to build TensorFlow with jemalloc as malloc support? [Y/n]: Y
Do you wish to build TensorFlow with Google Cloud Platform support? [Y/n]: Y
Do you wish to build TensorFlow with Hadoop File System support? [Y/n]: Y
Do you wish to build TensorFlow with Amazon S3 File System support? [Y/n]: Y
Do you wish to build TensorFlow with Apache Kafka Platform support? [Y/n]: Y
Do you wish to build TensorFlow with XLA JIT support? [y/N]: N
Do you wish to build TensorFlow with GDR support? [y/N]: N
Do you wish to build TensorFlow with VERBS support? [y/N]: N
Do you wish to build TensorFlow with OpenCL SYCL support? [y/N]: N
Do you wish to build TensorFlow with CUDA support? [y/N]: Y
Please specify the CUDA SDK version you want to use, e.g. 7.0. [Leave empty to default to CUDA 9.0]: 9.2
Please specify the location where CUDA 9.2 toolkit is installed. Refer to README.md for more details. [Default is /usr/local/cuda]: /usr/local/cuda-9.2
Please specify the cuDNN version you want to use. [Leave empty to default to cuDNN 7.0]: 7.1.4
Please specify the location where cuDNN 7 library is installed. Refer to README.md for more details. [Default is /usr/local/cuda-9.2]: /usr/local/cuda-9.2
Do you wish to build TensorFlow with TensorRT support? [y/N]: N
Please specify the NCCL version you want to use. [Leave empty to default to NCCL 1.3]: 2.2
Please specify the location where NCCL 2 library is installed. Refer to README.md for more details. [Default is /usr/local/cuda-9.2]: /usr/local/cuda-9.2/targets/x86_64-linux
--
Now you need compute capability which we have noted at step 1 eg. 5.0
Please note that each additional compute capability significantly increases your build time and binary size. [Default is: 5.0] 5.0

Do you want to use clang as CUDA compiler? [y/N]: N
Please specify which gcc should be used by nvcc as the host compiler. [Default is /usr/bin/gcc]: /usr/bin/gcc
Do you wish to build TensorFlow with MPI support? [y/N]: N
Please specify optimization flags to use during compilation when bazel option "--config=opt" is specified [Default is -march=native]: -march=native
Would you like to interactively configure ./WORKSPACE for Android builds? [y/N]:N
--
Configuration finished!
Step13:Build Tensorflow using bazel
a.To build a pip package for TensorFlow you would typically invoke the following command:
bazel build --config=opt //tensorflow/tools/pip_package:build_pip_packageNote: 并行编译器通常需要很长时间, 总计11000多个文件,12线程 至强 CPU 编译需要57分钟。
下面是编译结果拍的照片。
add "--config=mkl" if you want Intel MKL support for newer intel cpu for faster training on cpu
add "--config=monolithic" if you want static monolithic build (try this if build failed)
add "--local_resources 2048,.5,1.0" if your PC has low ram causing Segmentation fault or other related errors
b.编译pip 安装的whl文件
bazel build命令构建一个名为build_pip_package的脚本。 如下运行此脚本将在tensorflow_pkg目录中构建一个.whl文件:
bazel-bin/tensorflow/tools/pip_package/build_pip_package tensorflow_pkg安装To install tensorflow with pip:
cd tensorflow_pkg
pip install tensorflow*.whl
Step14:检验Tensorflow installation
import tensorflow as tf
hello = tf.constant('Hello, TensorFlow!')
sess = tf.Session()
print(sess.run(hello))
Hello, TensorFlow!---


 7393
7393


 被折叠的 条评论
为什么被折叠?
被折叠的 条评论
为什么被折叠?
 到【灌水乐园】发言


