


CUDA 11.6 + CUDNN + Anaconda + pytorch 参考网址:https://zhuanlan.zhihu.com/p/460806048
阿里巴巴开源镜像站-OPSX镜像站-阿里云开发者社区 (aliyun.com)
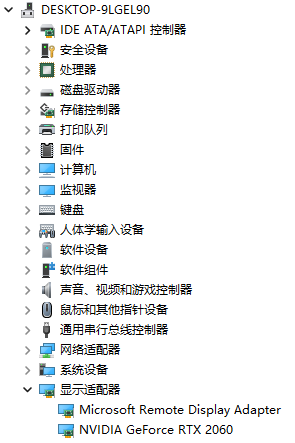
电脑信息 RTX 2060 GPU0
1. CUDA 11.6
1.1 确认信息
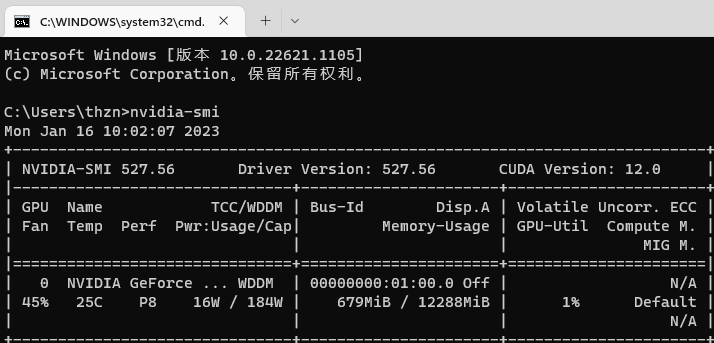
C:\Users\thzn>nvidia-smi (CUDA Version指的是支持的最高版本)
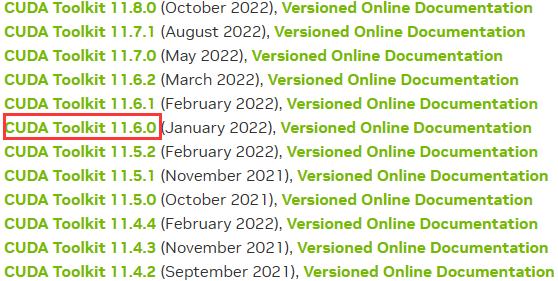
显卡驱动和cuda版本的对应关系 https://docs.nvidia.com/cuda/cuda-toolkit-release-notes/index.html

1.2 电脑配置满足后,更新驱动 https://developer.nvidia.com/cuda-toolkit-archive
1.3 驱动安装完成后,版本查看:
C:\Users\thzn>nvcc --version
nvcc: NVIDIA (R) Cuda compiler driver
Copyright (c) 2005-2021 NVIDIA Corporation
Built on Fri_Dec_17_18:28:54_Pacific_Standard_Time_2021
Cuda compilation tools, release 11.6, V11.6.55
Build cuda_11.6.r11.6/compiler.30794723_0
会自动添加环境变量
CUDA PATH C:\Program Files\NVIDIA GPU Computing Toolkit\CUDA\v11.6
CUDA PATH V10 0 C:\Program Files\NVIDIA GPU Computing Toolkit\CUDA\v11.6
1.4 CUDNN下载并配置 https://developer.nvidia.com/zh-cn/cudnn


打开cudnn后里面有bin,include,lib三个文件夹;而打开上面安装好的CUDA目录,里面也存在bin,include,lib三个文件夹,只要将cudnn中bin,include内的文件全选复制到CUDA中的bin,include内即可
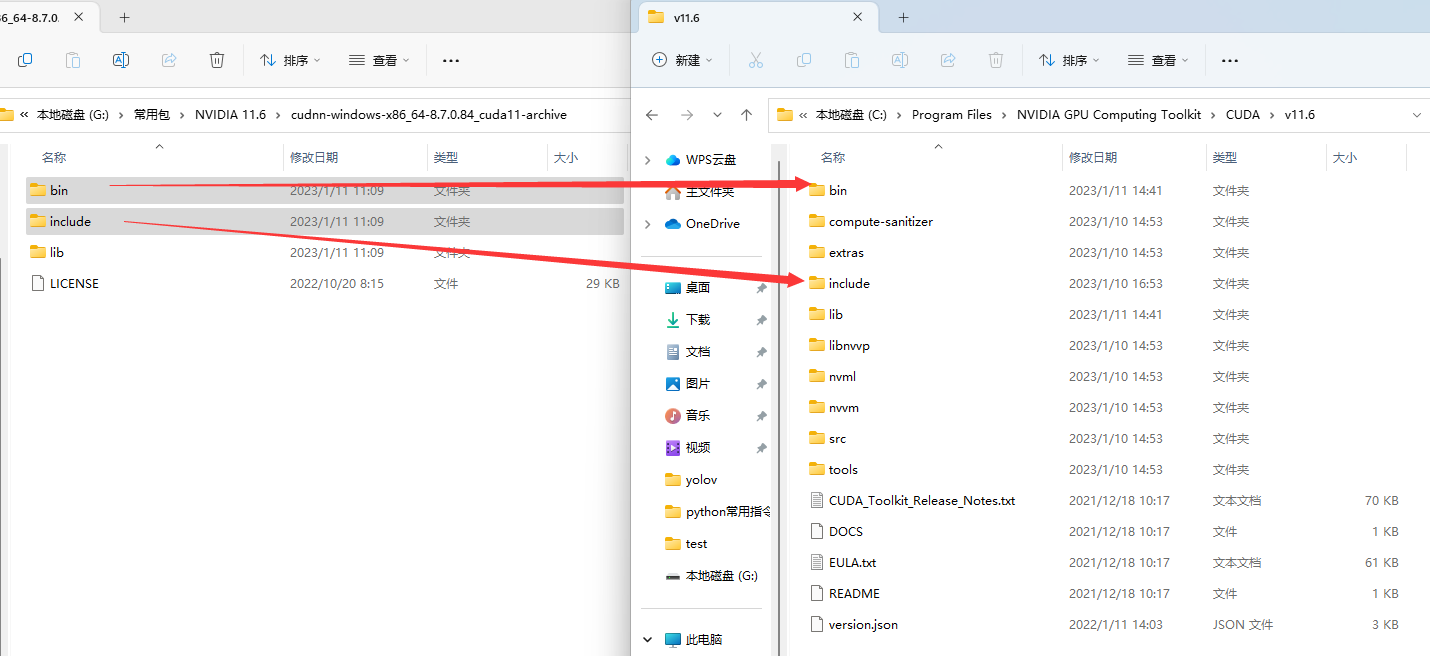
对于cdnn里的lib文件夹,里面还存在一个x64文件夹,而CUDA中lib文件中存在Win32和x64文件,于是这时把cudnn中lib里打开x64文件夹,拷贝x64文件夹里所有内容到CUDA里lib中x64文件夹中去

验证cuda是否安装成功,首先win+R启动cmd,进入到CUDA安装目录下的 ...\extras\demo_suite,然后分别运行bandwidthTest.exe和deviceQuery.exe,返回Result=PASS表示cuda安装成功
C:\Program Files\NVIDIA GPU Computing Toolkit\CUDA\v11.6\extras\demo_suite>bandwidthTest
[CUDA Bandwidth Test] - Starting...
Running on...
Device 0: NVIDIA GeForce RTX 2060
Quick Mode
Host to Device Bandwidth, 1 Device(s)
PINNED Memory Transfers
Transfer Size (Bytes) Bandwidth(MB/s)
33554432 11865.8
Device to Host Bandwidth, 1 Device(s)
PINNED Memory Transfers
Transfer Size (Bytes) Bandwidth(MB/s)
33554432 12609.9
Device to Device Bandwidth, 1 Device(s)
PINNED Memory Transfers
Transfer Size (Bytes) Bandwidth(MB/s)
33554432 260632.7
Result = PASS
NOTE: The CUDA Samples are not meant for performance measurements. Results may vary when GPU Boost is enabled.
C:\Program Files\NVIDIA GPU Computing Toolkit\CUDA\v11.6\extras\demo_suite>deviceQuery.exe
deviceQuery.exe Starting...
CUDA Device Query (Runtime API) version (CUDART static linking)
Detected 1 CUDA Capable device(s)
Device 0: "NVIDIA GeForce RTX 2060"
CUDA Driver Version / Runtime Version 12.0 / 11.6
CUDA Capability Major/Minor version number: 7.5
Total amount of global memory: 12288 MBytes (12884574208 bytes)
(34) Multiprocessors, ( 64) CUDA Cores/MP: 2176 CUDA Cores
GPU Max Clock rate: 1680 MHz (1.68 GHz)
Memory Clock rate: 7001 Mhz
Memory Bus Width: 192-bit
L2 Cache Size: 3145728 bytes
Maximum Texture Dimension Size (x,y,z) 1D=(131072), 2D=(131072, 65536), 3D=(16384, 16384, 16384)
Maximum Layered 1D Texture Size, (num) layers 1D=(32768), 2048 layers
Maximum Layered 2D Texture Size, (num) layers 2D=(32768, 32768), 2048 layers
Total amount of constant memory: zu bytes
Total amount of shared memory per block: zu bytes
Total number of registers available per block: 65536
Warp size: 32
Maximum number of threads per multiprocessor: 1024
Maximum number of threads per block: 1024
Max dimension size of a thread block (x,y,z): (1024, 1024, 64)
Max dimension size of a grid size (x,y,z): (2147483647, 65535, 65535)
Maximum memory pitch: zu bytes
Texture alignment: zu bytes
Concurrent copy and kernel execution: Yes with 2 copy engine(s)
Run time limit on kernels: Yes
Integrated GPU sharing Host Memory: No
Support host page-locked memory mapping: Yes
Alignment requirement for Surfaces: Yes
Device has ECC support: Disabled
CUDA Device Driver Mode (TCC or WDDM): WDDM (Windows Display Driver Model)
Device supports Unified Addressing (UVA): Yes
Device supports Compute Preemption: Yes
Supports Cooperative Kernel Launch: Yes
Supports MultiDevice Co-op Kernel Launch: No
Device PCI Domain ID / Bus ID / location ID: 0 / 1 / 0
Compute Mode:
< Default (multiple host threads can use ::cudaSetDevice() with device simultaneously) >
deviceQuery, CUDA Driver = CUDART, CUDA Driver Version = 12.0, CUDA Runtime Version = 11.6, NumDevs = 1, Device0 = NVIDIA GeForce RTX 2060
Result = PASS
2. 安装Anaconda https://www.anaconda.com/download
3. 配置源
pip 配置清华源
常见的国内源有以下几种:
清华:https://pypi.tuna.tsinghua.edu.cn/simple/
阿里云:http://mirrors.aliyun.com/pypi/simple/
豆瓣:http://pypi.douban.com/simple/
中国科学技术大学 :https://pypi.mirrors.ustc.edu.cn/simple/
C:\Users\thzn>pip config list # 查看
global.index-url='https://pypi.tuna.tsinghua.edu.cn/simple'
C:\Users\thzn>pip config set global.index-url https://pypi.tuna.tsinghua.edu.cn/simple/ # 配置
Writing to C:\Users\thzn\AppData\Roaming\pip\pip.ini
C:\Users\thzn>pip config list
global.index-url='http://mirrors.aliyun.com/pypi/simple/'
C:\Users\thzn>python -m pip install --upgrade pip # 升级
conda 配置清华源
conda config --add channels https://mirrors.tuna.tsinghua.edu.cn/anaconda/pkgs/free/
conda config --add channels https://mirrors.tuna.tsinghua.edu.cn/anaconda/pkgs/main/
conda config --add channels https://mirrors.tuna.tsinghua.edu.cn/anaconda/cloud//pytorch/
conda config --add channels https://mirrors.tuna.tsinghua.edu.cn/anaconda/cloud/conda-forge/
conda config --set show_channel_urls yes
4. 安装pytorch https://pytorch.org/get-started/locally
conda create -n mmlabGPU python=3.7 -y
conda activate mmlabGPU
GPU:pip install torch torchvision torchaudio --extra-index-url https://download.pytorch.org/whl/cu116
CPU:pip3 install torch torchvision torchaudio
测试
python
>> import torch
>> torch.cuda.is_available() #检查cuda是否可以使用 True
>> torch.cuda.current_device() #查看当前gpu索引号
>> torch.cuda.current_stream(device=0)#查看当前cuda流
>> torch.cuda.device(1) #选择device
>> torch.cuda.device_count() #查看有多少个GPU设备
>> torch.cuda.get_device_capability(device=0) #查看gpu的容量


 283
283


 被折叠的 条评论
为什么被折叠?
被折叠的 条评论
为什么被折叠?
 到【灌水乐园】发言


