


caffe 添加python数据层
本文主要是详细介绍如何在caffe中添加自定义python数据层(imagedata类型)。我之所以要实现这个python数据层是因为最近准备使用caffe+LSTM结构做行为识别,需要给视频每帧添加一个clips数据层,这意味着整个网络的输入有三个(data,label,clips),而caffe中是没有的,所以就尝试使用python实现自定义数据层,废话不多说,下面就开始详细介绍如何实现python数据层(imagedata类型)。
1.修改prototxt文件,格式如下图所示
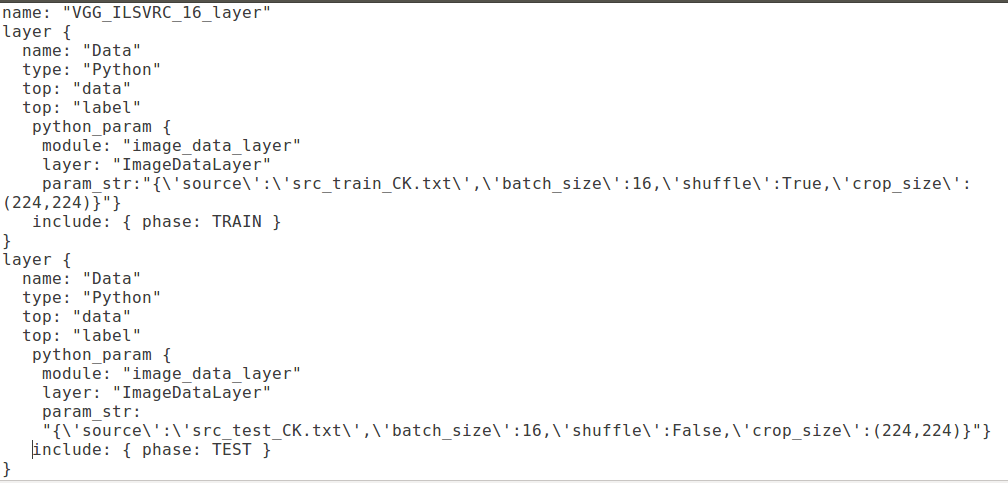
从上图可以看出,python_param中有三个部分:module,layer,param_str。其中module就是我们需要实现python层的文件名,如下图示:
注意,这个文件一定要和上面的prototxt文件放在同一个路径下。下面就具体看一下image_data_layer.py文件具体都需要实现哪些内容。
2.实现image_data_layer.py
在caffe中添加自定义层时,必须要实现这四个函数,在C++中是(LayerSetUp,Reshape,Forward_cpu,Backward_cpu),在python 中是(setup,reshape,forward_cpu,backword_cpu)。下面是.py文件的具体内容:
import sys
sys.path.append('../python')
import caffe
import numpy as np
import skimage.io
from PIL import Image
import scipy
import random
class ImageDataLayer(caffe.Layer):
    """
    This is a simple python datalayer for reading image data
    """

    def setup(self, bottom, top):
        self.top_names = ['data', 'label']

        # === Read input parameters ===

        # params is a python dictionary with layer parameters.
        params = eval(self.param_str)

        # Check the parameters for validity.
        check_params(params)

        # store input as class variables
        self.batch_size = params['batch_size']

        # Create a batch loader to load the images.
        self.batch_loader = BatchLoader(params, None)

        # === reshape tops ===
        # since we use a fixed input image size, we can shape the data layer
        # once. Else, we'd have to do it in the reshape call.
        top[0].reshape(self.batch_size, 3, params['crop_size'][0], params['crop_size'][1])

        top[1].reshape(self.batch_size, 1) #each image label is a intger

        print_info("ImageDataLayer", params)

    def forward(self, bottom, top):
        """
        Load data.
        """
        for itt in range(self.batch_size):
            # Use the batch loader to load the next image.
            im, label = self.batch_loader.load_next_image()

            # Add directly to the caffe data layer
            top[0].data[itt, ...] = im
            top[1].data[itt, ...] = label

    def reshape(self, bottom, top):
        """
        There is no need to reshape the data, since the input is of fixed size
        (rows and columns)
        """
        pass

    def backward(self, top, propagate_down, bottom):
        """
        These layers does not back propagate
        """
        pass


class BatchLoader(object):
    """
    This class abstracts away the loading of images.
    Images can either be loaded singly, or in a batch. The latter is used for
    the asyncronous data layer to preload batches while other processing is
    performed.
    """

    def __init__(self, params, result):
        self.result = result
        self.source = params['source']
        self.batch_size = params['batch_size']

        self.crop_size = params['crop_size']
        self.isshuffle = params['shuffle']

        # get list of image indexes.
        self.imagelist = open(self.source, 'r').read().splitlines()

        self._cur = 0  # current image
        # this class does some simple data-manipulations
        #self.transformer = SimpleTransformer()

        print "BatchLoader initialized with {} images".format(
            len(self.imagelist))

    def load_next_image(self):
        """
        Load the next image in a batch.
        """
        # Did we finish an epoch?
        if self._cur == len(self.imagelist):
            self._cur = 0

            if int(self.isshuffle):
                self._cur=random.randint(0,len(self.imagelist)-1)

        # Load an image
        image_sample = self.imagelist[self._cur]  # Get an image   eg: xxx.jpg 0

        im = np.asarray(Image.open(image_sample.split(' ')[0]))
        im = scipy.misc.imresize(im, self.crop_size)  # resize
        im=im/255


        # do a simple horizontal flip as data augmentation
        flip = np.random.choice(2) * 2 - 1
        im = im[:, ::flip, :]

        im = im[:, :, ::-1]  # change to BGR
        im = im.transpose((2, 0, 1))

        # Load and prepare ground truth
        #label = np.zeros(7).astype(np.float32)
        gt_classes=image_sample.split(' ')[1]

        #label[gt_classes] = 1  # eg: [0,1,0,0,0,0,0]
        self._cur += 1
        return im, int(gt_classes)


def check_params(params):
    """
    A utility function to check the parameters for the data layers.
    """
    required = ['batch_size', 'source', 'crop_size']
    for r in required:
        assert r in params.keys(), 'Params must include {}'.format(r)


def print_info(name, params):
    """
    Output some info regarding the class
    """
    print "{} initialized for with batch_size: {}, crop_size: {}.".format(
        name,params['batch_size'],params['crop_size'])
3.运行
以下是我的.sh脚本文件的具体内容:

上面的export PYTHONPATH=.
必须添加,不然会出现如下错误:ImportError:No module named image_data_layer错误

添加完数据层运行时出现下面问题时,想要运行自己的数据集,因此使用了Python写了数据的输入层,但是当运行的时候确报错
This program requires version 3.3.0 of the Protocol Buffer runtime library
通过问题的前几行发现问题主要出在Protocol Buffer上,说是版本太低,升级库的版本可以解决。千万不要升级,只会在这上面浪费时间。
问题原因
主要是因为caffe编译的时候默认的protobuf的版本是2.6.1,而Python通过pip install protobuf 安装的版本是最新版本3.4.0!
而在caffe环境中我们必须统一ProtoBuffer的版本才可以避免各种不易排查的错误!!
为此,我们先卸载Python的版本ProtoBuffer,再重新安装2.6.1的版本就完美的解决了这个问题。
操作:
pip uninstall protobuf
然后再重新安装:
pip install protobuf==2.6.1
解决。


 5万+
5万+


 被折叠的 条评论
为什么被折叠?
被折叠的 条评论
为什么被折叠?
 到【灌水乐园】发言


