Angry Bots是Unity安装程序自带的开源示例项目。该示例项目虽然已经发布很久了,但是其很多设计和实现仍然具有参考价值。运行该项目仔细观察,可以发现其雨天地面效果是实时反射的。这里我们先阐明实时反射的原理,然后分析其绘制流程。
构造反射相机
视图矩阵
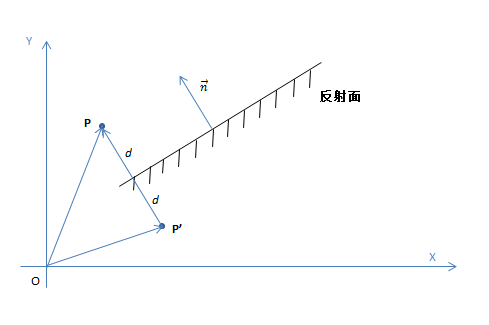
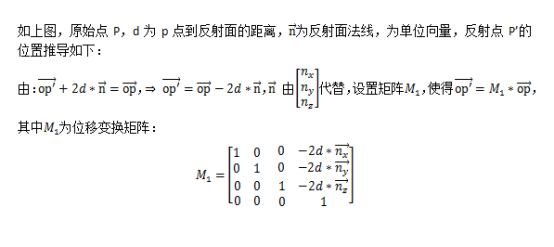
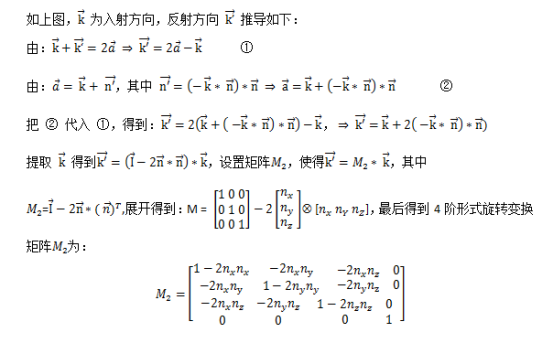
反射相机的视图矩阵由反射矩阵变换得到,反射矩阵由反射平面确定,下面列出反射矩阵推导过程。
反射位置
反射方向
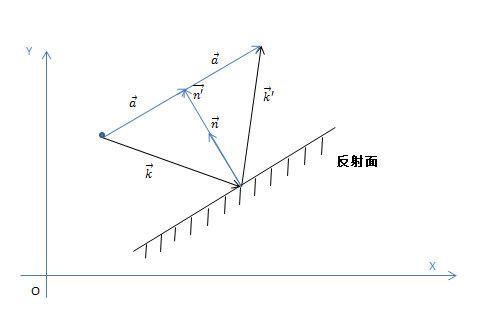
M1*M2即得到示例代码所示的反射矩阵。
static Matrix4x4 CalculateReflectionMatrix(Matrix4x4 reflectionMat, Vector4 plane)
{
    reflectionMat.m00 = (1.0F - 2.0F * plane[0] * plane[0]);
    reflectionMat.m01 = (-2.0F * plane[0] * plane[1]);
    reflectionMat.m02 = (-2.0F * plane[0] * plane[2]);
    reflectionMat.m03 = (-2.0F * plane[3] * plane[0]);
    reflectionMat.m10 = (-2.0F * plane[1] * plane[0]);
    reflectionMat.m11 = (1.0F - 2.0F * plane[1] * plane[1]);
    reflectionMat.m12 = (-2.0F * plane[1] * plane[2]);
    reflectionMat.m13 = (-2.0F * plane[3] * plane[1]);
    reflectionMat.m20 = (-2.0F * plane[2] * plane[0]);
    reflectionMat.m21 = (-2.0F * plane[2] * plane[1]);
    reflectionMat.m22 = (1.0F - 2.0F * plane[2] * plane[2]);
    reflectionMat.m23 = (-2.0F * plane[3] * plane[2]);
    reflectionMat.m30 = 0.0F;
    reflectionMat.m31 = 0.0F;
    reflectionMat.m32 = 0.0F;
    reflectionMat.m33 = 1.0F;

   return reflectionMat;
}
其中代码中4维数组plane存的是点法线式平面方程的参数。
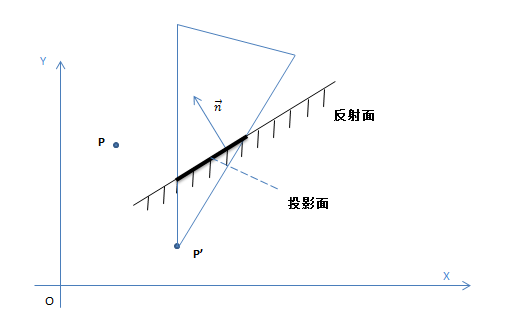
投影矩阵
反射相机的投影矩阵并非常规的投影矩阵,反射面上的斜投影面才是反射相机真正的投影面,所以需要用斜投影面代替掉常规的投影面。示例代码中给出了斜投影矩阵,原理和推导过程参看本文末尾给出的参考文献链接。这里给出示意图:
绘制
流程
1.创建反射摄像机reflectionCamera,reflectionCamera默认disable,用一张RenderTexutre来保存reflectionCamera绘制的结果,用来在之后的shader里采样。
reflectCamera.enabled = false;
reflectCamera.targetTexture = CreateTextureFor(cam);

private RenderTexture CreateTextureFor(Camera cam)
{
    …
    RenderTexture rt = new RenderTexture(Mathf.FloorToInt(cam.pixelWidth * rtSizeMul), Mathf.FloorToInt(cam.pixelHeight * rtSizeMul), 24, rtFormat);
    rt.hideFlags = HideFlags.DontSave;
    return rt;
}
2.在LateUpdate中根据当前摄像机去构造反射摄像机变换矩阵,涉及到反射面reflectiveSurface的选取,示例中是选取合适的路面做反射面,然后手动调用绘制,绘制前设置前面剔除,绘制完置回。
private void RenderReflectionFor (Camera cam, Camera reflectCamera)
{
     …
     //构造反射平面
     Vector3 pos = reflectiveSurface.transform.position;
     pos.y = reflectiveSurface.position.y;
     Vector3 normal = reflectiveSurface.transform.up;
     float d = -Vector3.Dot(normal, pos) - clipPlaneOffset;
     Vector4 reflectionPlane = new Vector4(normal.x, normal.y, normal.z, d);

     //构造反射视图矩阵
     Matrix4x4 reflection = Matrix4x4.zero;
     reflection = CalculateReflectionMatrix(reflection, reflectionPlane);

     //得到反射摄像机位置
     oldpos = cam.transform.position;
     Vector3 newpos = reflection.MultiplyPoint (oldpos);

     //得到反射摄像机视图矩阵
     reflectCamera.worldToCameraMatrix = cam.worldToCameraMatrix * reflection;

     //得到反射摄像机投影矩阵
     Vector4 clipPlane = CameraSpacePlane(reflectCamera, pos, normal, 1.0f);
     Matrix4x4 projection =  cam.projectionMatrix;
     projection = CalculateObliqueMatrix(projection, clipPlane);
     reflectCamera.projectionMatrix = projection;
     …

     GL.SetRevertBackfacing(true);
     reflectCamera.RenderWithShader (replacementShader, "Reflection");
     GL.SetRevertBackfacing(false);
}
Shader
反射面的材质接受反射相机绘制好的RenderTexture做为贴图对其采样。示例中的反射面——地面shader增加了uv扰动参数和噪声贴图用来达到扭曲效果,还叠加了一个水花效果,这样的话使得雨天地面反射更加真实,而不是干净得像一面镜子。
v2f_full vert (appdata_full v)
{
    …
    // uv坐标扰动,随时间变化
    o.normalScrollUv.xyzw = v.texcoord.xyxy * _TexAtlasTiling + _Time.xxxx * _DirectionUv;

    //经验算法?!生成UV取水花贴图
    half3 worldSpace = mul(_Object2World, v.vertex).xyz;
    worldSpace = (-_WorldSpaceCameraPos * 0.6 + worldSpace) * 0.07;
    o.fakeRefl =  worldSpace.xz;

    return o;
}


fixed4 frag (v2f_full i) : COLOR0
{
    fixed4 nrml = tex2D(_Normal, i.normalScrollUv.xy);
    nrml = (nrml - 0.5) * 0.1;

    //UV扰动,在RenderTexture采样
    fixed4 rtRefl = tex2D (_ReflectionTex, (i.screen.xy / i.screen.w) + nrml.xy);

    //叠加上在水花贴图
    rtRefl += tex2D (_FakeReflect, i.fakeRefl + nrml.xy);

    //原贴图颜色
    fixed4 tex = tex2D (_MainTex, i.uv);

    //SrcAlpha One混合模式叠加
    tex  = tex + tex.a * rtRefl;
    return tex;
}
效果
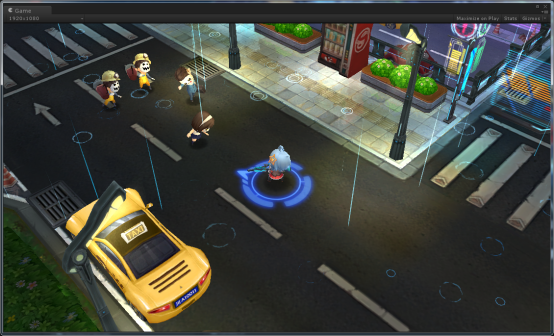
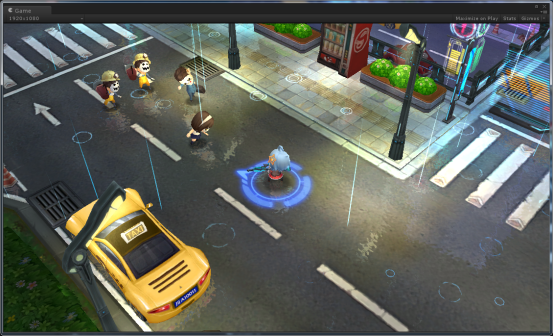
附School项目按示例方式添加雨水地面实时反射效果前后对比图:
参考链接:
http://fp.optics.arizona.edu/optomech/Fall13/Notes/6%20Mirror%20matrices.pdf
http://www.terathon.com/lengyel/Lengyel-Oblique.pdf




 224
224

 被折叠的 条评论
为什么被折叠?


