


在上一篇已经在vscode的终端成功创建了.net core项目,并安装NodeNetwork包,且应用到项目上
这次我们继续
将MainWindow.xaml改成如下
<Window x:Class="MyUml.MainWindow"
        xmlns="http://schemas.microsoft.com/winfx/2006/xaml/presentation"
        xmlns:x="http://schemas.microsoft.com/winfx/2006/xaml"
        xmlns:d="http://schemas.microsoft.com/expression/blend/2008"
        xmlns:mc="http://schemas.openxmlformats.org/markup-compatibility/2006"
        xmlns:nodenetwork="clr-namespace:NodeNetwork.Views;assembly=NodeNetwork"
        xmlns:local="clr-namespace:MyUml"
        mc:Ignorable="d"
        Title="testUml数据库设计v1.0" Height="450" Width="800">
    <Grid>
        <DockPanel>

            <!--DockPanel停靠顶部-->
            <Menu DockPanel.Dock="Top">
                <MenuItem Header="_文件">
                    <MenuItem Header="_新建" />
                    <MenuItem Header="_打开" />
                    <MenuItem Header="_保存" />
                    <Separator />
                    <MenuItem Header="_退出" />
                </MenuItem>
                <MenuItem Header="_工具">
                    <MenuItem Header="_设置" Click="menuSet" />
                </MenuItem>
            </Menu>

            <!--DockPanel停靠底部-->
            <StatusBar DockPanel.Dock="Bottom">
                <StatusBarItem>
                    <TextBlock Text="加载中…" />
                </StatusBarItem>
                <Separator />
                <StatusBarItem>
                    <ProgressBar Value="50" Width="100" />
                </StatusBarItem>
            </StatusBar>

            <!--DockPanel停靠中部-->
            <Grid>
                <!--可移动的布局GridSplitter,中部分成5列-->
                <Grid.ColumnDefinitions>
                    <ColumnDefinition Width="120" />
                    <ColumnDefinition Width="5" />
                    <ColumnDefinition Width="*" />
                    <ColumnDefinition Width="5" />
                    <ColumnDefinition Width="120" />
                </Grid.ColumnDefinitions>
                <TreeView x:Name="treeView" >
                    <TreeView.ContextMenu>
                        <ContextMenu>
                            <MenuItem x:Name="ContextMenu1" Header="添加"  Click="cMenu_add"/>
                            <MenuItem x:Name="ContextMenu2" Header="修改"  Click="cMenu_update"/>
                            <MenuItem x:Name="ContextMenu3" Header="删除"  Click="cMenu_del"/>
                        </ContextMenu>
                    </TreeView.ContextMenu>
                </TreeView>
                <GridSplitter Grid.Column="1" Width="5" HorizontalAlignment="Stretch" />
                <nodenetwork:NetworkView x:Name="networkView" Grid.Column="2" />
                <!-- <Views:NetworkView x:Name="networkView" Grid.Column="2"/> -->
                <GridSplitter Grid.Column="3" Width="5" HorizontalAlignment="Stretch" />
                <Canvas Grid.Column="4" />
            </Grid>

        </DockPanel>
    </Grid>
</Window>
MainWindow.xaml.cs文件改成如下
using System;
using System.Collections.Generic;
using System.Linq;
using System.Text;
using System.Threading.Tasks;
using System.Windows;
using System.Windows.Controls;
using System.Windows.Data;
using System.Windows.Documents;
using System.Windows.Input;
using System.Windows.Media;
using System.Windows.Media.Imaging;
using System.Windows.Navigation;
using System.Windows.Shapes;
using DynamicData;
using NodeNetwork.ViewModels;
using NodeNetwork.Views;

namespace MyUml
{
    /// <summary>
    /// Interaction logic for MainWindow.xaml
    /// </summary>
    public partial class MainWindow : Window
    {

        // 创建NetworkView视图的ViewModel实例
        private readonly NetworkViewModel _network;

        public MainWindow()
        {
            InitializeComponent();

            _network = new NetworkViewModel();
            networkView.ViewModel = _network;
        }


        private void menuSet(object sender, RoutedEventArgs e)
        {
            // Set aSet = new Set();
            // aSet.ShowDialog();
        }

        private void cMenu_add(object sender, RoutedEventArgs e)
        {
            nodeAdd aNodeAdd = new nodeAdd();
            if (aNodeAdd.ShowDialog() == true)
            {
                this.treeView.Items.Add(aNodeAdd.nameStr);

                // 创建第一个节点ViewModel,设置它的名称并将此节点加入到network
                var node1 = new NodeViewModel();
                node1.Name = aNodeAdd.nameStr;
                node1.Position = new Point(100, 100);
                _network.Nodes.Add(node1);

                // 创建第一个节点的输入端口ViewModel,设置它的名称并加入第一个节点
                var node1Input = new NodeInputViewModel();
                node1Input.Name = "节点1输入";
                node1.Inputs.Add(node1Input);

                var node2Output = new NodeOutputViewModel();
                node2Output.Name = "节点2输出";
                node1.Outputs.Add(node2Output);

                //MessageBox.Show("提示","提示",MessageBoxButton.YesNo)
            }
        }

        private void cMenu_update(object sender, RoutedEventArgs e)
        {

            _network.Nodes.Clear();

            int maxX = 10;
            int maxY = 10;
            for (int x = 0; x < maxX; x++)
            {
                for (int y = 0; y < maxY; y++)
                {
                    NodeViewModel node = new NodeViewModel();
                    node.Position = new Point(x * 200, y * 200);
                    _network.Nodes.Add(node);
                    //Debug.WriteLine($"Added node {(x*maxY)+y}");
                }
            }
        }

        private void cMenu_del(object sender, RoutedEventArgs e)
        {
            // Set aSet = new Set();
            // aSet.ShowDialog();
        }

    }
}
之后发现界面多了顶部菜单栏,底部状态栏,中间分三列可移动,如下图:
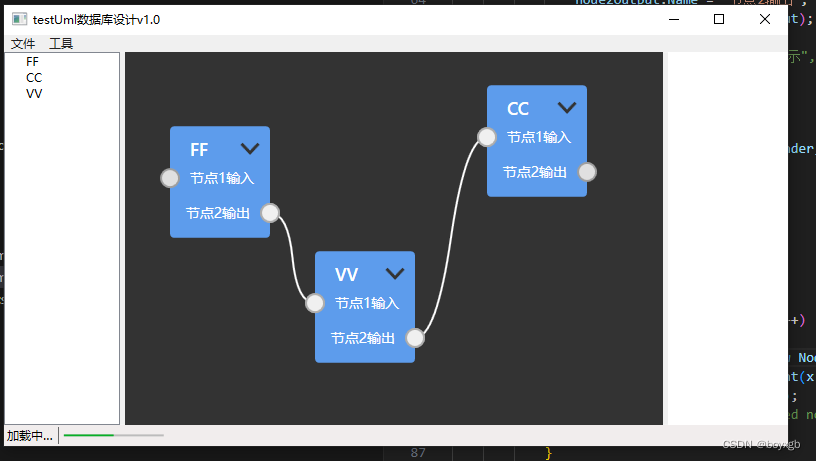
在左边树形结构我们可以鼠标右键来动态添加节点,并在右边试图中同步创建可以移动对象
nodeAdd.xaml代码如下
<Window x:Class="MyUml.nodeAdd"
        xmlns="http://schemas.microsoft.com/winfx/2006/xaml/presentation"
        xmlns:x="http://schemas.microsoft.com/winfx/2006/xaml"
        xmlns:d="http://schemas.microsoft.com/expression/blend/2008"
        xmlns:mc="http://schemas.openxmlformats.org/markup-compatibility/2006"
        xmlns:local="clr-namespace:MyUml"
        mc:Ignorable="d"
        Title="添加节点" Height="163.024" Width="284.034">
    <Grid>
        <Button x:Name="button" Content="添加" HorizontalAlignment="Left" Margin="182,95,0,0" VerticalAlignment="Top" Width="75" RenderTransformOrigin="0.58,2.451"  Click="btn_Ok"/>
        <TextBox x:Name="textBox" HorizontalAlignment="Left" Height="23" Margin="93,54,0,0" TextWrapping="Wrap" VerticalAlignment="Top" Width="120"/>
        <Label x:Name="label" Content="名称:" HorizontalAlignment="Left" Margin="42,52,0,0" VerticalAlignment="Top"/>
    </Grid>
</Window>
nodeAdd.xaml.cs代码如下:
using System;
using System.Collections.Generic;
using System.Linq;
using System.Text;
using System.Threading.Tasks;
using System.Windows;
using System.Windows.Controls;
using System.Windows.Data;
using System.Windows.Documents;
using System.Windows.Input;
using System.Windows.Media;
using System.Windows.Media.Imaging;
using System.Windows.Shapes;

namespace MyUml
{
    /// <summary>
    /// nodeAdd.xaml 的交互逻辑
    /// </summary>
    public partial class nodeAdd : Window
    {
        public nodeAdd()
        {
            InitializeComponent();
        }

        public string nameStr { get; set; }

        private void btn_Ok(object sender, RoutedEventArgs e)
        {
            this.nameStr = this.textBox.Text;
            this.DialogResult = true;
        }
    }
}


 524
524


 被折叠的 条评论
为什么被折叠?
被折叠的 条评论
为什么被折叠?
 到【灌水乐园】发言


