


一:项目介绍
本次实验主要涉及到的技术是 Vue3 + Ts,当然其中也有部分是 Vue2 格式的代码以及 json 和 CSS 布局等。本来是想仿照 文心一言 来开发的一个聊天机器人案例。结果由于时间不足,可能只是做出来了一个半成品。不过核心功能是有的。由于大 json 内数据写的比较少,因此可测数据在下文中有。有需要的小伙伴可以自行添加,格式在文中也有。
PS.代码在文章底部,需要的小伙伴请底部自取。
二:各部分代码
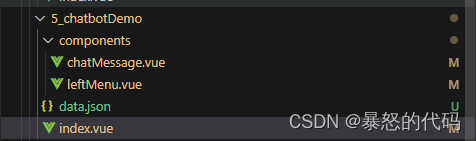
1、项目目录
以下是项目的目录,index.vue 是我们所看到的主页面,components 下的两个文件一个是消息回复的组件,一个是左侧导航的组件。至于data.json 则是一个大 json 数据,回复的内容是从这里面拿的,判断问题产生回复。
2、index.vue代码
这个页面呢,主要就是将各个组件进行逻辑串联。里面有定义清屏方法和加载提示等。该页面更多的是布局。这里小白的话可以看一下按回车发送消息的判断逻辑。
<template>
    <div class="screen">
        <div class="left">
            <leftMenu />
        </div>
        <div class="right">
            <div class="up">
                <chatMessage :sendMessage="sendMessage" :data='data' />
            </div>
            <div class="input">
                <el-input class="inputStyle" v-model="message" placeholder="Please input your problem" clearable />
                <el-button @click="send" @keyup.enter="keyDown($event)">send</el-button>
            </div>
        </div>
    </div>
    <el-button type="primary" @click="openFullScreen2"> 重新加载 </el-button>
</template>

<script lang="ts" setup>
import { ref, onMounted } from 'vue'
import { ElLoading } from 'element-plus'
import leftMenu from '@/views/5_chatbotDemo/components/leftMenu.vue'
import chatMessage from '@/views/5_chatbotDemo/components/chatMessage.vue'

/** 发送消息模块 */
let message = ref('')
let sendMessage = ref('')
let data = ref() // 定义一个时间戳,方便检查是否更新发送了数据
/** 发送消息的方法 */
function send() {
    sendMessage.value = message.value
    data.value = Date.now()
    message.value = ''
    // console.log(data.value);
}

/** 刷新加载 */
onMounted(() => {
    openFullScreen2();
    window.addEventListener("keydown", keyDown);
});
/** 回车方法 */
function keyDown(e: any) {
    // 回车则执行登录方法 enter键的ASCII是13
    if (e.key == 'Enter') {
        send()
    }
}
/** 加载中... */
const openFullScreen2 = () => {
    const loading = ElLoading.service({
        lock: true,
        text: '',
        background: 'rgba(0, 0, 0, 0.7)',
    })
    setTimeout(() => {
        loading.close()
    }, 2000)
}
</script>

<style scoped>
.screen {
    height: 80vh;
    display: flex;
    flex-direction: row;
    background: rgb(236, 239, 246);
}

.right {
    width: 100%;
    position: relative;
}

.up {
    position: absolute;
    top: 10px;
    left: 30%;
    /* align-items: center; */
}

.input {
    position: absolute;
    display: flex;
    bottom: 0px;
    left: 40%;
}

.inputStyle {
    width: 300px;
    margin-right: 10px;
}
</style>
3、data.json数据
这个是大json里面存储的数据,我们可以看到这里是一个放了很多对象的数组,对象里有问题字段 question 和回复字段 replay 而我们实现的逻辑则是判断用户发送的消息是否被这些 question 所包含,如果包含的话就会返回对应的 replay 。
[
    {
        "question":"你叫什么名字?",
        "replay":"我的名字是小娃!"
    },{
        "question":"你的年龄是几岁?",
        "replay":"我今年20岁啦!"
    },{
        "question":"你上几年级",
        "replay":"我今年大四了!"
    },{
        "question":"你是哪里人",
        "replay":"我来自浙江温州"
    },{
        "question":"你现在在干嘛?",
        "replay":"我正在学习..."
    },{
        "question":"你是猪吗?",
        "replay":"是的,我是一头大笨猪~"
    },{
        "question":"今天天气怎么样?",
        "replay":"为什么要问天气怎么样?有这精力不如好好赚钱,好好想想自己的原因,这么多年了工资涨没涨心里有点数!"
    },{
        "question":"我好无聊。",
        "replay":"不要无聊,小娃给你唱首歌吧,太阳当空照,花儿对我笑,小鸟说:喳喳喳,你为什么背上炸药包?"
    }
]
4、leftMenu.vue代码
该组件由于时间关系并没有写逻辑,只是简单地布局,如果有小伙伴感兴趣的话可以自己思考开发一些东西上去。布局已经布好啦。
<template>
  <div class="home">
    <div class="title">我能做什么?</div>
    <div class="menu">
      <div class="item" v-for="item in menuItem">{{ item }}</div>
    </div>
  </div>
</template>

<script setup>
let menuItem=['陪你唠嗑','发现生活','周游世界','吃吃喝喝','一起长胖']
</script>

<style lang="scss" scoped>
.home{
    width: 200px;
    height: 100%;
    background: linear-gradient(to bottom, rgb(238,231,235), rgb(221,221,245));
}
.title{
    color: rgb(81,122,237);
    height: 80px;
    line-height: 80px;
    text-align: center;
    font-size: 26px;
    border-bottom: 1px solid rgb(222,219,232);
}
.menu{
  .item{
    font-size: 18px;
    text-align: center;
    height: 60px;
    line-height: 60px;
  }
  .item:hover{
    cursor: pointer;
    background: rgb(221,221,245);
  }
}
</style>
5、chatMessage.vue代码
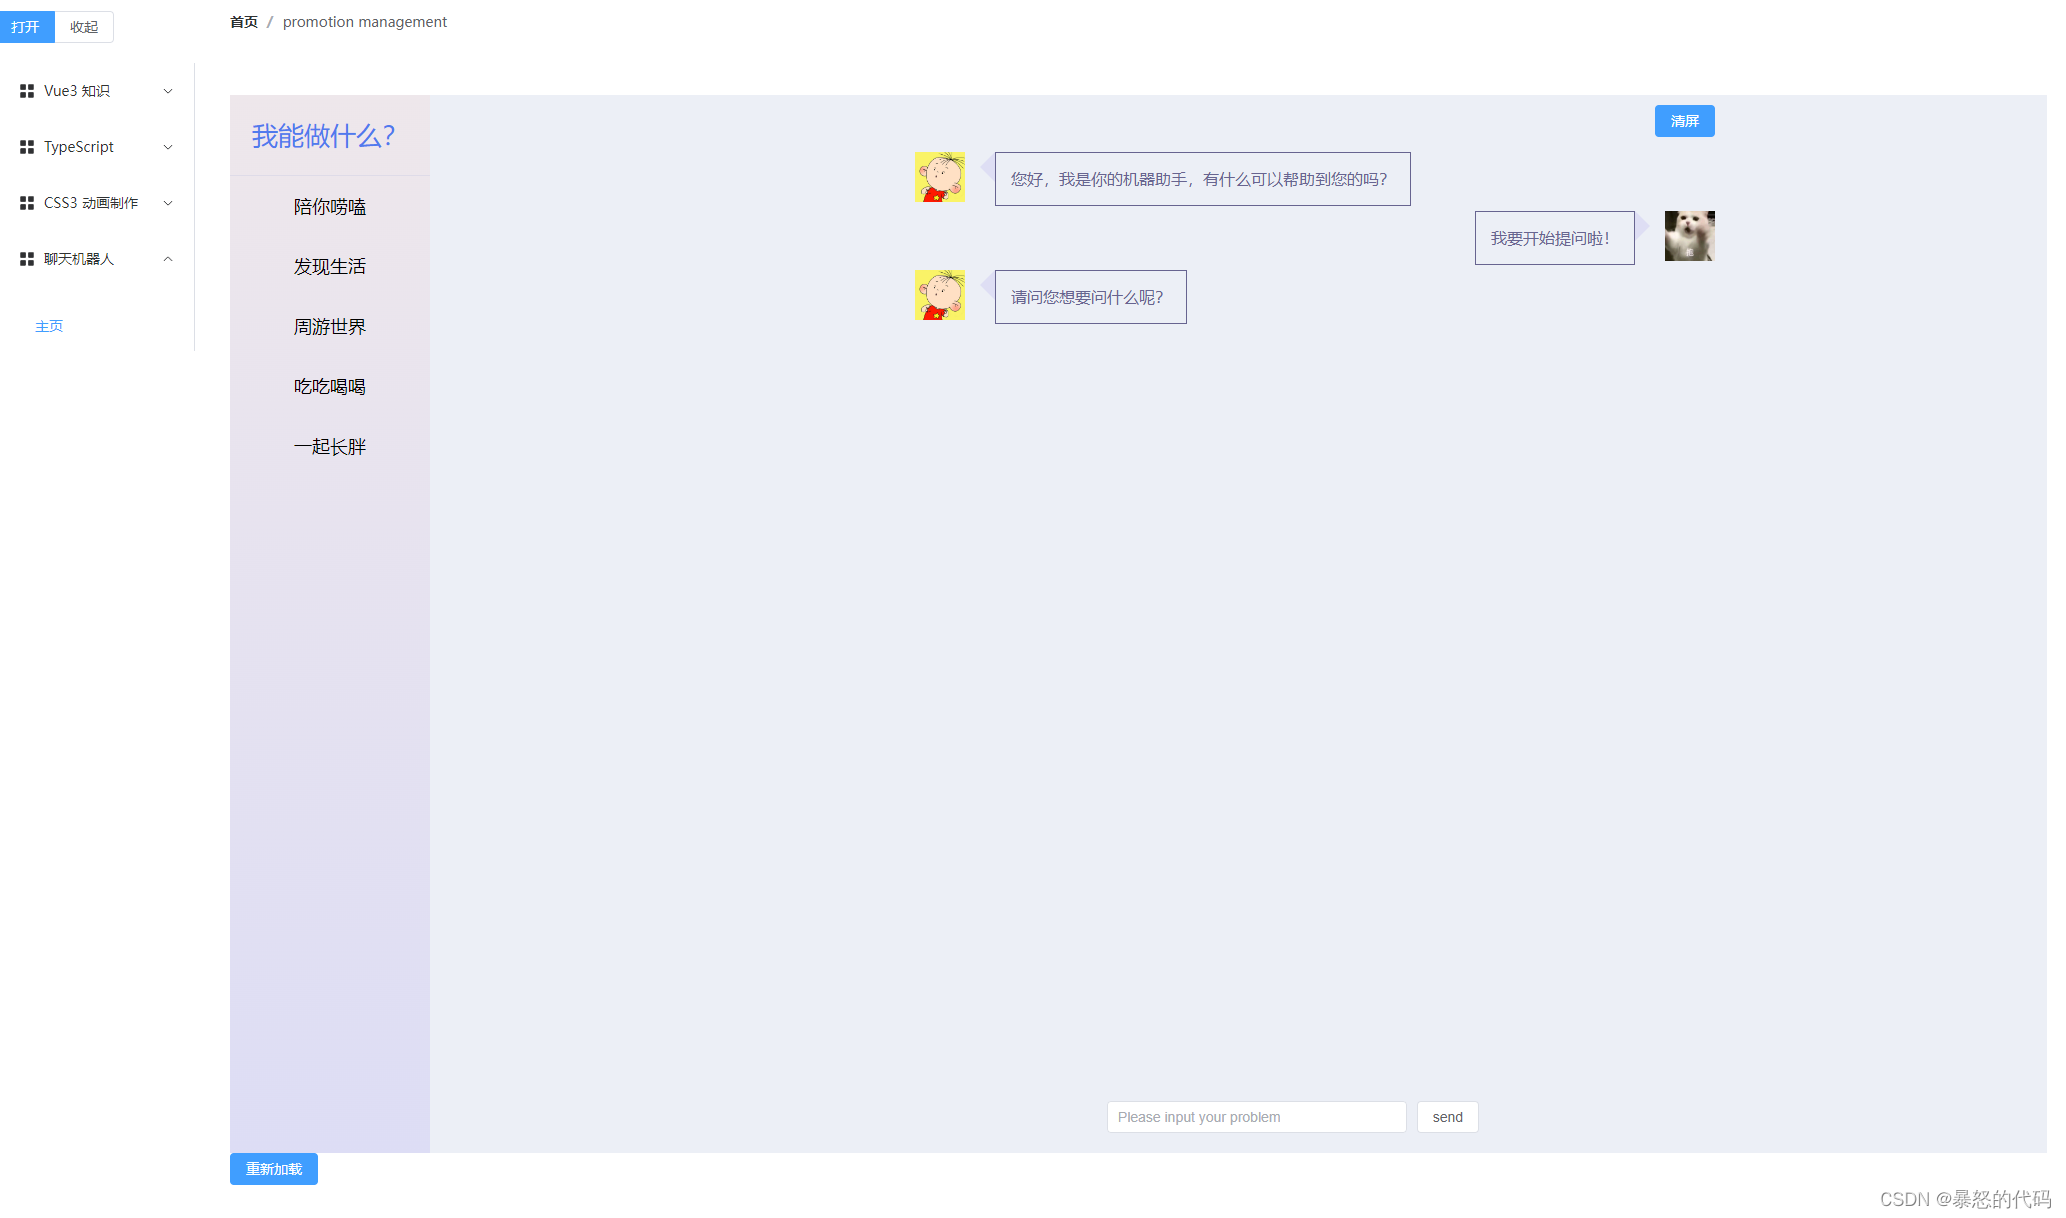
来了来了,这个页面是我们的核心组件,消息的发送,判断,回复等逻辑都是写在了这个组件里的。里面有写了注释,各位小伙伴可以沉下心来看一看哦、
<template>
  <div class="clear">
    <el-button type="primary" @click="clearScreen">清屏</el-button>
  </div>

  <div class="home" >
    <div v-for="(item, index) in chatArr" :key="index">
      <div class="reply" v-if="item.status === '0'">
      <div class="avatar"><img width="50" src="@/assets/images/avatar.jpeg" alt=""></div>
      <div class="left"></div>
      <div class="content">{{ item.content }}</div>
    </div>

    <div class="question" v-if="item.status === '1'">
      <div class="content">{{ item.content }}</div>
      <div class="left"></div>
      <div class="avatar"><img width="50" src="@/assets/images/avatar2.png" alt=""></div>
    </div>
    </div>
  </div>
</template>

<script >
import { defineComponent, reactive } from "vue";
import jsonData from "@/views/5_chatbotDemo/data.json"

export default defineComponent({
  watch: {
    data(newValue) {
      this.addArr('1', this.sendMessage);
      this.replayFnc() // 当监听到有消息传入的时候调用回复方法产生回复
    }
  },
  // props:['sendMessage']
  props: {
    sendMessage: {
      type: String,
      default: "",
    },
    data: 0
  },
  setup() {
    let chatArr = reactive([
      {
        status: '0', // 0-回复,1-问题
        content: '您好,我是你的机器助手,有什么可以帮助到您的吗?'
      }, {
        status: '1',
        content: '我要开始提问啦!'
      }, {
        status: '0',
        content: '请问您想要问什么呢?'
      }
    ]);
    /** 判断问题,产生回复的方法 */
    function replayFnc() {
      let hasQuestion = false
      let replayMessage = '听不懂'
      /** 循环判断是否存在该问题的答案,存在的话就改变回复的内容 */
      for (let index = 0; index < jsonData.length; index++) {
        if(jsonData[index].question.indexOf(this.sendMessage) > -1){
          replayMessage =jsonData[index].replay
          hasQuestion = true
        }
      }
      addArr('0',replayMessage)
    }

    /** 添加进数组的方法 */
    function addArr(status, content) {
      let obj = {
        status: status,
        content: content
      }
      chatArr.push(obj)
    }
    /** 清屏 */
    function clearScreen(){
      chatArr.length = 0
      console.log(chatArr);
    }
    return {
      clearScreen,
      replayFnc,
      chatArr,
      addArr
    }
  }
});
</script>

<style lang="scss" scoped>
.clear{
  width: 800px;
  margin-bottom: 10px;
  display: flex;
  justify-content: right;
}
.home {
  height: 70vh;
  position: relative;
  width: 800px;
  overflow: auto; // 滚动条
}

// 回复的样式
.reply {
  display: flex;
  margin-top: 5px;

  .content {
    padding: 15px;
    max-width: 500px;
    border: 1px solid;
    color: #676490;
    ;
  }

  .left {
    width: 0px;
    height: 0px;
    border: 15px solid transparent;
    border-right-color: rgba(222, 222, 244);
  }
}

// 提问的样式
.question {
  display: flex;
  margin-top: 5px;
  // background: greenyellow;
  justify-content: right;

  .content {
    padding: 15px;
    max-width: 500px;
    border: 1px solid;
    color: #676490;
  }

  .left {
    width: 0px;
    height: 0px;
    border: 15px solid transparent;
    border-left-color: rgba(222, 222, 244);
  }
}
</style>
三:结尾
其实本次实验的整体逻辑代码是很简单的,只是使用了 Vue3 + Ts 技术,其实现的逻辑和细节部分才是本次实验的重点。也算是通过本次复习了 Vue3 + Ts + json +css 等诸多内容吧。最后附上gitee的地址:
乾辰/vue3全家桶练习![]() https://gitee.com/qianchen12138/vue3-family-bucket-practice
https://gitee.com/qianchen12138/vue3-family-bucket-practice


 3403
3403


 被折叠的 条评论
为什么被折叠?
被折叠的 条评论
为什么被折叠?
 到【灌水乐园】发言


