


vue.js 构建项目
Over the last few years, chatbots have exploded in popularity. It makes sense that businesses and customers alike would want the easiest way to perform tasks without human intervention. But, building your own chatbot can be a daunting task without a third party service.
在过去的几年中,聊天机器人Swift普及。 企业和客户都希望有最简单的方法来执行任务而无需人工干预,这是有道理的。 但是,没有第三方服务,构建自己的聊天机器人可能是一项艰巨的任务。
This is where AWS Amplify’s interactions API shines. It leverages the same deep learning power that Amazon Alexa uses. With it, you can build out chatbots quickly and efficiently. So, let's jump right into setting one up.
这是AWS Amplify的交互API的亮点。 它利用了与Amazon Alexa相同的深度学习能力。 有了它,您可以快速有效地构建聊天机器人。 因此,让我们直接进行设置。
影片教学 (Video Tutorial)
AWS Amplify CLI设置 (AWS Amplify CLI Setup)
If you don’t already have an account, head over to AWS, and create one. Then open your terminal and run this command:
如果您还没有账户,请转到AWS ,然后创建一个。 然后打开您的终端并运行以下命令:
npm i -g @aws-amplify/cliVue应用程式建立 (Vue App Creation)
To create the Vue app, open your terminal, cd into the directory of your choosing and run this command:
要创建Vue应用程序,请打开您的终端,将cd插入您选择的目录并运行以下命令:
npx vue create aws-amplify-chatbotThen just choose the default settings for the app:1. Please pick a preset: default (babel, eslint)
然后只需为应用选择默认设置:1.。 请选择一个预设: 默认(babel,eslint)
放大设置 (Amplify Setup)
扩大帐户 (Amplify Account)
Now open the newly created Vue Project in the code editor of your choice (I’m using VS Code). Then, open a new terminal in the root of your project (In VS code, Terminal -> New Terminal). If you’ve never used Amplify, run the following command:
现在,在您选择的代码编辑器中打开新创建的Vue项目(我正在使用VS Code)。 然后,在项目的根目录中打开一个新的终端(在VS代码中,终端->新建终端)。 如果您从未使用过Amplify,请运行以下命令:
amplify configureThis will walk you through the steps of setting up a new IAM account in AWS. This account will programmatically generate everything we tell Amplify via the CLI.
这将引导您完成在AWS中设置新IAM帐户的步骤。 该帐户将以编程方式生成我们通过CLI告知Amplify的所有内容。
初始化Vue项目中的Amplify (Initializing Amplify In Vue Project)
Then, we’ll need to initialize Amplify in our project. To do so, run the following command in the terminal:
然后,我们需要在项目中初始化Amplify。 为此,请在终端中运行以下命令:
amplify initChoose the following:
选择以下内容:
Enter a name for the project:
输入项目名称:
Enter a name for the project:hit enter to choose the default
输入项目名称:按Enter键选择默认名称
Enter a name for the environment:dev
输入环境名称: dev
Choose your default editor:
选择默认编辑器:
Choose your default editor:Visual Studio Code
选择默认编辑器: Visual Studio Code
Choose the type of app that you’re building:
选择您要构建的应用程序类型:
Choose the type of app that you’re building:javascript
选择您要构建的应用程序类型: javascript
What javascript framework are you using:
您正在使用什么javascript框架:
What javascript framework are you using:vue
您使用的是什么JavaScript框架: vue
Source Directory Path:
源目录路径:
Source Directory Path:hit enter to choose the default (src)
源目录路径:按Enter键选择默认值 (src)
Distribution Directory Path:
分发目录路径:
Distribution Directory Path:hit enter to choose the default (dist)
分发目录路径:按Enter键选择默认值 (dist)
Build Command:
生成命令:
Build Command:hit enter to choose the default (npm.cmd run-script build)
生成命令:按Enter键选择默认值 (npm.cmd运行脚本生成)
Start Command:
启动命令:
Start Command:hit enter to choose the default (npm.cmd run-script serve)
启动命令:按Enter键选择默认值 (npm.cmd运行脚本服务)
Do you want to use an AWS profile?:
您是否要使用AWS配置文件?:
Do you want to use an AWS profile?:Y
您是否要使用AWS配置文件?: 是
- Choose the account you set up in the last step 选择您在最后一步中设置的帐户
添加放大互动 (Adding Amplify Interactions)
In your terminal run the following command:
在您的终端中运行以下命令:
amplify add interactionsChoose the following:
选择以下内容:
Provide a friendly resource name that will be used to label this category in the project:
提供一个友好的资源名称,该名称将用于在项目中标记此类别:
Provide a friendly resource name that will be used to label this category in the project:hit enter to choose the default
提供一个友好的资源名称,该名称将用于在项目中标记此类别:按Enter选择默认
Would you like to start with a sample chatbot, import a chatbot, or start from scratch?Start with a sample
您要从示例聊天机器人开始,导入聊天机器人还是从头开始? 从样本开始
Choose a sample chatbot:
选择一个示例聊天机器人:
Choose a sample chatbot:OrderFlowers
选择一个示例聊天机器人: OrderFlowers
Please indicate if your use of this bot is subject to the Children’s Online Privacy Protection Act (COPPA).
请指出您使用此漫游器是否受儿童在线隐私保护法(COPPA)的约束。
Please indicate if your use of this bot is subject to the Children’s Online Privacy Protection Act (COPPA).N
请指出您使用此漫游器是否受儿童在线隐私保护法(COPPA)的约束。 ñ
将更改推送到云 (Push Changes to Cloud)
To have Amplify push your changes to the cloud, run the following command in your terminal:
要使Amplify将更改推送到云,请在终端中运行以下命令:
amplify push在AWS中查看 (View In AWS)
To view the resources that have been created run the following command in your terminal:
要查看已创建的资源,请在终端中运行以下命令:
amplify consoleUnfortunately, the amplify console does not show our bot, but it will get you to the correct was account and region. After the console has opened, click the services dropdown in the top menu and search for “Lex”. Then click on Amazon Lex.
不幸的是,放大控制台未显示我们的漫游器,但是它将使您正确地找到帐户和区域。 打开控制台后,单击顶部菜单中的服务下拉菜单,然后搜索“ Lex”。 然后单击Amazon Lex。
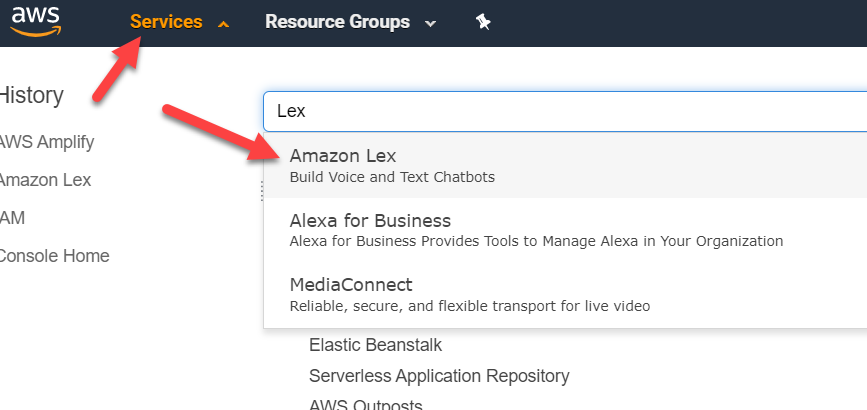
Once there, you will see a list of your chatbots. Since we picked the sample of OrderFlowers, we’ll see a chatbot named OrderFlowers_dev or something similar. Click on it to go to the bot settings.
到达那里后,您将看到您的聊天机器人列表。 既然我们选择OrderFlowers的样品,我们将看到一个名为OrderFlowers_dev或类似聊天机器人。 点击它进入机器人设置。
机器人设置演练 (Bot Settings Walkthrough)
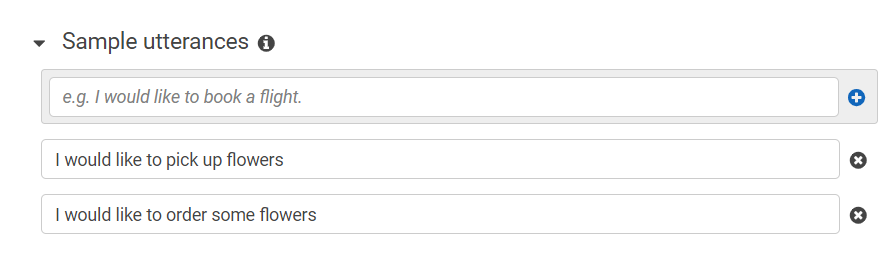
Sample UtterancesThese are the first words a user will type to initialize the bot. They don't have to be exact as Lex will use natural language processing for phrases close to the ones specified.
样本示例这些是用户键入以初始化机器人的第一个单词。 它们不必很精确,因为Lex将对与指定短语接近的短语使用自然语言处理。
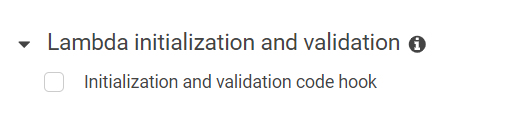
Lambda InitializationHere you can specify if you want a lambda function to fire of initialization of the bot.
Lambda初始化在这里,您可以指定是否要启动机器人初始化Lambda函数。
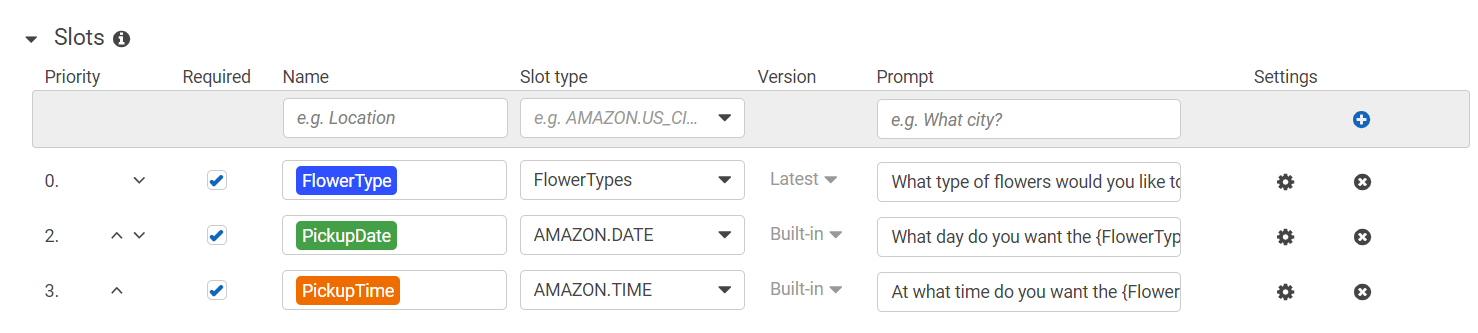
SlotsThink of these as the steps that the bot will walk the user through. Each slot has the following:
插槽将这些视为机器人将引导用户执行的步骤。 每个插槽具有以下内容:
- Priority — When the question will be asked. 优先级-何时提出问题。
- Required — Whether or not it is required input. 必填-是否为必填项。
- Name — Variable name of the input. This will be used when passing the data to complete function 名称-输入的变量名称。 将数据传递给完整功能时使用
- Slot Type— These are meta fields for the input to determine valid input data. You can choose a predefined slot or create your own in the left menu. See the flower type slot for an example of a custom slot. 插槽类型-这些是用于确定有效输入数据的输入元字段。 您可以选择预定义的插槽,也可以在左侧菜单中创建自己的插槽。 有关自定义广告位的示例,请参见花型广告位。
- Version — The version of the slot. Used for your custom slots. 版本—插槽的版本。 用于您的自定义插槽。
- Prompt — How the bot will prompt the user to enter data. Entered in the form of a question. 提示-机器人将如何提示用户输入数据。 以问题的形式输入。
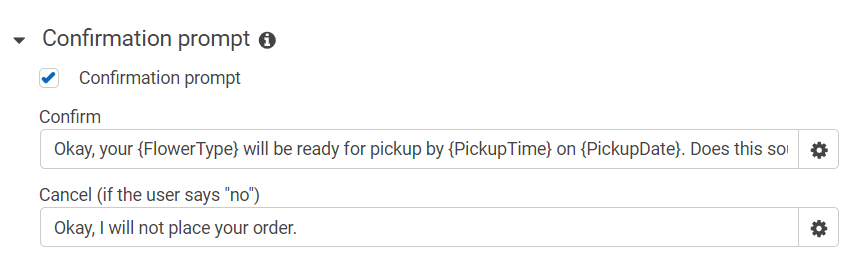
Confirmation PromptThis is the prompt that will conclude the bot operations. Typically, it will reiterate what the user has chosen and as for confirmation.
确认提示这是结束机器人操作的提示。 通常,它将重申用户选择的内容并进行确认。
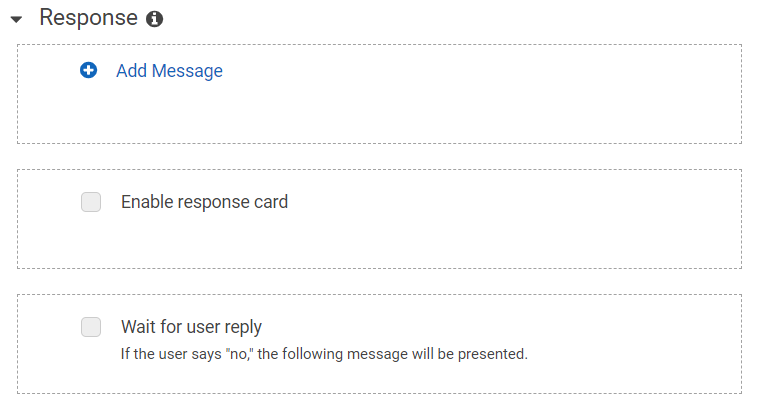
FulfillmentAfter the bot has finished, you can fire a lambda function. In this case, we would add the order to our database or send out an email with the order details to the florist.
实现机器人完成后,您可以启动lambda函数。 在这种情况下,我们会将订单添加到我们的数据库中,或者将包含订单详细信息的电子邮件发送给花店。

ResponseAfter fulfillment has been executed, we can send another response. I’ll add a message that says “Flower order successfully placed”
响应执行完成后,我们可以发送另一个响应。 我将添加一条消息,指出“已成功下达鲜花订单”
将放大添加到Vue (Adding Amplify to Vue)
Now that we have our Chatbot Provisioned in AWS, we can add the Amplify npm packages to our Vue project and initialize Amplify. Open a terminal in the root of your project and run the following command:
现在我们已经在AWS中配置了Chatbot,我们可以将Amplify npm软件包添加到我们的Vue项目中并初始化Amplify。 在项目的根目录中打开一个终端,然后运行以下命令:
npm i aws-amplify aws-amplify-vueNext head over to src/main.js and add the following:
接下来转到src / main.js并添加以下内容:
// Import Amplify Modules, Plugins, and aws exports file
import Amplify, * as AmplifyModules from "aws-amplify";
import { AmplifyPlugin } from "aws-amplify-vue";
import awsconfig from "./aws-exports";// Configure Amplify in project
Amplify.configure(awsconfig); // Configure vue to use plugins and modules
Vue.use(AmplifyPlugin, AmplifyModules);
聊天机器人界面 (Chatbot UI)
Luckily for us, Amplify gives us a chatbot component we can add to our page. In src/App.vue, in the main app div, we’ll remove everything to add the chatbot component:
对我们来说幸运的是,Amplify给了我们一个聊天机器人组件,我们可以将其添加到页面中。 在src / App.vue的主应用div中,我们将删除所有内容以添加chatbot组件:
<amplify-chatbot v-bind:chatbotConfig="chatbotConfig"></amplify-chatbot>In the script tag, we’ll add a data property with our chatbotConfig. You’ll need to add the bot name and I optionally added clearComplete and set it to false.
在脚本标签中,我们将使用chatbotConfig添加数据属性。 您需要添加机器人名称,我可以选择添加clearComplete并将其设置为false。
<script>
 export default {
  name: "App",
  data: () => ({
   chatbotConfig: {
    bot: "OrderFlowers_dev",
    clearComplete: false,
   },
  }),
 };
</script>
处理确认 (Processing The Confirmation)
There are two ways you can process the confirmation of the flower order in our demo. You can either use a lambda function or pass the data back to our client (Vue). We’ll be passing it back to our project.
您可以通过两种方式处理演示中的花序确认。 您可以使用lambda函数,也可以将数据传递回我们的客户端(Vue)。 我们将把它传递回我们的项目。
To do so, we’ll need to import the Interaction class from the AWS Amplify package. Then we’ll declare a method called handleComplete. In this method, we’ll log any errors and alert a completed bot. Lastly, we’ll need to register the function on load which we’ll do in the mounted lifecycle hook.
为此,我们需要从AWS Amplify包中导入Interaction类。 然后,我们将声明一个名为handleComplete的方法。 在这种方法中,我们将记录所有错误并提醒已完成的漫游器。 最后,我们需要在加载时注册功能,这将在已安装的生命周期挂钩中进行。
When finished your App.vue file will look like this:
完成后,您的App.vue文件将如下所示:
演示版 (Demo)
That’s it! Now we can check out a demo of the bot.
而已! 现在,我们可以查看该机器人的演示。

结论 (Conclusion)
As you can see it is extremely easy to get a powerful chatbot up and running using AWS Amplify. I’d love to know what you plan to build with one. Let us know in the comments below.
如您所见,使用AWS Amplify启动和运行功能强大的聊天机器人非常容易。 我很想知道您打算用什么构建。 在下面的评论中让我们知道。
Bitbucket Repo: https://bitbucket.org/TheDiligentDev/aws-chatbot/src/master/
Bitbucket回购: https : //bitbucket.org/TheDiligentDev/aws-chatbot/src/master/
vue.js 构建项目


 455
455


 被折叠的 条评论
为什么被折叠?
被折叠的 条评论
为什么被折叠?
 到【灌水乐园】发言


