


大家好,我技术人Howzit,这是深度学习入门系列第十五篇,欢迎大家一起交流!
深度学习入门系列1:多层感知器概述
深度学习入门系列2:用TensorFlow构建你的第一个神经网络
深度学习入门系列3:深度学习模型的性能评价方法
深度学习入门系列4:用scikit-learn找到最好的模型
深度学习入门系列5项目实战:用深度学习识别鸢尾花种类
深度学习入门系列6项目实战:声纳回声识别
深度学习入门系列7项目实战:波士顿房屋价格回归
深度学习入门系列8:用序列化保存模型便于继续训练
深度学习入门系列9:用检查点保存训练期间最好的模型
深度学习入门系列10:从绘制记录中理解训练期间的模型行为
深度学习入门系列11:用Dropout正则减少过拟合
深度学习入门系列12:使用学习规划来提升性能
深度学习入门系列13:卷积神经网络概述
深度学习入门系列14:项目实战:基于CNN的手写数字识别
深度学习入门系列15:用图像增强改善模型性能
深度学习入门系列16:项目实战:图像中目标识别
深度学习入门系列17:项目实战:从电影评论预测情感
深度学习入门系列18:递归神经网络概述
深度学习入门系列19:基于窗口(window)的多层感知器解决时序问题
深度学习入门系列20:LSTM循环神经网络解决国际航空乘客预测问题
深度学习入门系列21:项目:用LSTM+CNN对电影评论分类
深度学习入门系列22:从猜字母游戏中理解有状态的LSTM递归神经网络
深度学习入门系列23:项目:用爱丽丝梦游仙境生成文本
文章目录
当从事神经网络和深度学习模型工作时,数据预处理是必要的。在比较复杂对象识别任务上越来越需要数据增强技术。当你在python中用Keras开发和评估深度学习模型时,在这节课,你将学习如何在图片集上使用数据预处理和数据增强。完成这节课之后,你将学习到:
- 关于Keras中提供的图像赠钱API和如何在你的模型中使用。
- 如何标准化特征
- 如何对图像执行ZCA白化
- 如何通过图像的随机旋转,移位和翻转来增强数据。
- 如何将增强的图像数据保存到磁盘。
让我们开始吧!
15.1 Keras 图片增强API
像Keras其他API一样,图像增强API既简单又强大。Keras提供ImageDataGenerator,它定义了图片数据预测和增强的配置。这些功能如下:
- 面向特征的标准化。
- ZCA白化
- 随机旋转,移动和翻转。
- 维度重设
- 保存已增强图片到磁盘。
一个增强图片生成器创建如下:
datagen = ImageDataGenerator()
该API是为了能够及时对深度学习拟合过程,创建增强图像数据进行迭代而设计,而不是在内存中的整个图像数据集执行操作。这样可以减少您的内存开销,但会增加一些时间模型训练时间的成本。在你创建和配置你ImageDataGenerator之后,你必须在你图片数据上拟合。这将计算任何所需要的统计信息为了能够实地的在数据集上执行转换。你可以通过fit() 函数在数据生成器上做这个操作并传回给训练集。
datagen.fit(train)
数据生成器实际上本身是个迭代器,返回我们需要的图片样本的批量块。通过调用flow()函数,我们可以配置批处理大小并准备数据生成器并获取一批图像
X_batch, y_batch = datagen.flow(train, train, batch_size=32)
最后,我们能够利用数据生成器,与调用模型上的fit()函数不同,我们必须调用fit_generator()函数并传入数据生成器和所需的周期的长度以及要训练的周期总数。
fit_generator(datagen, samples_per_epoch=len(train), nb_epoch=100)
你可以在Keras文档中学习更多关于Keras图片数据生成器API
15.2 图片增强比较点
既然你已经知道了Keras中图像增强技术原理,那么让我们看看一些例子。这些例子中,我们将使用MNIST手写体识别任务(可以在上一节深度学习入门系列14项目实战:基于CNN的手写数字识别了解更多)。首先,让我们看看训练集的前9张图片。
# Plot of images as baseline for comparison
from keras.datasets import mnist
from matplotlib import pyplot

# load data
(X_train, y_train), (X_test, y_test) = mnist.load_data()

# create a grid of 3x3 images
for i in range(0, 9):
	pyplot.subplot(330 + 1 + i)
	pyplot.imshow(X_train[i], cmap=pyplot.get_cmap( gray ))

# show the plot
pyplot.show()
运行这个例子提供了下面图片,我们可以用它作为一个比较点,即数据预处理与下面增强任务的例子。
[外链图片转存失败,源站可能有防盗链机制,建议将图片保存下来直接上传(img-gcoDdn1O-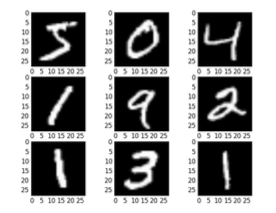
15.3 特征标准化
对整个数据集标准化像素值是也是有可能的,这个过程称为特征标准化,它反映在对制表数据集中的每一列执行的标准化的类型。这不同于之前章节描述的样本标准化,它是对所有的样本像素值(数据集中所有图片)标准化。在这种情况情况下,每张图片被认为是一张特征。你能够在ImageDataGenerator类中设置feature_center和feature_std_normalization参数进行特征标准化。
# Standardize images across the dataset, mean=0, stdev=1

from keras.datasets import mnist
from keras.preprocessing.image import ImageDataGenerator from matplotlib import pyplot
from keras import backend as K
K.set_image_dim_ordering('th')

# load data
(X_train, y_train), (X_test, y_test) = mnist.load_data()

# reshape to be [samples][pixels][width][height]
X_train = X_train.reshape(X_train.shape[0], 1, 28, 28)
X_test = X_test.reshape(X_test.shape[0], 1, 28, 28)

# convert from int to float
X_train = X_train.astype('float32')
X_test = X_test.astype('float32')

# define data preparation
datagen = ImageDataGenerator(featurewise_center=True, featurewise_std_normalization=True)
# fit parameters from data
datagen.fit(X_train)

# configure batch size and retrieve one batch of images
for X_batch, y_batch in datagen.flow(X_train, y_train, batch_size=9):
	# create a grid of 3x3 images
	for i in range(0, 9):
		pyplot.subplot(330 + 1 + i)
		pyplot.imshow(X_batch[i].reshape(28, 28), cmap=pyplot.get_cmap('gray'))

# show the plot
pyplot.show()
break
运行这个例子你能够看到在实际图片的效果上,不同数字变暗和变亮。

15.4 ZCA白化
一个图片的白化转换是线性代数操作,能够减少像素图片矩阵的冗余。图片中更少的冗余是为了更好突出结构和特征,是为了学习算法。通常,使用主成分分析(PCA)技术执行图像增白。最近,一种称为ZCA的替代方法(在此技术报告2的附录A中了解更多信息)显示了更好的结果,并且转换后的图像保留了所有原始尺寸,而与PCA不同,转换后的图像仍然看起来像原始图像。你可以通过设置zca_whitening参数为true执行ZCA白化转换。
# ZCA whitening
from tensorflow.keras.datasets import mnist
from tensorflow.keras.preprocessing.image import ImageDataGenerator
from matplotlib import pyplot

# load data
(X_train, y_train), (X_test, y_test) = mnist.load_data()

# reshape to be [samples][pixels][width][height]
X_train = X_train.reshape(X_train.shape[0], 1, 28, 28)
X_test = X_test.reshape(X_test.shape[0], 1, 28, 28)

# convert from int to float
X_train = X_train.astype("float32")
X_test = X_test.astype("float32")

# define data preparation
datagen = ImageDataGenerator(zca_whitening=True)

# fit parameters from data
datagen.fit(X_train)

# configure batch size and retrieve one batch of images

for X_batch, y_batch in datagen.flow(X_train, y_train, batch_size=9):
	# create a grid of 3x3 images

	for i in range(0, 9):
		pyplot.subplot(330 + 1 + i)
		pyplot.imshow(X_batch[i].reshape(28, 28), cmap=pyplot.get_cmap("gray"))

# show the plot
pyplot.show()
break
运行该示例,您可以在图像中看到相同的常规结构,以及如何突出显示每个数字的轮廓。

15.5 随机旋转
有时,样本数据中的图片可能会在场景中有变化和旋转。你能通过人为或者随机旋转图片来训练你的模型,以便能更好的处理旋转的图片。下面这个例子通过旋转范围参数能够随机旋转MNIST数字达到90度。
# Random Rotations
from tensorflow.keras.datasets import mnist
from tensorflow.keras.preprocessing.image import ImageDataGenerator
from matplotlib import pyplot

# load data
(X_train, y_train), (X_test, y_test) = mnist.load_data()

# reshape to be [samples][pixels][width][height]
X_train = X_train.reshape(X_train.shape[0], 1, 28, 28)
X_test = X_test.reshape(X_test.shape[0], 1, 28, 28)

# convert from int to float
X_train = X_train.astype("float32")
X_test = X_test.astype("float32")

# define data preparation
datagen = ImageDataGenerator(rotation_range=90)

# fit parameters from data
datagen.fit(X_train)

# configure batch size and retrieve one batch of images

for X_batch, y_batch in datagen.flow(X_train, y_train, batch_size=9):
	# create a grid of 3x3 images

	for i in range(0, 9):
		pyplot.subplot(330 + 1 + i)
		pyplot.imshow(X_batch[i].reshape(28, 28), cmap=pyplot.get_cmap("gray"))

# show the plot
pyplot.show()
break
运行这个例子,你能够看到图片向左和向右旋转最大达90度。在这个问题上没有用,因为MNIST数字已经标准化方向,但是当从有不同方向的图片学习时,这个转换可能有用。

15.6 随机移位
图片中的对象在一帧中没有居中。它们可能以各种不同的方式偏离中心。您可以通过人为地创建移位版的训练数据训练深度学习网络以期望并处理当前偏移对象。 Keras分别支持随机水平和垂直移位通过width shift range 和height shift range 参数
# Random Shifts
from tensorflow.keras.datasets import mnist
from tensorflow.keras.preprocessing.image import ImageDataGenerator
from matplotlib import pyplot

# load data
(X_train, y_train), (X_test, y_test) = mnist.load_data()

# reshape to be [samples][pixels][width][height]
X_train = X_train.reshape(X_train.shape[0], 1, 28, 28)
X_test = X_test.reshape(X_test.shape[0], 1, 28, 28)

# convert from int to float
X_train = X_train.astype("float32")
X_test = X_test.astype("float32")

# define data preparation
shift = 0.2
datagen = ImageDataGenerator(width_shift_range=shift, height_shift_range=shift)

# fit parameters from data
datagen.fit(X_train)

# configure batch size and retrieve one batch of images

for X_batch, y_batch in datagen.flow(X_train, y_train, batch_size=9):
	# create a grid of 3x3 images

	for i in range(0, 9):
		pyplot.subplot(330 + 1 + i)
		pyplot.imshow(X_batch[i].reshape(28, 28), cmap=pyplot.get_cmap("gray"))

# show the plot
pyplot.show()
break
运行这个例子,创建移位版的数字。再一次,这对于MNIST数据集是没必要的,因为手写数字已经被居中了,但是你能够看出在更为复杂问题领域上是如何起作用的。

15.7 随机翻转
针对你的图像数据,还有另外一个增强技术,能够改善大而复杂的问题,那就是在训练集上随机翻转图片集。Keras支持沿着水平和垂直方向随机翻转,使用vertical flip和horizontal flip参数。
# Random Flips

from tensorflow.keras.datasets import mnist
from tensorflow.keras.preprocessing.image import ImageDataGenerator
from matplotlib import pyplot

# load data
(X_train, y_train), (X_test, y_test) = mnist.load_data()

# reshape to be [samples][pixels][width][height]
X_train = X_train.reshape(X_train.shape[0], 1, 28, 28)
X_test = X_test.reshape(X_test.shape[0], 1, 28, 28)

# convert from int to float
X_train = X_train.astype("float32")
X_test = X_test.astype("float32")

# define data preparation
datagen = ImageDataGenerator(horizontal_flip=True, vertical_flip=True)

# fit parameters from data
datagen.fit(X_train)

# configure batch size and retrieve one batch of images
for X_batch, y_batch in datagen.flow(X_train, y_train, batch_size=9):
	# create a grid of 3x3 images
	for i in range(0, 9):
		pyplot.subplot(330 + 1 + i)
		pyplot.imshow(X_batch[i].reshape(28, 28), cmap=pyplot.get_cmap("gray"))

# show the plot
pyplot.show()
break
运行这个例子,你能看到翻转的数字。MNIST中翻转的数字没有用,因为他们总是有正确的左边和右边方向,但是这对于场景中有不同的方向图像对象的问题有作用。

15.8 保存增强图片为文件
数据准备和扩充由Keras即时执行。就内存来说是有效的,但是你可能训练期间需要确切的图片。举个例子,可能你愿意通过不同软件包来使用他们或者仅立刻生成它们并在不同的深度学习模型或配置上使用他们。
Keras 允许你在训练期间保存已经生成的图片。在训练之前,目录,文件名,前缀和文件类型在flow() 函数指定。然后,训练期间,生成的图片将被写成文件。下面例子描述这个的并且写了前缀为aug的9张图片到Images子目录下,并且文件类型为PNG。
# Save augmented images to file
import os
from matplotlib import pyplot
from tensorflow.keras.datasets import mnist
from tensorflow.keras.preprocessing.image import ImageDataGenerator

# load data
(X_train, y_train), (X_test, y_test) = mnist.load_data()

# reshape to be [samples][pixels][width][height]
X_train = X_train.reshape(X_train.shape[0], 1, 28, 28)
X_test = X_test.reshape(X_test.shape[0], 1, 28, 28)

# convert from int to float
X_train = X_train.astype("float32")
X_test = X_test.astype("float32")

# define data preparation
datagen = ImageDataGenerator()

# fit parameters from data
datagen.fit(X_train)

# configure batch size and retrieve one batch of images

os.makedirs("images")

for X_batch, y_batch in datagen.flow(X_train, y_train, batch_size=9, save_to_dir="images",save_prefix="aug", save_format="png"):
	# create a grid of 3x3 images

	for i in range(0, 9):

		pyplot.subplot(330 + 1 + i)

		pyplot.imshow(X_batch[i].reshape(28, 28), cmap=pyplot.get_cmap("gray"))

# show the plot
pyplot.show()
break
运行这个例子,你能够看到但他们生成时图片仅仅被写。
15.9 用Keras增强图片的技巧
图像数据的独特之处在于,您可以查看数据的转换后的副本,并快速了解模型如何感知输入的。以下是一些可以充分利用图像数据预处理和深度学习增强功能的实践。
- 复盘数据
花更多的时间详细复盘你的数据集。看看图片,请注意可能有利于模型训练过程的图像预处理和增强,如需要处理场景中对象的不同移位,旋转和翻转。
- 复盘增强技术
在已经应用增强技术之后查看样本数据。从理智上了解您正在使用的图像转换是一回事,看示例则是另一回事。
- 评估一套转换 尝试不止一种的数据预处理和增强模式。你经常被数据预处理的结果惊讶到,因为你认为这是没用的。
15.10 总结
在这节课中,你已经学习到图片预处理和增强技术。你也学习一系列技术,对于深度学习模型,这些技术针对在python版Keras中轻松使用。你已经学到:
- Keras中ImageDataGenerator API 能实时生成变换的图片。
- 基于特征的像素标准化
- ZCA 白化转换
- 图片随机旋转,移位和翻转
- 如何保存变换的为文件,在之后使用。
15.10.1 接下来
你现在已经知道如何构建卷积神经网络并在Keras中使用图像增强技术。在接下来的章节,你将使用Keras开发更大且更深的模型用于更为复杂的对象检测任务。


 4369
4369


 被折叠的 条评论
为什么被折叠?
被折叠的 条评论
为什么被折叠?
 到【灌水乐园】发言


