【threejs教程11】threejs添加水面效果

        【图中效果完整代码位于文章末】

目录

        准备工作

添加水面效果的步骤

1.引入Water库

2.创建水面几何体

3.初始化水面材质

4.设置水面旋转与添加至场景

5. 动画循环:更新水面时间参数

总结

完整代码如下


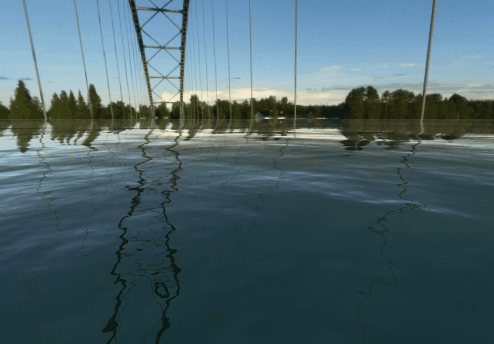
         在三维场景设计中,水面效果能够极大地增强视觉体验,营造出更加真实或梦幻的氛围。Three.js作为一个强大的JavaScript库,为WebGL提供了简单易用的3D图形接口,使得在网页上实现高级视觉效果成为可能。本文将指导你如何使用Three.js添加一个逼真的水面效果到你的场景中。

        准备工作

        首先,确保你的项目已经引入了three.js库,并且已经加载了基础场景和背景,以免水面缺少环境反射无法显示,上面动图中的环境贴图效果可以参考文章👇👉【threejs教程9】threejs加载360全景图(VR)的两种方法

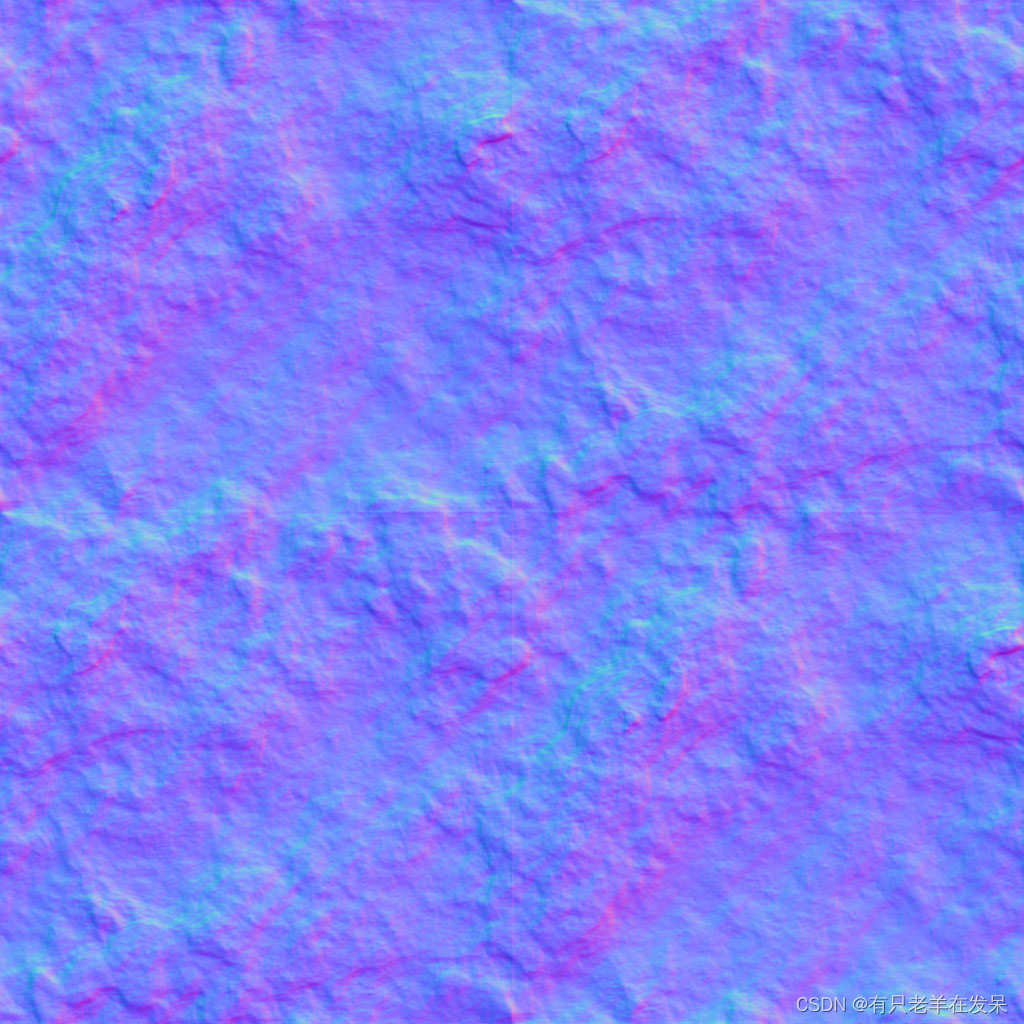
        接下来,你需要一张水纹法线贴图(waternormals.jpg),用于模拟水面波动的细节。这张图片可以自定义或从网络上获取。无水印图片下载👉图片地址

添加水面效果的步骤

1.引入Water库

import { Water } from 'three/examples/jsm/objects/Water'

2.创建水面几何体

        一切始于几何体。我们使用PlaneGeometry来创建一个广阔的平面作为水面的基础形状。这个平面的尺寸设为10000x10000单位,足以覆盖大部分场景

const waterGeometry = new THREE.PlaneGeometry(10000, 10000);

3.初始化水面材质

        水面的效果主要依赖于特殊的材质——在这里,我们使用Water材质。这个材质需要一些特定的设置,比如法线贴图路径、光源方向和颜色等,以达到逼真的效果。

const water = new Water(waterGeometry, {
    textureWidth: 512,
    textureHeight: 512,
    waterNormals: new THREE.TextureLoader().load(
        './img/waternormals.jpg',
        function (texture) {
            texture.wrapS = texture.wrapT = THREE.RepeatWrapping;
        }
    ),
    sunDirection: new THREE.Vector3(), // 需要根据场景设置正确的阳光方向
    sunColor: 0xffffff,
    waterColor: 0x001e0f,
    distortionScale: 3.7,
    fog: scene.fog !== undefined,
});

        注意,waterNormals加载了一个法线贴图,这对于模拟水面波纹至关重要。同时,通过调整sunDirection、sunColor和waterColor等属性,你可以控制水面的光照效果和颜色。

4.设置水面旋转与添加至场景

        为了让水面看起来更自然,我们将平面旋转-90度使其与X轴平行,模拟真实的水面状态。

water.rotation.x = -Math.PI / 2;
scene.add(water);

5. 动画循环:更新水面时间参数

        水面效果需要随着时间变化而动态更新,因此我们需要一个动画循环来不断更新水面材质中的时间参数。

function animate() {
    requestAnimationFrame(animate);
    water.material.uniforms['time'].value += 1.0 / 60.0; // 每帧更新时间参数
}

animate();

        这段代码启动了一个无限循环,每一帧都会调用requestAnimationFrame,并使水面材质的时间值递增,从而模拟水流的动态变化。

总结

        通过上述步骤,你已经在Three.js项目中成功添加了一个基本但视觉效果出众的水面。这仅仅是一个起点,Three.js的灵活性允许你进一步定制材质属性、添加反射和折射效果、甚至是交互功能,让水面更加生动和真实。

完整代码如下

import { Water } from 'three/examples/jsm/objects/Water'
function addWater() {
	const waterGeometry = new THREE.PlaneGeometry(10000, 10000)

	const water = new Water(waterGeometry, {
		textureWidth: 512,
		textureHeight: 512,
		waterNormals: new THREE.TextureLoader().load(
			'./img/waternormals.jpg',
			function (texture) {
				texture.wrapS = texture.wrapT = THREE.RepeatWrapping
			}
		),
		sunDirection: new THREE.Vector3(),
		sunColor: 0xffffff,
		waterColor: 0x001e0f,
		distortionScale: 3.7,
		fog: scene.fog !== undefined,
	})

	water.rotation.x = -Math.PI / 2
	scene.add(water)
	function animate() {
		requestAnimationFrame(animate)
		water.material.uniforms['time'].value += 1.0 / 60.0
	}
	animate()
}

  • 31
    点赞
  • 21
    收藏
    觉得还不错? 一键收藏
  • 打赏
    打赏
  • 10
    评论
要实现水面倒影效果,可以使用three.js的水面倒影插件`three.js-water`。这个插件可以创建一个水面对象,并且将其反射到场景中,从而实现水面倒影效果。 以下是实现水面倒影效果的基本步骤: 1. 导入`three.js`和`three.js-water`插件。 ```javascript import * as THREE from 'three'; import Water from 'three-water'; ``` 2. 创建场景、渲染器和相机。 ```javascript const scene = new THREE.Scene(); const renderer = new THREE.WebGLRenderer(); const camera = new THREE.PerspectiveCamera(45, window.innerWidth / window.innerHeight, 1, 1000); camera.position.set(0, 100, 200); renderer.setSize(window.innerWidth, window.innerHeight); document.body.appendChild(renderer.domElement); ``` 3. 创建水面对象。 ```javascript const waterGeometry = new THREE.PlaneBufferGeometry(10000, 10000); const water = new Water(waterGeometry, { color: 'blue', scale: 5, flowDirection: new THREE.Vector2(1, 1), textureWidth: 512, textureHeight: 512, reflectivity: 0.3 }); water.rotation.x = -Math.PI / 2; scene.add(water); ``` 4. 创建地面对象,并将其添加到场景中。 ```javascript const groundGeometry = new THREE.PlaneBufferGeometry(10000, 10000); const groundMaterial = new THREE.MeshPhongMaterial({ color: 0x999999, depthWrite: false }); const ground = new THREE.Mesh(groundGeometry, groundMaterial); ground.rotation.x = -Math.PI / 2; scene.add(ground); ``` 5. 创建一个立方体,并将其添加到场景中。 ```javascript const cubeGeometry = new THREE.BoxBufferGeometry(50, 50, 50); const cubeMaterial = new THREE.MeshPhongMaterial({ color: 'red' }); const cube = new THREE.Mesh(cubeGeometry, cubeMaterial); cube.position.set(0, 25, 0); scene.add(cube); ``` 6. 创建一个点光源,并将其添加到场景中。 ```javascript const light = new THREE.PointLight('white', 1, 1000); light.position.set(0, 200, 0); scene.add(light); ``` 7. 使用`three.js-water`插件提供的`update`方法更新水面对象。 ```javascript function animate() { requestAnimationFrame(animate); water.material.uniforms.time.value += 1.0 / 60.0; water.render(); renderer.render(scene, camera); } animate(); ``` 通过以上步骤,就可以在three.js中实现水面倒影效果了。完整的代码示例可以参考`three.js-water`插件的官方文档。

“相关推荐”对你有帮助么?

  • 非常没帮助
  • 没帮助
  • 一般
  • 有帮助
  • 非常有帮助
提交
评论 10
添加红包

请填写红包祝福语或标题

红包个数最小为10个

红包金额最低5元

当前余额3.43前往充值 >
需支付:10.00
成就一亿技术人!
领取后你会自动成为博主和红包主的粉丝 规则
hope_wisdom
发出的红包

打赏作者

有只老羊在发呆

你的鼓励将是我创作的最大动力

¥1 ¥2 ¥4 ¥6 ¥10 ¥20
扫码支付:¥1
获取中
扫码支付

您的余额不足,请更换扫码支付或充值

打赏作者

实付
使用余额支付
点击重新获取
扫码支付
钱包余额 0

抵扣说明:

1.余额是钱包充值的虚拟货币,按照1:1的比例进行支付金额的抵扣。
2.余额无法直接购买下载,可以购买VIP、付费专栏及课程。

余额充值