


 本文介绍了如何使用Three.js库中的Water和Sky对象来实现三维场景中的水面和天空效果。通过配置Water对象的参数,如纹理大小、法向量贴图等,可以创建流动的水面效果。同时,Sky对象结合CubeCamera,可以生成天空背景。文章还提供了代码示例和参数调整建议,帮助读者理解并应用到自己的项目中。
threejs效果比较好的天空和水面
目录
前言
本文使用的是threejs提供的 Water 和 Sky 实现天空与水面。水的着色器代码比较复杂,threejs提供了封装的两种水,可以方便使用。
一、引入水
import { Water } from 'three/examples/jsm/objects/Water.js';


initWater(){
      let waterGeometry = new THREE.PlaneBufferGeometry( 1000, 1000 );
      let water = new Water(
        waterGeometry,
        {
          textureWidth: 512,
          textureHeight: 512,
          waterNormals: new THREE.TextureLoader().load( require('../../assets/waternormals.jpg'), ( texture )=> {
            texture.wrapS = texture.wrapT = THREE.RepeatWrapping;
          } ),
          alpha: 1.0,
          sunDirection: this.light.position.clone().normalize(),
          sunColor: 0xffffff,
          waterColor: 0x001e0f,
          // waterColor: 'red',
          distortionScale: 3.7,
          fog: this.scene.fog !== undefined
        }
      );
      water.rotation.x = - Math.PI / 2;
      this.water = water
      this.scene.add( water );
  }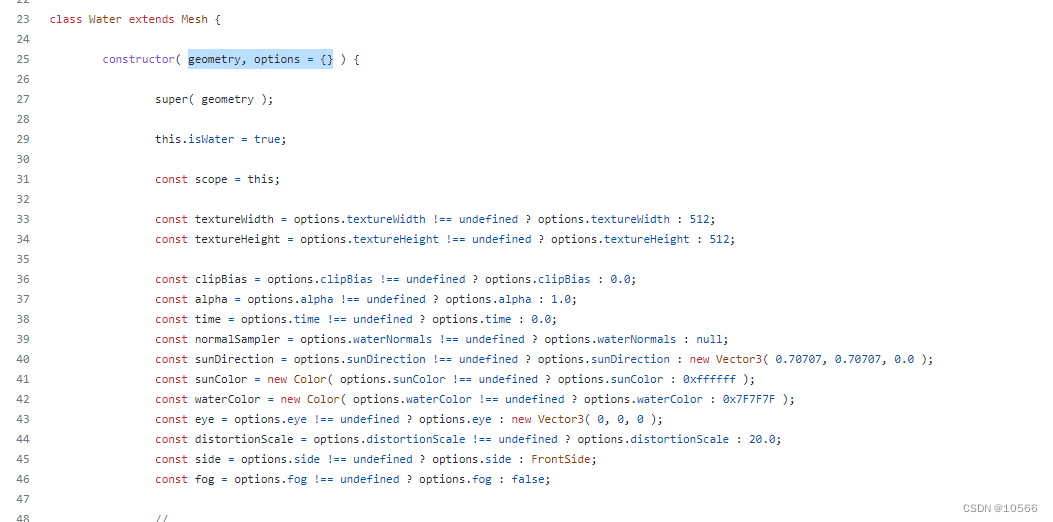
这是水的参数,一个geo,和一些配置。eye除非特殊需求可以不传,他默认相机位置是eye。
render里面更新时间,用来制造水波流动
this.water.material.uniforms[ 'time' ].value += 1.0 / 60.0;这是法向量贴图https://techbrood.com/threejs/examples/textures/waternormals.jpg
二、引入天空
代码如下:
import { Sky } from 'three/examples/jsm/objects/Sky.js';


initSky(){
      let sky = new Sky();
      let uniforms = sky.material.uniforms;
      uniforms[ 'turbidity' ].value = 10;
      uniforms[ 'rayleigh' ].value = 3;
      uniforms[ 'mieCoefficient' ].value = 0.005;
      uniforms[ 'mieDirectionalG' ].value = 0.7;
      let parameters = {
        distance: 400,
        inclination: 0.49,//倾向
        azimuth: 0.205//方位角
      };
      this.parameters = parameters

      const cubeRenderTarget = new THREE.WebGLCubeRenderTarget(128, {
        format: THREE.RGBAFormat,
        generateMipmaps: true,
        minFilter: THREE.LinearMipmapLinearFilter
      })

      const cubeCamera = new THREE.CubeCamera( 0.01, 1000, cubeRenderTarget );

      this.sky = sky
      this.cubeCamera = cubeCamera
      this.cubeRenderTarget = cubeRenderTarget
      this.updateSun()
    },
    updateSun(){
      let parameters = this.parameters
      let sky = this.sky
      let cubeCamera = this.cubeCamera
      let light = this.light
      let theta = Math.PI * ( parameters.inclination - 0.5 );
      let phi = 2 * Math.PI * ( parameters.azimuth - 0.5 );
      light.position.x = parameters.distance * Math.cos( phi );
      light.position.y = parameters.distance * Math.sin( phi ) * Math.sin( theta );
      light.position.z = parameters.distance * Math.sin( phi ) * Math.cos( theta );

      sky.material.uniforms[ 'sunPosition' ].value = light.position.copy( light.position );
      this.water.material.uniforms[ 'sunDirection' ].value =
      light.position.clone().normalize();
      cubeCamera.update( this.renderer, sky );

      this.scene.background = this.cubeRenderTarget.texture
    },
这里可能有点乱,懒得整理了。主要是sky是返回一个背面渲染的mesh,这里利用cubeCamera去获取mesh的纹理图,就可以作为背景图片了。(注意:new THREE.CubeCamera( 0.01, 1000, cubeRenderTarget )这里的远视点与近视点,设置问题会看不见,坑我半天时间)。如果不想设置背景图片,也可以使用一个大的sky,使得看起来就是天空图。
sky.scale.setScalar( 450000 );
this.scene.add(sky);
这样就不需要cubeCamera了。
总结
只是记录一下,代码很多是官网的案例,但是比较老了,有些参数都没了。我给修改了一下。


 1539
1539

 被折叠的 条评论
为什么被折叠?
被折叠的 条评论
为什么被折叠?
 到【灌水乐园】发言


