


摘要: 图像在输入神经网络之前,通常需要进行尺寸压缩,如yolov5的输入为640x640,分类网络Resnet-50的输入为224x224。通常地,分类网络直接将输入进行resize处理,而对于目标检测网络,为了防止目标变形,通常采用padding的方法。
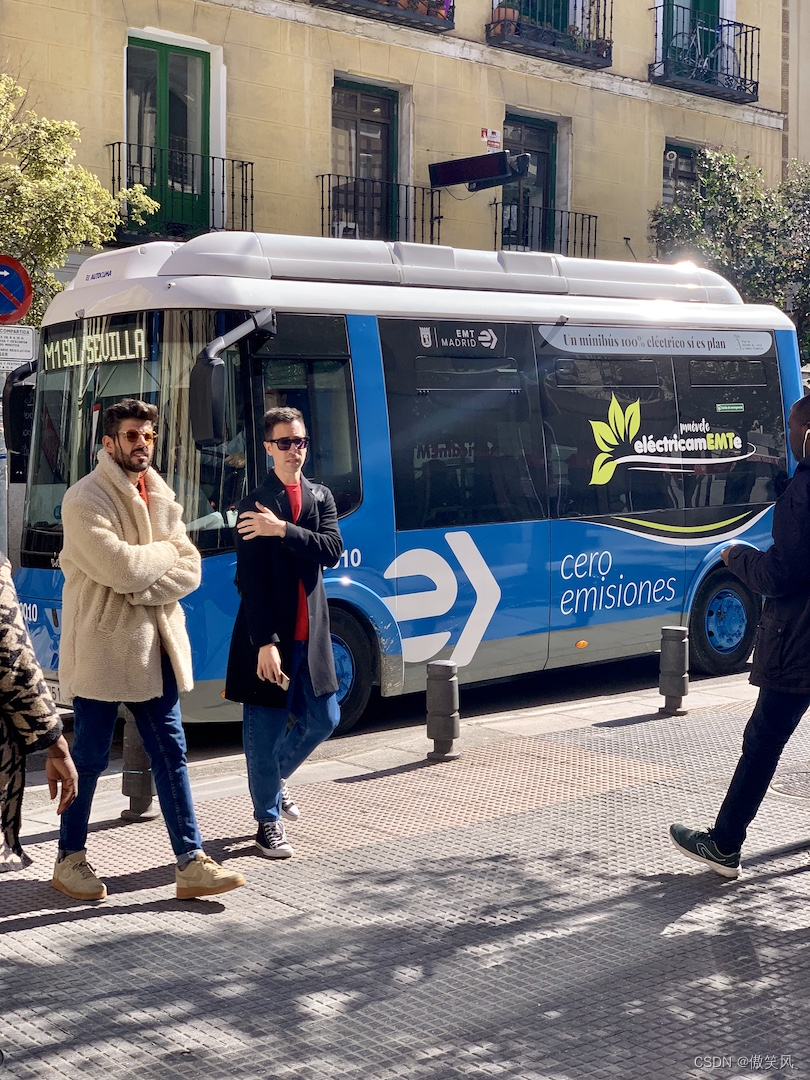
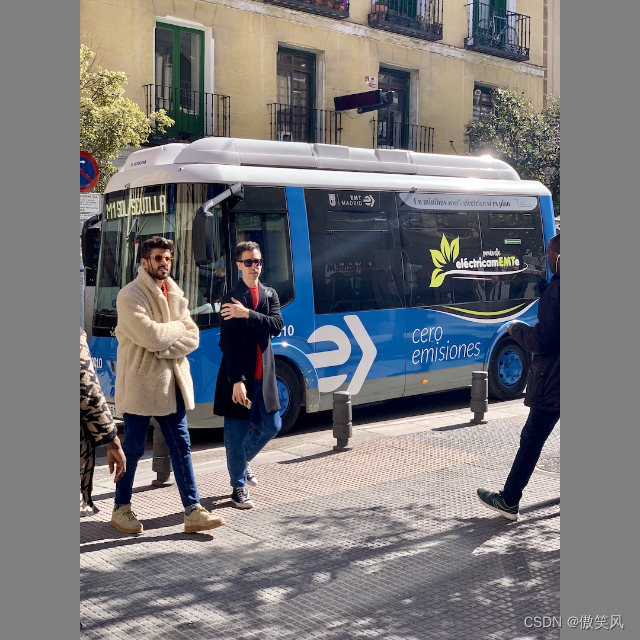
padding方法:把输入图像按比例压缩,然后对边界进行填充,效果如下图所示:
原图:
padding处理后:
要实现以上效果,可以使用yolov5的letterbox()函数:
    def letterbox(self, im, new_shape=(384, 640), color=(114, 114, 114), auto=True, scaleFill=False, scaleup=True, stride=32):
        # Resize and pad image while meeting stride-multiple constraints
        shape = im.shape[:2]  # current shape [height, width]
        if isinstance(new_shape, int):
            new_shape = (new_shape, new_shape)

        # Scale ratio (new / old)
        r = min(new_shape[0] / shape[0], new_shape[1] / shape[1])
        if not scaleup:  # only scale down, do not scale up (for better val mAP)
            r = min(r, 1.0)

        # Compute padding
        ratio = r, r  # width, height ratios
        new_unpad = int(round(shape[1] * r)), int(round(shape[0] * r))
        dw, dh = new_shape[1] - new_unpad[0], new_shape[0] - new_unpad[1]  # wh padding
        if auto:  # minimum rectangle
            dw, dh = np.mod(dw, stride), np.mod(dh, stride)  # wh padding
        elif scaleFill:  # stretch
            dw, dh = 0.0, 0.0
            new_unpad = (new_shape[1], new_shape[0])
            ratio = new_shape[1] / shape[1], new_shape[0] / shape[0]  # width, height ratios

        dw /= 2  # divide padding into 2 sides
        dh /= 2

        if shape[::-1] != new_unpad:  # resize
            im = cv2.resize(im, new_unpad, interpolation=cv2.INTER_LINEAR)
        top, bottom = int(round(dh - 0.1)), int(round(dh + 0.1))
        left, right = int(round(dw - 0.1)), int(round(dw + 0.1))
        im = cv2.copyMakeBorder(im, top, bottom, left, right, cv2.BORDER_CONSTANT, value=color)  # add border
        return im, ratio, (dw, dh)
但由于letterbox函数太过难理解了,于是就自己写了一个,分别使用PIL和opencv实现了。
使用opencv实现padding的方法:
def padding_opencv(image, target_size):
	# image: 输入图像(HWC)
	# target_size: (h, w),格式化输出尺寸
    ih, iw = image.shape[0:2]
    h, w = target_size
    scale = min(float(w) / float(iw), float(h) / float(ih))  # 转换的最小比例

    # 保证长或宽,至少一个符合目标图像的尺寸
    nw = int(iw * scale)
    nh = int(ih * scale)

    image = cv2.resize(image, (nw, nh), cv2.INTER_LINEAR)

    dh = (h - nh) / 2
    dw = (w - nw) / 2

    top, bottom = int(round(dh - 0.1)), int(round(dh + 0.1))
    left, right = int(round(dw - 0.1)), int(round(dw + 0.1))
    return cv2.copyMakeBorder(image, top, bottom, left, right, cv2.BORDER_CONSTANT, value=(128, 128, 128))
使用PIL显示padding方法:
def padding_pil(image, target_size):
    iw, ih = image.size  # 原始图像的尺寸
    w, h = target_size  # 目标图像的尺寸
    scale = min(float(w) / float(iw), float(h) / float(ih))  # 转换的最小比例

    # 保证长或宽,至少一个符合目标图像的尺寸
    nw = int(iw * scale)
    nh = int(ih * scale)

    image = image.resize((nw, nh), Image.BICUBIC)  # 采用双三次插值算法缩小图像
    new_image = Image.new('RGB', target_size, (128, 128, 128))  # 生成灰色图像
    # // 为整数除法,计算图像的位置
    new_image.paste(image, ((w - nw) // 2, (h - nh) // 2))  # 将图像填充为中间图像,两侧为灰色的样式

    return new_image


 3944
3944


 被折叠的 条评论
为什么被折叠?
被折叠的 条评论
为什么被折叠?
 到【灌水乐园】发言


