


1. About GDB debug
1) Start gdbserver on your target board:
 $  gdbserver  <host-ip>:2345  <programm>
         ## (eg. host-ip : 192.168.0.178)
Gdbserver listen the port 2345(of course,you can set any port unsed),and start programm,“then display:”Process test created:pid=88”
2) Start gdb client on your host sides:
$ arm-linux-gdb <programm>
........
This GDB was configured as “--host=i686-pc-linux-gnu,--target=arm-linux”...
(gdb) target remote <target-board-ip>:2345
After then, the gdb connection is ok. The usage for remote gdb like as the normal gdb debug way.
2. Install newest version Qt creator
If you follow the GPL, please install the code.
$ apt-get install libgl1-mesa-dev3. Qt Developement guide
We have two ways to build a Qt project: the command line mode and the gui mode. We have a description as follow:
3.1 Setup Environment in command line mode.
If you want to build C, C++, Qt and other linux application, there is a magical script to use. It’s environment-setup in the $(BSP_ROOT)/cross_compiler/linux-devkit directory. To build some linux application, you just need to excute this script as follow, and then everything will be ok.
$ cd  $(BSP_ROOT)/cross_compiler/linux-devkit>
$ source  environment-setup
After this, you can buid Qt project. For example, we have a calculator qt demo to build as follow:
$  cd  $(demo)/calculator
$  ls
button.cpp  button.h  calculator.cpp  calculator.h  calculator.pro  main.cpp
$  qmake calculator.pro   ## Generating a makefile
$  make    ## If no error, a binary will be generated after make.
3.2 Setup Environment in gui mode.
Qt Creator is a cross-platform IDE that makes application and UI development a breeze. Since time-to-market is key, the IDE includes productivity tools that speed up your development time. Before your qt developement in gui mode, a qtcreator is essential. You can download it at this link https://www.qt.io/download/. The Installation package qt-unified-linux-x64-2.0.3-1-online.run is recommended, because we have tested it on ubuntu14.04 and some previous version of qtcreator installer has some bugs on using gdb debugging.
Then, there are some steps to setup your developement environment as follow:
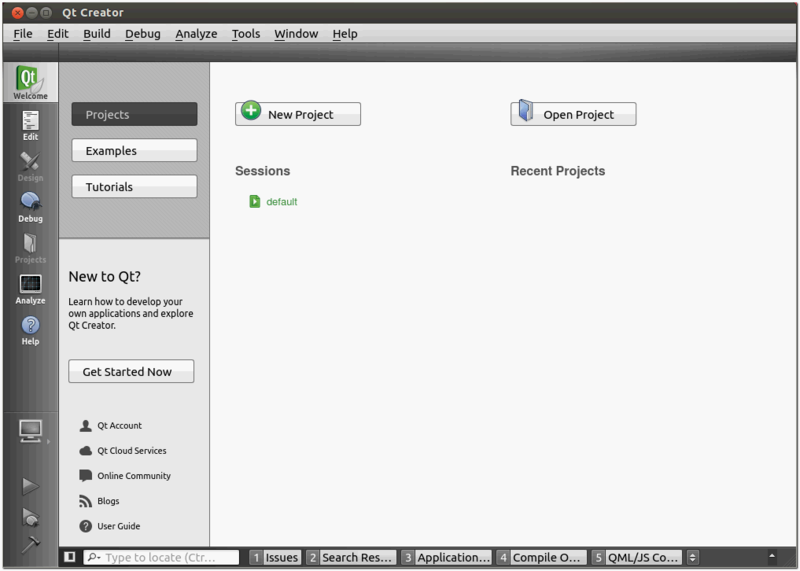
3.2.1 Start the qtcreator IDE
$ cd  $(BSP_ROOT)/cross_compiler/linux-devkit>
$ source  environment-setup
$ cd $(your_qtcreator_install_path)/Tools/QtCreator/bin
$ ./qtcreator.sh
And the QtCreator’s main window shows up.
Check QtCreator’s version by using “Help” -> “About Qt Creator”.
3.2.2 Configuring the Cross-Compiler Options
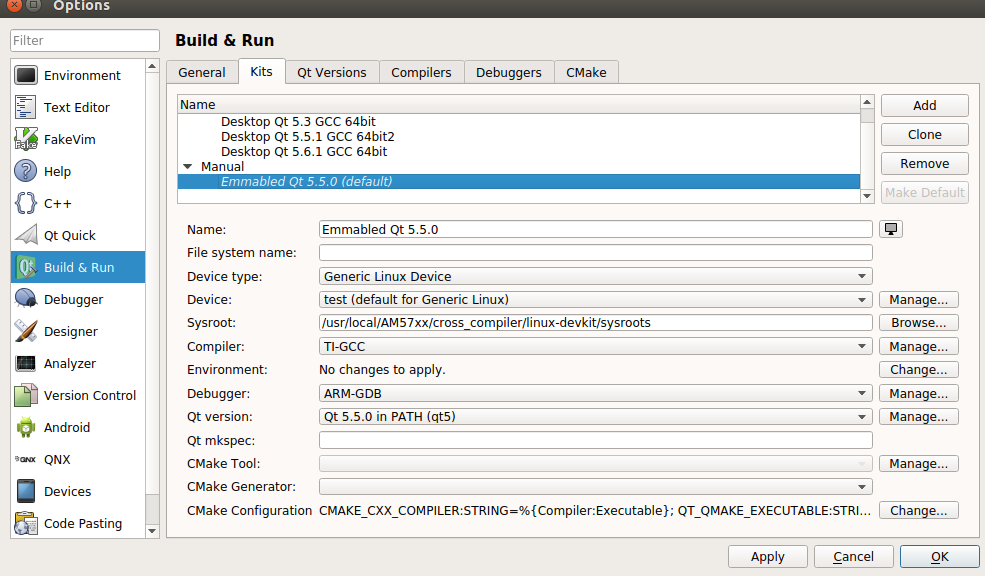
Qt Creator groups settings used for building and running projects as kits to make cross-platform and cross-configuration development easier. Each kit consists of a set of values that define one environment, such as a device, compiler, Qt version, and debugger command to use, and some metadata, such as an icon and a name for the kit. Once you have defined kits, you can select them to build and run projects.
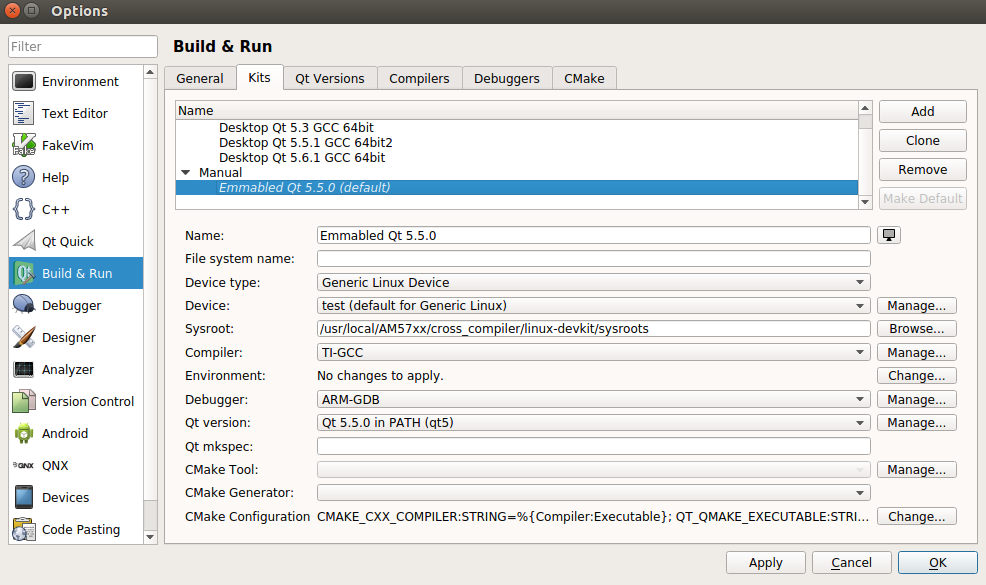
Let’s have a view for kits, select “Tools” -> “Options…” -> “Build & Run” -> “Kits”
Device: You can connect mobile devices to the host PC to run, debug, and analyze applications on them from Qt Creator. You can connect Linux-based devices over a WLAN. You must also configure a connection between Qt Creator and the host PC in the device tab.
Compiler: Qt is supported on a variety of 32-bit and 64-bit platforms, and can usually be built on each platform with GCC, a vendor-supplied compiler, or a third party compiler. In Qt Creator, a kit specifies the compiler and other necessary tools for building and running an application on a particular platform.
Version: Qt Creator allows you to have multiple versions of Qt installed on your development PC and use different versions to build your projects for different purposes. Qt Creator automatically detects the Qt versions that are registered by your system or by installers.
Debugger: The Qt Creator debugger plugin acts as an interface between the Qt Creator core and external native debuggers such as the GNU Symbolic Debugger (GDB), The debugger plugin automatically selects a suitable native debugger for each kit from the ones found on your system. You can also override this choice.
About the details, please refer to this link:
http://doc.qt.io/qtcreator/creator-configuring.html
After these theories, let’s do it.
1) Create qt device:
a. Bring up the options dialog using “Tools” -> “Options…”
b. Select the “Devices” page on the left, and click “Add…”
c. Select “Generic Linux Device” and click “Start Wizard”.

d. Specify proper settings and click “Next>”
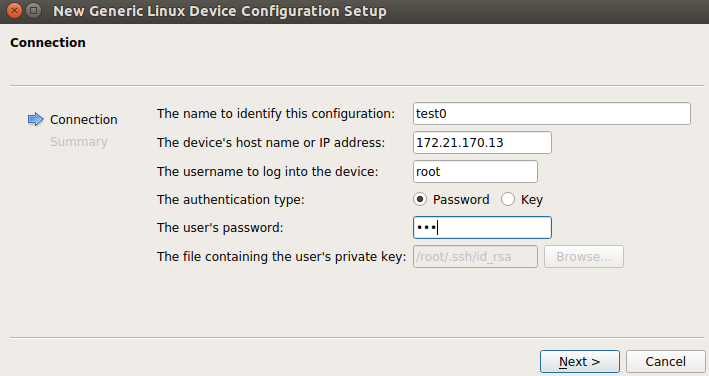
e. Click “Finish”
f. Device test finished successfully. Click “Close”.
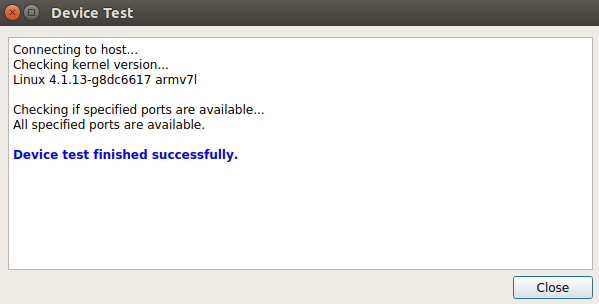
If device test failed, please go back to specify proper settings.
g. Click “Apply”.
Then, a device has been created succesfully.
About the details, please refer to this link:
http://doc.qt.io/qtcreator/creator-developing-generic-linux.html
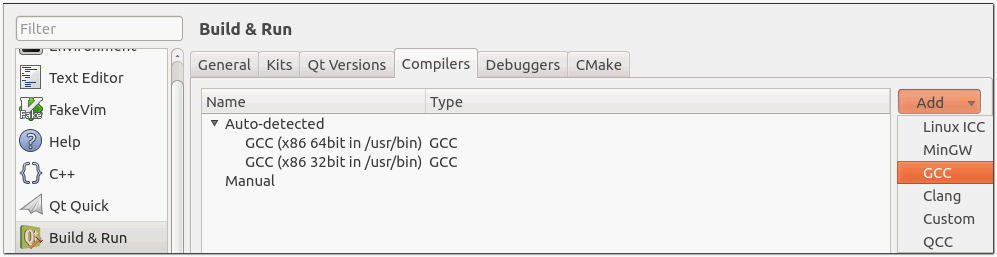
2) Adding Compilers
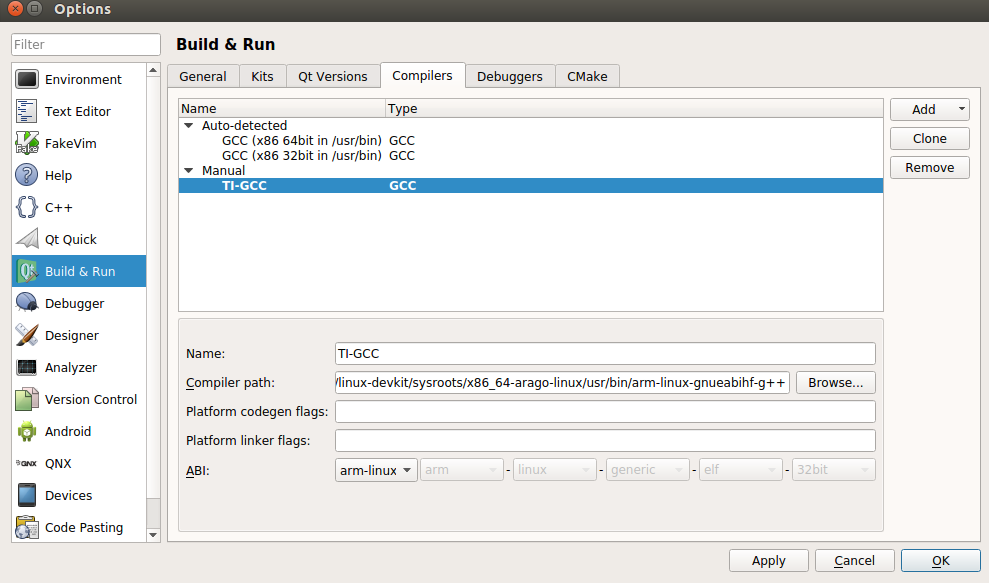
a. Select the “Build & Run” page on the left, switch to “Compilers” tab, drop down “Add” menu and choose “GCC”.
b. Name the compiler as “TI-GCC”
c. Click “Browse…” to select “/usr/local/AM57xx/cross_compiler/linux-devkit/sysroots/x86_64-arago-linux/usr/bin/arm-linux-gnueabihf-g++”
d. Select ABI as “arm-linux-generic-elf-32bit”
e. Click “Apply”
About the details, please refer to this link:
http://doc.qt.io/qtcreator/creator-tool-chains.html
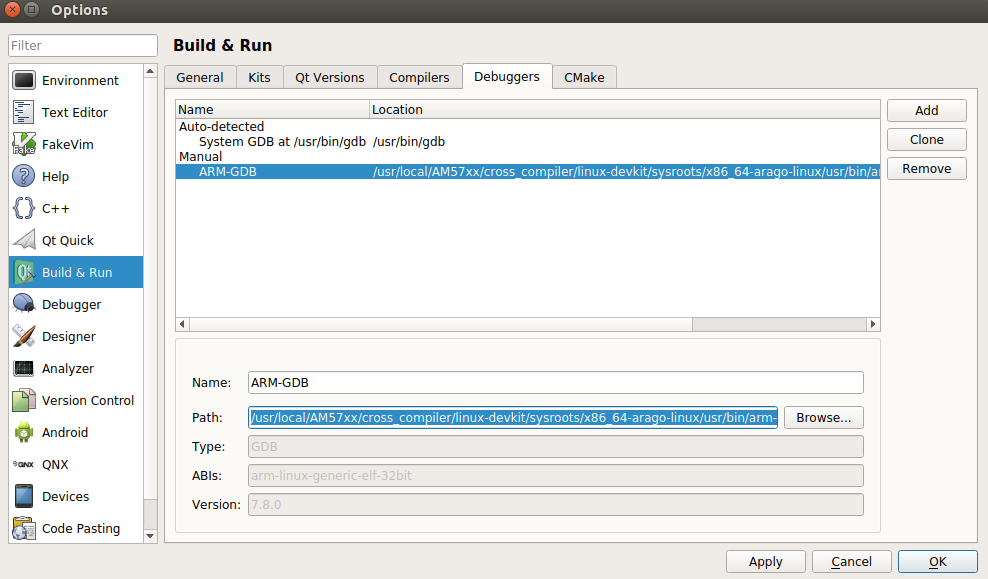
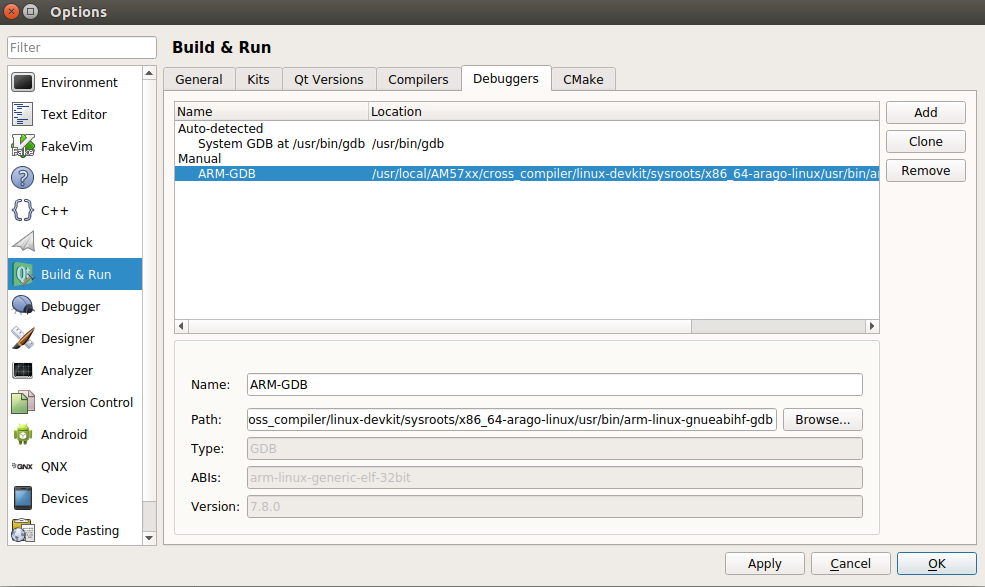
3) Adding Debuggers
a. Switch to the “Debuggers” tab
b. Click “Add”
c. Name the debugger as “ARM-GDB”
d. Click “Browse…” to select “/usr/local/AM57xx/cross_compiler/linux-devkit/sysroots/x86_64-arago-linux/usr/bin/arm-linux-gnueabihf-gdb”
e. Click “Apply”
About the details, please refer to this link:
http://doc.qt.io/qtcreator/creator-debuggers.html
4) Adding Qt Versions
a. Switch to the “Qt Versions” tab.
b. Check if the “Qt 5.5.0 (System)” is auto detected in “Manual” item ? If not, click “Add…” to choose the proper qmake.
c. Click “Apply”
About the details, please refer to this link:
http://doc.qt.io/qtcreator/creator-project-qmake.html
5) Adding Qt Kits
a. Switch to the “Kits” tab.
b. Click “Add”.
c. Name the kit as “Emmabled Qt 5.5.0”.
d. Specify the correct “Device Tpye“, “Compiler“, “Debugger” and “Qt version“(we have added).
e. Click “Browse…” to select “/usr/local/AM57xx/cross_compiler/linux-devkit/sysroots/” as sysroot.
f. Click Apply.
g. Select “Emmabled Qt 5.5.0” and click “make default”.
h. Click OK to finalize the configuration.
About the details, please refer to this link:
http://doc.qt.io/qtcreator/creator-targets.html
http://doc.qt.io/qtcreator/creator-configuring.html
3.3 Creating Qt Project
We have a demo to create a qt project as below:
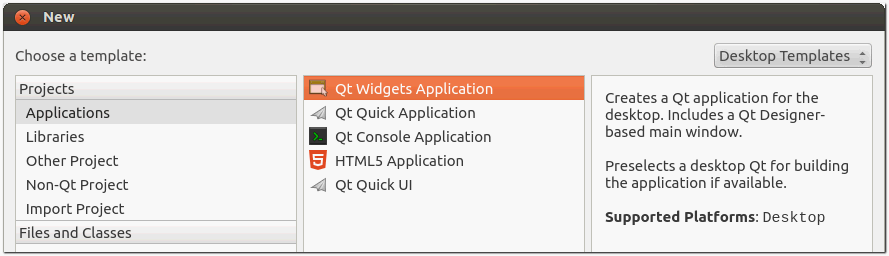
1) Bring up “New” dailog using “File” -> “New File or Project…”
2) Select “Applications” -> ‘Qt Widgets Application”
3) Click “Choose…”
4) Use “hello_qt” as name
5) Create in “/home/adv/qt”
5) Click “Next”

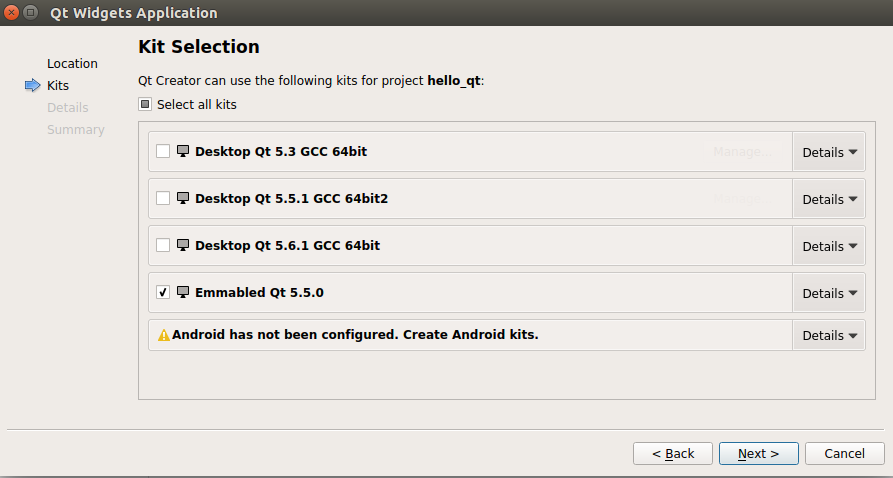
6) Uncheck “Desktop” and check “Emmabled Qt 5.5.0”
7) Click “Next”.
8) Use default settings for “Class Information”
9) Click “Next”
10) Use default settings for “Project Management”
11) Click “Finish”
12) Double click “hello_qt.pro” to switch to editor window
13) When you run the application, Qt Creator copies the necessary files to the device and starts the application on it. For example, adding
target.path = /root
INSTALLS += target
to the project .pro file will copy the binary of your project to /root on the remote device. Additional files can be deployed by adding them to further targets and adding those to INSTALLS as well.
3.4 Building Qt Project
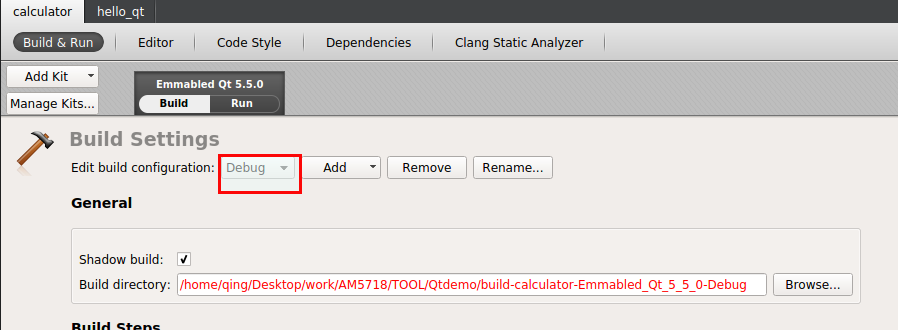
1) Switch to “Projects” mode
2) Check if “build configuration” is set to “Debug”.
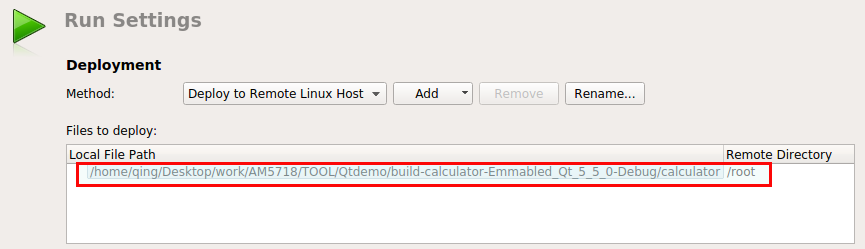
3) Select “Run”, and check if “Files to deploy” is correct
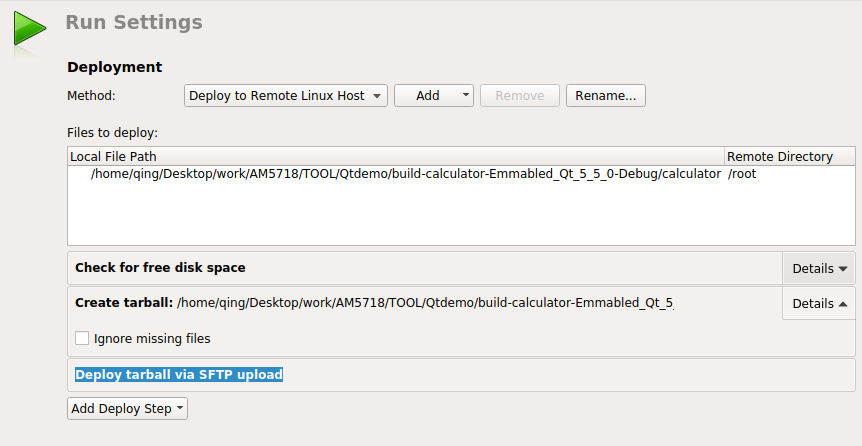
4) Click “Add deploy steps”, select “Create tarball”.
5) Click “Add deploy steps”, select “Deploy tarball via SFTP upload”.
6) Switch to “Edit” mode
7) Click “Build” to make qt project.
3.5 Deploying Qt Application
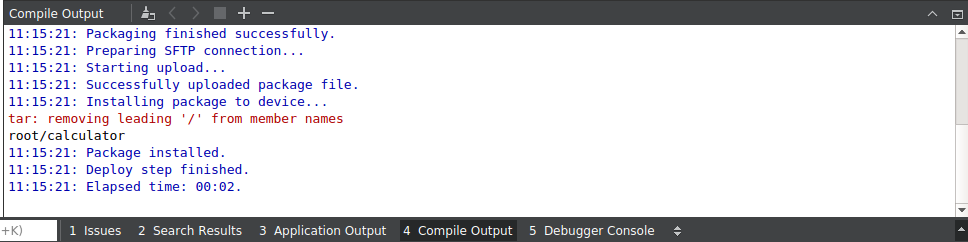
1) Right click your project and select the “Deploy” to upload the binary file to your target board. Note, Please ensure your target board connect to your host PC via LAN before all.
2) You can also copy the binary file to your target board though U dsik directly.
About the details, please refer to this link:
http://doc.qt.io/qt-5/deployment.html
http://doc.qt.io/qtcreator/creator-deployment-embedded-linux.html
3.6 Debugging Qt Application
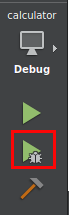
1) Click debug icon to start debugging.
As we know, we have created the Qt device and we have added the gdb to kits. So, once the icon was kicked, the qtcreator will start the gdb server on your target board, and use the gdb client to connect the gdb server automatically.
After this, a debug window will be popped as follow.

Then, you can start to debug your qt code.
2) debug with anthor way Using GDB
When debugging on a target supported by GDB server, a local(host sides) GDB process talks to a GDB server running on the remote machine (target board)that controls the process to be debugged.
The GDB server process is started on the remote machines by passing a port number and the executable:
gdbserver :1234 <executable>It then typically responds:
Process bin/qtcreator created; pid = 5159
Listening on port 1234
On the local machine(host PC) that runs Qt Creator:
a. Select Debug > Start Debugging > Attach to Running Debug Server.
b. In the Host and port field, enter the name of the remote machine and the port number to use.
c. Select OK to start debugging.
About the details, please refer to this link:
http://doc.qt.io/qtcreator/creator-debugger-operating-modes.html
http://doc.qt.io/qtcreator/creator-configuring-projects.html
http://doc.qt.io/qtcreator/creator-debugger-engines.html


 1402
1402

 被折叠的 条评论
为什么被折叠?
被折叠的 条评论
为什么被折叠?
 到【灌水乐园】发言


