


1.研究背景与意义
项目参考AAAI Association for the Advancement of Artificial Intelligence
研究背景与意义
随着数字图像处理技术的不断发展,图像去雪成为了一个重要的研究领域。在冬季,大量的雪花会覆盖在图像上,影响图像的质量和可视性。因此,开发一种高效的图像去雪系统对于提高图像质量和增强图像内容的可视性具有重要意义。
目前,已经有许多图像去雪算法被提出,如基于滤波器的方法、基于统计学的方法、基于边缘检测的方法等。然而,这些方法在处理复杂的雪花纹理和低对比度的图像时存在一定的局限性。因此,需要进一步研究和开发更加高效和准确的图像去雪算法。
另一方面,小波变换作为一种有效的信号分析工具,在图像处理领域得到了广泛应用。它能够将信号分解成不同频率的子带,从而更好地捕捉图像的细节和结构信息。然而,传统的小波变换存在一些问题,如频率分辨率不均匀、边缘信息损失等。为了克服这些问题,复小波变换被提出并应用于图像处理中。
基于双树复小波变换的图像去雪系统是一种新兴的图像去雪方法。双树复小波变换是对传统小波变换的改进,它具有更好的频率分辨率和边缘保持能力。通过将图像进行双树复小波变换,可以将图像分解成不同频率的子带,从而更好地捕捉雪花的细节和结构信息。然后,通过对这些子带进行处理,可以有效地去除图像中的雪花。
基于双树复小波变换的图像去雪系统具有许多优点。首先,它能够更好地保持图像的细节和结构信息,从而避免了传统方法中的信息损失问题。其次,它能够更准确地检测和去除图像中的雪花,提高了去雪的效果。此外,该系统还具有较高的计算效率和实时性,适用于各种图像去雪应用场景。
在实际应用中,基于双树复小波变换的图像去雪系统具有广泛的应用前景。例如,在交通监控系统中,雪花会影响图像的清晰度和可视性,从而影响交通安全。通过应用该系统,可以有效地去除图像中的雪花,提高交通监控系统的性能和可靠性。此外,在数字摄影和图像处理软件中,该系统也可以用于去除图像中的雪花,提高图像的质量和可视性。
综上所述,基于双树复小波变换的图像去雪系统是一个具有重要意义和广泛应用前景的研究领域。通过研究和开发更加高效和准确的图像去雪算法,可以提高图像质量和增强图像内容的可视性,满足实际应用的需求。
2.图片演示


3.视频演示
基于双树复小波变换的图像去雪系统_哔哩哔哩_bilibili
4.算法流程图
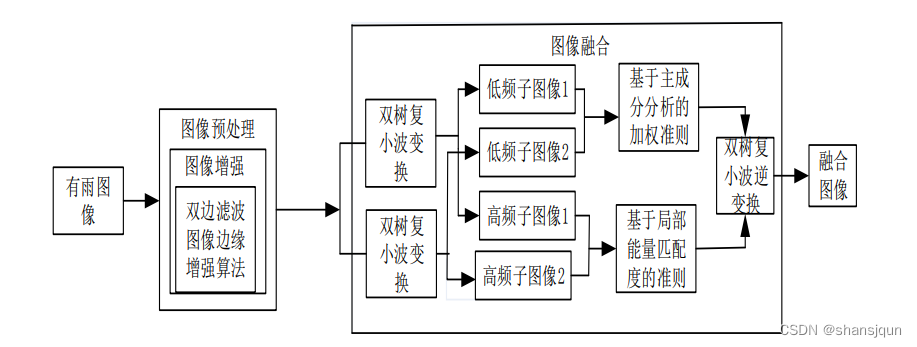
本节论述了基于双树复小波融合的视频图像去雪算法的整体方案设计,该算法主要利用的是雪滴的频域特性,通过对雪滴频域特性的分析,实现雪滴的去除。总体设计主要包括两部分:(⑴)图像预处理部分,(2图像融合部分等,下面将分别介绍这两部分。
5.核心代码讲解
5.1 desnow_allros.py
class Desnow:

    def __init__(self):
        self.pub = rospy.Publisher("/desnow_img", Image, queue_size=1)
        self.pub2= rospy.Publisher("/refog_img", Image, queue_size=1)
        self.get_image(self.pub)

    def progress(self, count, total, status=''):
        self.bar_len = 60
        self.filled_len = int(round(self.bar_len * count / float(total)))
        self.percents = round(100.0 * count / float(total), 1)
        self.bar = '|' * self.filled_len + '-' * (self.bar_len - self.filled_len)
        sys.stdout.write('[%s] %s%s ...%s\r' % (self.bar, self.percents, '%', status))
        if count != total:
            sys.stdout.flush()
        else:
            print()

    def generate_data_generator(self, datagenerator, X, BATCHSIZE):
        self.genX1 = datagenerator.flow(X,batch_size = BATCHSIZE,shuffle=False)
        self.count = 0
        while True:
            self.Xi1 = self.genX1.next()
            self.Xi1 = self.Xi1/255
            yield [self.Xi1]

    def publish_image(self, pub, data, frame_id='base_link'):
        assert len(data.shape) == 3, 'len(data.shape) must be equal to 3.'
        self.header = Header(stamp=rospy.Time.now())
        self.header.frame_id = frame_id
        self.msg = Image()
        self.msg.height = data.shape[0]
        self.msg.width = data.shape[1]
        self.msg.encoding = 'rgb8'
        self.msg.data = np.array(data).tostring()
        self.msg.header = self.header
        self.msg.step = self.msg.width * 1 * 3
        self.pub.publish(self.msg)

    def get_image(self,pub):
        print('Start...')
        rospy.loginfo(rospy.get_caller_id() + "=Loading The Image...")

        folder_path = "/home/seucar/task/desnow/src/image/";
        count = os.listdir(folder_path)
        count.sort()
        print(len(count))
        i=0
        while i<len(count):
            image_path = "/home/seucar/task/desnow/src/image/"+count[i]
            self.save_path ="/home/seucar/task/desnow/src/desnow_image/"+count[i]
            self.img = cv2.imread(image_path)
            self.DATA = []
            if self.img.shape[1]<self.img.shape[0]:
                self.img = np.rot90(self.img)
            if self.img.shape[0] != 480 or self.img.shape[1] != 640:
                self.img = cv2.resize(self.img, (640, 480), interpolation=cv2.INTER_CUBIC)
            self.DATA.append(self.img)
            self.DATA = np.array(self.DATA)
            print(self.DATA.shape,'DATA shape3')
            print('Start Padding')
            self.progress(2,self.DATA.shape[0],'Paddding and convert DATA to YCRCB...')
            self.DATA[0] = cv2.cvtColor(self.DATA[0],cv2.COLOR_BGR2YCR_CB)
            self.DATA = np.pad(self.DATA,((0,0),(16,16),(16,16),(0,0)),'constant')
            print('Got The Image!')

            print('----------Computing...----------')
            with graph.as_default():
                self.val_data_gen = ImageDataGenerator(featurewise_center=False, featurewise_std_normalization=False)
                self.pred = model.predict_generator(self.generate_data_generator(self.val_data_gen,self.DATA, args.batch_size),steps = self.DATA.shape[0]/args.batch_size,verbose=1)
                print('Computing Ok!')

                self.progress(2,self.pred.shape[0],'Saving output...')
                self.pred[0] = np.clip(self.pred[0],0.0,1.0)
                self.image = cv2.cvtColor( (self.pred[0] * 255).astype(np.uint8), cv2.COLOR_YCrCb2BGR)
                self.refog(self.pub2,self.image,self.save_path)
                print('Got The Result!')

                self.publish_image(self.pub, self.image, frame_id='base_link')
            i+=1

    def refog(self,pub,image,path):
        img = cv2.resize(image, (720, 405), interpolation=cv2.INTER_LINEAR)
        m = self.deHaze(img/255)*255
        m = np.clip(m,a_min=0,a_max=255)
        new_image_save = cv2.resize(m, (1920, 1080), interpolation=cv2.INTER_LINEAR)
        cv2.imwrite(path, new_image_save)
        m = m.astype(np.int8)
        self.publish_image2(self.pub2,m,'base_link')

    def deHaze(self,img, r=600, eps=0.001, w=0.55, maxV1=0.01, bGamma=True):
        Y = np.zeros(img.shape)
        V1,A = self.getV1(img, r, eps, w, maxV1)
        for k in range(3):
            Y[:,:,k] = (img[:,:,k]-V1)/(1-V1/A)
        Y = np.clip(Y, 0, 1)
        Y = Y**(np.log(0.3)/np.log(Y.mean()))
        Y = self.imgBrightness(Y, 2.9, -0.05)
        return Y

    def imgBrightness(self,img1, a, b):
        h, w, ch = img1.shape
        src2 = np.zeros([h, w, ch], img1.dtype)
        dst = cv2.addWeighted(img1, a, src2, 1-a, b)
        return dst

    def getV1(self,m, r, eps, w, maxV1):
        V1 = np.min(m,2)
        V1 = self.guidedfilter(V1, self.zmMinFilterGray(V1,7), r, eps)
        bins = 2000
        ht = np.histogram(V1, bins)
        d = np.cumsum(ht[0])/float(V1.size)
        for lmax in range(bins-1, 0, -1):
            if d[lmax]<=0.999:
                break
        A = np.mean(m,2)[V1>=ht[1][lmax]].max()
        V1 = np.minimum(V1*w, maxV1)
        return V1,A

    def zmMinFilterGray(self,src, r=7):
        return cv2.erode(src, np.ones((2*r+1, 2*r+1)))

    def guidedfilter(self,I, p, r, eps):
        height, width = I.shape
        m_I = cv
这个程序文件是一个ROS节点,用于去雪和去雾的图像处理。它首先导入了所需的ROS和Python库,然后定义了一个名为Desnow的类。在类的初始化函数中,定义了发布者和订阅者,并调用了get_image函数来获取图像并进行处理。get_image函数首先加载图像,然后对图像进行预处理和计算,最后发布处理后的图像。在计算过程中,使用了预训练的深度学习模型来进行去雪处理,并使用自定义的去雾算法进行去雾处理。最后,程序进入主函数,初始化ROS节点并创建Desnow对象,然后进入循环以保持节点的运行。
5.2 predict.py
class Denoiser:
    def __init__(self, model_path):
        self.model = model.model.build_DTCWT_model((512, 672, 3))
        self.model.load_weights(model_path, by_name=False)

    def load_and_preprocess_image(self, image_path):
        image = cv2.imread(image_path)
        original_image = image.copy()  # 复制原始图像以便稍后显示
        if image.shape[1] < image.shape[0]:
            image = np.rot90(image)
        if image.shape[0] != 480 or image.shape[1] != 640:
            image = cv2.resize(image, (640, 480), interpolation=cv2.INTER_CUBIC)
        image = cv2.cvtColor(image, cv2.COLOR_BGR2YCrCb)
        image = np.pad(image, ((16, 16), (16, 16), (0, 0)), 'constant')
        return image, original_image

    def predict_and_postprocess(self, image):
        # 将输入图像的数据范围从 [0, 255] 缩放到 [0, 1]
        image = image / 255.0
        prediction = self.model.predict(np.expand_dims(image, axis=0))
        prediction = np.clip(prediction[0], 0.0, 1.0)

        # 将预测结果的数据范围从 [0, 1] 缩放回 [0, 255]
        prediction = (prediction * 255).astype(np.uint8)
        prediction = cv2.cvtColor(prediction, cv2.COLOR_YCrCb2BGR)
        return prediction

if __name__ == '__main__':
    # 加载和预处理图像
    image_path = './testImg/0.tif'  # 修改为您的图像路径
    denoiser = Denoiser('./modelParam/finalmodel.h5')
    image, original_image = denoiser.load_and_preprocess_image(image_path)

    # 显示原始图像
    cv2.imshow("Original Image", original_image)

    # 预测和后处理
    result = denoiser.predict_and_postprocess(image)

    # 显示去雪后的图像
    cv2.imshow("Denoised Image", result)
    cv2.waitKey(0)  # 等待用户按键
    cv2.destroyAllWindows()
这个程序文件名为predict.py,它的功能是加载一个训练好的模型,对输入的图像进行去雪处理,并显示去雪后的图像。
程序首先导入了必要的库,包括cv2和numpy,以及一个名为model的自定义模块。
接下来定义了两个函数load_and_preprocess_image和predict_and_postprocess。
load_and_preprocess_image函数用于加载和预处理图像。它首先使用cv2.imread函数读取图像,然后复制一份原始图像以便稍后显示。如果图像的宽度小于高度,则将图像旋转90度。如果图像的尺寸不是480x640,则使用cv2.resize函数将图像调整为该尺寸。接着,将图像转换为YCrCb颜色空间,并使用np.pad函数在图像周围填充16个像素。最后,返回预处理后的图像和原始图像。
predict_and_postprocess函数用于对预处理后的图像进行预测和后处理。首先,将输入图像的像素值范围从[0, 255]缩放到[0, 1]。然后,使用模型对图像进行预测,并将预测结果限制在[0, 1]的范围内。接着,将预测结果的像素值范围从[0, 1]缩放回[0, 255],并将颜色空间从YCrCb转换回BGR。最后,返回后处理后的预测结果。
在主函数中,首先指定了一个图像路径,然后调用load_and_preprocess_image函数加载和预处理图像,并将返回的图像和原始图像分别显示出来。
接着,使用model.model.build_DTCWT_model函数构建一个模型,并使用model.load_weights函数加载训练好的模型参数。
然后,调用predict_and_postprocess函数对预处理后的图像进行预测和后处理,得到去雪后的图像。
最后,将去雪后的图像显示出来,并等待用户按键关闭窗口。
5.3 predict_batch.py
class ImagePredictor:
    def __init__(self, dataroot='./testImg', datatype=['jpg','tif','png'], predictpath='./predictImg', batch_size=3):
        self.dataroot = dataroot
        self.datatype = datatype
        self.predictpath = predictpath
        self.batch_size = batch_size

    def parse_args(self):
        parser = ArgumentParser(description='Predict')
        parser.add_argument(
            '-dataroot', '--dataroot',
            type=str, default=self.dataroot,
            help='root of the image, if data type is npy, set datatype as npy'
        )
        parser.add_argument(
            '-datatype', '--datatype',
            type=str, default=self.datatype,
            help='type of the image, if == npy, will load dataroot'
        )
        parser.add_argument(
            '-predictpath', '--predictpath',
            type=str, default=self.predictpath,
            help='root of the output'
        )
        parser.add_argument(
            '-batch_size', '--batch_size',
            type=int, default=self.batch_size,
            help='batch_size'
        )

        return  parser.parse_args()

    def progress(self, count, total, status=''):
        bar_len = 60
        filled_len = int(round(bar_len * count / float(total)))

        percents = round(100.0 * count / float(total), 1)
        bar = '|' * filled_len + '-' * (bar_len - filled_len)

        sys.stdout.write('[%s] %s%s ...%s\r' % (bar, percents, '%', status))
        if count != total:
            sys.stdout.flush()
        else:
            print()

    def generate_data_generator(self, datagenerator, X, BATCHSIZE):
        genX1 = datagenerator.flow(X,batch_size = BATCHSIZE,shuffle=False)
        count = 0
        while True:
                Xi1 = genX1.next()

                Xi1 = Xi1/255
                yield [Xi1]

    def predict(self):
        args = self.parse_args()

        #read test data
        selectNames = []
        if args.datatype == 'npy':
            print('Load from npy:',args.dataroot)
            data = np.load(args.dataroot)
        else:
            data=[]
            print('Read img from:' , args.dataroot)
            fnames=os.listdir(args.dataroot)
            print('Len of the file:',len(fnames))
            count = 1
            for f in fnames:
                self.progress(count,len(fnames),'Loading data...')
                count+=1
                if f.split('.')[-1] in args.datatype:
                    tmp=cv2.imread(args.dataroot+'/'+f)
                    selectNames.append(f)
                    if tmp.shape[1]<tmp.shape[0]:
                        tmp=np.rot90(tmp)
                    if tmp.shape[0]!=480 or tmp.shape[1]!=640:
                        tmp=cv2.resize(tmp, (640, 480), interpolation=cv2.INTER_CUBIC)
                    data.append(tmp)
            data=np.array(data)

        print(data.shape,'data shape')
        print('Start Padding')
        for i in range(data.shape[0]):
            self.progress(i+1,data.shape[0],'Paddding and convert data to YCRCB...')
            data[i]=cv2.cvtColor(data[i],cv2.COLOR_BGR2YCR_CB)
        data=np.pad(data,((0,0),(16,16),(16,16),(0,0)),'constant')
        print(data.shape,'data shape')
        #data=data/255

        if not os.path.exists(args.predictpath):
            os.mkdir(args.predictpath)

        #BUILD COMBINE MODEL
        print('----------Build Model----------')
        model=model.model.build_DTCWT_model((512,672,3))
        model.load_weights('./modelParam/finalmodel.h5',by_name=False)

        print('LogPath:',args.predictpath)

        val_data_gen = ImageDataGenerator(featurewise_center=False,
                             featurewise_std_normalization=False)

        pred=model.predict_generator(self.generate_data_generator(val_data_gen,data,args.batch_size),steps = data.shape[0]/args.batch_size,verbose=1)

        print('Save Output')
        for i in range(pred.shape[0]):
            self.progress(i+1,pred.shape[0],'Saving output...')
            pred[i]=np.clip(pred[i],0.0,1.0)
            if args.datatype == 'npy':
                cv2.imwrite(args.predictpath+'/'+str(i)+'.jpg',cv2.cvtColor( (pred[i]*255).astype(np.uint8), cv2.COLOR_YCrCb2BGR))
            else:
                cv2.imwrite(args.predictpath+'/'+os.path.splitext(selectNames[i])[0]+'.jpg',cv2.cvtColor( (pred[i]*255).astype(np.uint8), cv2.COLOR_YCrCb2BGR))
该程序文件是一个用于批量预测图像的脚本。它首先读取测试数据,可以从.npy文件中加载数据,也可以从指定文件夹中读取图像文件。然后对读取的图像进行预处理,包括调整大小和颜色空间转换。接下来,构建一个模型并加载预训练的权重。最后,使用生成器生成批量数据,并使用模型进行预测。预测结果保存为图像文件。
5.4 train.py
def seperateChannel(input):
    ############ Seperate R, G, B kernel ############

    R_kernel = np.array([[[1, 0, 0]]])
    G_kernel = np.array([[[0, 1, 0]]])
    B_kernel = np.array([[[0, 0, 1]]])
    R = Conv2D(1, (1, 1), padding='same', kernel_initializer=keras.initializers.Constant(value=R_kernel),name="seperateR")(input)
    G = Conv2D(1, (1, 1), padding='same', kernel_initializer=keras.initializers.Constant(value=G_kernel),name="seperateG")(input)
    B = Conv2D(1, (1, 1), padding='same', kernel_initializer=keras.initializers.Constant(value=B_kernel),name="se
    ......
train.py是一个用于训练模型的程序文件。该文件使用了Keras库来构建深度学习模型,并使用了一些常用的层和优化器。程序中定义了一些自定义的层,包括dtcwtLayer、inversedtcwtLayer和sliceLayer。这些层用于实现离散小波变换和逆变换。程序还定义了一些辅助函数,如seperateChannel和refine_H。这些函数用于对输入数据进行预处理和后处理。最后,程序使用ImageDataGenerator来生成训练数据,并使用一些回调函数来监控训练过程。
5.5 ui.py
class SnowRemovalSystem:
    def __init__(self):
        # 加载模型
        self.model = model.model.build_DTCWT_model((512, 672, 3))
        self.model.load_weights('./modelParam/finalmodel.h5', by_name=False)
        # 创建应用
        self.window_application = QApplication(sys.argv)
        # 设置登录窗口
        self.login_ui = LoginDialog()
        # 校验是否验证通过
        if self.login_ui.exec_() == QDialog.Accepted:
            # 初始化主功能窗口
            self.MainWindow = QtWidgets.QMainWindow()
            self.ui = Ui_MainWindow()
            self.ui.setupUi(self.MainWindow)
            self.MainWindow.show()
            if self.login_ui.administrator == 1:
                self.ui.printf('欢迎管理员')
                for i in range(0,len(self.login_ui.userstext)):
                    self.ui.printf('账户' + str(i) + ':' + str(self.login_ui.userstext[i]))
                    self.ui.printf('密码' + str(i) + ':' + str(self.login_ui.passtext[i]))
            else:
                self.ui.printf('欢迎用户')
            # 设置应用退出
            sys.exit(self.window_application.exec_())

class SnowRemovalSystemUI:
    def __init__(self):
        self.setupUi()

    def setupUi(self):
        self.MainWindow = QtWidgets.QMainWindow()
        self.ui = Ui_MainWindow()
        self.ui.setupUi(self.MainWindow)
        self.MainWindow.show()

    def printf(self, text):
        self.ui.textBrowser.append(text)
        self.cursor = self.ui.textBrowser.textCursor()
        self.ui.textBrowser.moveCursor(self.cursor.End)
        QtWidgets.QApplication.processEvents()

class LoginDialog(QDialog):
    def __init__(self, *args, **kwargs):
        super().__init__(*args, **kwargs)
        self.setWindowTitle('欢迎登录')
        self.resize(600, 500)
        self.setFixedSize(self.width(), self.height())
        self.setWindowFlags(Qt.WindowCloseButtonHint)
        self.setStyleSheet("background-image: url(\"./template/1.png\")")
        self.setupUi()

    def setupUi(self):
        self.frame = QFrame(self)
        self.frame.setStyleSheet("background:rgba(255,255,255,0);")
        self.frame.move(185, 180)

        self.nameEd1 = QLineEdit(self)
        self.nameEd1.setFixedSize(150, 30)
        self.nameEd1.setPlaceholderText("账号")
        op1 = QGraphicsOpacityEffect()
        op1.setOpacity(0.5)
        self.nameEd1.setGraphicsEffect(op1)
        self.nameEd1.setStyleSheet('''QLineEdit{border-radius:5px;}''')

        self.nameEd3 = QLineEdit(self)
        ......
该程序文件名为ui.py,主要功能是基于双树复小波变换的图像去雪系统。程序使用PyQt5库实现图形用户界面,并调用OpenCV和模型文件进行图像处理和预测。
程序主要包含以下功能:
- 加载和预处理图像:通过cv2库读取图像文件,进行旋转、调整大小和颜色空间转换等预处理操作。
- 预测和后处理:将预处理后的图像输入模型进行预测,并对预测结果进行后处理,包括数据范围缩放和颜色空间转换等操作。
- 显示图像:通过Qt库将处理前后的图像显示在界面上。
- 线程处理:使用QThread类创建线程,实现图像处理的并行操作。
- 用户界面:使用QtDesigner设计界面,包括标签、按钮和文本框等控件,实现图像选择、处理和退出等功能。
程序还包含一个登录对话框,用于验证用户身份。用户可以选择登录或注册账号,并输入账号和密码进行验证。
在程序运行时,首先加载模型文件,然后显示登录对话框。如果验证通过,会显示主功能窗口,并根据用户身份显示相应的信息。用户可以选择图片进行处理,显示原始图像和去雪后的图像,并在文本框中显示处理结果。用户还可以选择退出系统。
整个程序的功能是基于双树复小波变换的图像去雪系统,通过图形用户界面提供了方便的操作和显示功能,可以对图像进行去雪处理。
5.6 model\model.py
class DTCWTModel:
    def __init__(self):
        self.model = None

    def build_model(self):
        input = Input(shape=(None, None, 3))
        R, G, B = self.seperateChannel(input)
        R_low, R_high_0, R_high_1 = self.dtcwtLayer(R)
        G_low, G_high_0, G_high_1 = self.dtcwtLayer(G)
        B_low, B_high_0, B_high_1 = self.dtcwtLayer(B)
        R_low, R_high_0, R_high_1 = self.refine_H(R, R_low, 'he_normal', 'R')
        G_low, G_high_0, G_high_1 = self.refine_H(G, G_low, 'he_normal', 'G')
        B_low, B_high_0, B_high_1 = self.refine_H(B, B_low, 'he_normal', 'B')
        R = self.inversedtcwtLayer([R_low, R_high_0, R_high_1])
        G = self.inversedtcwtLayer([G_low, G_high_0, G_high_1])
        B = self.inversedtcwtLayer([B_low, B_high_0, B_high_1])
        output = Concatenate()([R, G, B])
        self.model = Model(inputs=input, outputs=output)

    def seperateChannel(self, input):
        R_kernel = np.array([[[1, 0, 0]]])
        G_kernel = np.array([[[0, 1, 0]]])
        B_kernel = np.array([[[0, 0, 1]]])
        R = Conv2D(1, (1, 1), padding='same', kernel_initializer=keras.initializers.Constant(value=R_kernel),name="seperateR")(input)
        G = Conv2D(1, (1, 1), padding='same', kernel_initializer=keras.initializers.Constant(value=G_kernel),name="seperateG")(input)
        B = Conv2D(1, (1, 1), padding='same', kernel_initializer=keras.initializers.Constant(value=B_kernel),name="seperateB")(input)
        return R, G, B

    def dtcwtLayer(self, input):
        xfm = dtcwt.tf.Transform2d()
        x = xfm.forward_channels(input, data_format = 'nhwc',nlevels=2)
        output_low = x.lowpass_op
        high_0_list = []
        for is_imag in range(2):
            for i in range(3):
                for j in range(6):
                    if is_imag == 0:
                        high_0_list.append(K.expand_dims(tf.math.real(x.highpasses_ops[0][:,:,:,i,j]),3))
                    elif is_imag == 1:
                        high_0_list.append(K.expand_dims(tf.math.imag(x.highpasses_ops[0][:,:,:,i,j]),3))
                    else:
                        raise ValueError
        output_high_0 = K.concatenate(high_0_list,axis=3)
        high_1_list = []
        for is_imag in range(2):
            for j in range(6):
                for i in range(3):
                    if is_imag == 0:
                        high_1_list.append(K.expand_dims(tf.math.real(x.highpasses_ops[1][:,:,:,i,j]),3))
                    elif is_imag == 1:
                        high_1_list.append(K.expand_dims(tf.math.imag(x.highpasses_ops[1][:,:,:,i,j]),3))
                    else:
                        raise ValueError
        output_high_1 = K.concatenate(high_1_list,axis=3)
        return output_low, output_high_0, output_high_1

    def inversedtcwtLayer(self, input):
        xfm = dtcwt.tf.Transform2d()
        low_part = input[0]
        high_part0 = input[1]
        high_part1 = input[2]
        final_high_0_real_list = []
        for j in range(6):
            rgb_channel_list = []
            for i in range(3):
                rgb_channel_list.append(K.expand_dims(high_part0[:,:,:,i + 3 * j],3))
            rgb_channel = K.concatenate(rgb_channel_list,axis=3)
            final_high_0_real_list.append(K.expand_dims(rgb_channel,4))
        final_high_0_real = K.concatenate(final_high_0_real_list,axis=4)
        final_high_0_imag_list = []
        for j in range(6):
            rgb_channel_list = []
            for i in range(3):
                rgb_channel_list.append(K.expand_dims(high_part0[:,:,:,i + 3 * j + 18],3))
            rgb_channel = K.concatenate(rgb_channel_list,axis=3)
            final_high_0_imag_list.append(K.expand_dims(rgb_channel,4))
        final_high_0_imag = K.concatenate(final_high_0_imag_list,axis=4)
        final_high_0 = tf.complex(final_high_0_real, final_high_0_imag)
        final_high_1_real_list = []
        for j in range(6):
            rgb_channel_list = []
            for i in range(3):
                rgb_channel_list.append(K.expand_dims(high_part1[:,:,:,i + 3 * j],3))
            rgb_channel = K.concatenate(rgb_channel_list,axis=3)
            final_high_1_real_list.append(K.expand_dims(rgb_channel,4))
        final_high_1_real = K.concatenate(final_high_1_real_list,axis=4)
        final_high_1_imag_list = []
        for j in range(6):
            rgb_channel_list = []
            for i in range(3):
                rgb_channel_list.append(K.expand_dims(high_part1[:,:,:,i + 3 * j + 18],3))
            rgb_channel = K.concatenate(rgb_channel_list,axis=3)
            final_high_1_imag_list.append(K.expand_dims(rgb_channel,4))
        final_high_1_imag = K.concatenate(final_high_1_imag_list,axis=4)
        final_high_1 = tf.complex(final_high_1_real, final_high_1_imag)
        pyramid = dtcwt.tf.Pyramid(low_part, (final_high_0, final_high_1))
        inverse_result = xfm.inverse_channels(pyramid, data_format = 'nhwc')
        return inverse_result

    def refine_H(self, input, inputD, initializer, nameAdjust, dropout=0.0):
        init = input
        channel_axis = 1 if K.image_data_format() == 'channels_first' else -1
        L1 = Conv2D(64, (2, 2), padding='same', strides=(2, 2), kernel_initializer = initializer)(inputD)
        L2 = Conv2D(64, (3, 3), padding='same', strides=(2, 2), kernel_initializer = initializer)(inputD)
        L3 = Conv2D(64, (5, 5), padding='same', strides=(2, 2), kernel_initializer = initializer)(inputD)
        L = Concatenate()([L1,L2,L3])
        L = BatchNormalization(axis=channel_axis)(L)
        L = Dropout(dropout)(L)
        L_m = LeakyReLU(alpha=0.5)(L)

        L1 = Conv2D(64, (2, 2), padding='same', kernel_initializer = initializer)(L_m)
        L2 = Conv2D(64, (3, 3), padding='same', kernel_initializer = initializer)(L_m)
        L3 = Conv2D(64, (5, 5), padding='same', kernel_initializer = initializer)(L_m)
        L4 = Conv2D(64, (9, 9), padding='same', kernel_initializer = initializer)(L_m)
        L1 = LeakyReLU(alpha=0.5)(L1)
        L2 = LeakyReLU(alpha=0.5)(L2)
model\model.py是一个使用Keras构建的模型文件。该模型文件定义了一些自定义的层和函数,并且使用了一些Keras的内置层和函数。
该模型文件的主要内容包括:
- 导入必要的库和模块。
- 定义了一个用于分离RGB通道的函数seperateChannel。
- 定义了一个自定义的层dtcwtLayer,用于进行离散小波变换。
- 定义了一个自定义的层inversedtcwtLayer,用于进行离散小波逆变换。
- 定义了一个自定义的层bound_relu,用于对输入进行ReLU激活,并限制输出的范围。
- 定义了一个自定义的层sliceLayer,用于对输入进行裁剪。
- 定义了一个函数refine_H,用于对输入进行卷积和激活操作。
总体来说,该模型文件实现了一些常用的图像处理操作,如分离RGB通道、离散小波变换和逆变换等。这些操作可以用于图像处理和图像增强等任务。
6.系统整体结构
整体功能和构架概述:
该程序是一个基于双树复小波变换的图像去雪系统,使用了深度学习模型进行图像处理和预测。程序包含了图像加载、预处理、模型训练、预测和后处理等功能,并通过图形用户界面提供了方便的操作和显示。
下表是每个文件的功能概述:
| 文件名 | 功能概述 |
|---|---|
| desnow_allros.py | ROS节点,用于去雪和去雾的图像处理,包括图像加载、预处理、深度学习模型预测和后处理等功能 |
| predict.py | 加载训练好的模型,对输入的图像进行去雪处理,并显示去雪后的图像 |
| predict_batch.py | 批量预测图像的脚本,包括加载测试数据、预处理、模型预测和保存预测结果等功能 |
| train.py | 训练模型的脚本,使用Keras构建深度学习模型,并包含自定义层和优化器等功能 |
| ui.py | 基于双树复小波变换的图像去雪系统的图形用户界面,包括图像加载、预测、显示和退出等功能 |
| model\model.py | 模型文件,定义了自定义层和函数,用于图像处理和预测的一些常用操作 |
以上是对每个文件功能的简要概述,每个文件在整个程序中扮演着不同的角色,共同构成了基于双树复小波变换的图像去雪系统的完整功能。
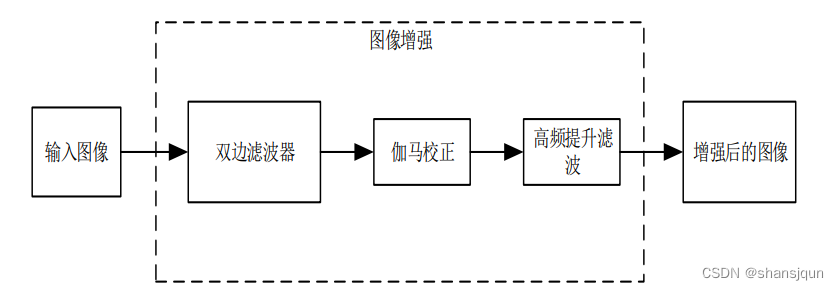
7.图像预处理
在该部分中,提出了一种基于双边滤波器的图像增强算法。首先通过空间域的伽马校正方法,实现图像灰度范围的增大,再通过利用双边滤波和高频提升滤波两者不同原理的滤波算法,实现对比度的增加,增强算法流程如图所示。
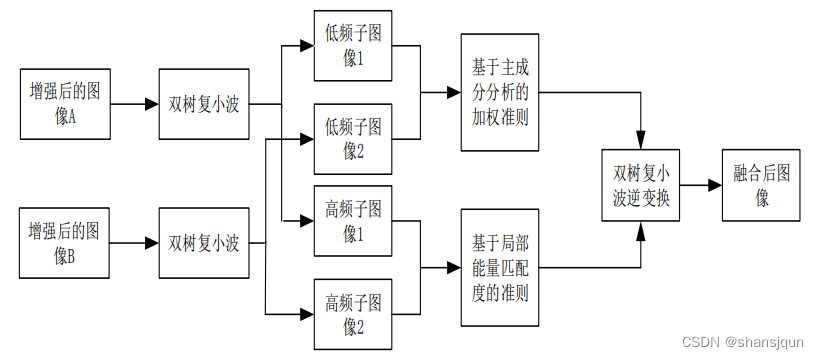
8.图像融合
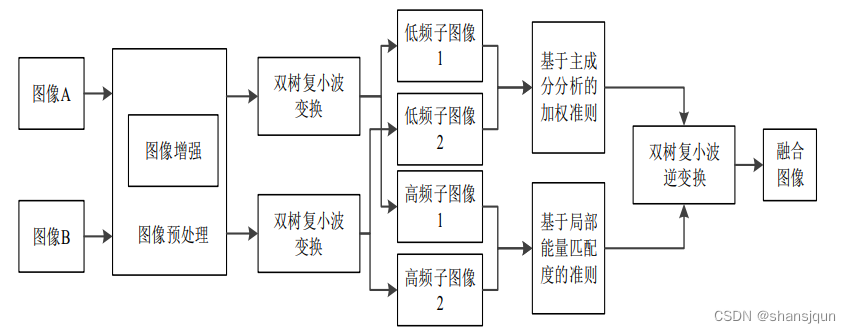
在该部分中,提出一种基于双树复小波融合的去雨方法,算法流程如图所示,算法简要步骤如下:
(1)双树复小波对图像增强后的有雪图像进行分解。
(2)对于低频子图像,按照基于PCA的加权准则进行融合。(3)对于高频子图像,按照基于能量匹配度的融合准则进行融合。
(4)通过双树复小波对融合后的子图像实现逆变换运算,获得无雪图像。
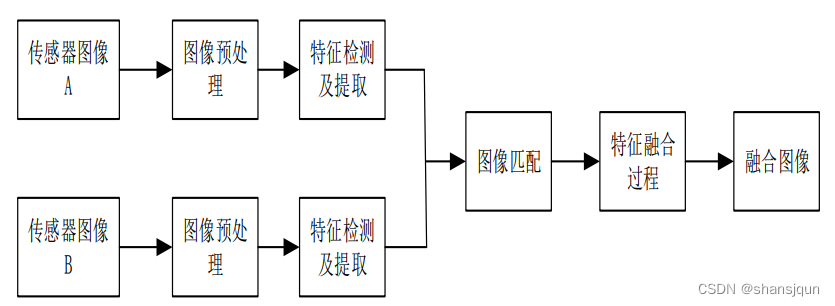
依据于图像特征信息层级的不同,图像融合技术主要为像素层级的融合、特征层级的融合和决策层级的融合[1-4]。下面对三种层级的融合技术逐一进行介绍。
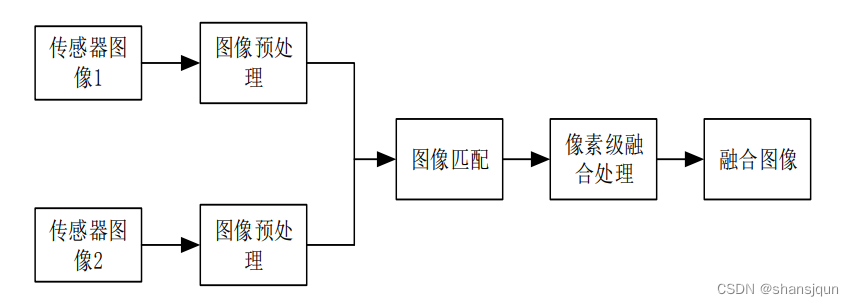
像素层级的融合,顾名思义,是针对像素进行融合的一种策略,融合策略较简单。由于像素级融合是处理像素点,因此其等级也是最低的,但这并不影响其融合效果,该融合技术的融合效果好,精度高、能保留图像中大量的信息,还可以应用于较多的领域当中。像素级融合是一种最为基础的融合技术,为其他两种融合技术奠定了研究基础和借鉴价值。但是,像素级融合有其自身的缺点,当之前获得的图像匹配精度不高时,融合的图像效果不是十分良好。在实现像素级融合之前,要对图像进行预处理操作。由于该融合技术是作用于全部像素点的,导致算法处理的数据量非常大,算法完成时间过高,无法应用在对算法时间较苛刻的系统中。图为像素层级的融合框图。
特征层级的融合,顾名思义,是利用图像中的特征信息实现融合的一种技术,具体的特征应该包括物体的边缘信息、物体的轮廓信息、目标物的形状等,通过对这些信息数据进行对比分析实现融合。特征级的融合能很好地突出图像的特征信息,便于后期的处理和人眼评判质量的优劣。相比于上一种融合技术,该类融合是一种更高层级的融合,所应用的领域也更广泛。由于特征级融合利用的是特征信息,其信息量要明显小于像素级融合中的像素信息量。因此,该类融合相比于像素级融合的算法运行时间大大提高了,但也付出了图像信息丢失的代价。经过特征级融合后的图像质量并不是十分高,这也就决定了其无法应用于更多图像处理领域,只能适用于对大目标物识别和跟踪的图像处理领域,其融合框图如图所示。
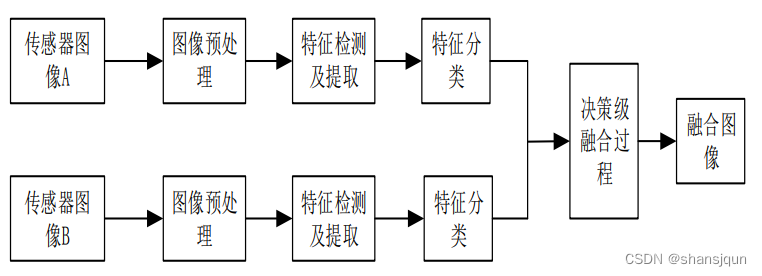
决策层级的融合和特征层级的融合类似,都是要先提取图像特征信息,对获得的信息进行对比研究,计算决策可信度,再依据可信度完成最终的融合。与上两种融合技术做比较,决策层级融合的级别最高,算法运行时间少,适用性强,但图像质量严重下降,融合框图如图所示。
9.双树复小波变换DTCWT
在上小节介绍的离散小波具有实现原理简单、可以实现多角度的图像分解、算法运行时间少等优势,可适用于多个领域,但也存在如下问题
(1)平移敏感性。当要进行变换的图像进行下采样操作时,会发生一定程度的平移,致使其系数会发生变化。
(2)频率混叠性。在对图像的分解和重构操作时,由于其不具备频率截止的特征,这样就会增加不需要的频率部分。
(3)方向受限。离散小波变换只能进行三个方向上的分解,无法满足更高地需求,无法全面的对图像进行分析。
由于离散小波变换存在上述的问题,也就导致其应用的范围受到了很大的限制。针对其无法弥补的缺陷,Kingsbury 第一次提出了双树复小波变换的概念,并研究出复小波的分解和重构。双树复小波的具体实现思想是通过2个平行的滤波器来达到分解和重构所需的要求,该变换即有小波变换的优势,还弥补了小波变换的缺陷,使其不会发生平移和具有分解方向多的优势,它已被大量应用各个行业范畴当中。
双树复小波变换指的是通过两个不相关的树状小波对信息进行分解、重构处理。其中,一路是系数的实部,另一路是系数的虚部,且这两路都需符合重构要求。一维复小波定义如下:

其中yg(x)是小波函数v,(x)的 Hibert变换,具体分解过程如图所示。

双树复小波融合算法
王志超等研究学者研究了一种基于小波融合的视频图像去雪方法,该算法是利用小波分解对图像进行10层的分解,并通过小波分析得出了雪噪声存在于第4层到第2层的高频系数中,背景和颜色信息主要在第10到第5层的高频系数中,而纹理和边缘信息主要在第1层高频系数中。该方法针对不同部分的特点,制定了合适的融合规则[2]。由于雪滴的亮度值明显要高于背景的亮度值,并且亮度变化值很大,因此,作者提出了采用局部梯度度量灰度变化量大小的方法。又因为雨滴像素要比背景像素具有更高、更稳定的能量,作者提出了采用局部能量度量像素点能量的大小,将局部梯度和局部能量相乘得到新的参数矩阵S,当S矩阵在同一位置上对应的数值越大,表明该位置被雪滴污染的程度越高。最后对S矩阵进行逆加权运算获得无雪图像,实验结果表明:该方法能达到较好的融合效果,能高效的去除图像中的雪滴。
由于王志超等人提出的去雨算法是基于小波变换的,在图像融合部分,小波变换有的平移性差的缺点,因此,其得到的图像效果并不是十分理想,为了使去雪效果最佳,本文利用双树复小波变换替代小波变换对有雪图像进行融合,克服了小波变换的缺点,同时又能获得较好的去雪效果,算法的整体流程如图所示。
10.系统整合
下图[完整源码&数据集&环境部署视频教程&自定义UI界面]


 1274
1274

 被折叠的 条评论
为什么被折叠?
被折叠的 条评论
为什么被折叠?
 到【灌水乐园】发言


