一 后端
1 创建监听器
import com.alibaba.excel.context.AnalysisContext;
import com.alibaba.excel.event.AnalysisEventListener;
import com.baiyee.sdgt.cmn.mapper.DictMapper;
import com.baiyee.sdgt.model.cmn.Dict;
import com.baiyee.sdgt.vo.cmn.DictEeVo;
import org.springframework.beans.BeanUtils;

public class DictListener extends AnalysisEventListener<DictEeVo> {
    private DictMapper dictMapper;

    public DictListener(DictMapper dictMapper) {
        this.dictMapper = dictMapper;
    }

    // 一行一行读取
    @Override
    public void invoke(DictEeVo dictEeVo, AnalysisContext analysisContext) {
        // 调用方法添加数据库
        Dict dict = new Dict();
        BeanUtils.copyProperties(dictEeVo, dict);
        dictMapper.insert(dict);
    }

    @Override
    public void doAfterAllAnalysed(AnalysisContext analysisContext) {
    }
}
2 接口
// 导入数据字典
void importDictData(MultipartFile file);
3 实现
// 导入数据字典
@Override
@CacheEvict(value = "dict", allEntries = true)
public void importDictData(MultipartFile file) {
    try {
        EasyExcel.read(file.getInputStream(), DictEeVo.class, new DictListener(baseMapper)).sheet().doRead();
    } catch (IOException e) {
        e.printStackTrace();
    }
}
4 控制器
// 导入数据字典
@PostMapping("importData")
public Result importDict(MultipartFile file) {
    dictService.importDictData(file);
    return Result.ok();
}
二 前端
1 页面部分
<template>
  <div class="app-container">
    <!-- 导出功能 -->
    <div class="el-toolbar">
      <div class="el-toolbar-body" style="justify-content: flex-start;">
        <!-- 导出功能 -->
        <el-button type="text" @click="exportData">
          <i class="fa fa-plus" /> 导出
        </el-button>
        <!-- 导入功能 -->
        <el-button type="text" @click="importData">
          <i class="fa fa-plus" /> 导入
        </el-button>
      </div>
    </div>
    <!-- 列表功能 -->
    <el-table
      :data="list"
      style="width: 100%"
      row-key="id"
      border
      lazy
      :load="getChildrens"
      :tree-props="{children: 'children', hasChildren: 'hasChildren'}"
    >
      <el-table-column label="名称" width="230" align="left">
        <template slot-scope="scope">
          <span>{{ scope.row.name }}</span>
        </template>
      </el-table-column>
      <el-table-column label="编码" width="220">
        <template slot-scope="{row}">{{ row.dictCode }}</template>
      </el-table-column>
      <el-table-column label="值" width="230" align="left">
        <template slot-scope="scope">
          <span>{{ scope.row.value }}</span>
        </template>
      </el-table-column>
      <el-table-column label="创建时间" align="center">
        <template slot-scope="scope">
          <span>{{ scope.row.createTime }}</span>
        </template>
      </el-table-column>
    </el-table>
    <!-- 导入弹框 -->
    <el-dialog title="导入" :visible.sync="dialogImportVisible" width="480px">
      <el-form label-position="right" label-width="170px">
        <el-form-item label="文件">
          <el-upload
            :multiple="false"
            :on-success="onUploadSuccess"
            :action="'http://localhost:8202/admin/cmn/dict/importData'"
            class="upload-demo"
          >
            <el-button size="small" type="primary">点击上传</el-button>
            <div slot="tip" class="el-upload__tip">只能上传Excel文件,且不超过500kb</div>
          </el-upload>
        </el-form-item>
      </el-form>
      <div slot="footer" class="dialog-footer">
        <el-button @click="dialogImportVisible = false">取消</el-button>
      </div>
    </el-dialog>
  </div>
</template>

<script>
import dict from "@/api/dict";
export default {
  data() {
    return {
      list: [], // 数据字典列表数组
      listLoading: true,
      dialogImportVisible: false
    };
  },
  created() {
    this.getDictList(1);
  },
  methods: {
    // 弹出导入弹窗
    importData() {
      this.dialogImportVisible = true;
    },

    // 导入成功后的提醒
    onUploadSuccess(response, file) {
      this.$message.info("上传成功");
      this.dialogImportVisible = false;
      this.getDictList(1);
    },

    // 数据字典列表
    getDictList(id) {
      dict.dictList(id).then(response => {
        this.list = response.data;
      });
    },
    getChildrens(tree, treeNode, resolve) {
      dict.dictList(tree.id).then(response => {
        resolve(response.data);
      });
    },
    // 导出功能
    exportData() {
      window.location.href = "http://localhost:8202/admin/cmn/dict/exportData";
    }
  }
};
</script>
三 测试
1 清空数据
DROP table dict

CREATE TABLE `dict` (
  `id` bigint(20) NOT NULL DEFAULT '0' COMMENT '主键id',
  `parent_id` bigint(20) NOT NULL DEFAULT '0' COMMENT '上级id',
  `name` varchar(100) NOT NULL DEFAULT '' COMMENT '名称',
  `value` bigint(20) DEFAULT NULL COMMENT '值',
  `dict_code` varchar(20) DEFAULT NULL COMMENT '编码',
  `create_time` timestamp NOT NULL DEFAULT CURRENT_TIMESTAMP COMMENT '创建时间',
  `update_time` timestamp NOT NULL DEFAULT CURRENT_TIMESTAMP ON UPDATE CURRENT_TIMESTAMP COMMENT '更新时间',
  `is_deleted` tinyint(3) unsigned zerofill NOT NULL DEFAULT '0' COMMENT '删除标记(0:可用 1:已删除)',
  PRIMARY KEY (`id`),
  KEY `idx_dict_code` (`dict_code`),
  KEY `idx_parent_id` (`parent_id`)
) ENGINE=InnoDB DEFAULT CHARSET=utf8 COMMENT='数据字典';
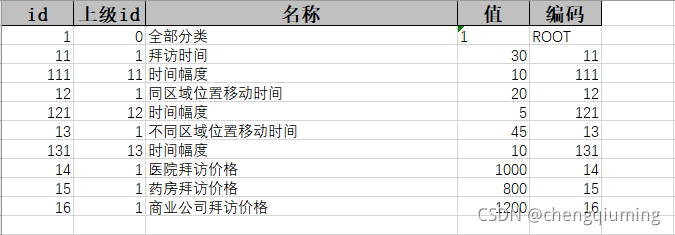
2 准备表格
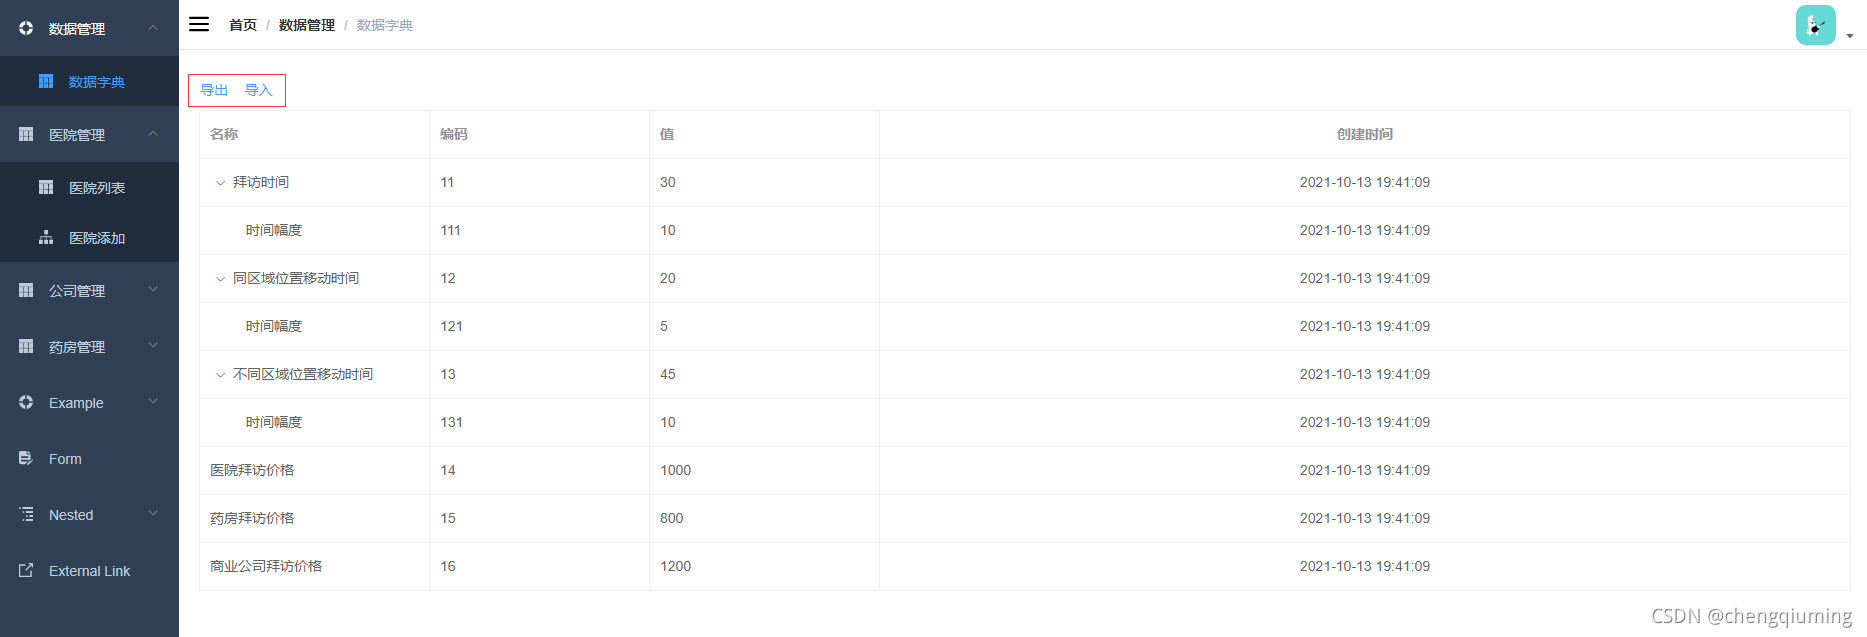
3 上传该表格的结果


 1771
1771


 被折叠的 条评论
为什么被折叠?
被折叠的 条评论
为什么被折叠?
 到【灌水乐园】发言


