fckedit控件的一些修改与设置

fckedit这个html可编辑控件是很多朋友都在使用的一个html编辑器.现在将我在使用它的时候,进行的一些修改记录下来:


下面这些操作是转自:http://www.cnblogs.com/dick/archive/2009/05/09/1453117.html 记录.net兄弟的信息,对于基本设置很管用.
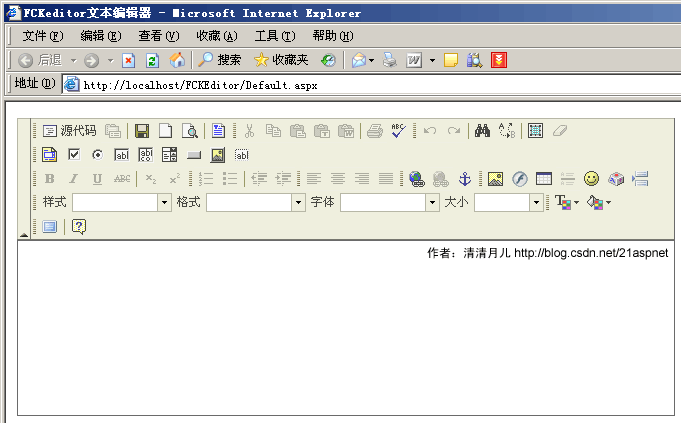

效果图:

那么为什么说是FCKeditor的冰冷之心呢?这不是哗众取宠,主要是说它使用起来有点麻烦,下文就详细说明如何搞定这玩意儿。

1.FCKeditor的官方网站是:http://www.fckeditor.net/download
目前最新的FCKeditor 2.4.2版本。
请在此页下载:http://sourceforge.net/project/showfiles.php?group_id=75348
如图所示:

要下载FCKeditor2.4.2.zip和   FCKeditor.NET版的2个zip包。

说明:
FCKeditor2.4.2.zip是其最新的Javascript文件和图片什么的;
FCKeditor.NET.zip是ASP.NET调用的DLL在里面。

2.分别解压后把FCKeditor2.4.2.zip里的fckeditor目录整个复制到网站中。

3.解压FCKeditor.NET.zip包后在FCKeditor.Net_2.2\bin\Debug目录里找到FredCK.FCKeditorV2.dll。其他文件没用,把FredCK.FCKeditorV2.dll复制到我们的网站,建立一个Bin目录

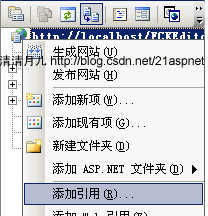
4.引用FredCK.FCKeditorV2.dll。
第一步:

第二步:
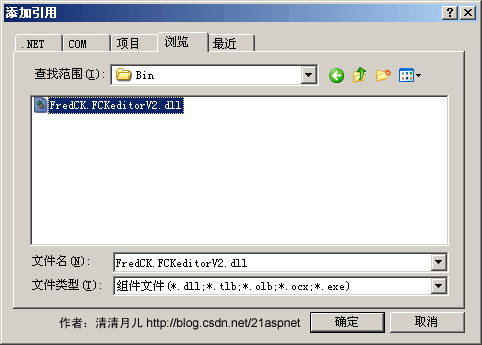
5.导入工具箱。
在“工具箱”下右键
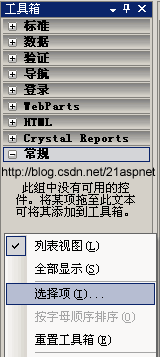
点击“选择项”。弹出如图窗口:
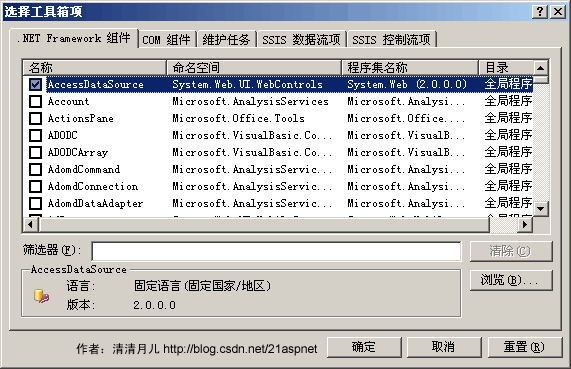

点击浏览,找到dll所在目录。
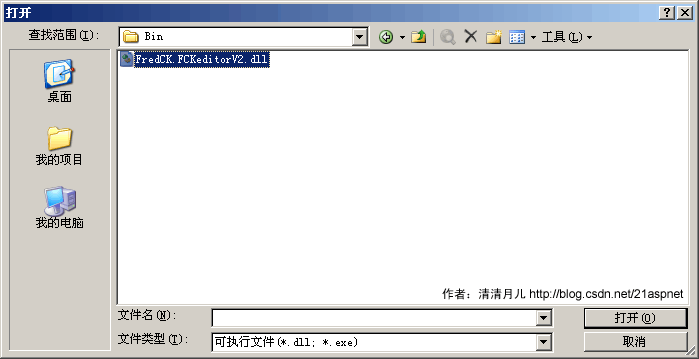
这时发现工具箱里多出FCKeditor控件。
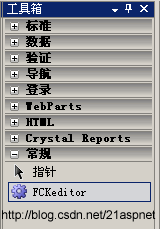
6.拖拽FCKeditor到页面上
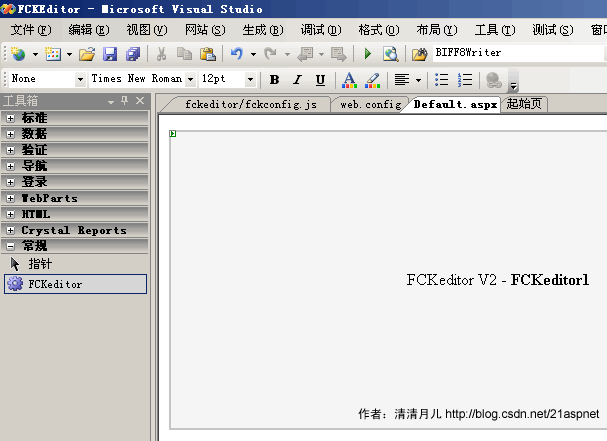
7.配置WebConfig
<?xml version="1.0"?>
<!--
    注意: 除了手动编辑此文件以外,您还可以使用
    Web 管理工具来配置应用程序的设置。可以使用 Visual Studio 中的
     “网站”->“Asp.Net 配置”选项。
    设置和注释的完整列表在
    machine.config.comments 中,该文件通常位于
    \Windows\Microsoft.Net\Framework\v2.x\Config 中
-->
<configuration>
<appSettings>

    <add key="FCKeditor:BasePath" value="~/fckeditor/"/>

    <add key="FCKeditor:UserFilesPath" value="/Files/" />

</appSettings>

<connectionStrings/>
<system.web>

说明:BasePath是fckeditor所在路径,fckeditor由于我们直接放网站目录下这样写就可以,如果您的网站多放几层适当调整即可。
            UserFilesPath所有上传的文件的所在目录。为什么要设置成/Files这样而不是~/Files因为FCKeditor使用这个值来返回你上传后的文件的相对路径到客户端。否则的话客户访问的时候就会取客户的机器目录而不是http形式的目录。

建议:Files要单独做wwwroot目录下的一个站点比较好,和我们的站点FCKEditor平行。不要把它放FCKEditor里,为什么呢?因为Files是要让客户有写的权限的,如果放FCKEditor下很危险。

8.Files目录要有的权限。你根据自己网站需求设置那个帐号,本文为方便设置User实际中你可能用ASP.NET帐号更合理。
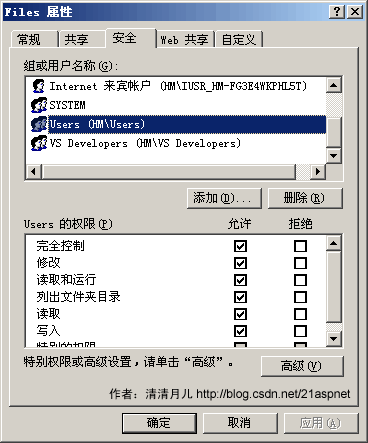
 

9.修改fckeditor/fckconfig.js文件
在第182行的位置
var _FileBrowserLanguage = 'asp' ; // asp | aspx | cfm | lasso | perl | php | py
var _QuickUploadLanguage = 'asp' ; // asp | aspx | cfm | lasso | php
改为
var _FileBrowserLanguage = 'aspx' ; // asp | aspx | cfm | lasso | perl | php | py
var _QuickUploadLanguage = 'aspx' ; // asp | aspx | cfm | lasso | php

10.FCKeditor给其瘦身。以_打头的的都是范例文件或源文件,不过建议小心。

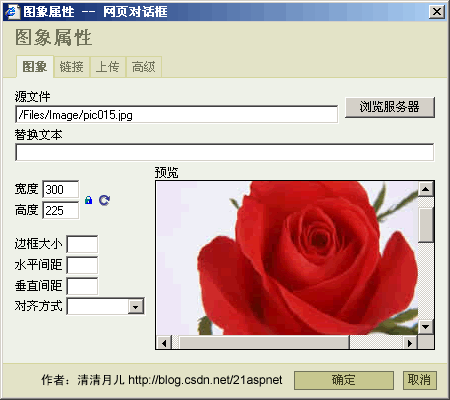
11.下面以上传图片示例说明如何使用,
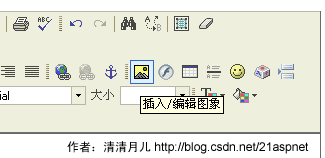
点击“浏览服务器”。
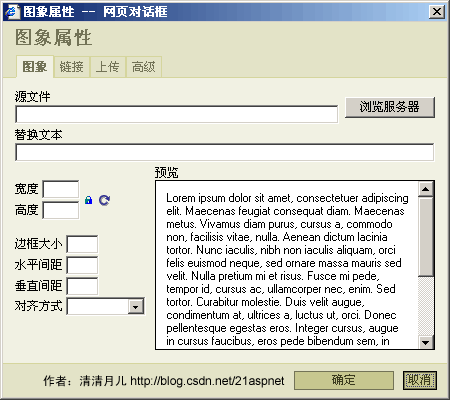
弹出窗口很容易报错
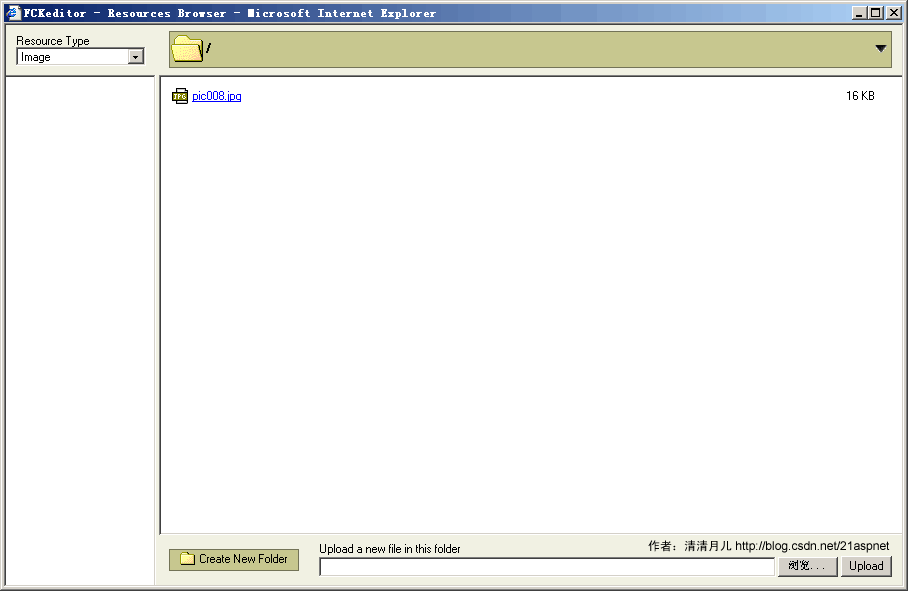
如果报错XML request error: Internal Server Error(500),很可能就是目录路径不对和写权限没有。

选择图像


最后效果
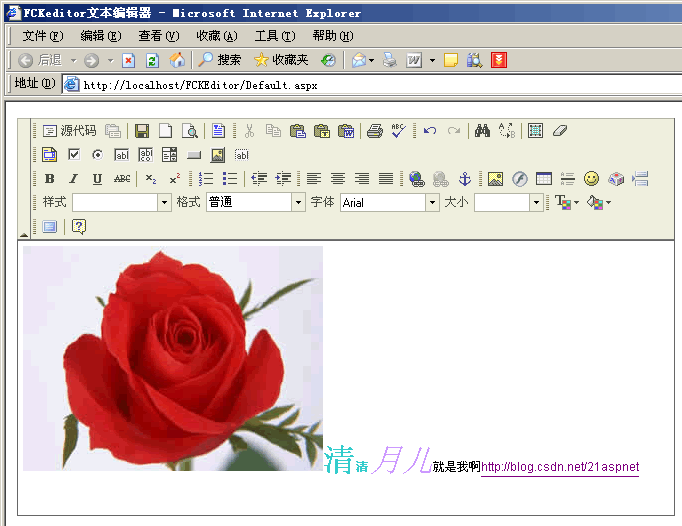
前台代码:

<%@ Page Language="C#" validateRequest=false AutoEventWireup="true" CodeFile="Default.aspx.cs" Inherits="_Default" %>

<%@ Register Assembly="FredCK.FCKeditorV2" Namespace="FredCK.FCKeditorV2" TagPrefix="FCKeditorV2" %>

<!DOCTYPE html PUBLIC "-//W3C//DTD XHTML 1.0 Transitional//EN" "http://www.w3.org/TR/xhtml1/DTD/xhtml1-transitional.dtd">

<html xmlns="http://www.w3.org/1999/xhtml" >
<head runat="server">
    <title>FCKeditor文本编辑器</title>
</head>
<body>
    <form id="form1" runat="server">
    <div>
        <fckeditorv2:fckeditor id="FCKeditor1" runat="server" DefaultLanguage="zh-cn" Height="400px" Width="660px"
></fckeditorv2:fckeditor>

   
    </div>
    </form>
</body>
</html>

怎么样获取结果呢?FCKeditor1.Value就是。

--------------------------------------------------------------------------------------------------------------------------------------------------------------------------------------------------------------

下面是我的一些设置

我下的版本是最新的版本:FCKeditor_2.6.6  FCKeditor.Net_2.6.4

一,设置完成之后,在添加图片或上传文件时,上传和浏览服务器提示有错误

This connector is disabled. Please check the "editor/filemanager/connectors/

解决方法:

     打开editor/filemanager/connectors/aspx/config.ascx修改CheckAuthentication()方法,返回true


private bool CheckAuthentication()
{
// WARNING : DO NOT simply return "true". By doing so, you are allowing
// "anyone" to upload and list the files in your server. You must implement
// some kind of session validation here. Even something very simple as...
//
//        return ( Session[ "IsAuthorized" ] != null && (bool)Session[ "IsAuthorized" ] == true );
//
// ... where Session[ "IsAuthorized" ] is set to "true" as soon as the
// user logs in your system.

        return true;  //这里默认提false改成true就好了
}

二,我们都知道fckedit上传图片的名字是图片的原有名字,如果有重名的,就是在名字之前加上个编号 如1,2这样的,可是有些图下会是中文,在某些情况下会出错.这怎么办呢.

解决方法:

     我们用vs打开FCKeditor.Net_2.6.4,里面有二个版本,一个vs2003版,一个vs2005版,因为我用的是vs2008,所以我修改的是vs2005版的

                   在FileBrowser/FileWorkerBase.cs文件里修改

                   protected void FileUpload( string resourceType, string currentFolder, bool isQuickUpload )方法

                   在70---92行之前的方法.


    //下面这条就是我们要加的,别的不用动,就是将文件名重新起个名,把时间戳加上.编译然后把.dll文件进行使用就行了.
    sFileName = DateTime.Now.ToString("yyyy-MM-dd HH:mm:ss fff").Replace(" ", "").Replace(":", "").Replace("-", "") + "." + sExtension;

            string orginalNameWithoutExt = System.IO.Path.GetFileNameWithoutExtension(sFileName);
			while ( true )
			{
                
				string sFilePath = System.IO.Path.Combine( sServerDir, sFileName );

				if ( System.IO.File.Exists( sFilePath ) )
				{
					iCounter++;
					sFileName =
                        orginalNameWithoutExt +
						"(" + iCounter + ")." +
						sExtension;

					iErrorNumber = 201;
				}
				else
				{
					oFile.SaveAs( sFilePath );
					break;
				}
			}

三,我们在打开


  这个窗口的时候会发现预览里面有很多英文,这让用户看起来有点不爽,怎么变呢.去掉他

       editor/dialog/fck_image/fck_image_preview.html文字里,不说了,你懂的

四,在上传文件成功后,会提示你成功.可惜是英文Your file has been successfully uploaded

  我们再改一下,在editor/dialog/fck_image/fck_image.js


function OnUploadCompleted( errorNumber, fileUrl, fileName, customMsg )
{
	// Remove animation
	window.parent.Throbber.Hide() ;
	GetE( 'divUpload' ).style.display  = '' ;

	switch ( errorNumber )
	{
		case 0 :	// No errors
			alert( '文件上传成功!' ) ;
			break ;
		case 1 :	// Custom error
			alert( customMsg ) ;
			return ;
		case 101 :	// Custom warning
			alert( customMsg ) ;
			break ;
		case 201 :
			alert( 'A file with the same name is already available. The uploaded file has been renamed to "' + fileName + '"' ) ;
			break ;
		case 202 :
			alert( 'Invalid file type' ) ;
			return ;
		case 203 :
			alert( "Security error. You probably don't have enough permissions to upload. Please check your server." ) ;
			return ;
		case 500 :
			alert( 'The connector is disabled' ) ;
			break ;
		default :
			alert( 'Error on file upload. Error number: ' + errorNumber ) ;
			return ;
	}

	sActualBrowser = '' ;
	SetUrl( fileUrl ) ;
	GetE('frmUpload').reset() ;
}

这是图下,当然了,在相当的目录下. editor/dialog/下面还有flash什么的,都是一样的修改


  • 0
    点赞
  • 0
    收藏
    觉得还不错? 一键收藏
  • 0
    评论
编辑器 FCKeditor2.4 使用说明 .下载 FCKeditor2.3 (FCKeditot for java) FCKeditor2.4 (FCKeditor基本文件) 以下是下载地址: http://www.fckeditor.net/download/default.html 2.建立项目: 建立项目tomcat/webapps/TestFCKeditor. 3.将FCKeditor2.4解压缩 将FCKeditor2.4解压缩,将整个目录FCKeditor复制到项目的根目录下,并将解压缩出来的文件夹fckeditor重命名为FCKeditor 目录结构为:tomcat/webapps/TestFCKeditor/FCKeditor 然后将FCKeditor-2.3.zip(java)压缩包中\web\WEB-INF\lib\目录下的两个jar文件拷到项目的\WEB-INF\ lib\目录下把其中的src目录下的FCKeditor.tld文件copy到TestFCKedit/WEB-INF/下 4.合并web.xml: 将FCKeditor-2.3.zip压缩包中\web\WEB-INF\目录下的web.xml文件合并到项目的\WEB-INF\目录下的web.xml文件中 5. 修改合并后的web.xml文件 修改合并后的web.xml文件,将名为SimpleUploader的Servlet的enabled参数值改为true, 以允许上传功能,Connector Servlet的baseDir参数值用于设置上传文件存放的位置 在web.xml最后添加标签定义: <taglib> <taglib-uri>/TestFCKeditor</taglib-uri> <taglib-location>/WEB-INF/FCKeditor.tld</taglib-location> </taglib> 现在的web.xml文件没有<taglib>标签了,应该直接在jsp文件中使用:<%@ taglib uri="http://fckeditor.net/tags-fckeditor" prefix="FCK" %> 6. 映射: 上面文件中两个servlet的映射分别为:/editor/filemanager/browser/default/connectors/jsp/connector 和/editor/filemanager/upload/simpleuploader,需要在两个映射前面加上/FCKeditor, 即改为/FCKeditor/editor/filemanager/browser/default/connectors/jsp/connector和 /FCKeditor/editor/filemanager/upload/simpleuploader 这两个名字根据你放在工程中的FCKeditor文件夹名称而定 7.修改skin文件夹 进入skin文件夹,如果你想使用fckeditor默认的这种奶黄色, 那就把除了default文件夹外的另两个文件夹直接删除.(建议不删除,以后要用到其中的一个文件夹) 8.删除无用文件 删除/FCKeditor/目录下除fckconfig.js, fckeditor.js, fckstyles.xml, fcktemplates.xml四个文件以外的所有文件,保留文件夹editor 删除目录/editor/_source, 删除/editor/filemanager/browser/default/connectors/下的所有文件 删除/editor/filemanager/upload/下的所有文件 删除/editor/lang/下的除了fcklanguagemanager.js(我下载的没有这个文件), en.js, zh.js, zh-cn.js四个文件的所有文件 9.修改配置: 打开/FCKeditor/fckconfig.js 修改 FCKConfig.DefaultLanguage = 'zh-cn' ; 把FCKConfig.LinkBrowserURL等的值替换成以下内容: FCKConfig.LinkBrowserURL = FCKConfig.BasePath + "filemanager/browser/default/browser.html?Connector=connectors/jsp/connector" ; FCKConfig.ImageBrowserURL = FCKConfig.BasePath + "filemanager/browser/default/browser.html?Type=Image&Connector=connectors/jsp/connector" ; FCKConfig.FlashBrowserURL = FCKConfig.BasePath + "filemanager/browser/default/browser.html?Type=Flash&Connector=connectors/jsp/connector" ; FCKConfig.LinkUploadURL = FCKConfig.BasePath + 'filemanager/upload/simpleuploader?Type=File' ; FCKConfig.FlashUploadURL = FCKConfig.BasePath + 'filemanager/upload/simpleuploader?Type=Flash' ; FCKConfig.ImageUploadURL = FCKConfig.BasePath + 'filemanager/upload/simpleuploader?Type=Image' ; 10.其它 fckconfig.js总配置文件,可用记录本打开,修改后将文件存为utf-8 编码格式找到: FCKConfig.TabSpaces = 0 ; 改为FCKConfig.TabSpaces = 1 ; 即在编辑器域内可以使用Tab键 如果你的编辑器还用在网站前台的话,比如说用于留言本或是日记回复时,那就不得不考虑安全了, 在前台千万不要使用Default的toolbar,要么自定义一下功能,要么就用系统已经定义好的Basic, 也就是基本的toolbar,找到: FCKConfig.ToolbarSets["Basic"] = [ ['Bold','Italic','-','OrderedList','UnorderedList','-',/*'Link',*/'Unlink','-','Style','FontSize','TextColor','BGColor','-', 'Smiley','SpecialChar','Replace','Preview'] ] ; 这是改过的Basic,把图像功能去掉,把添加链接功能去掉,因为图像和链接和flash和图像按钮添加功能都能让前台 页直接访问和上传文件, fckeditor还支持编辑域内的鼠标右键功能 FCKConfig.ContextMenu = ['Generic',/*'Link',*/'Anchor',/*'Image',*/'Flash','Select','Textarea','Checkbox','Radio','TextField','HiddenField', /*'ImageButton',*/'Button','BulletedList','NumberedList','TableCell','Table','Form'] ; 这也是改过的把鼠标右键的链接图像,FLASH,图像按钮功能都去掉 找到: FCKConfig.FontNames = 'Arial;Comic Sans MS;Courier New;Tahoma;Times New Roman;Verdana' ; 加上几种我们常用的字体 FCKConfig.FontNames = '宋体;黑体;隶书;楷体_GB2312;Arial;Comic Sans MS;Courier New;Tahoma;Times New Roman;Verdana' ; 11.添加文件 添加文件 /TestFCKeditor/test.jsp: <%@ page language="java" import="com.fredck.FCKeditor.*" %> <%@ taglib uri="/TestFCKeditor" prefix="FCK" %> <script type="text/javascript" src="/TestFCKeditor/FCKeditor/fckeditor.js"></script> <%-- 三种方法调用FCKeditor 1.FCKeditor自定义标签 (必须加头文件 <%@ taglib uri="/TestFCKeditor" prefix="FCK" %> ) 2.script脚本语言调用 (必须引用 脚本文件 <script type="text/javascript" src="/TestFCKeditor/FCKeditor/fckeditor.js"></script> ) 3.FCKeditor API 调用 (必须加头文件 <%@ page language="java" import="com.fredck.FCKeditor.*" %> ) --%> //标签调用方式 <%-- <form action="show.jsp" method="post" target="_blank"> <FCK:editor basePath="/TestFCKeditor/FCKeditor/" width="700" height="500" skinPath="/TestFCKeditor/FCKeditor/editor/skins/silver/" toolbarSet = "Default" > input </FCK:editor> <input type="submit" value="Submit"> </form> --%> //JS调用方式 <form action="show.jsp" method="post" target="_blank"> <table border="0" width="700"><tr><td> <textarea style="WIDTH: 100%; HEIGHT: 400px">input</textarea> <script type="text/javascript"> var oFCKeditor = new FCKeditor('content') ; oFCKeditor.BasePath = "/TestFCKeditor/FCKeditor/" ; oFCKeditor.Height = 400; oFCKeditor.ToolbarSet = "Default" ; oFCKeditor.ReplaceTextarea(); </script> <input type="submit" value="Submit"> </td></tr></table> </form> //FCKeditor API 调用 <%-- <form action="show.jsp" method="post" target="_blank"> <% FCKeditor oFCKeditor ; oFCKeditor = new FCKeditor( request, "content" ) ; oFCKeditor.setBasePath( "/TestFCKeditor/FCKeditor/" ) ; oFCKeditor.setValue( "input" ); out.println( oFCKeditor.create() ) ; %> <br> <input type="submit" value="Submit"> </form> --%> 添加文件/TestFCKeditor/show.jsp: <% String content = request.getParameter("content"); out.print(content); %> 12.测试 浏览http://localhost:8080/TestFCKeditor/test.jsp 最后注意不同的版本 变量名称可能不一样请参考你使用的API文档 配置选项: AutoDetectLanguage=true/false 自动检测语言 BaseHref="" 相对链接的基地址 ContentLangDirection="ltr/rtl" 默认文字方向 ContextMenu=字符串数组,右键菜单的内容 CustomConfigurationsPath="" 自定义配置文件路径和名称 Debug=true/false 是否开启调试功能,这样,当调用FCKDebug.Output()时,会在调试窗中输出内容 DefaultLanguage="" 缺省语言 EditorAreaCss="" 编辑区的样式表文件 EnableSourceXHTML=true/false 为TRUE时,当由可视化界面切换到代码页时,把HTML处理成XHTML EnableXHTML=true/false 是否允许使用XHTML取代HTML FillEmptyBlocks=true/false 使用这个功能,可以将空的块级元素用空格来替代 FontColors="" 设置显示颜色拾取器时文字颜色列表 FontFormats="" 设置显示在文字格式列表中的命名 FontNames="" 字体列表中的字体名 FontSizes="" 字体大小中的字号列表 ForcePasteAsPlainText=true/false 强制粘贴为纯文本 ForceSimpleAmpersand=true/false 是否不把&符号转换为XML实体 FormatIndentator="" 当在源码格式下缩进代码使用的字符 FormatOutput=true/false 当输出内容时是否自动格式化代码 FormatSource=true/false 在切换到代码视图时是否自动格式化代码 FullPage=true/false 是否允许编辑整个HTML文件,还是仅允许编辑BODY间的内容 GeckoUseSPAN=true/false 是否允许SPAN标记代替B,I,U标记 IeSpellDownloadUrl=""下载拼写检查器的网址 ImageBrowser=true/false 是否允许浏览服务器功能 ImageBrowserURL="" 浏览服务器时运行的URL ImageBrowserWindowHeight="" 图像浏览器窗口高度 ImageBrowserWindowWidth="" 图像浏览器窗口宽度 LinkBrowser=true/false 是否允许在插入链接时浏览服务器 LinkBrowserURL="" 插入链接时浏览服务器的URL LinkBrowserWindowHeight=""链接目标浏览器窗口高度 LinkBrowserWindowWidth=""链接目标浏览器窗口宽度 Plugins=object 注册插件 PluginsPath="" 插件文件夹 ShowBorders=true/false 合并边框 SkinPath="" 皮肤文件夹位置 SmileyColumns=12 图符窗列数 SmileyImages=字符数组 图符窗中图片文件名数组 SmileyPath="" 图符文件夹路径 SmileyWindowHeight 图符窗口高度 SmileyWindowWidth 图符窗口宽度 SpellChecker="ieSpell/Spellerpages" 设置拼写检查器 StartupFocus=true/false 开启时FOCUS到编辑器 StylesXmlPath="" 设置定义CSS样式列表的XML文件的位置 TabSpaces=4 TAB键产生的空格字符数 ToolBarCanCollapse=true/false 是否允许展开/折叠工具栏 ToolbarSets=object 允许使用TOOLBAR集合 ToolbarStartExpanded=true/false 开启是TOOLBAR是否展开 UseBROnCarriageReturn=true/false 当回车时是产生BR标记还是P或者DIV标记 解决上传乱码: 在SimpleUploaderServlet.java和ConnectorServlet.java两个文件里找到 DiskFileUpload upload = new DiskFileUpload(); 分别在其后加入 upload.setHeaderEncoding("utf-8"); 这样解决了文件上传的中文乱码问题. 但是在控制台显示的中文内容还是乱码,但是没关系,我们没必要去看控制台下的中文 ----------------------------------------------------------------another FCKeditor2.4.2 Java版使用说明 下载地址以及基本配置请参考:http://hi.baidu.com/wain19/blog/item/c33fb0fab74f24dfb48f312d.html 我的开发环境是ubuntu7.04, 系统默认编码是utf-8, 期间,本人遇到了下面这些问题: 问题一:XML request error: Internel Server Error(500) 出现错误的地方是在:点插入图片,点Browse按钮的时候: XML request error: Internel Server Error(500) 找资料:http://lamono.javaeye.com/blog/49135 拷贝xalan.jar和serialize.jar到/WEB-INF/lib,问题解决 FCKeditor-java没有很好的解决中文问题需要我们修改它的源代码后重新编译打包打包过程如下: 1 新建一个web工程名字为FCKeditor-java-2.3,然后把FCKeditor-2.3-java.zip解压缩后的代码拷贝到工程目录下 2如果是用的Eclipse,使用快捷键Ctrl+Shift+R 在SimpleUploaderServlet.java和ConnectorServlet.java两个文件里找到 DiskFileUpload upload = new DiskFileUpload(); 分别在其后加入 upload.setHeaderEncoding("utf-8"); 现在如果直接运行ant任务,会报下面的错误: taskdef class org.apache.catalina.ant.DeployTask cannot be found 3 把tomcat安装目录下/server/lib中的catalina-ant.jar拷贝到/WEB-INF/lib目录 下 4 打开build.xml 找到 <property 修改成你自己的tomcat安装目录 <property value="/home/uniquejava/tool/tomcat5028/"/> 找到 <taskdef 修改成如下内容 <taskdef classname="org.apache.catalina.ant.DeployTask"> <classpath refid="compile.classpath"> </classpath> </taskdef> <taskdef classname="org.apache.catalina.ant.ListTask"> <classpath refid="compile.classpath"> </classpath> </taskdef> <taskdef classname="org.apache.catalina.ant.ReloadTask"> <classpath refid="compile.classpath"> </classpath> </taskdef> <taskdef classname="org.apache.catalina.ant.UndeployTask"> <classpath refid="compile.classpath"> </classpath> </taskdef> 运行ant任务dist, 就可以生成新的FCKeditor-2.3.jar包 问题三: 上传时新建的中文目录全部乱码 虽然上传到服务器上的文件名正常,但在JSP页面点下载链接时文件名乱码导致不能正常下载 查找资料:TOMCAT 链接参数有中文时,乱码解决方法 http://hi.baidu.com/jadestone/blog/item/7564deefc9192d36acafd5be.html 修改tomcat-home/conf/server.xml 方法一: 在两处地方加上URIEncoding="utf-8": <Connector port="8080" maxThreads="150" minSpareThreads="25" maxSpareThreads="75" enableLookups="false" redirectPort="8443" acceptCount="100" debug="0" connectionTimeout="20000" disableUploadTimeout="true" URIEncoding="utf-8" /> <Connector port="8009" enableLookups="false" redirectPort="8443" debug="0" protocol="AJP/1.3" URIEncoding="utf-8" /> 方法二: 使用useBodyEncodingForURI="true". 这个方法适合你的TOMCAT实例下需要跑多个不同Encoding的程序时(有点怀疑?!) <... maxThreads="150" minSpareThreads="25" maxSpareThreads="75" enableLookups="false" redirectPort="8443" acceptCount="100" connectionTimeout="20000" disableUploadTimeout="true" useBodyEncodingForURI="true" /> enableLookups="false" redirectPort="8443" protocol="AJP/1.3" useBodyEncodingForURI="true" / 我只试了方法一,问题解决! 这样, FCKeditor终于可以正常使用了 ================================================================= 以下为个人原创 http://blog.csdn.net/nickshen3/ 怎么将FCKeditor2.4使用在自己的web中 1. 在webapps创建test文件夹webapps\test 2. 将下载的FCKeditor2.3的Java包FCKeditor-2.3.zip解压缩,并将web文件夹下的两个文件夹_samples,WEB-INF拷贝到刚才建立的webapps\test下再将src文件夹下的FCKeditor.tld拷贝到WEB-INF下 3. 在webapps\test\下建立文件夹FCKeditor 4. 将刚才下载的 FCKeditor_2.4.3.zip 解压缩,然后将fckeditor文件夹下的 editor(文件夹),fckconfig.js,fckeditor.js,fckstyles.xml,fcktemplates.xml四个文件拷贝到刚才建立的文件夹FCKeditor下 5.修改test\_samples\jsp\sample02.jsp文件,将原来的 <FCK:editor basePath="/FCKeditor/" 改为<FCK:editor basePath="/test/FCKeditor/"以后使用的时候只需将test换成项目的名称即可 6.打开tomcat测试Http://localhost:8080/test/_samples/jsp/sample02.jsp ok
兼容目前的浏览器 里面包含FCKeditor编辑器和控件 一、集成方法 FCKeditor应用在ASP.NET上,需要两组文件,一组是FCKeditor本身,另一个是用于ASP.NET的FCKeditor控件(分为1.1和2.0两个版本,这里使用2.0版本)。 1. 将FCKeditor加入到项目中 解压FCKeditor编辑器,得到文件夹fckeditor,复制此文件夹到Web应用的项目下(也可以是子孙目录下)。 解压FCKeditor控件,在其子目录bin/Release/2.0下有一个程序集。在Web应用的项目中引用该程序集。 2. 在页面中使用FCKeditor 有两种方式。 (1)手工编码 在页面中加入ASP.NET指令: 然后在需要的地方加入FCKeditor控件: (2)集成到Visual Studio工具箱 打开一ASP.NET页面,展开Toolbox,打开右键菜单,选择“Choose Items ...”,在出现的“Choose Toolbox Items”会话框的“.NET Framework Components”选项卡中选择“Browse”,找到并选中FCKeditor程序集,打开后回到“Choose Toolbox Items”窗口,点击“OK”,完成控件导入。 这时,在Toolbox的General分类下出现了一个名为FCKeditor控件,可以像使用Visual Studio内置控件一样使用它。 3. 配置FCKeditor编辑器路径 在页面中,使用的是FCKeditor控件,该控件需要知道FCKeditor编辑器文件组的路径。有两种配置方法。 (1)配置web.config 在appSettings配置节中加入 使用这种配置方法后,对于项目中任何一个页面中用到的FCKeditor控件,都不用再配置其BasePath属性。 (2)直接对用到的FCKeditor控件进行配置 在页面代码中设置FCKeditor的属性BasePath为FCKeditor编辑器文件组的路径,或者在Page_Init事件处理器中设置其BasePath的值。 4. 配置FCKeditor编辑器文件上传路径 在web.config的appSettings配置节中加入 这样,就完成了FCKeditorASP.NET页面的集成工作。 二、配置FCKeditor 按照FCKeditor的默认配置,可以完成一些常用的HTML可视化编辑工作,但在实际应用中,还需要对其做进一步的配置。FCKeditor控件的可配置属性不多,且配置后只能作用于一个单一实例。实际上,需要对FCKeditor编辑器文件组中的通用配置文件/fckconfig.js和ASP.NET专用文件上传管理代码文件/editor/filemanager/connectors/aspx/config.ascx进行配置。 1. 配置控件语言 FCKeditor是自动探测浏览器所使用的语言编码的,其默认语言是英文。修改配置行"FCKConfig.DefaultLanguage = 'en';"为'zh-cn',采用中文为默认语言。 2. 配置控件应用技术 FCKeditor默认是用于php技术的。修改配置行"var _FileBrowserLanguage = 'php';"和"var _QuickUploadLanguage = 'php';"为'aspx',采用ASP.NET技术。 3. 配置Tab键 默认Tab键在FCKeditor中不可用,可以修改配置行"FCKConfig.TabSpaces = 0;"为1,启用Tab键。 4. 定制FCKe
评论
添加红包

请填写红包祝福语或标题

红包个数最小为10个

红包金额最低5元

当前余额3.43前往充值 >
需支付:10.00
成就一亿技术人!
领取后你会自动成为博主和红包主的粉丝 规则
hope_wisdom
发出的红包
实付
使用余额支付
点击重新获取
扫码支付
钱包余额 0

抵扣说明:

1.余额是钱包充值的虚拟货币,按照1:1的比例进行支付金额的抵扣。
2.余额无法直接购买下载,可以购买VIP、付费专栏及课程。

余额充值