


1.下载地址:Index of /tesseract
建议选择最新V5.0的,在识别性能和准确度上都有所提升
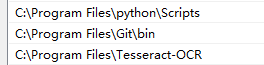
2.添加环境变量
安装完成后,添加环境变量:
在Path上添加tesseract的安装路径:
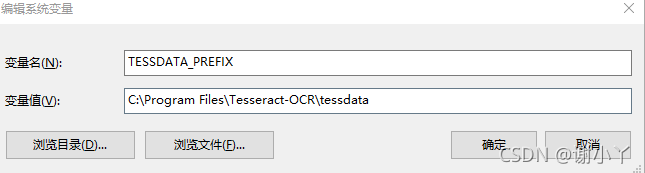
添加新的系统变量:TESSDATA_PREFIX, 值为tesseract-OCR testdata路径
3.python 使用
import pytesseract
from PIL import Image
import cv2
img = cv2.imread("y1y2.png")
gray = cv2.cvtColor(img, cv2.COLOR_BGR2GRAY)
text = pytesseract.image_to_string(gray)
print(text)
此时就能读取出来图片里的文字。
如果识别效果不好,但是图片里的文字是确定的,则可以通过指定识别的文字范围来提高精确度。
4.tesseact限定识别内容
例如要识别数字和英文字母的内容,加了限定以后,识别的准确率有所提升。亲测,比如Y1,Y2;3-position在未加限制之前,识别了 L ¥ 23 position. 加了限定后识别成了Y1,Y2;3-position
具体方法:
打开tesseract安装目录,进入
tessdata/configs/
将digits复制一份,改名为:tmptest,表示增加一份识别规则的配置
使用文字编辑工具,打开文件tmptest
在tessedit_char_whitelist 后面跟随要识别的字符, 叫识别的白名单,保存退出。
tessedit_char_whitelist 0123456789-;...abcdefghigklmnopqrstuvwxyz.&%ABCDEFGHIGKLMNOPQRSTUVWXYZ,
识别的时候,需要在命令里加上tmptest配置,例如
tesseract xxx.jpg result -psm 7 tmptestpython 代码:
import pytesseract
from PIL import Image
import cv2

img = cv2.imread("y1y2.png")
gray = cv2.cvtColor(img, cv2.COLOR_BGR2GRAY)
config = "--psm  7"
text = pytesseract.image_to_string(gray, config='--psm 7 tmptest')
print(text)
5.其它
语言叠加
识别多语言,可以这样传:
code = pytesseract.image_to_string(image,lang="chi_sim+eng",config="-psm 6")
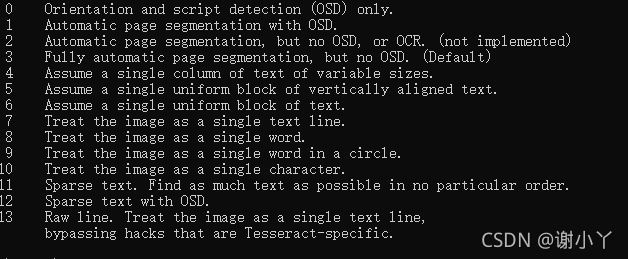
-psm的说明
关于config中 -psm配置项的说明可以通过tesseract --help-psm 查看psm


 1万+
1万+

 被折叠的 条评论
为什么被折叠?
被折叠的 条评论
为什么被折叠?
 到【灌水乐园】发言


