


小黑终于有了自己的家:http://www.uustory.com/,欢迎来坐坐。
题记:很多做游戏开发的人,估计都或多或少地接过渠道SDK,什么UC,当乐,91,小米,360......据统计国内市场当前不下于100家渠道,还包括一些没有SDK的小渠道。每个渠道SDK接入的方法呢,多是大同小异。但是,正是这些小异,又让SDK的接入,产生了无穷无尽的变数。所以,接入SDK之前,如果你没有经验,或者没有被SDK坑过,那么当你看到这系列文章的时候,你很幸运,你可以避免这一切了。如果你之前被坑过,而且还在继续被坑着,那么现在,就是你解脱的时刻。
上一篇文章,我们总体地分析并设计了一套高效的SDK接入方案,也罗列出这套方案,我们需要完成的工作。这里再罗列并回顾下:
1、统一抽象的SDK接入框架
2、各个SDK接入实现
3、一键打包工具
4、统一的登陆认证中心和支付中心
5、对多个平台的支持,比如Unity3D,Cocos2D等
那么接下来这篇文章,我们就开始第一部分:抽象的SDK接入框架的实现。在实现之前,我们再深入地想一下,抽象层需要提供哪些接口。因为,对于每个游戏来说,都只需要接入这个抽象层,而所有SDK的接入就是实现这个抽象层。所以,这个抽象层设计的好坏,不仅影响到游戏的接入,同时也影响到各个渠道SDK的实现。
没有好的思路,我们可以看下AnySDK,或者棱镜SDK他们的宣传资料和文档,我们发现他们支持的组件有这些:
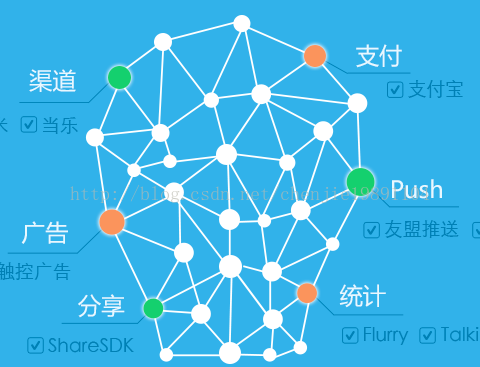
渠道SDK就不用说了,除了渠道SDK,他把部分支付SDK,广告SDK,分享SDK,统计SDK,消息推送SDK等都放到了这套统一SDK接入框架中来了。那么,作为我们这套抽象框架,我们也需要考虑以后可能会加入这些其他非渠道的SDK。所以,我们总体的设计思想是:
1、游戏各个渠道有一个主渠道SDK,比如UC,当乐,91等SDK。这个各个渠道只能同时有一个。不可能同时为UC也是91SDK
2、非渠道的功能性SDK,包括广告,分享,统计,推送等。这些东西,我们作为插件集成到这套抽象框架来。
3、所有SDK的实现可以很方便,而且结构比较统一
4、所有的渠道SDK也好,还是功能性SDK也好,SDK抽象层都抽象出对应的接口。方便游戏层的调用,也方便具体插件的实现。
那么,接下来,我们就根据前一篇我们画的那个登陆和支付流程图,和上面提到的总体设计思路来实现这个抽象层。上篇文章说道,我们这套东西暂且命名为u8 sdk,那么我们这个抽象层就叫U8 SDK。为了可以将各个功能作为插件式开发,我们抽象接口的时候,也将各个功能分开。
首先,我们定义两个接口,一个是登陆接口,一个是支付接口:
<span style="font-family:KaiTi_GB2312;font-size:18px;color:#333333;">package com.u8.sdk;


public interface IUser {

	public void login();

}</span>
<span style="font-family:KaiTi_GB2312;font-size:18px;color:#333333;">package com.u8.sdk;
public interface IPay {
public void pay(PayParams data);
}
</span>
<span style="font-family:KaiTi_GB2312;font-size:18px;color:#333333;">package com.u8.sdk;

public class PayParams{

	private String productId;
	private String productName;
	private int price;
	private int buyNum;
	private int coinNum;
	private String serverId;
	private String roleId;
	private String roleName;
	private int roleLevel;
	private String extension;

	public String getProductId() {
		return productId;
	}
	public void setProductId(String productId) {
		this.productId = productId;
	}
	public String getProductName() {
		return productName;
	}
	public void setProductName(String productName) {
		this.productName = productName;
	}
	public int getPrice() {
		return price;
	}
	public void setPrice(int price) {
		this.price = price;
	}
	public int getBuyNum() {
		return buyNum;
	}
	public void setBuyNum(int buyNum) {
		this.buyNum = buyNum;
	}
	public int getCoinNum() {
		return coinNum;
	}
	public void setCoinNum(int coinNum) {
		this.coinNum = coinNum;
	}
	public String getServerId() {
		return serverId;
	}
	public void setServerId(String serverId) {
		this.serverId = serverId;
	}
	public String getRoleId() {
		return roleId;
	}
	public void setRoleId(String roleId) {
		this.roleId = roleId;
	}
	public String getRoleName() {
		return roleName;
	}
	public void setRoleName(String roleName) {
		this.roleName = roleName;
	}
	public int getRoleLevel() {
		return roleLevel;
	}
	public void setRoleLevel(int roleLevel) {
		this.roleLevel = roleLevel;
	}
	public String getExtension() {
		return extension;
	}
	public void setExtension(String extension) {
		this.extension = extension;
	}


}
</span>
大家要问这里参数怎么抽象出来的,那么我告诉你,不是我拍脑袋想出来的,是参考AnySDK文档中提供的充值参数信息来的。(小贱一把)
两个接口有了,紧接着,上层游戏需要登录和支付的地方,怎么调用呢?对于游戏来说,这个接口需要new一个哪个实现?是UC还是当乐还是91呢?
所以,我们对每个插件定义一个单例的包装类。简单地说,就是怎么方便,怎么搞。这样就是方便上层游戏层得调用。那么,我们实现两个包装类:
<span style="font-family:KaiTi_GB2312;font-size:18px;color:#333333;">package com.u8.sdk.components;

import com.u8.sdk.IUser;
import com.u8.sdk.ComponentFactory;
import com.u8.sdk.U8SDK;

/**
 * 用户插件
 *
 */
public class U8User{
	private static U8User instance;

	private IUser userComponent;

	private U8User(){

	}

	public void init(){
		this.userComponent = (IUser)ComponentFactory.getInstance().initComponent(U8SDK.TYPE_LOGIN);
	}

	public static U8User getInstance(){
		if(instance == null){
			instance = new U8User();
		}

		return instance;
	}

	public void login(){
		if(userComponent==null){
			return;
		}

		userComponent.login();
	}
}
</span>
<span style="font-family:KaiTi_GB2312;font-size:18px;color:#333333;">package com.u8.sdk.components;


import com.u8.sdk.IPay;
import com.u8.sdk.PayParams;
import com.u8.sdk.ComponentFactory;
import com.u8.sdk.U8SDK;


/***
 * 支付插件
 *
 */
public class U8Pay{

	private static U8Pay instance;

	private IPay payComponent;

	private U8Pay(){

	}

	public static U8Pay getInstance(){
		if(instance == null){
			instance = new U8Pay();
		}
		return instance;
	}

	public void init(){
		this.payComponent = (IPay)ComponentFactory.getInstance().initComponent(U8SDK.TYPE_PAY);
	}

	public void pay(PayParams data){
		if(this.payComponent == null){
			return;
		}
		this.payComponent.pay(data);
	}
}
</span>关于这两个包装类,大家可以看到,有一个初始化init方法,然后就是所有的插件对应的方法,他把插件接口作为一个私有属性,在init方法里面,将对应的插件接口赋值了。然后在插件对应的方法里面,间接地调用插件对应的接口。那么,这里的关键就是ComponentFactory这个类。刚刚说了,我们这个后面可能有多个插件,所以,我们需要一个插件管理类。ComponentFactory就是我们的插件管理类:
<span style="font-family:KaiTi_GB2312;font-size:18px;color:#333333;">package com.u8.sdk;

import java.io.IOException;
import java.io.StringReader;
import java.util.HashMap;
import java.util.Map;

import org.xmlpull.v1.XmlPullParser;
import org.xmlpull.v1.XmlPullParserException;

import com.u8.sdk.utils.SDKTools;

import android.annotation.SuppressLint;
import android.app.Activity;
import android.util.Log;
import android.util.Xml;

@SuppressLint("UseSparseArrays")
public class ComponentFactory {

	private static ComponentFactory instance;

	private Map<Integer, String> supportedComponents;

	private ComponentFactory(){
		supportedComponents = new HashMap<Integer, String>();
	}

	public static ComponentFactory getInstance(){
		if(instance == null){
			instance = new ComponentFactory();
		}

		return instance;
	}

	public void init(Activity context){
		loadComponentInfo();

	}

	private boolean isSupportComponent(int type){

		return supportedComponents.containsKey(type);
	}

	private String getComponentName(int type){
		if(supportedComponents.containsKey(type)){
			return supportedComponents.get(type);
		}
		return null;
	}

	public SDKConfigData getSDKConfigData(){
		Map<String, String> configs = SDKTools.getAssetPropConfig(U8SDK.getInstance().getContext(), "developer_config.properties");
		return new SDKConfigData(configs);
	}

	@SuppressWarnings({ "unchecked", "rawtypes" })
	public Object initComponent(int type){
		Class localClass = null;

		try {

			if(!isSupportComponent(type)){

				Log.e("U8SDK", "The config of the U8SDK is not support plugin type:"+type);
				return null;
			}

			String name = getComponentName(type);

			localClass = Class.forName(name);

		} catch (ClassNotFoundException e) {
			// TODO Auto-generated catch block
			e.printStackTrace();
			return null;
		}

		try {
			return localClass.getDeclaredConstructor(new Class[]{Activity.class}).newInstance(new Object[]{U8SDK.getInstance().getContext()});
		} catch (Exception e) {

			e.printStackTrace();
		}
		return null;
	}


	private void loadComponentInfo(){
		String xmlStr = SDKTools.getAssetConfigs(U8SDK.getInstance().getContext(), "plugin_config.xml");

		Log.e("The plugin Str:", xmlStr);

		XmlPullParser parser = Xml.newPullParser();

		try {
			parser.setInput(new StringReader(xmlStr));

			int eventType = parser.getEventType();
			while(eventType != XmlPullParser.END_DOCUMENT){

				switch(eventType){
				case XmlPullParser.START_TAG:
					String tag = parser.getName();
					if("plugin".equals(tag)){
						String name = parser.getAttributeValue(0);
						int type = Integer.parseInt(parser.getAttributeValue(1));
						this.supportedComponents.put(type, name);
						Log.e("u8_plugin", "Curr Supported Plugin: "+type+"; name:"+name);
					}
				}
				eventType = parser.next();
			}

		} catch (XmlPullParserException e) {
			e.printStackTrace();
		} catch (IOException e) {
			e.printStackTrace();
		}
	}
}
</span>大家可以看到initComponent方法里面,就是判断当前插件是否支持,如果支持,则从supportedComponents 里面根据当前插件类型取到对应插件实现类的完整类名。通过Class.forName().newInstance()进行初始化。那么,我们怎么知道支持哪些插件呢?怎么得到当前支持的各个插件的实现类呢?大家也许已经看到了,这个管理类中,也有一个初始化init方法。在init方法中,调用了loadComponentInfo方法来加载当前支持的插件信息。大家可以看到它是从assets目录下的plugin_config.xml配置来读取的。关于这个plugin_config.xml怎么生成的,我们后面说打包工具的时候,会详细讲到。这个文件不是我们手动写的,而是打包工具在生成各个渠道包的时候动态生成的。
为了在SDK抽象层和SDK实现层传递数据,我们定义一个监听器:
<span style="font-family:KaiTi_GB2312;font-size:18px;color:#333333;">package com.u8.sdk;

public interface IU8SDKListener {

	public void onResult(int code, String msg);

	public void onLoginResult(LoginResult result);
}
</span>
这个监听器,我们定义了两个接口,一个是onResult,是SDK实现层传递的状态信息,比如SDK初始化成功,SDK初始化失败,SDK登陆成功,登陆失败等信息。而onLoginResult()这个接口,就是之前说到的,登陆成功之后,SDK实现层需要调用该接口,将封装好的登陆结果,返回给SDK抽象层。这个LoginResult里面,就包含sid信息。
为了能够将我们刚刚说的这些插件,插件包装类,插件管理类,和事件监听接口整合到一起,我们最后定义一个总的单例类,也是我们整个抽象层的核心纽带:
<span style="font-family:KaiTi_GB2312;font-size:18px;color:#333333;">package com.u8.sdk;

import com.u8.sdk.components.U8Pay;
import com.u8.sdk.components.U8User;

import android.app.Activity;
import android.content.Intent;
import android.os.Handler;
import android.os.Looper;
import android.util.Log;

public class U8SDK{

	public static final int TYPE_LOGIN = 1;
	public static final int TYPE_PAY = 2;

	private static U8SDK instance;

	private Activity context;
	private Handler mainThreadHandler;

	private SDKConfigData developInfo;

	private IU8SDKListener listener;
	private IActivityListener activityCallback;

	private U8SDK(){
		mainThreadHandler = new Handler(Looper.getMainLooper());
	}

	public static U8SDK getInstance(){
		if(instance == null){
			instance = new U8SDK();
		}
		return instance;
	}

	public SDKConfigData getSDKParams(){
		return developInfo;
	}

	public int getCurrChannel(){
		if(this.developInfo == null || !this.developInfo.contains("U8_Channel")){
			return 0;
		}

		return this.developInfo.getInt("U8_Channel");
	}

	public void setSDKListener(IU8SDKListener listener){
		this.listener = listener;
	}

	public void setActivityCallback(IActivityListener callback){
		this.activityCallback = callback;
	}

	public void init(Activity context){
		this.context = context;
		ComponentFactory.getInstance().init(context);
		developInfo = ComponentFactory.getInstance().getSDKConfigData();

		U8User.getInstance().init();
		U8Pay.getInstance().init();
	}

	public void runOnMainThread(Runnable runnable){
		if(mainThreadHandler != null){
			mainThreadHandler.post(runnable);
			return;
		}

		if(context != null){
			context.runOnUiThread(runnable);
		}
	}

	public Activity getContext(){
		return this.context;
	}

	public void onResult(int code, String msg){
		Log.e("U8SDK Action Result:", "code:"+code+";msg:"+msg);
		if(listener != null){
			listener.onResult(code, msg);
		}
	}

	public void onLoginResult(LoginResult result){
		if(listener != null){
			listener.onLoginResult(result);
		}
	}

	public void onActivityResult(int requestCode, int resultCode, Intent data) {
		if(this.activityCallback != null){
			this.activityCallback.onActivityResult(requestCode, resultCode, data);
		}
	}

	public void onBackPressed(){
		if(this.activityCallback != null){
			this.activityCallback.onBackPressed();
		}
	}


	public void onPause() {
		if(this.activityCallback != null){
			this.activityCallback.onPause();
		}
	}


	public void onResume() {

		if(this.activityCallback != null){
			this.activityCallback.onResume();
		}

	}


	public void onNewIntent(Intent newIntent) {
		if(this.activityCallback != null){
			this.activityCallback.onNewIntent(newIntent);
		}

	}


	public void onStop() {
		if(this.activityCallback != null){
			this.activityCallback.onStop();
		}

	}


	public void onDestroy() {
		if(this.activityCallback != null){
			this.activityCallback.onDestroy();
		}

	}


	public void onRestart() {
		if(this.activityCallback != null){
			this.activityCallback.onRestart();
		}

	}


}
</span>
大家可以看到,我们这里,通过U8SDK这个单例,将所有的东西进行了连接和整合。在init方法里面,我们init插件管理类,也init所有的插件包装类。然后,对事件监听器也进行一个简单的包装。使得SDK实现层的调用简单方便,游戏层的调用也简单方便。
最后,因为有的SDK,需要在Activity的系统事件中做一些处理操作,而Activity是在游戏接入我们这个抽象层时,传递进来的,所以,我们在抽象层定义了一个Activity事件监听器:
<span style="font-family:KaiTi_GB2312;font-size:18px;color:#333333;">package com.u8.sdk;

import android.content.Intent;

public interface IActivityListener {

	public void onPause();
	public void onResume();
	public void onRestart();
	public void onBackPressed();
	public void onNewIntent(Intent newIntent);
	public void onStop();
	public void onDestroy();
	public void onActivityResult(int requestCode, int resultCode, Intent data);
}
</span>
这样,整个SDK接入的抽象层就差不多了。还有一些细节,我们可以后面边开发,边迭代,边完善。后面我们将用实例来看看,游戏层怎么调用这个抽象层SDK,以及具体的SDK接入怎么来实现这个抽象层。
本系列课程视频教程已经录制完毕,但是收费的。想要看视频的童鞋请访问:
本文作者:小黑


 1875
1875

 被折叠的 条评论
为什么被折叠?
被折叠的 条评论
为什么被折叠?
 到【灌水乐园】发言


