


19.1 Linux监控平台介绍

19.2 zabbix监控介绍


19.3/19.4/19.6 安装zabbix
1.首先下载zabbix文件
[root@liuhongwei-01 ~]# wget repo.zabbix.com/zabbix/3.2/rhel/7/x86_64/zabbix-release-3.2-1.el7.noarch.rpm
--2018-07-24 19:31:20--  http://repo.zabbix.com/zabbix/3.2/rhel/7/x86_64/zabbix-release-3.2-1.el7.noarch.rpm
正在解析主机 repo.zabbix.com (repo.zabbix.com)... 162.243.159.138
正在连接 repo.zabbix.com (repo.zabbix.com)|162.243.159.138|:80... 已连接。
已发出 HTTP 请求,正在等待回应... 200 OK
长度:13392 (13K) [application/x-redhat-package-manager]
正在保存至: “zabbix-release-3.2-1.el7.noarch.rpm”

100%[===========================================================================================>] 13,392      --.-K/s 用时 0s

2018-07-24 19:31:25 (169 MB/s) - 已保存 “zabbix-release-3.2-1.el7.noarch.rpm” [13392/13392])
2. 使用rpm安装
[root@liuhongwei-01 ~]# rpm -ivh zabbix-release-3.2-1.el7.noarch.rpm
警告:zabbix-release-3.2-1.el7.noarch.rpm: 头V4 RSA/SHA512 Signature, 密钥 ID a14fe591: NOKEY
准备中...                          ################################# [100%]
正在升级/安装...
   1:zabbix-release-3.2-1.el7         ################################# [100%]
3.可以看到多了一个yum源
[root@liuhongwei-01 ~]# cat /etc/yum.repos.d/
CentOS7-Base-163.repo  CentOS-Debuginfo.repo  CentOS-Media.repo      CentOS-Vault.repo      epel-testing.repo
CentOS-CR.repo         CentOS-fasttrack.repo  CentOS-Sources.repo    epel.repo              zabbix.repo
4.第二台机器也要下载zabbix
[root@hongwei-02 ~]# wget repo.zabbix.com/zabbix/3.2/rhel/7/x86_64/zabbix-release-3.2-1.el7.noarch.rpm
--2018-07-24 19:41:17--  http://repo.zabbix.com/zabbix/3.2/rhel/7/x86_64/zabbix-release-3.2-1.el7.noarch.rpm
正在解析主机 repo.zabbix.com (repo.zabbix.com)... 162.243.159.138
正在连接 repo.zabbix.com (repo.zabbix.com)|162.243.159.138|:80... 已连接。
已发出 HTTP 请求,正在等待回应... 200 OK
长度:13392 (13K) [application/x-redhat-package-manager]
正在保存至: “zabbix-release-3.2-1.el7.noarch.rpm”

100%[===========================================================================================>] 13,392      --.-K/s 用时 0s

2018-07-24 19:41:22 (163 MB/s) - 已保存 “zabbix-release-3.2-1.el7.noarch.rpm” [13392/13392])
5.然后使用yum 安装zabbix
[root@liuhongwei-01 ~]# yum install -y zabbix-agent zabbix-get zabbix-server-mysql zabbix-web zabbix-web-mysql
已加载插件:fastestmirror
base                                                                                                          | 3.6 kB  00:00:00
epel/x86_64/metalink                                                                                          | 6.7 kB  00:00:00
epel                                                                                                          | 3.2 kB  00:00:00
extras                                                                                                        | 3.4 kB  00:00:00
updates
安装zabbix会连带安装很多包,并且会安装httpd和php
6.然后要安装mysql,我的已经安装好,=不再显示,查看mysql进程有没有启动,没有启动要启动
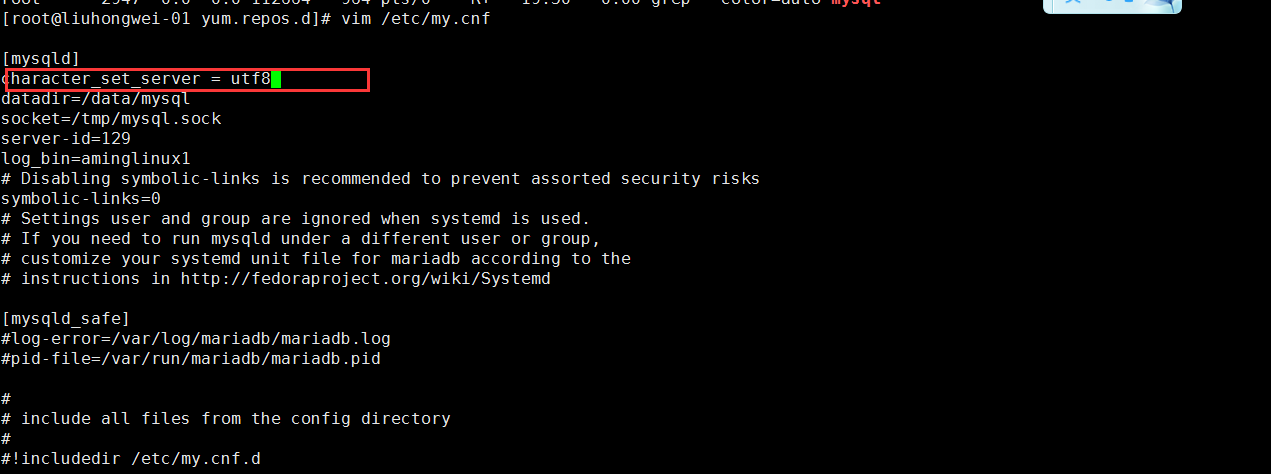
7.然后编辑一下mysql 的配置文件,设置一下默认的字符集(不设置的话 可能zabbix web页面会出现乱码的情况)
8.然后重启mysql服务
9.进入到mysql 然后创建zabbix库
[root@liuhongwei-01 yum.repos.d]# mysql -uroot -phongwei
Warning: Using a password on the command line interface can be insecure.
Welcome to the MySQL monitor.  Commands end with ; or \g.
Your MySQL connection id is 2
Server version: 5.6.35-log MySQL Community Server (GPL)

Copyright (c) 2000, 2016, Oracle and/or its affiliates. All rights reserved.

Oracle is a registered trademark of Oracle Corporation and/or its
affiliates. Other names may be trademarks of their respective
owners.

Type 'help;' or '\h' for help. Type '\c' to clear the current input statement.

mysql>
mysql> create database zabbix character set utf8; Query OK, 1 row affected (0.37 sec) mysql>10.然后在创建用户,这个用户是让web代码(php代码)链接mysql
mysql> grant all on zabbix.* to 'zabbix'@'127.0.0.1' identified by 'woshi10086';
Query OK, 0 rows affected (0.19 sec)

mysql>
11。然后导入数据
进入到cd /usr/share/doc/zabbix-server-mysql-3.2.11/目录下面去,解压一下包,然后在恢复数据
[root@liuhongwei-01 ~]# cd /usr/share/doc/zabbix-server-mysql-3.2.11/
[root@liuhongwei-01 zabbix-server-mysql-3.2.11]# gzip -d create.sql.gz
[root@liuhongwei-01 zabbix-server-mysql-3.2.11]# mysql -uroot -phongwei zabbix < create.sql
Warning: Using a password on the command line interface can be insecure.
12.然后需要启动zabbix-service和httpd服务
[root@liuhongwei-01 zabbix-server-mysql-3.2.11]# systemctl start zabbix-server[root@liuhongwei-01 zabbix-server-mysql-3.2.11]# systemctl start httpd Job for httpd.service failed because the control process exited with error code. See "systemctl status httpd.service" and "journalctl -xe" for details. [root@liuhongwei-01 zabbix-server-mysql-3.2.11]# /etc/init.d/nginx stop Stopping nginx (via systemctl): [ 确定 ] [root@liuhongwei-01 zabbix-server-mysql-3.2.11]# [root@liuhongwei-01 zabbix-server-mysql-3.2.11]# systemctl start httpd [root@liuhongwei-01 zabbix-server-mysql-3.2.11]#在开启httpd 的时候出现错误,这是因为nginx也是监听80端口,发生冲突,需要关闭nginx服务
[root@liuhongwei-01 zabbix-server-mysql-3.2.11]# netstat -lntp
Active Internet connections (only servers)
Proto Recv-Q Send-Q Local Address           Foreign Address         State       PID/Program name
tcp        0      0 0.0.0.0:111             0.0.0.0:*               LISTEN      753/rpcbind
tcp        0      0 0.0.0.0:22              0.0.0.0:*               LISTEN      1024/sshd
tcp        0      0 127.0.0.1:25            0.0.0.0:*               LISTEN      2136/master
tcp6       0      0 :::3306                 :::*                    LISTEN      2303/mysqld
tcp6       0      0 :::111                  :::*                    LISTEN      753/rpcbind
tcp6       0      0 :::80                   :::*                    LISTEN      3196/httpd
tcp6       0      0 :::22                   :::*                    LISTEN      1024/sshd
tcp6       0      0 ::1:25                  :::*                    LISTEN      2136/master
[root@liuhongwei-01 zabbix-server-mysql-3.2.11]# ps aux|grep zabbix
zabbix    3157  0.0  0.3 256060  3504 ?        S    20:02   0:00 /usr/sbin/zabbix_server -c /etc/zabbix/zabbix_server.conf
root      3206  0.0  0.0 112664   964 pts/0    R+   20:06   0:00 grep --color=auto zabbix
[root@liuhongwei-01 zabbix-server-mysql-3.2.11]# ps aux|grep httpd
root      3196  0.4  1.5 461832 15384 ?        Ss   20:05   0:00 /usr/sbin/httpd -DFOREGROUND
apache    3199  0.0  0.7 461964  7632 ?        S    20:05   0:00 /usr/sbin/httpd -DFOREGROUND
apache    3200  0.0  0.7 461964  7632 ?        S    20:05   0:00 /usr/sbin/httpd -DFOREGROUND
apache    3201  0.0  0.7 461964  7632 ?        S    20:05   0:00 /usr/sbin/httpd -DFOREGROUND
apache    3202  0.0  0.7 461964  7632 ?        S    20:05   0:00 /usr/sbin/httpd -DFOREGROUND
apache    3203  0.0  0.7 461964  7632 ?        S    20:05   0:00 /usr/sbin/httpd -DFOREGROUND
root      3208  0.0  0.0 112664   964 pts/0    R+   20:06   0:00 grep --color=auto httpd
[root@liuhongwei-01 zabbix-server-mysql-3.2.11]#
13.然后把httpd和zabbix-server设置开机启动,nginx设置开机不启动
[root@liuhongwei-01 zabbix-server-mysql-3.2.11]# systemctl enable httpd
Created symlink from /etc/systemd/system/multi-user.target.wants/httpd.service to /usr/lib/systemd/system/httpd.service.
[root@liuhongwei-01 zabbix-server-mysql-3.2.11]# systemctl enable zabbix-server
Created symlink from /etc/systemd/system/multi-user.target.wants/zabbix-server.service to /usr/lib/systemd/system/zabbix-server.service.
[root@liuhongwei-01 zabbix-server-mysql-3.2.11]# systemctl disable nginx
nginx.service is not a native service, redirecting to /sbin/chkconfig.
Executing /sbin/chkconfig nginx off
[root@liuhongwei-01 zabbix-server-mysql-3.2.11]#
[root@liuhongwei-01 zabbix-server-mysql-3.2.11]# chkconfig nginx off
[root@liuhongwei-01 zabbix-server-mysql-3.2.11]#
14.查看zabbix监听端口的时候,看不到监听的端口,排查一下,需要设置一下
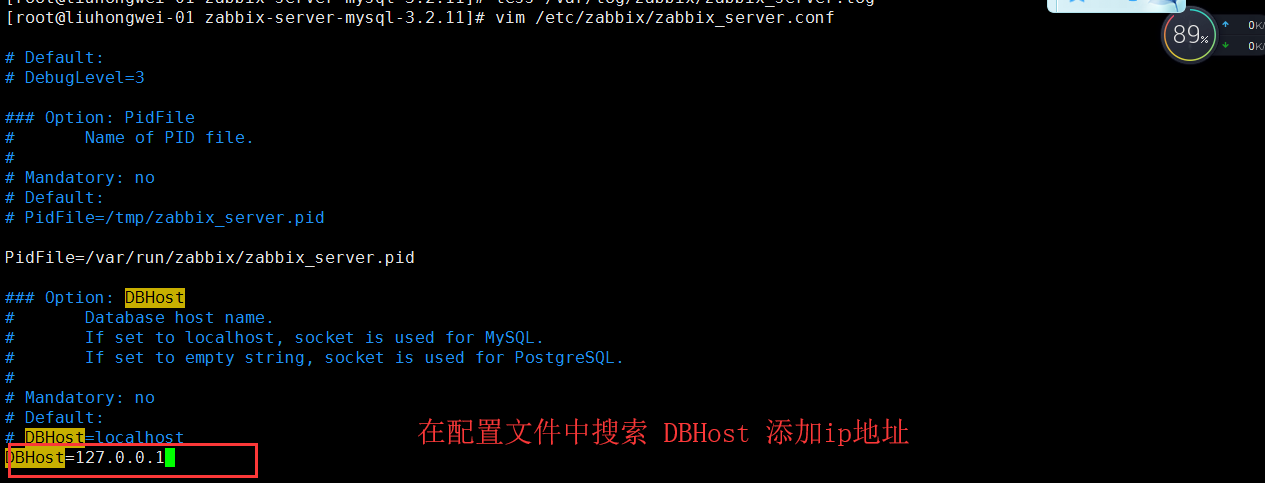
看到的日志信息是不能连接到mysql
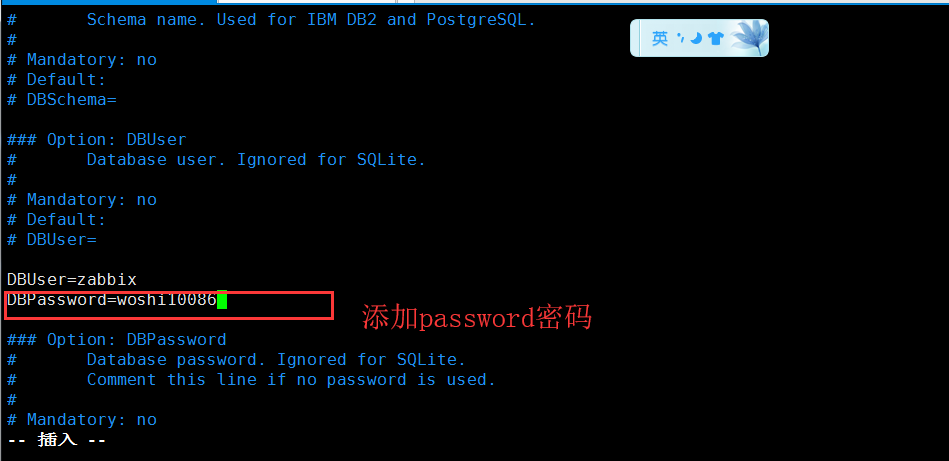
需要打开配置文件设置一下
15.更改之后重启一下zabbix,查看监听端口
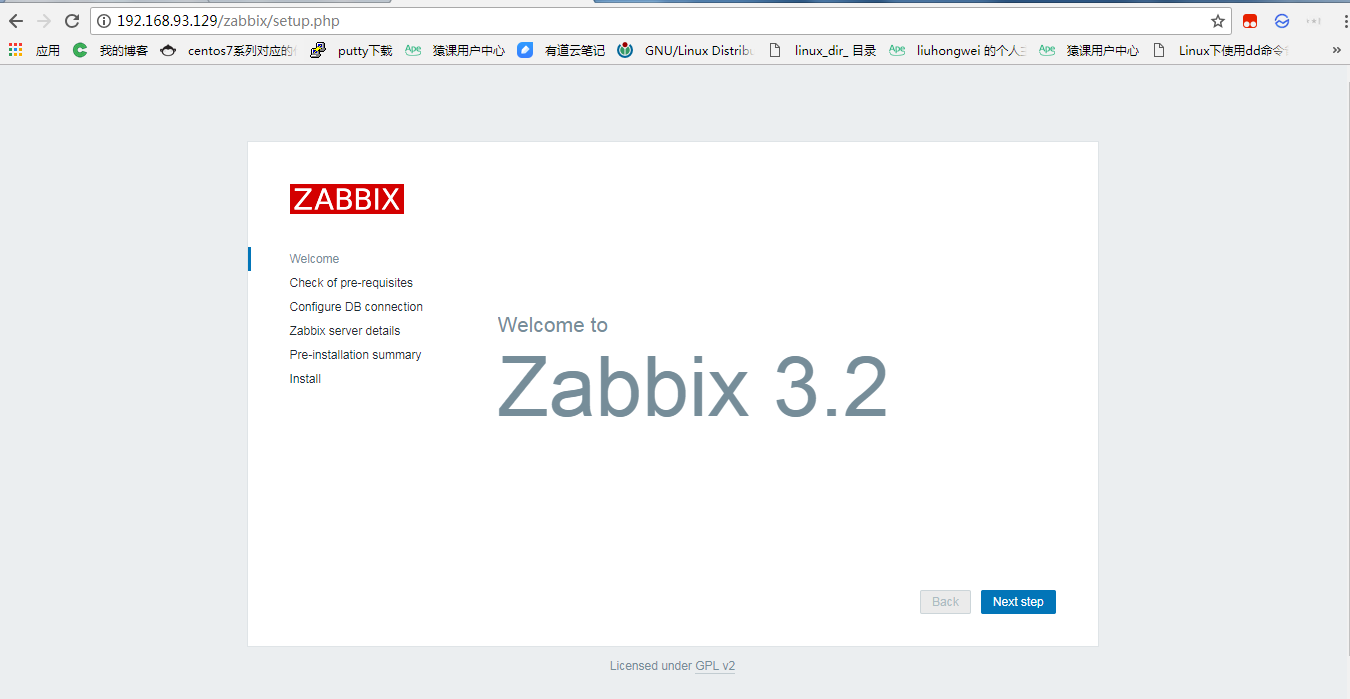
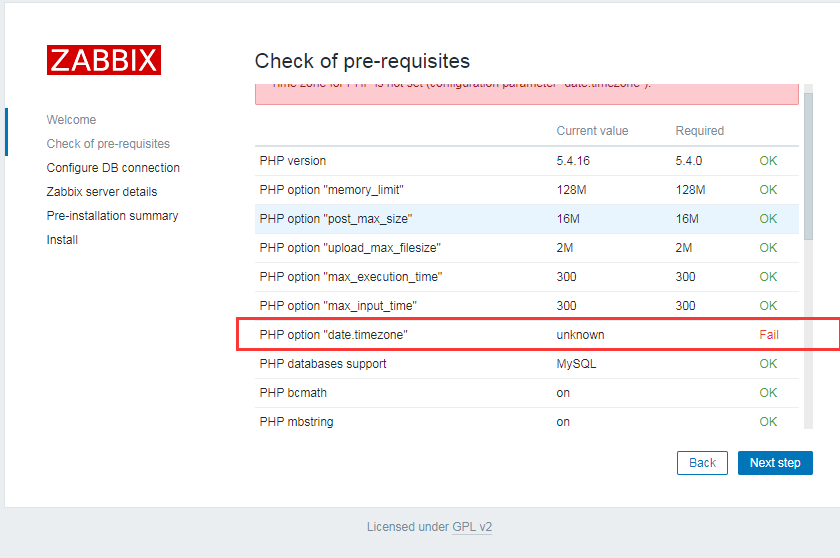
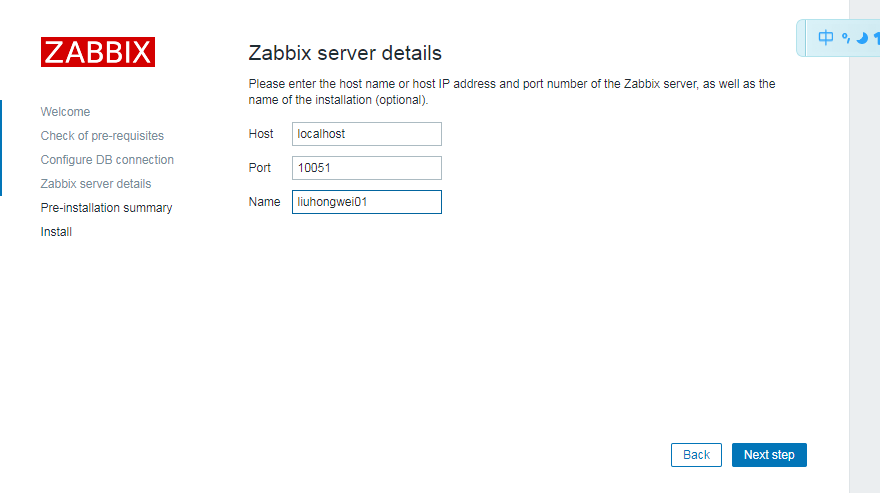
[root@liuhongwei-01 zabbix-server-mysql-3.2.11]# systemctl restart zabbix-server
[root@liuhongwei-01 zabbix-server-mysql-3.2.11]#
[root@liuhongwei-01 zabbix-server-mysql-3.2.11]# ps aux|grep zabbix zabbix 3367 1.2 0.4 256240 4156 ? S 20:57 0:00 /usr/sbin/zabbix_server -c /etc/zabbix/zabbix_server.conf zabbix 3370 0.0 0.2 256240 2456 ? S 20:57 0:00 /usr/sbin/zabbix_server: configuration syncer [waiting 60 sec for processes] zabbix 3371 0.0 0.2 256240 2668 ? S 20:57 0:00 /usr/sbin/zabbix_server: db watchdog [synced alerts config in 0.027335 sec, idle 60 sec] zabbix 3372 0.1 0.5 363176 5192 ? S 20:57 0:00 /usr/sbin/zabbix_server: poller #1 [got 0 values in 0.000003 sec, idle 5 sec] zabbix 3373 0.1 0.5 363176 5192 ? S 20:57 0:00 /usr/sbin/zabbix_server: poller #2 [got 0 values in 0.000012 sec, idle 5 sec] zabbix 3374 0.1 0.5 363176 5192 ? S 20:57 0:00 /usr/sbin/zabbix_server: poller #3 [got 0 values in 0.000004 sec, idle 5 sec] zabbix 3375 0.1 0.5 363176 5192 ? S 20:57 0:00 /usr/sbin/zabbix_server: poller #4 [got 0 values in 0.000005 sec, idle 5 sec] zabbix 3376 0.0 0.5 363176 5192 ? S 20:57 0:00 /usr/sbin/zabbix_server: poller #5 [got 0 values in 0.000004 sec, idle 5 sec] zabbix 3377 0.3 0.5 363176 5192 ? S 20:57 0:00 /usr/sbin/zabbix_server: unreachable poller #1 [got 0 values in 0.000006 sec, idle 5 sec] zabbix 3378 0.0 0.3 256240 3572 ? S 20:57 0:00 /usr/sbin/zabbix_server: trapper #1 [processed data in 0.000000 sec, waiting for connection] zabbix 3379 0.0 0.3 256240 3572 ? S 20:57 0:00 /usr/sbin/zabbix_server: trapper #2 [processed data in 0.000000 sec, waiting for connection] zabbix 3380 0.0 0.3 256240 3572 ? S 20:57 0:00 /usr/sbin/zabbix_server: trapper #3 [processed data in 0.000000 sec, waiting for connection] zabbix 3381 0.0 0.3 256240 3572 ? S 20:57 0:00 /usr/sbin/zabbix_server: trapper #4 [processed data in 0.000000 sec, waiting for connection] zabbix 3382 0.0 0.3 256240 3572 ? S 20:57 0:00 /usr/sbin/zabbix_server: trapper #5 [processed data in 0.000000 sec, waiting for connection] zabbix 3383 0.0 0.2 258812 2596 ? S 20:57 0:00 /usr/sbin/zabbix_server: icmp pinger #1 [got 0 values in 0.000004 sec, idle 5 sec] zabbix 3384 0.0 0.2 256240 2816 ? S 20:57 0:00 /usr/sbin/zabbix_server: alerter [sent alerts: 0 success, 0 fail in 0.000847 sec, idle 30 sec] zabbix 3387 0.0 0.2 256240 2452 ? S 20:57 0:00 /usr/sbin/zabbix_server: housekeeper [startup idle for 30 minutes] zabbix 3394 0.0 0.2 256316 2904 ? S 20:57 0:00 /usr/sbin/zabbix_server: timer #1 [processed 0 triggers, 0 events in 0.000880 sec, 0 maintenances in 0.000000 sec, idle 30 sec] zabbix 3397 0.0 0.2 256240 2828 ? S 20:57 0:00 /usr/sbin/zabbix_server: http poller #1 [got 0 values in 0.001226 sec, idle 5 sec] zabbix 3400 0.0 0.4 360592 5024 ? S 20:57 0:00 /usr/sbin/zabbix_server: discoverer #1 [processed 0 rules in 0.005146 sec, idle 60 sec] zabbix 3401 0.0 0.2 256240 2816 ? S 20:57 0:00 /usr/sbin/zabbix_server: history syncer #1 [synced 0 items in 0.000002 sec, idle 1 sec] zabbix 3404 0.0 0.2 256240 2816 ? S 20:57 0:00 /usr/sbin/zabbix_server: history syncer #2 [synced 0 items in 0.000001 sec, idle 1 sec] zabbix 3406 0.0 0.2 256240 2816 ? S 20:57 0:00 /usr/sbin/zabbix_server: history syncer #3 [synced 0 items in 0.000001 sec, idle 1 sec] zabbix 3408 0.0 0.2 256240 2816 ? S 20:57 0:00 /usr/sbin/zabbix_server: history syncer #4 [synced 0 items in 0.000002 sec, idle 1 sec] zabbix 3409 0.0 0.3 256240 3772 ? S 20:57 0:00 /usr/sbin/zabbix_server: escalator #1 [processed 0 escalations in 0.000990 sec, idle 3 sec] zabbix 3411 0.0 0.3 256240 3768 ? S 20:57 0:00 /usr/sbin/zabbix_server: proxy poller #1 [exchanged data with 0 proxies in 0.000004 sec, idle 5 sec] zabbix 3414 0.0 0.2 256240 2568 ? S 20:57 0:00 /usr/sbin/zabbix_server: self-monitoring [processed data in 0.000010 sec, idle 1 sec] zabbix 3415 0.0 0.2 256240 2804 ? S 20:57 0:00 /usr/sbin/zabbix_server: task manager [processed 0 task(s) in 0.000316 sec, idle 5 sec] root 3418 0.0 0.0 112664 960 pts/0 R+ 20:57 0:00 grep --color=auto zabbix [root@liuhongwei-01 zabbix-server-mysql-3.2.11]# netstat -lntp Active Internet connections (only servers) Proto Recv-Q Send-Q Local Address Foreign Address State PID/Program name tcp 0 0 0.0.0.0:111 0.0.0.0:* LISTEN 753/rpcbind tcp 0 0 0.0.0.0:22 0.0.0.0:* LISTEN 1024/sshd tcp 0 0 127.0.0.1:25 0.0.0.0:* LISTEN 2136/master tcp 0 0 0.0.0.0:10051 0.0.0.0:* LISTEN 3367/zabbix_server tcp6 0 0 :::3306 :::* LISTEN 2303/mysqld tcp6 0 0 :::111 :::* LISTEN 753/rpcbind tcp6 0 0 :::80 :::* LISTEN 3196/httpd tcp6 0 0 :::22 :::* LISTEN 1024/sshd tcp6 0 0 ::1:25 :::* LISTEN 2136/master tcp6 0 0 :::10051 :::* LISTEN 3367/zabbix_server [root@liuhongwei-01 zabbix-server-mysql-3.2.11]#16.然后去浏览器设置zabbix web
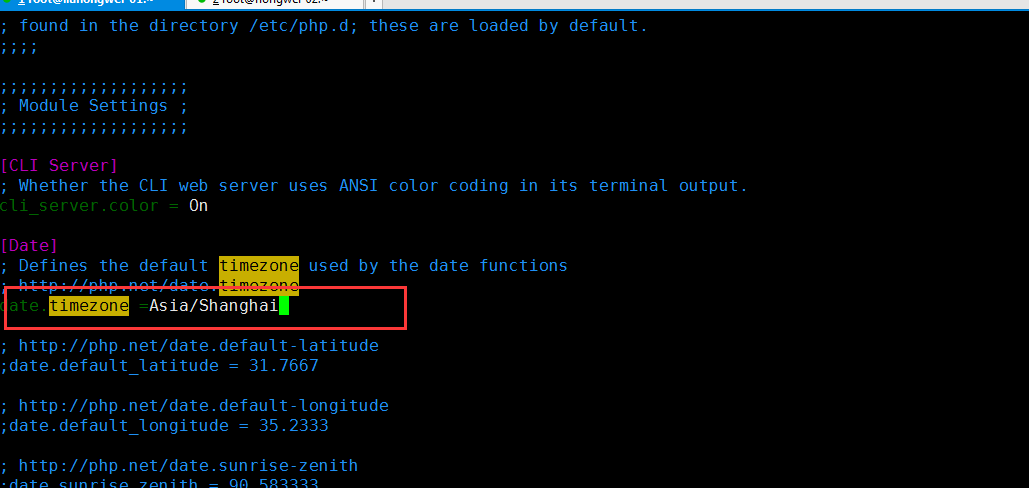
下一步之后,查看到有一个fail,需要设置一下时区
vi 、etc/php.ini
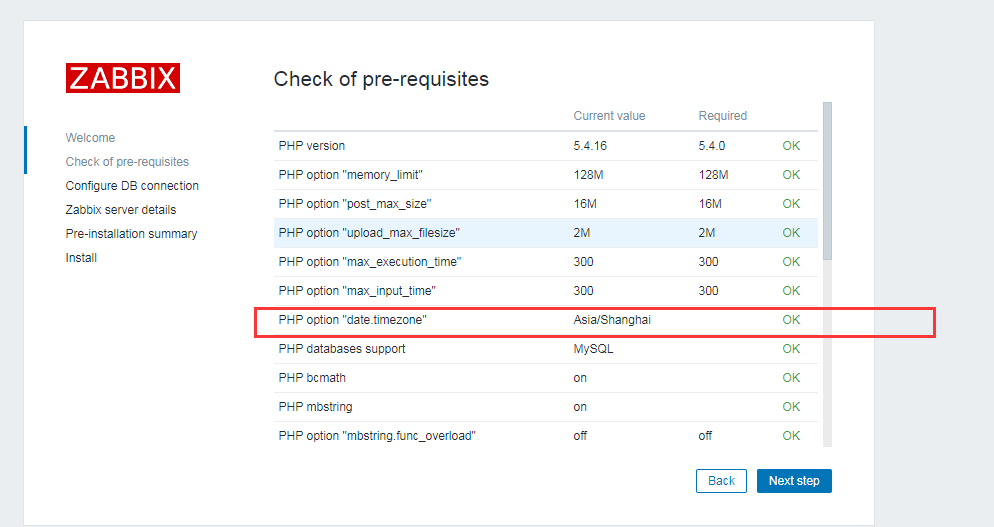
更改之后,重启httpd服务
然后在刷新一下浏览器
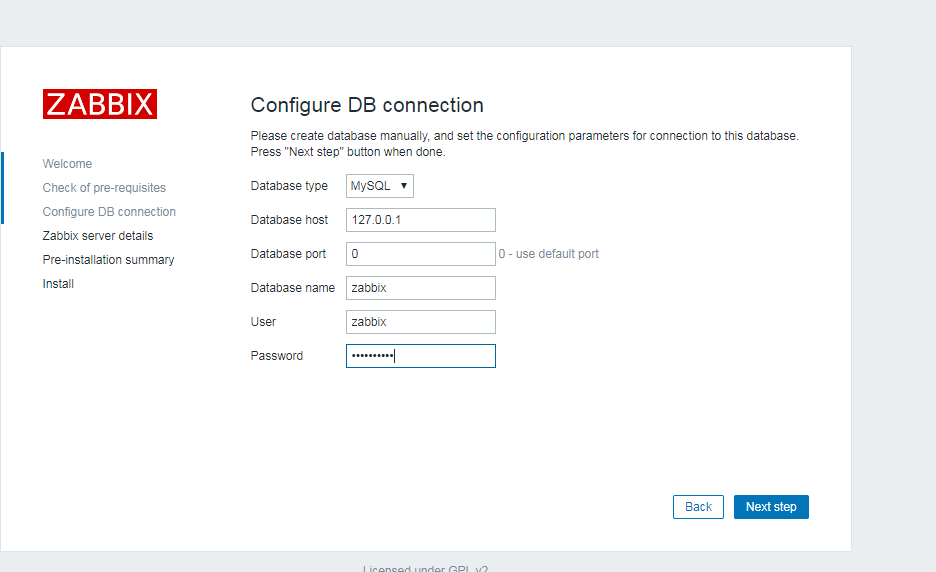
然后继续下一步设置
成功安装
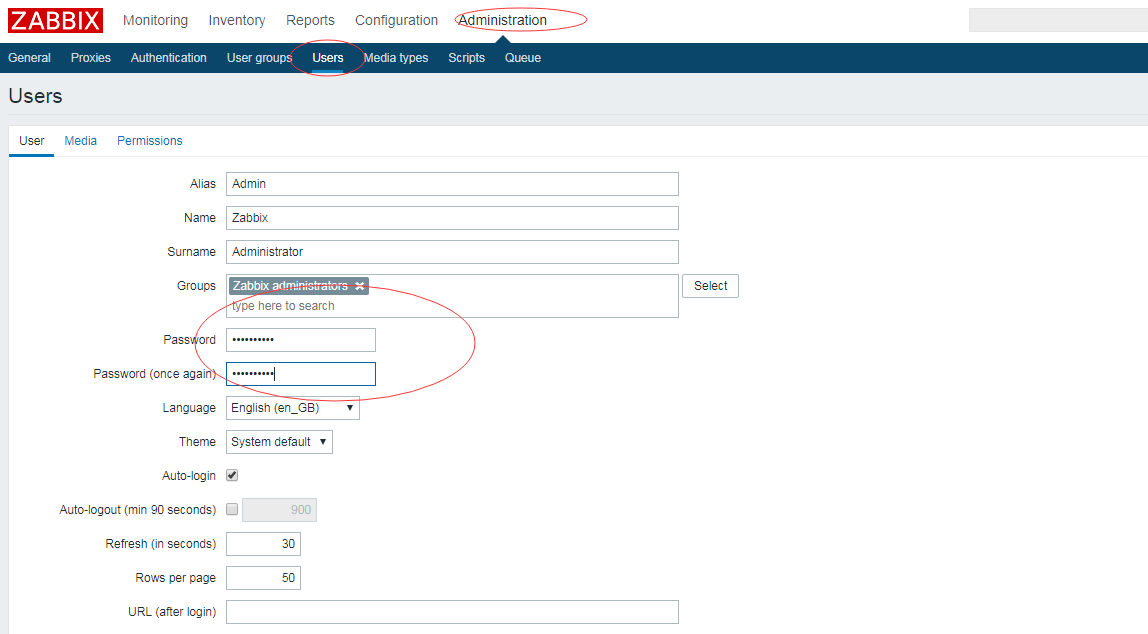
账户名叫Admin 密码是zabbix
首先进入后,要更改密码
然后序言选择中文
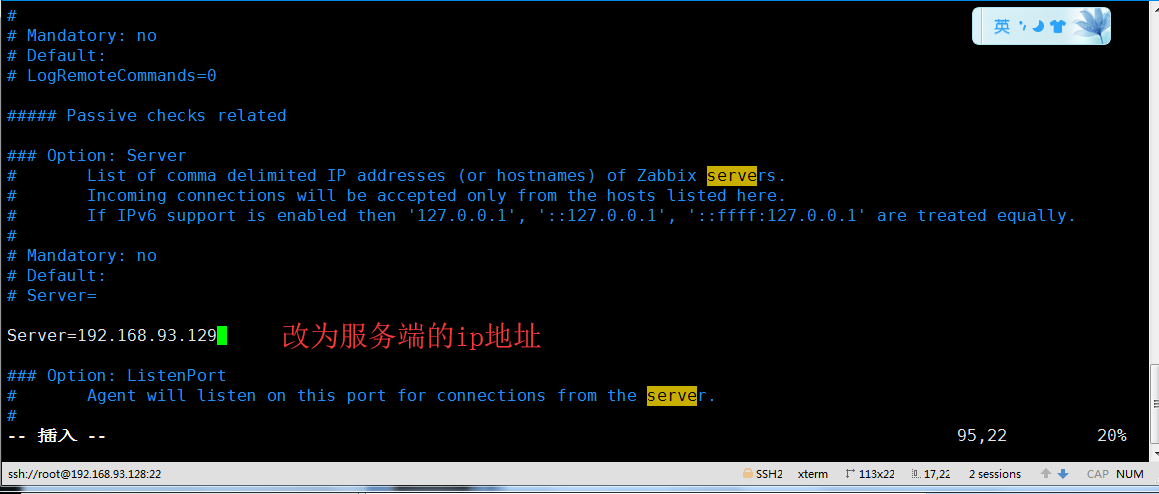
17.客户端也要安装zabbix
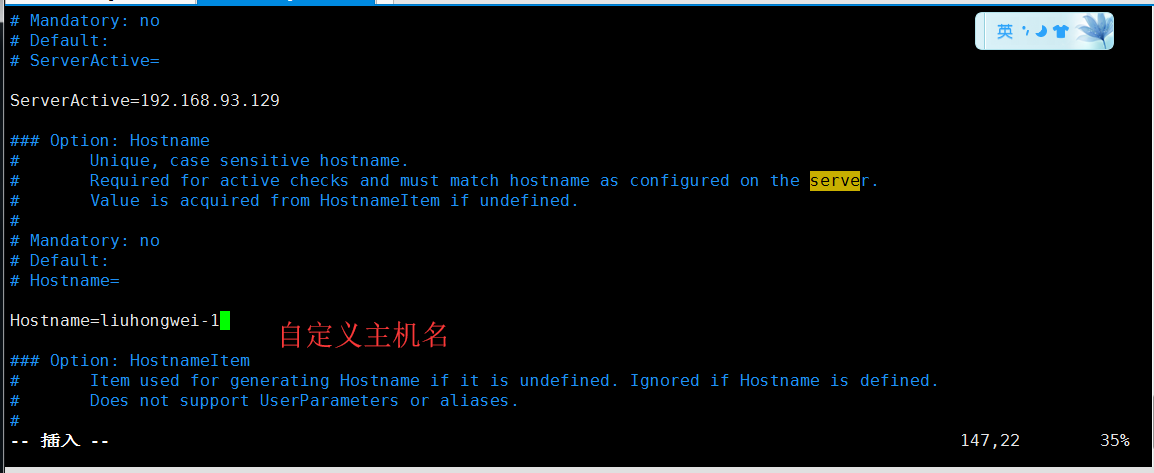
[root@hongwei-02 ~]# rpm -ivh zabbix-release-3.2-1.el7.noarch.rpm
警告:zabbix-release-3.2-1.el7.noarch.rpm: 头V4 RSA/SHA512 Signature, 密钥 ID a14fe591: NOKEY
准备中...                          ################################# [100%]
正在升级/安装...
   1:zabbix-release-3.2-1.el7         ################################# [100%]
[root@hongwei-02 ~]# yum install -y zabbix-agent编辑客户端配置文件
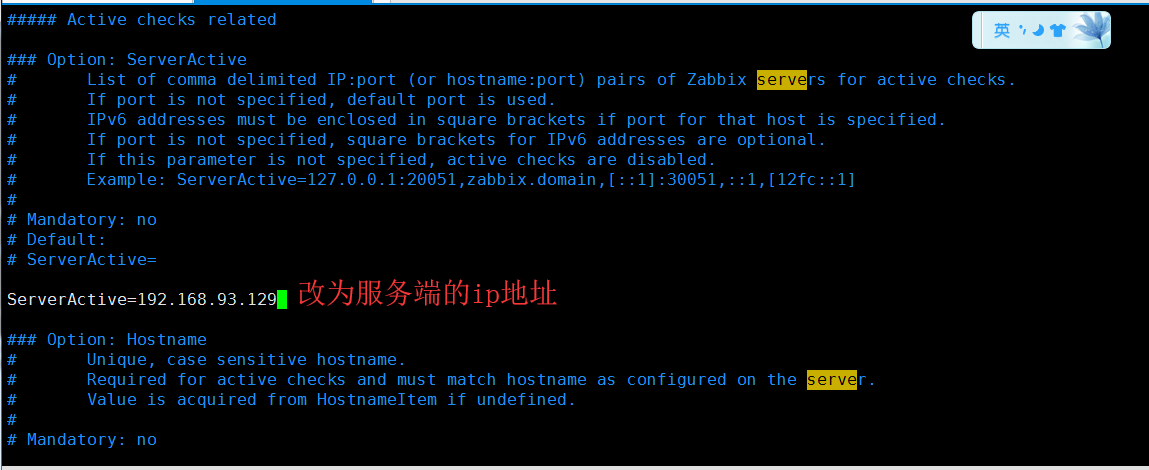
[root@hongwei-02 ~]# vim /etc/zabbix/zabbix_agentd.conf
然后启动zabbix服务
[root@hongwei-02 ~]# ps aux|grep zabbix
zabbix    2482  0.0  0.1  80600  1264 ?        S    13:57   0:00 /usr/sbin/zabbix_agentd -c /etc/zabbix/zabbix_agentd.conf
zabbix    2483  0.0  0.1  80600  1284 ?        S    13:57   0:00 /usr/sbin/zabbix_agentd: collector [idle 1 sec]
zabbix    2484  0.0  0.1  80600  1832 ?        S    13:57   0:00 /usr/sbin/zabbix_agentd: listener #1 [waiting for connection]
zabbix    2485  0.0  0.1  80600  1832 ?        S    13:57   0:00 /usr/sbin/zabbix_agentd: listener #2 [waiting for connection]
zabbix    2486  0.0  0.1  80600  1832 ?        S    13:57   0:00 /usr/sbin/zabbix_agentd: listener #3 [waiting for connection]
zabbix    2487  0.0  0.2  80728  2196 ?        S    13:57   0:00 /usr/sbin/zabbix_agentd: active checks #1 [idle 1 sec]
root      2490  0.0  0.0 112664   964 pts/0    R+   13:58   0:00 grep --color=auto zabbix
[root@hongwei-02 ~]# netstat -lntp
Active Internet connections (only servers)
Proto Recv-Q Send-Q Local Address           Foreign Address         State       PID/Program name
tcp        0      0 0.0.0.0:111             0.0.0.0:*               LISTEN      761/rpcbind
tcp        0      0 0.0.0.0:80              0.0.0.0:*               LISTEN      2055/nginx: master
tcp        0      0 0.0.0.0:22              0.0.0.0:*               LISTEN      993/sshd
tcp        0      0 127.0.0.1:25            0.0.0.0:*               LISTEN      2103/master
tcp        0      0 0.0.0.0:443             0.0.0.0:*               LISTEN      2055/nginx: master
tcp        0      0 0.0.0.0:10050           0.0.0.0:*               LISTEN      2482/zabbix_agentd
tcp6       0      0 :::3306                 :::*                    LISTEN      2270/mysqld
tcp6       0      0 :::111                  :::*                    LISTEN      761/rpcbind
tcp6       0      0 :::22                   :::*                    LISTEN      993/sshd
tcp6       0      0 ::1:25                  :::*                    LISTEN      2103/master
tcp6       0      0 :::10050                :::*                    LISTEN      2482/zabbix_agentd
[root@hongwei-02 ~]#


19.5 忘记Admin密码如何做
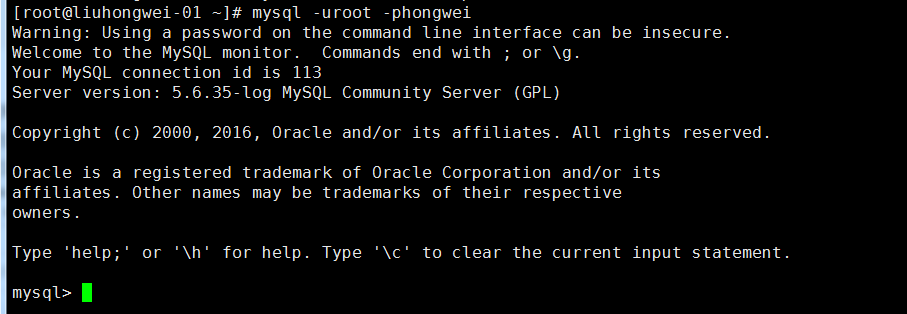
首先进入到mysql里面去
选择zabbix库
mysql> use zabbix;
Reading table information for completion of table and column names
You can turn off this feature to get a quicker startup with -A

Database changed
mysql> show tables;
+----------------------------+
| Tables_in_zabbix           |
+----------------------------+
| acknowledges               |
| actions                    |
| alerts                     |
| application_discovery      |
| application_prototype      |
| application_template       |
| applications               |
| auditlog                   |
| auditlog_details           |
| autoreg_host               |
| conditions                 |
| config                     |
| corr_condition             |
| corr_condition_group       |
| corr_condition_tag         |
| corr_condition_tagpair     |
| corr_condition_tagvalue    |
| corr_operation             |
| correlation                |
| dbversion                  |
| dchecks                    |
| dhosts                     |
| drules                     |
| dservices                  |
| escalations                |
| event_recovery             |
| event_tag                  |
| events                     |
| expressions                |
| functions                  |
| globalmacro                |
| globalvars                 |
| graph_discovery            |
| graph_theme                |
| graphs                     |
| graphs_items               |
| group_discovery            |
| group_prototype            |
| groups                     |
| history                    |
| history_log                |
| history_str                |
| history_text               |
| history_uint               |
| host_discovery             |
| host_inventory             |
| hostmacro                  |
| hosts                      |
| hosts_groups               |
| hosts_templates            |
| housekeeper                |
| httpstep                   |
| httpstepitem               |
| httptest                   |
| httptestitem               |
| icon_map                   |
| icon_mapping               |
| ids                        |
| images                     |
| interface                  |
| interface_discovery        |
| item_application_prototype |
| item_condition             |
| item_discovery             |
| items                      |
| items_applications         |
| maintenances               |
| maintenances_groups        |
| maintenances_hosts         |
| maintenances_windows       |
| mappings                   |
| media                      |
| media_type                 |
| opcommand                  |
| opcommand_grp              |
| opcommand_hst              |
| opconditions               |
| operations                 |
| opgroup                    |
| opinventory                |
| opmessage                  |
| opmessage_grp              |
| opmessage_usr              |
| optemplate                 |
| problem                    |
| problem_tag                |
| profiles                   |
| proxy_autoreg_host         |
| proxy_dhistory             |
| proxy_history              |
| regexps                    |
| rights                     |
| screen_user                |
| screen_usrgrp              |
| screens                    |
| screens_items              |
| scripts                    |
| service_alarms             |
| services                   |
| services_links             |
| services_times             |
| sessions                   |
| slides                     |
| slideshow_user             |
| slideshow_usrgrp           |
| slideshows                 |
| sysmap_element_url         |
| sysmap_url                 |
| sysmap_user                |
| sysmap_usrgrp              |
| sysmaps                    |
| sysmaps_elements           |
| sysmaps_link_triggers      |
| sysmaps_links              |
| task                       |
| task_close_problem         |
| timeperiods                |
| trends                     |
| trends_uint                |
| trigger_depends            |
| trigger_discovery          |
| trigger_tag                |
| triggers                   |
| users                      |
| users_groups               |
| usrgrp                     |
| valuemaps                  |
+----------------------------+
127 rows in set (0.00 sec)

mysql>
mysql> desc users; +----------------+---------------------+------+-----+---------+-------+ | Field | Type | Null | Key | Default | Extra | +----------------+---------------------+------+-----+---------+-------+ | userid | bigint(20) unsigned | NO | PRI | NULL | | | alias | varchar(100) | NO | UNI | | | | name | varchar(100) | NO | | | | | surname | varchar(100) | NO | | | | | passwd | char(32) | NO | | | | | url | varchar(255) | NO | | | | | autologin | int(11) | NO | | 0 | | | autologout | int(11) | NO | | 900 | | | lang | varchar(5) | NO | | en_GB | | | refresh | int(11) | NO | | 30 | | | type | int(11) | NO | | 1 | | | theme | varchar(128) | NO | | default | | | attempt_failed | int(11) | NO | | 0 | | | attempt_ip | varchar(39) | NO | | | | | attempt_clock | int(11) | NO | | 0 | | | rows_per_page | int(11) | NO | | 50 | | +----------------+---------------------+------+-----+---------+-------+ 16 rows in set (0.07 sec)然后更改密码
mysql> update users set passwd=md5('Woshi10086') where alias='Admin';
Query OK, 0 rows affected (0.00 sec)
Rows matched: 1  Changed: 0  Warnings: 0

mysql>
可以select * 看一下
mysql> mysql> select * from users;
+--------+-------+--------+---------------+----------------------------------+-----+-----------+------------+-------+---------+------+---------+----------------+------------+---------------+---------------+
| userid | alias | name   | surname       | passwd                           | url | autologin | autologout | lang  | refresh | type | theme   | attempt_failed | attempt_ip | attempt_clock | rows_per_page |
+--------+-------+--------+---------------+----------------------------------+-----+-----------+------------+-------+---------+------+---------+----------------+------------+---------------+---------------+
|      1 | Admin | Zabbix | Administrator | 9d4a926000858733a8b46ddff84a0ee6 |     |         1 |          0 | zh_CN |      30 |    3 | default |              0 |            |             0 |            50 |
|      2 | guest |        |               | d41d8cd98f00b204e9800998ecf8427e |     |         0 |        900 | en_GB |      30 |    1 | default |              0 |            |             0 |            50 |
+--------+-------+--------+---------------+----------------------------------+-----+-----------+------------+-------+---------+------+---------+----------------+------------+---------------+---------------+
2 rows in set (0.00 sec)

mysql>
然后返回浏览器使用新密码登录
19.7 主动模式和被动模式

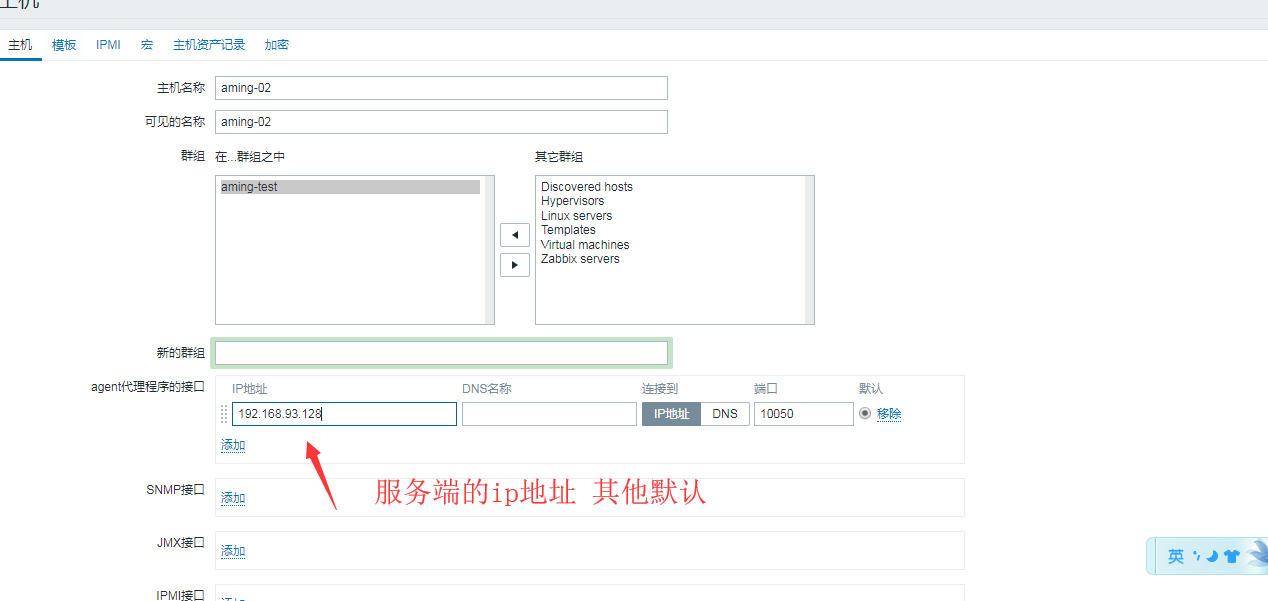
19.8 添加监控主机
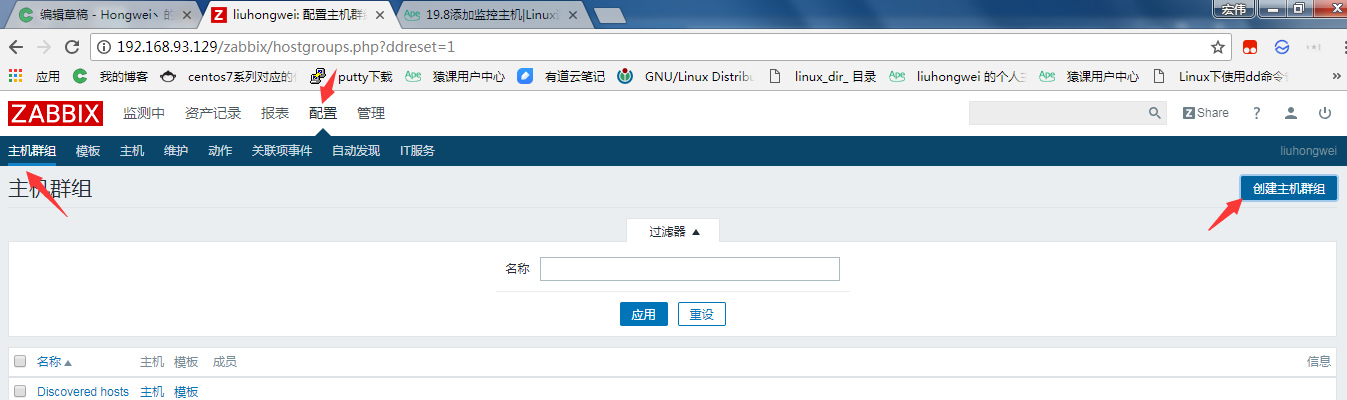
1.先添加主机组
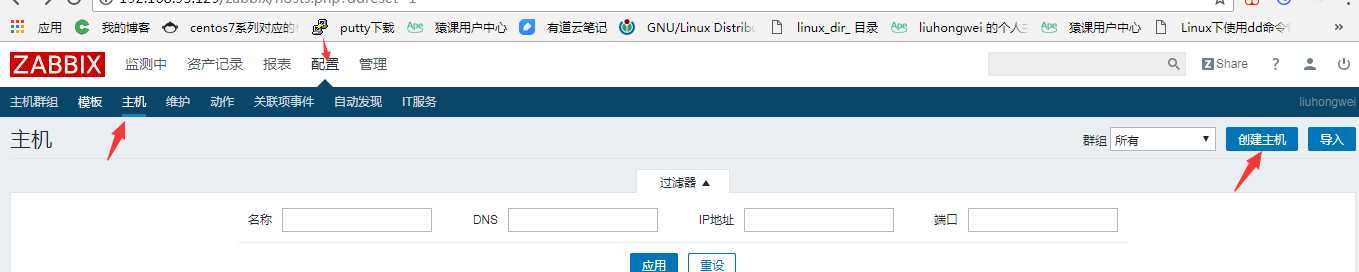
在添加主机aming-test

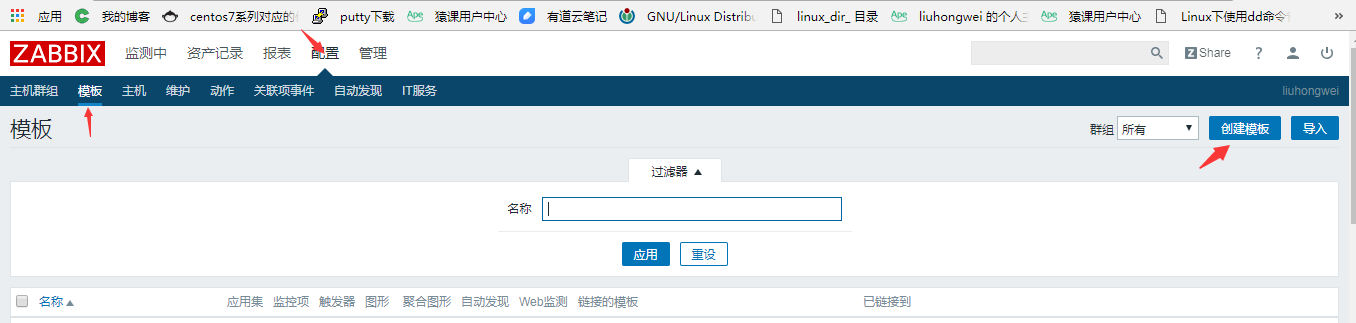
19.9 添加自定义模板
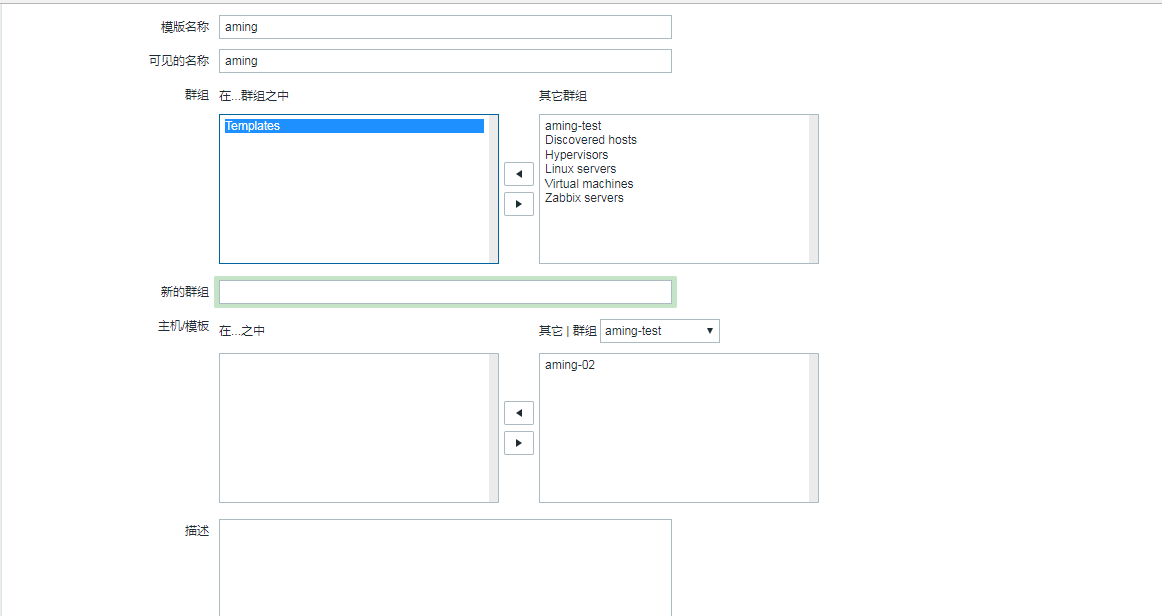
1.自定义一个模板
创建完的模板 是没有应用集 监控项 等等 都是空的
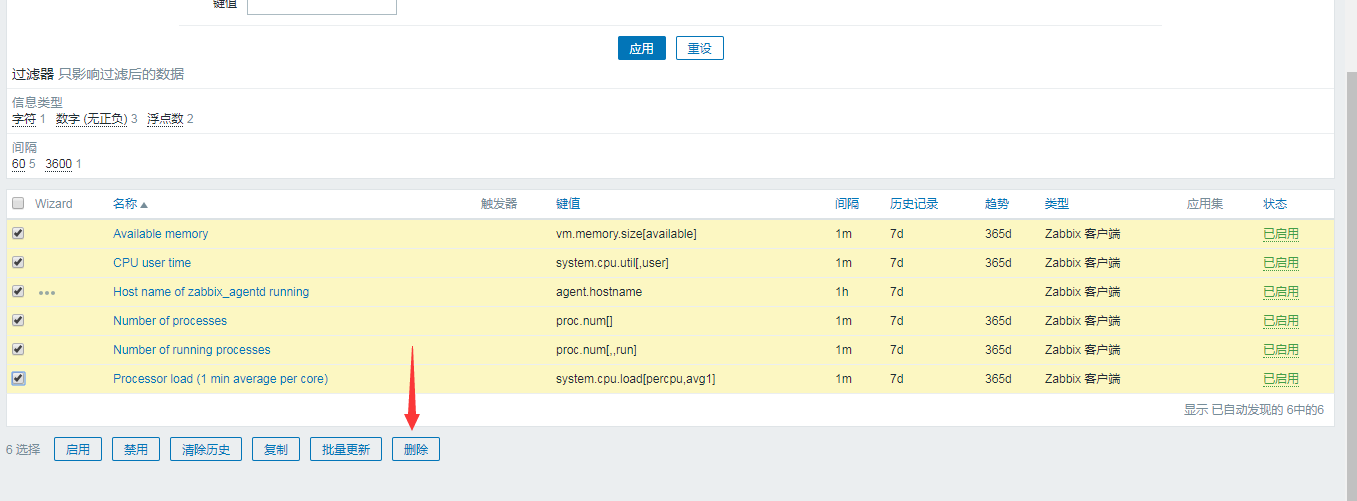
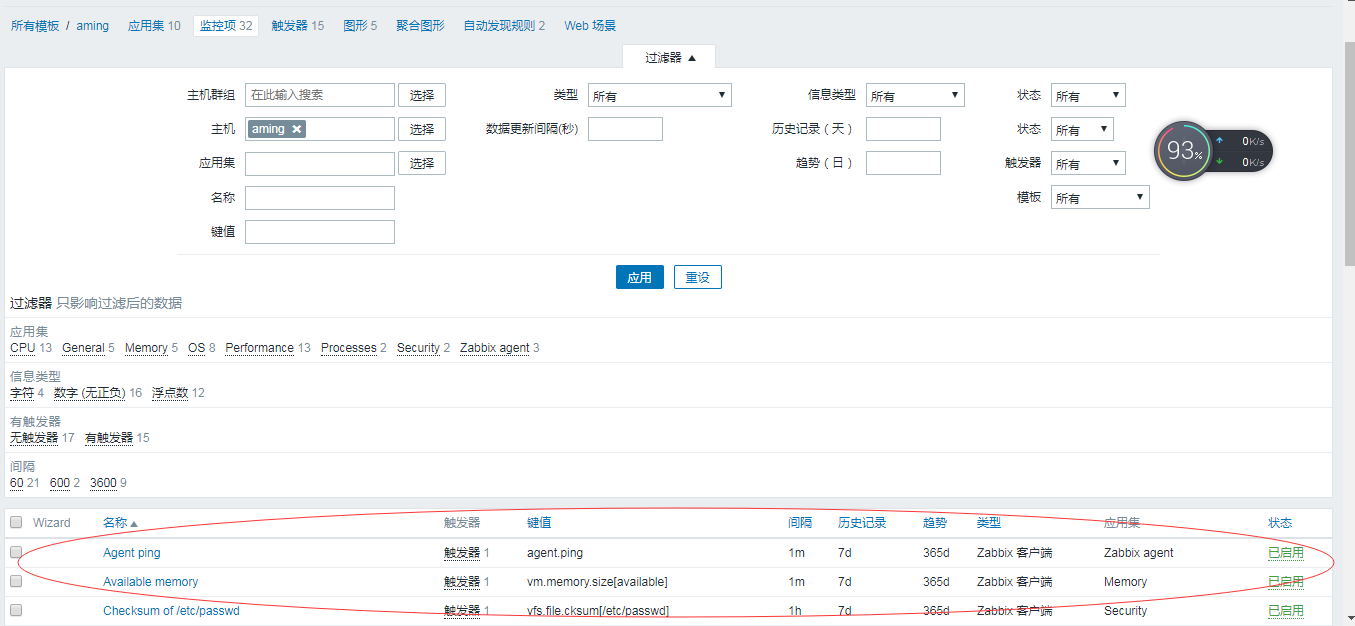
找到下面这个模板 点进去 找一些监控项 复制到aming模板里面去
选中这些项
复制到aming模板里面去
然后返回到aming模板看一下
然后导入自动发现规则,需要我们把os linux导出来,然后编辑这个文件,在把不需要的删除掉,很麻烦,还有一种方法
首先把之前添加的监控项给删除掉
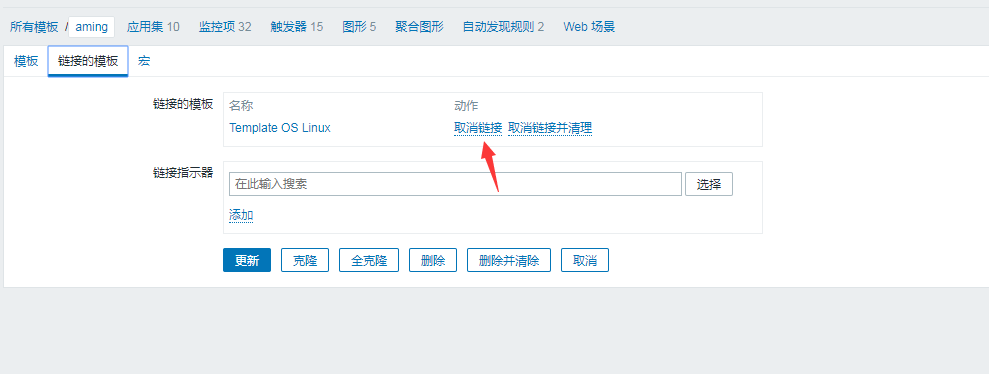
然后点击aming模板,点击链接的模板
然后点击选择,添加os linux 在点击更新 一定要点击更新
但是我们只想要自动发现模板,但是想要删除其他不用的监控项的时候,是删除不了的,因为是链接的模板,删除的话是删除os linux模板,我们可以点击aming 模板,点击取消链接,然后点击更新
然后再看一下aming模板里面的监控,发现没有了链接的名字
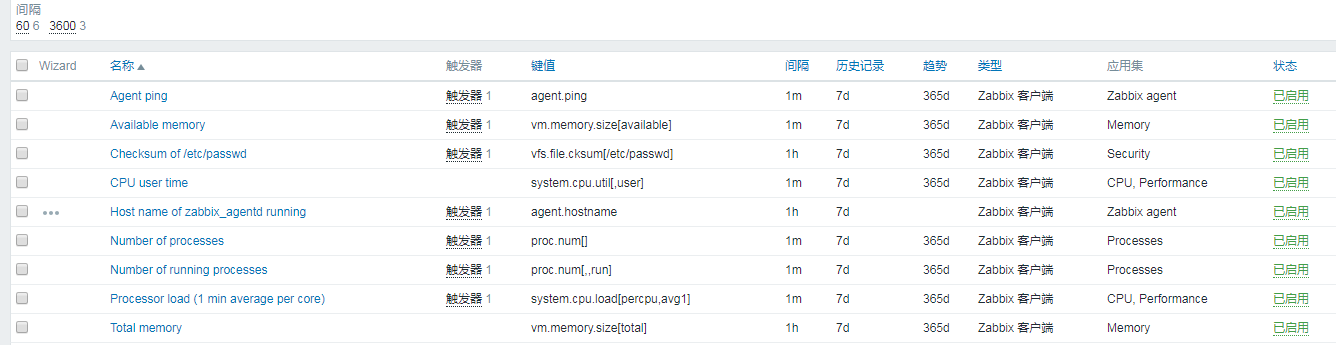
然后就可以删除不用的监控项了,删除的时候先删除监控项在删除应用集,因为应用集包含监控项
只留下这么多
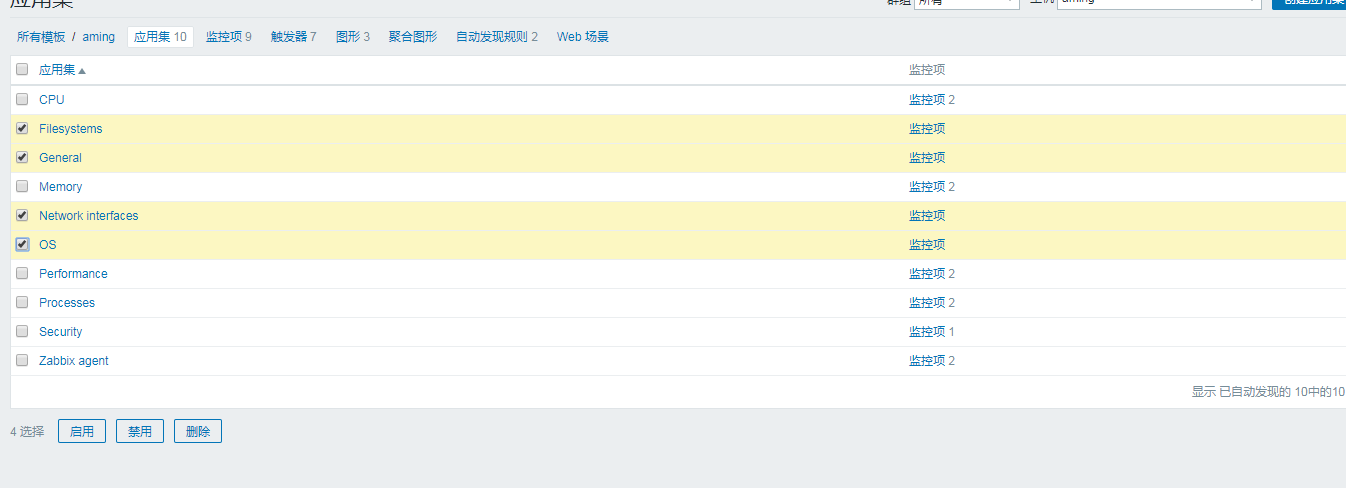
删除应用集的时候,只留下后面带数字的,不带数字的都删除
之后我们的模板就弄好了。


19.10 处理图形中的乱码
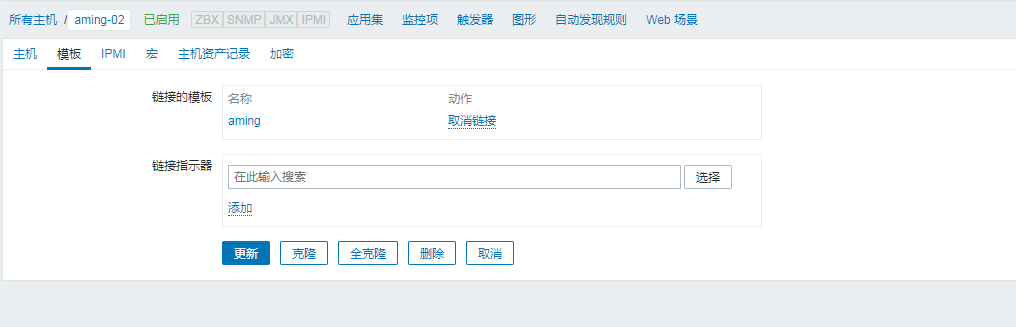
我们把刚刚建立好的aming模板链接到aming-02主机里面去
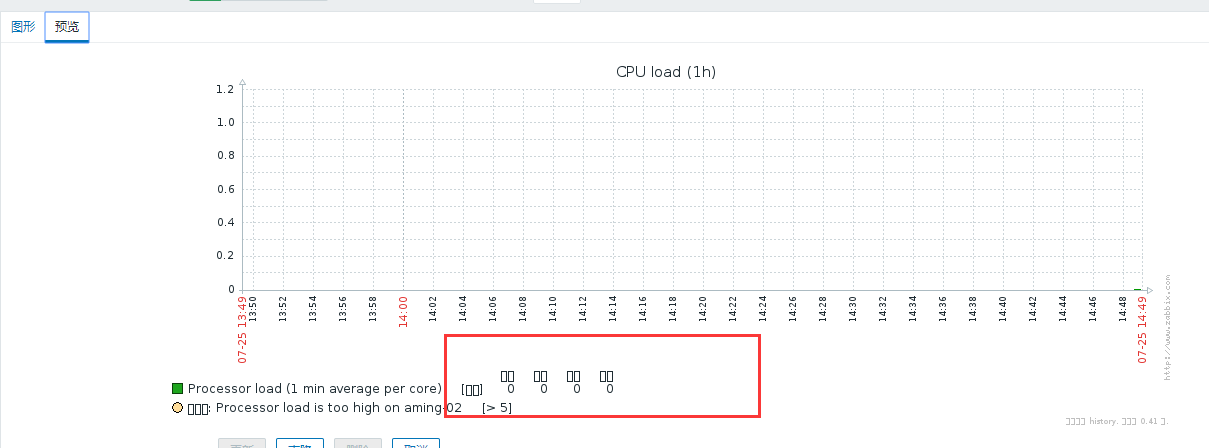
然后我们看一下图像,预览一下,
这个地方有很多小方块,这就是乱码。这是因为在zabbix的字体库中没有中文字体,需要从windows上借用一个过来
打开配置文件
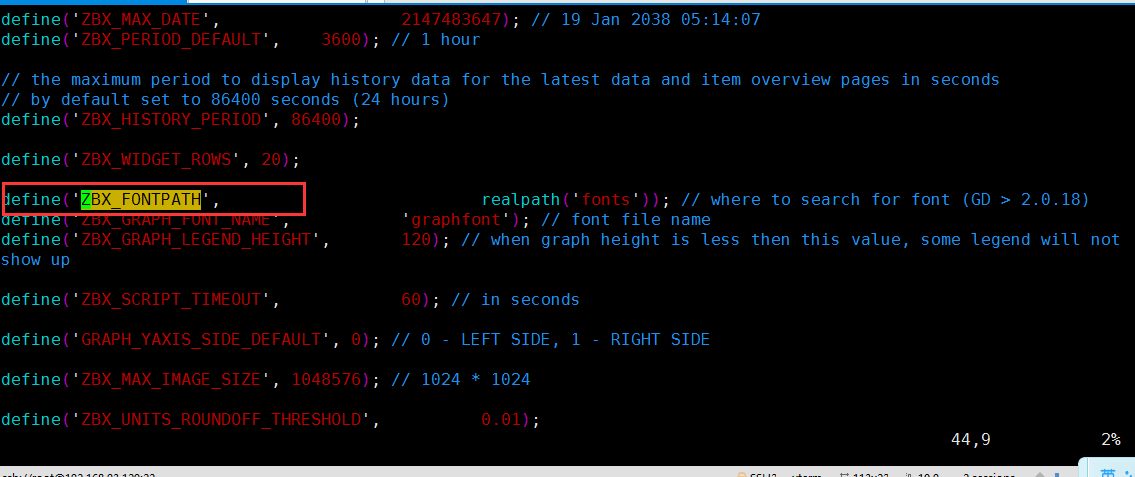
[root@liuhongwei-01 ~]# vim /usr/share/zabbix/include/defines.inc.php搜索ZBX_FONTPATH。它定义的路径是“fonts”,它是一个相对路径,绝对路径为/usr/share/zabbix/fonts,而字体文件为“ZBX_GRAPH_FONT_NAME”所定义的“graphfont”,它是一个文件,绝对路径为/usr/share/zabbix/fonts/graphfont
[root@liuhongwei-01 ~]# ls /usr/share/zabbix/fonts/
graphfont.ttf
[root@liuhongwei-01 ~]# ls -l !$
ls -l /usr/share/zabbix/fonts/
总用量 0
lrwxrwxrwx 1 root root 33 7月  24 19:46 graphfont.ttf -> /etc/alternatives/zabbix-web-font
[root@liuhongwei-01 ~]# ls -l /etc/alternatives/zabbix-web-font
lrwxrwxrwx 1 root root 38 7月  24 19:46 /etc/alternatives/zabbix-web-font -> /usr/share/fonts/dejavu/DejaVuSans.ttf
[root@liuhongwei-01 ~]#
然后去windows下fronts目录下面选择一个中文字体到linux下面去
然后把这个字体放到/usr/share/zabbix/fronts里面去
[root@liuhongwei-01 ~]# ls /root/
1.txt  aming.txt  anaconda-ks.cfg  log  logs  simhei.ttf  temp  zabbix-release-3.2-1.el7.noarch.rpm
[root@liuhongwei-01 ~]# mv /root/simhei.ttf /usr/share/zabbix/fonts/
[root@liuhongwei-01 ~]# cd !$
cd /usr/share/zabbix/fonts/
[root@liuhongwei-01 fonts]#
然后给这个字体做软链接
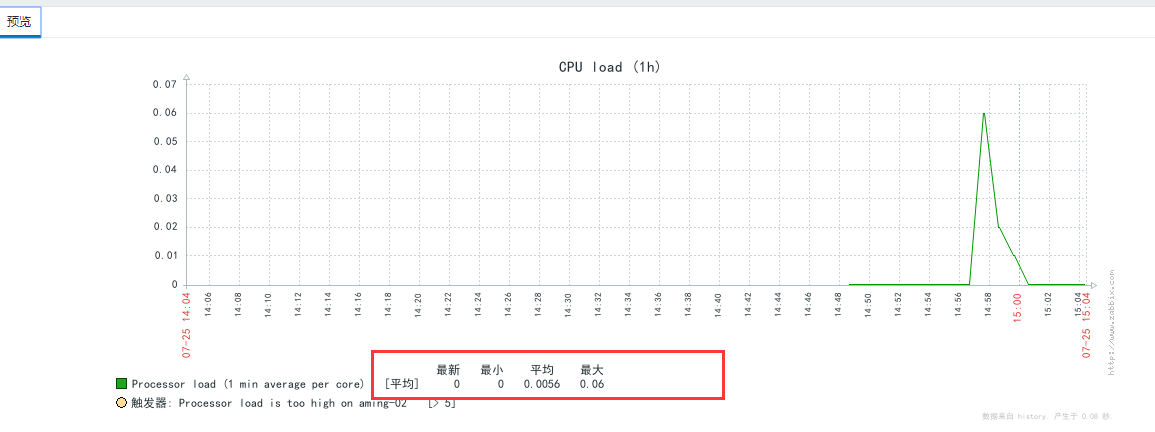
[root@liuhongwei-01 fonts]# mv graphfont.ttf graphfont.ttf.bak
[root@liuhongwei-01 fonts]# ls
graphfont.ttf.bak  simhei.ttf
[root@liuhongwei-01 fonts]# ln -s simhei.ttf graphfont.ttf
[root@liuhongwei-01 fonts]# ls -l
总用量 9524
lrwxrwxrwx 1 root root      10 7月  25 15:03 graphfont.ttf -> simhei.ttf
lrwxrwxrwx 1 root root      33 7月  24 19:46 graphfont.ttf.bak -> /etc/alternatives/zabbix-web-font
-rw-r--r-- 1 root root 9751960 7月  25 14:59 simhei.ttf
[root@liuhongwei-01 fonts]
然后在去浏览器刷新一下,有没有显示中文


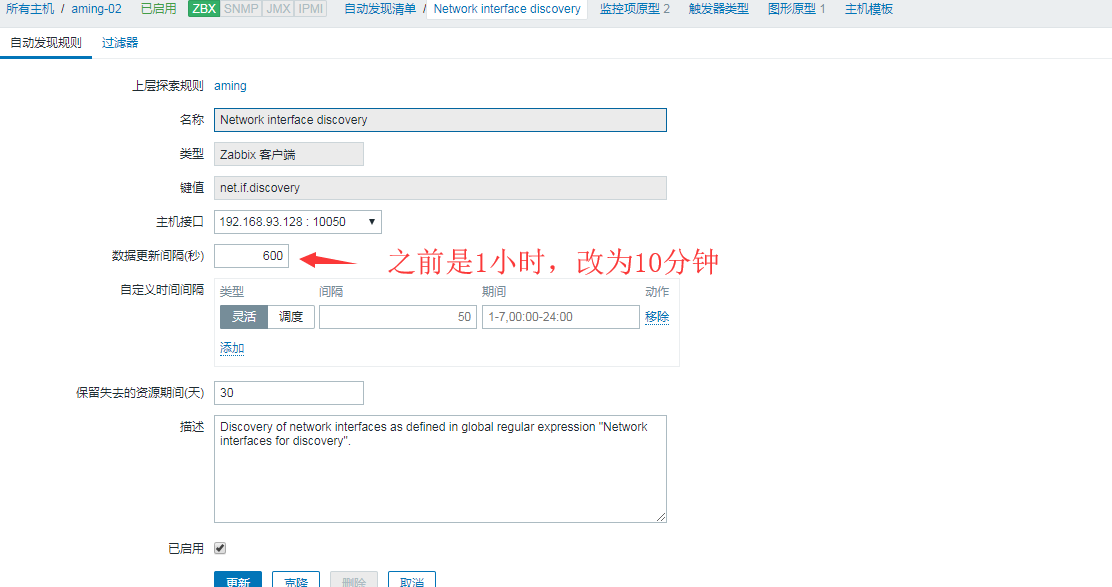
19.11 自动发现
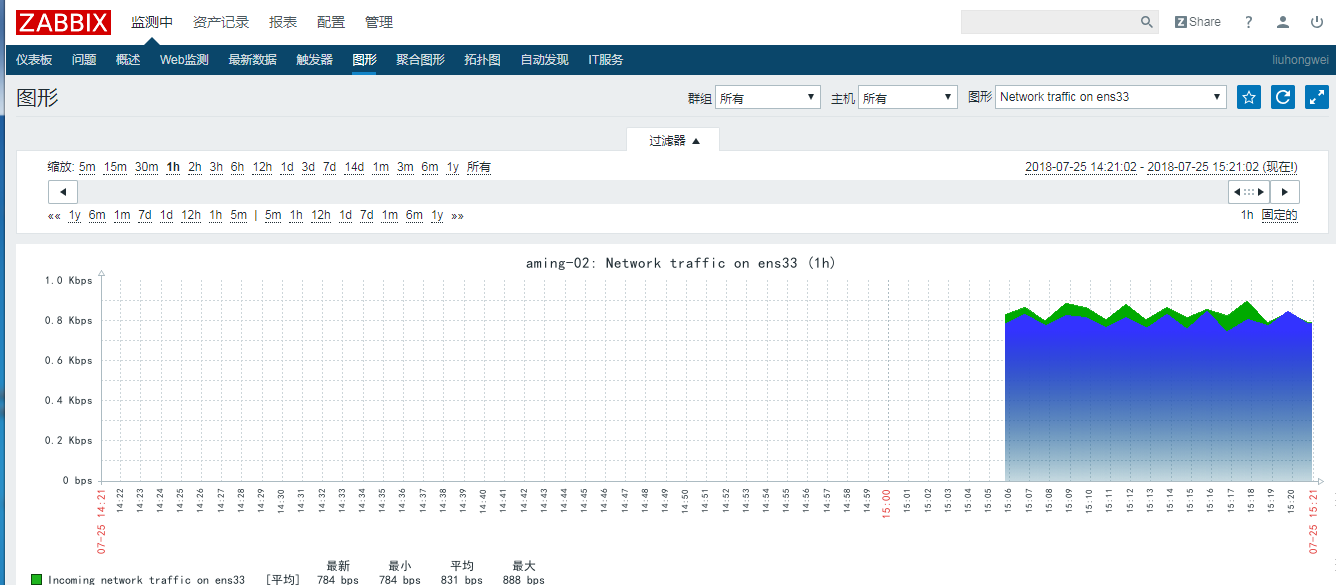
然后再来看一下网卡的图形预览
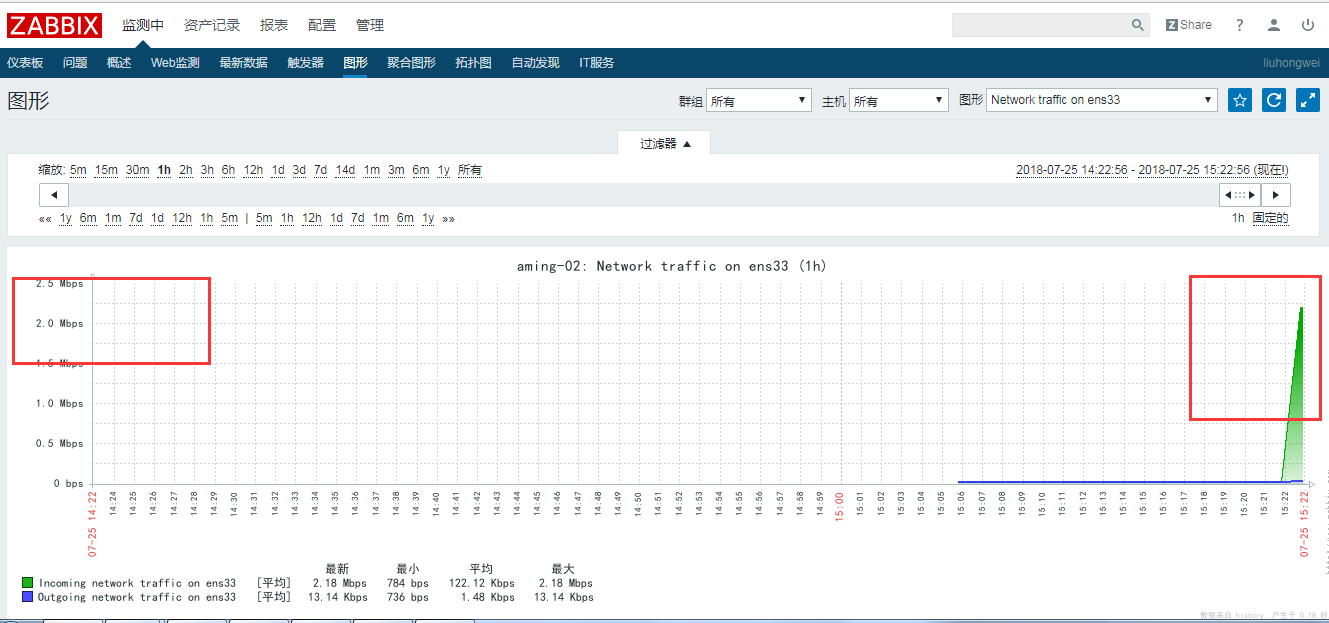
我们也可以给客户端传一下文件,看一下图形变化
然后在看一下图形

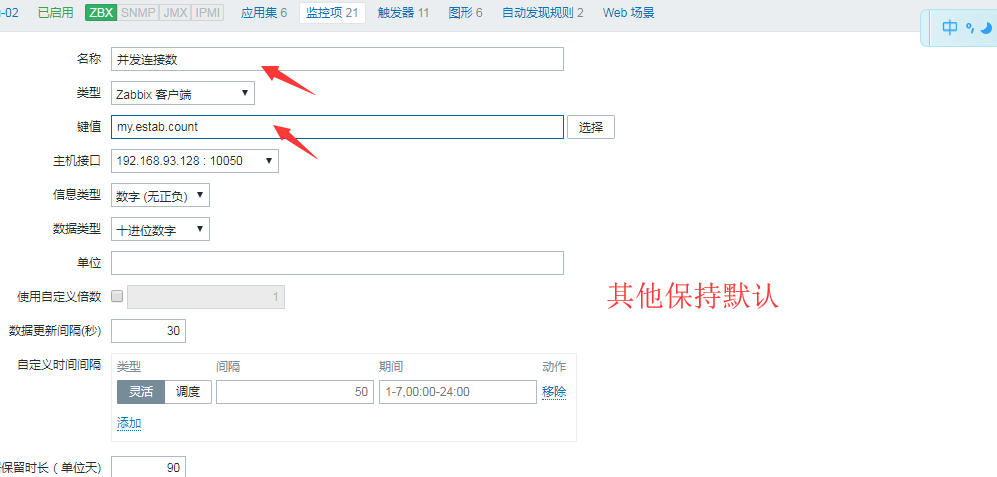
19.12 添加自定义监控项目
1,首先到客户端去编写脚本
[root@hongwei-02 ~]# vim /usr/local/sbin/estab.sh

#!/bin/bash
##获取80端口并发连接数
netstat -ant |grep ':80 ' |grep -c ESTABLISHED
2.然后给文件添加755权限
[root@hongwei-02 ~]# chmod 755 /usr/local/sbin/estab.sh
[root@hongwei-02 ~]#
3.然后在客户端上编辑配置文件,添加一行
[root@hongwei-02 ~]# vim /etc/zabbix/zabbix_agentd.conf# UnsafeUserParameters=0 UnsafeUserParameters=1 ### Option: UserParameter # User-defined parameter to monitor. There can be several user-defined parameters. # Format: UserParameter=<key>,<shell command> # See 'zabbix_agentd' directory for examples. # # Mandatory: no # Default: # UserParameter= UserParameter=my.estab.count[*],/usr/local/sbin/estab.shUnsafeUserParameters=1 //表示使用自定义脚本 UserParameter=my.estab.count[*],/usr/local/sbin/estab.sh //自定义监控项的key为my.estab.count,后面的[*]里面写脚本的参数,如果没有参数则可以省略,脚本为/usr/local/sbin/estab.sh4.然后重启zabbix-agent服务
[root@hongwei-02 ~]# systemctl restart zabbix-agent
[root@hongwei-02 ~]#
5.然后验证一下自定义脚本有没有识别,到服务端验证,执行下面命令
^C[root@liuhongwei-01 fonts]# zabbix_get -s 192.168.93.128 -p 10050 -k 'my.estab.count'
0
6.如果把刚才的客户端脚本不加755权限再次执行这个命令会提示权限不够
7.也要保证没有防火墙规则
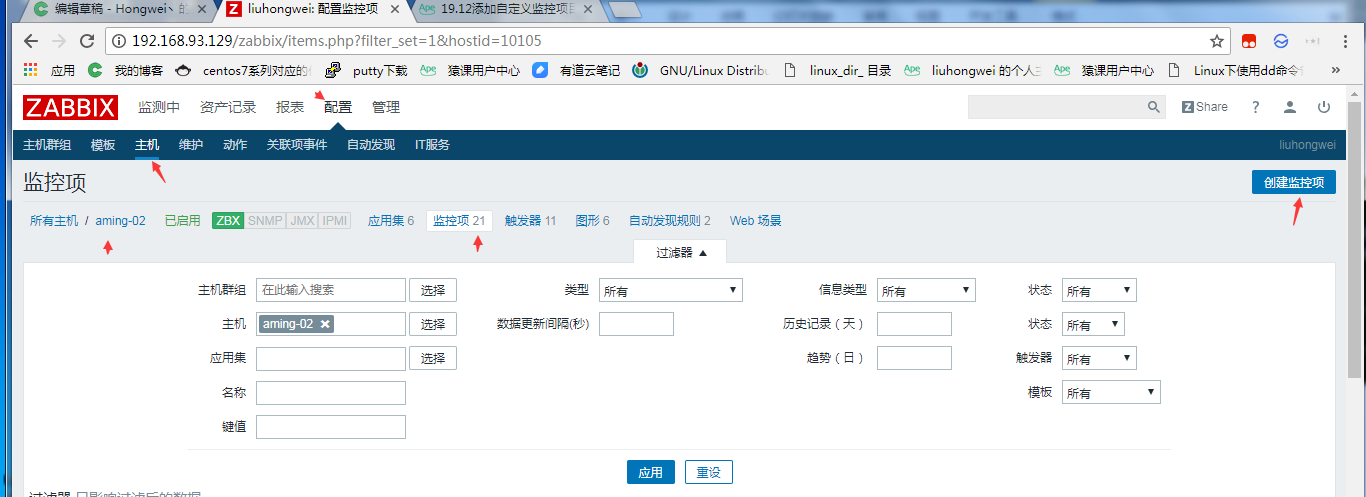
[root@liuhongwei-01 fonts]# iptables -nvL
Chain INPUT (policy ACCEPT 0 packets, 0 bytes)
 pkts bytes target     prot opt in     out     source               destination

Chain FORWARD (policy ACCEPT 0 packets, 0 bytes)
 pkts bytes target     prot opt in     out     source               destination

Chain OUTPUT (policy ACCEPT 0 packets, 0 bytes)
 pkts bytes target     prot opt in     out     source               destination
[root@liuhongwei-01 fonts]# getenforce
Disabled
[root@liuhongwei-01 fonts]#
8.• 然后在zabbix监控中心(浏览器)配置增加监控项目
9.然后在创建一个图形
10.创建触发器


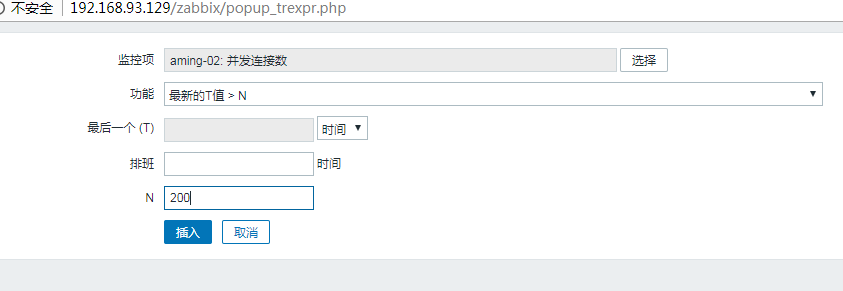

19.13/19.14 配置邮件告警
1.首先到163邮箱开启POP3、IMAP、SMTP服务
2.然后在163邮箱设置客户端授权密码
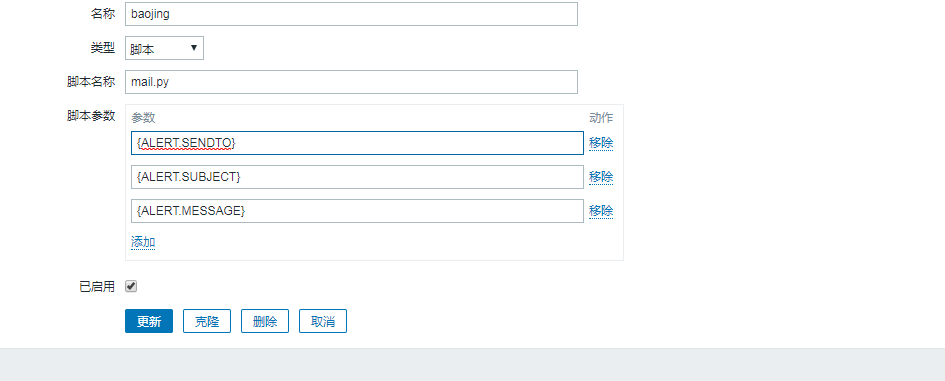
3.然后到监控中心设置邮件告警
4.创建报警脚本mail.py
[root@liuhongwei-01 fonts]# vim /usr/lib/zabbix/alertscripts/mail.py#!/usr/bin/env python #-*- coding: UTF-8 -*- import os,sys reload(sys) sys.setdefaultencoding('utf8') import getopt import smtplib from email.MIMEText import MIMEText from email.MIMEMultipart import MIMEMultipart from subprocess import * def sendqqmail(username,password,mailfrom,mailto,subject,content): gserver = 'smtp.qq.com' gport = 25 try: msg['to'] = mailto msg['Reply-To'] = mailfrom msg['Subject'] = subject import getopt import smtplib from email.MIMEText import MIMEText from email.MIMEMultipart import MIMEMultipart from subprocess import * def sendqqmail(username,password,mailfrom,mailto,subject,content): gserver = 'smtp.163.com' gport = 25 try: import getopt import smtplib from email.MIMEText import MIMEText from email.MIMEMultipart import MIMEMultipart from subprocess import * def sendqqmail(username,password,mailfrom,mailto,subject,content): gserver = 'smtp.163.com' gport = 25 msg = MIMEText(unicode(content).encode('utf-8')) msg['from'] = mailfrom msg['to'] = mailto msg['Reply-To'] = mailfrom msg['from'] = mailfrom msg['to'] = mailto msg['Reply-To'] = mailfrom msg['Subject'] = subject msg['Subject'] = subject smtp = smtplib.SMTP(gserver, gport) smtp.set_debuglevel(0) smtp.ehlo() smtp.login(username,password) smtp.sendmail(mailfrom, mailto, msg.as_string()) smtp.close() except Exception,err: print "Send mail failed. Error: %s" % err def main(): to=sys.argv[1] subject=sys.argv[2] content=sys.argv[3] ##定义QQ邮箱的账号和密码,你需要修改成你自己的账号和密码(请不要把真实的用户名和密码放到网上公开,否则你会死的很>惨) sendqqmail('15504986234@163.com','','15504986234@163.com',to,subject,content) if __name__ == "__main__": main()注意 邮箱地址后面的密码是 授权码 密码
5.然后加上权限
[root@liuhongwei-01 fonts]# chmod 755 /usr/lib/zabbix/alertscripts/mail.py
[root@liuhongwei-01 fonts]#
6.测试发送邮件 实验一下
[root@liuhongwei-01 alertscripts]# python mail.py 15504986234@163.com "这是一封测试邮件" "12345678910"
[root@liuhongwei-01 alertscripts]# python mail.py 15504986234@163.com "This is test page" "12345678910"
[root@liuhongwei-01 alertscripts]#
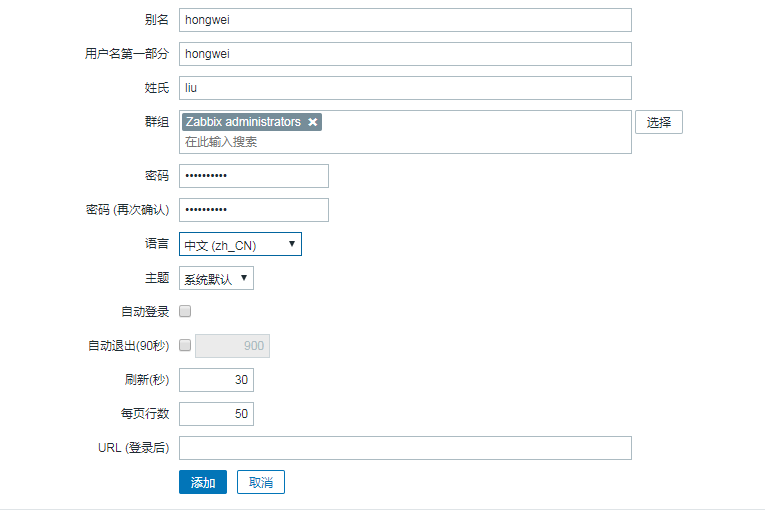
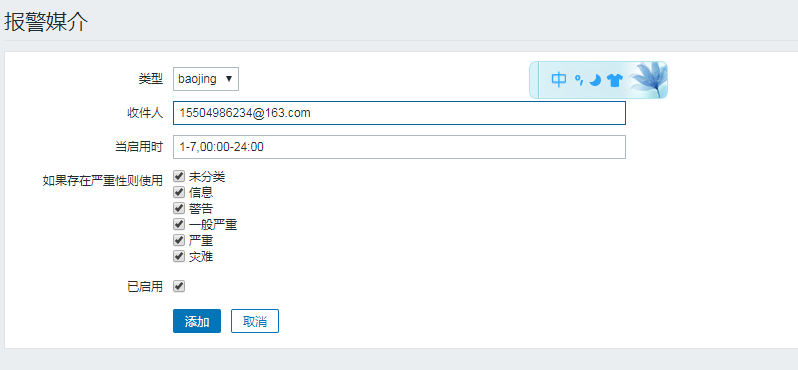
7.然后到浏览器去创建一个用户,接收邮件
再添加邮箱
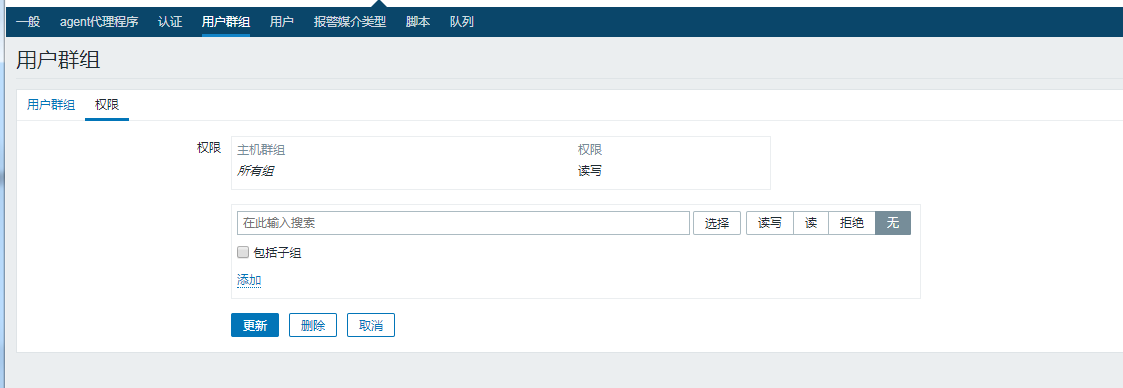
8.然后再到用户权限去更改所有
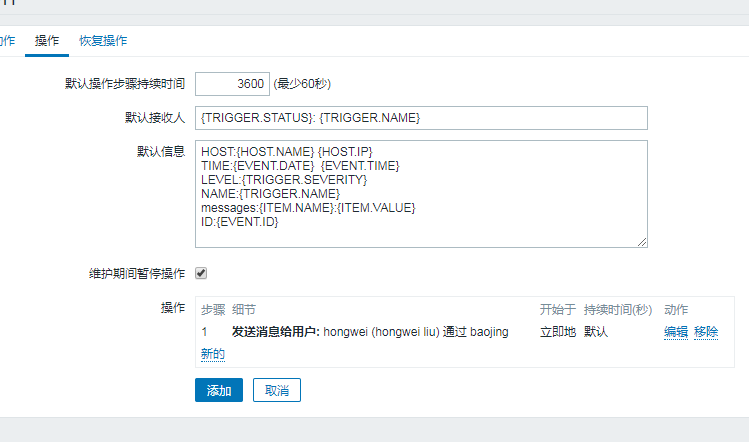
9.然后配置动作
然后点击操作
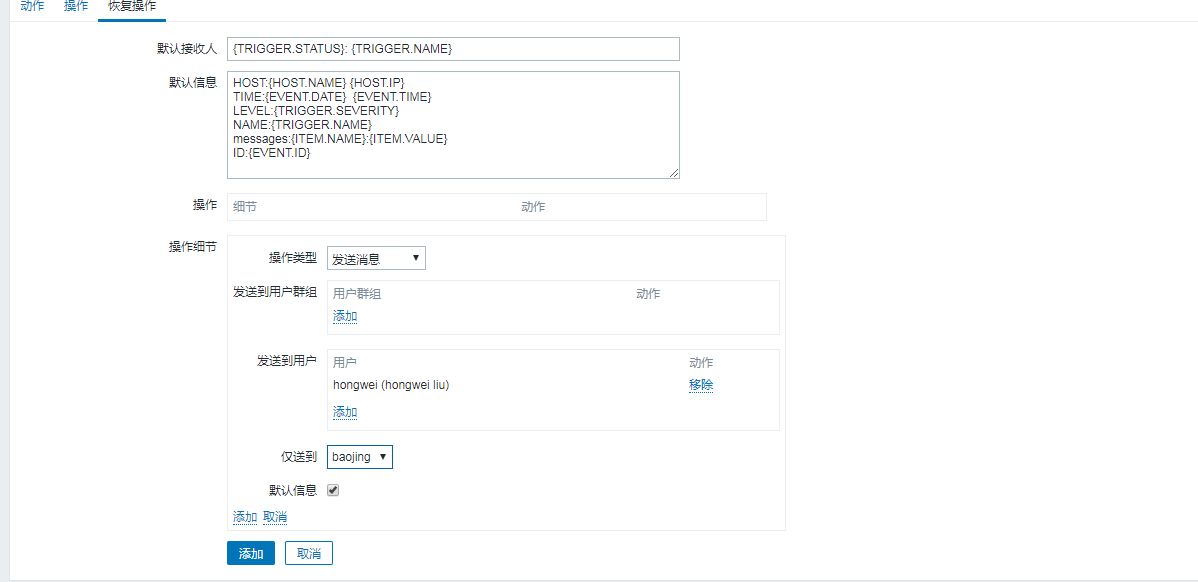
然后点击回复操作
10.配置完之后,显示的是已启用


19.15 测试告警
为了测试,我们需要把这个zabbix web改成有问题,看看能不能发送报警邮件
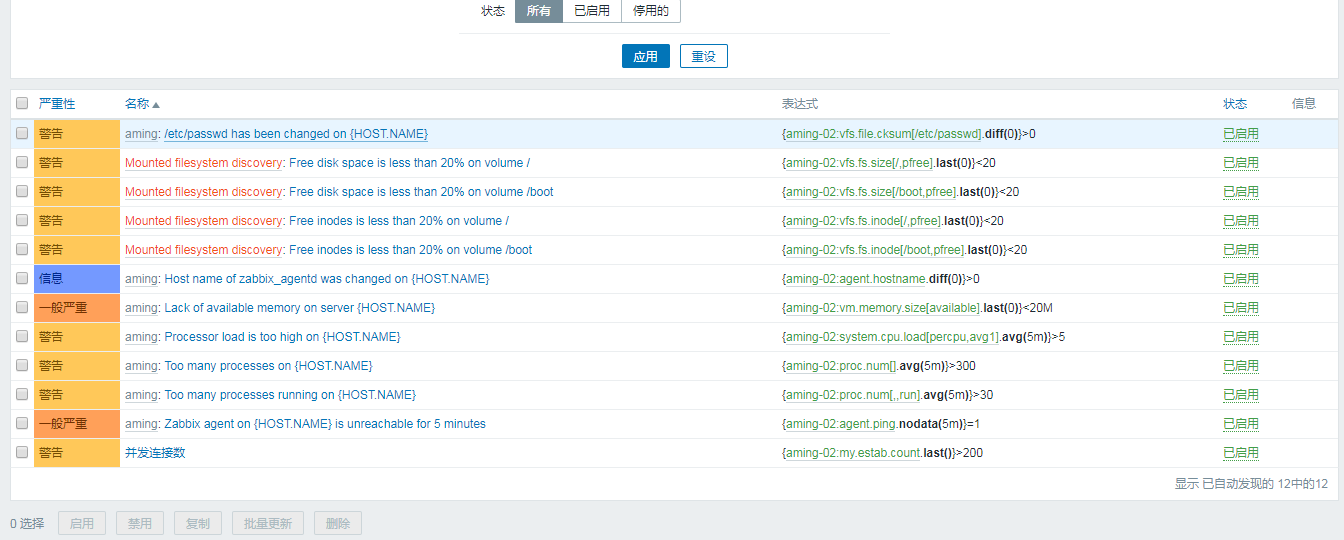
配置 >主机 >触发器
然后新添加一个系统负载,选择系统负载 <1 就报警,因为正常系统负载为0 ,所以故意设置它报警,然后看看有没有新邮件
然后回到监测中,看一下,会出现问题
然后在看看一下有没有邮件


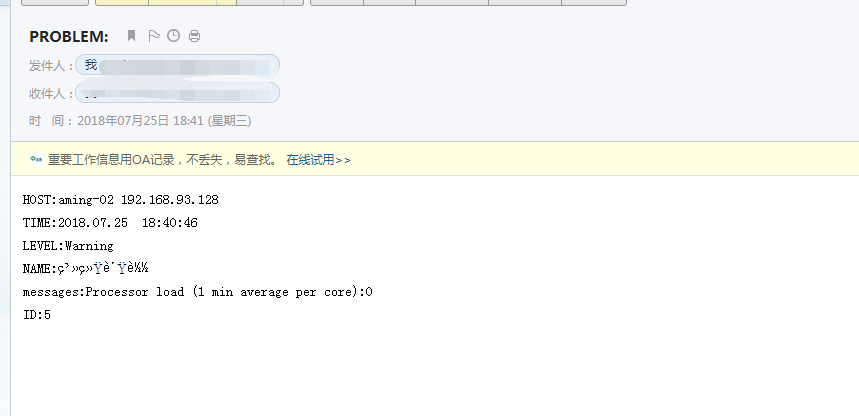
19.16 不发邮件的问题处理
我的实验是一次成功的 ,没有发现问题,有问题的话,要么恢复快照,重新配置,要不就挨个问题去查找。一步一步的去查找。


 7794
7794

 被折叠的 条评论
为什么被折叠?
被折叠的 条评论
为什么被折叠?
 到【灌水乐园】发言


