


目录
Node & Software & Docker Images Lists
Test2: Delete redis-0(master) and redis-4(slave)
Test3:Simulate node1 downtime:
In this guide , i'll show you how to deploy redis cluster(6+) on k8s cluster(v1.26) and do some experiments to verify the availability of the cluster.
Node & Software & Docker Images Lists
| HOSTNAME | IP | NODE TYPE | CONFIG |
| master1 | 192.168.1.100 | master/yum repository | 2vCPU4G |
| node1 | 192.168.1.110 | worker | 2vCPu2G |
| node2 | 192.168.1.120 | worker | 2vCPu2G |
| Software Name | Version |
| kubeadm | v1.26.0 |
| kubectl | v1.26.0 |
| kubelet | v1.26.0 |
| containerd | v1.6.14 |
| ipvsadm | v1.27 |
| System | Version |
kernel | 3.10.0-1160.el7.x86_64 |
| centos | CentOS Linux release 7.9.2009 (Core) |
| Image Type | Version |
| k8s | registry.aliyuncs.com/google_containers/coredns:v1.9.3 registry.aliyuncs.com/google_containers/etcd:3.5.6-0 registry.aliyuncs.com/google_containers/kube-apiserver:v1.26.0 registry.aliyuncs.com/google_containers/kube-controller-manager:v1.26.0 registry.aliyuncs.com/google_containers/kube-proxy:v1.26.0 registry.aliyuncs.com/google_containers/kube-scheduler:v1.26.0 registry.aliyuncs.com/google_containers/pause:3.9 |
| calico | docker.io/calico/apiserver:v3.24.5 docker.io/calico/cni:v3.24.5 docker.io/calico/kube-controllers:v3.24.5 docker.io/calico/node:v3.24.5 docker.io/calico/pod2daemon-flexvol:v3.24.5 docker.io/calico/typha:v3.24.5 quay.io/tigera/operator:v1.28.5 |
| redis | docker.io/library/redis:6.2.3-alpine |
| dashbord | docker.io/kubernetesui/dashboard:v2.7.1 |
| python | docker.io/library/python:3.11.3 |
| redis-stat | docker.io/insready/redis-stat:latest |
Prerequisites
Before we begin, there are a few things that you will need to make sure you have installed:
- Kubernetes Cluster
- Containerd
If you haven't installed,you could refer to this guide: Install Redis Cluster(1master-2slave) on Kubernetes_JJH的创世纪的博客-CSDN博客
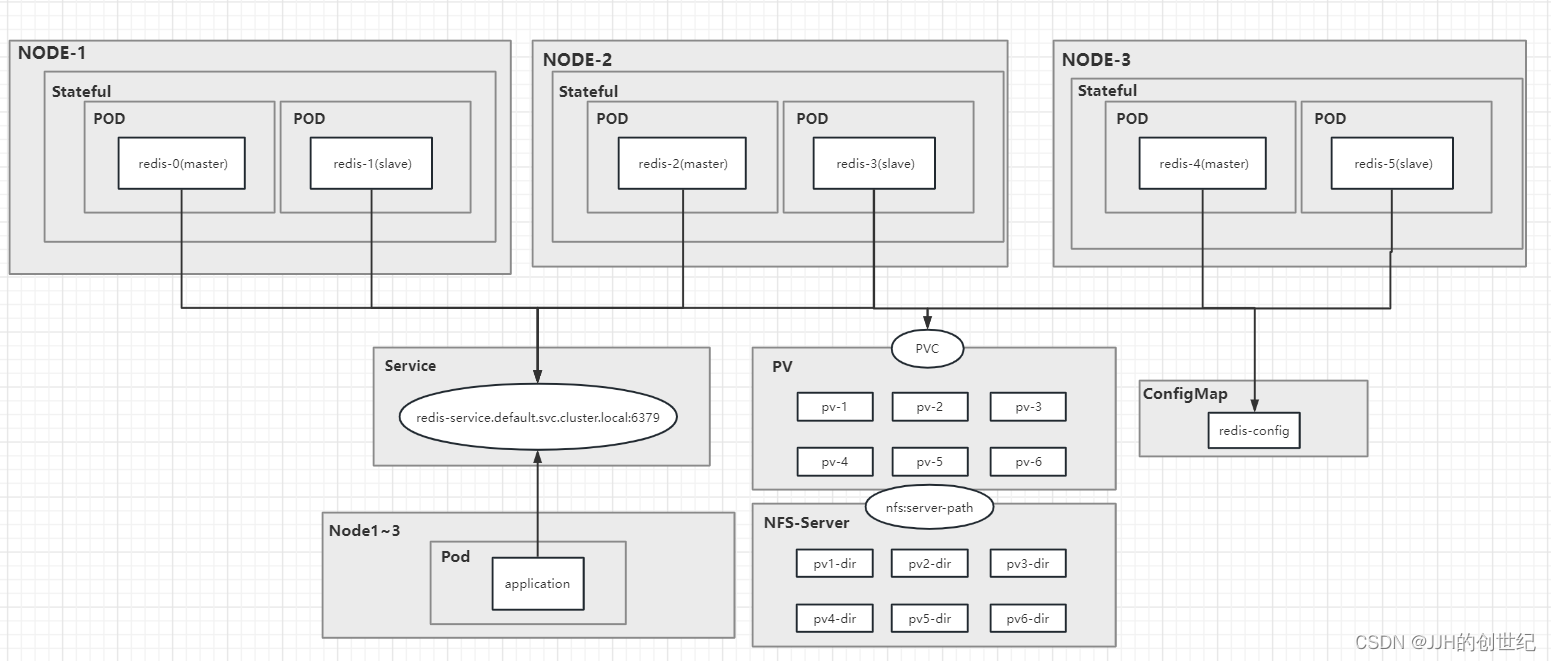
Architecture
The architecture of Redis cluster on k8s cluster like below diagram.The are 3 Work Node(inlcude Master) and we set 6 redis-pods distribute as evenly as possible to each node.And we use StatusfulSet to manager pods that offers ordered pod names starting from zero and recreates the pod with the same name whenever the pod dies or crashes.We Set a NFS Server and 3 NFS Client which provide stable backend storage,when the Redis Pod is restarted or migrated, the original data can still be obtained.
And we set a HeadService to export Redis Cluster.Headless services are usually used in conjunction with StatefulSet. Using headless services can expose breakpoints to other applications for their access .
Finally,we set an application to access Redis Cluster for some test items.
Steps
- Setting UP NFS
- Setting UP Redis-cluster and redis-stat
- Setting UP Application
- Tests
Setting UP NFS
The main purpose of creating NFS storage is to provide stable back-end storage for Redis. When the Pod of Redis is restarted or migrated, the original data can still be obtained. Here, we need to create NFS first, and then mount a remote NFS path for Redis by using PV.
In this guide, I want to deploy the NFS Server to the Master Node just for a simple experiment.And we need deploy NFS Client to other Nodes.
On Server
yum -y install nfs-utils rpcbind
cat > /etc/exports <<EOF
/data/nfs/redis/pv1 *(rw,no_root_squash,sync,insecure)
/data/nfs/redis/pv2 *(rw,no_root_squash,sync,insecure)
/data/nfs/redis/pv3 *(rw,no_root_squash,sync,insecure)
/data/nfs/redis/pv4 *(rw,no_root_squash,sync,insecure)
/data/nfs/redis/pv5 *(rw,no_root_squash,sync,insecure)
/data/nfs/redis/pv6 *(rw,no_root_squash,sync,insecure)
EOF

mkdir -p /data/nfs/redis/pv{1..6}

systemctl restart rpcbind
systemctl restart nfs
systemctl enable nfs
systemctl enable rpcbind

exportfs -v
On Client
yum -y install nfs-utils
showmount -e 192.168.1.100
Creating PersistentVolume
Persistent volumes (PVs) are used to create a storage size. In this demo, you will create a Redis cluster with 6 pods (3 master and 3 slaves). Therefore, create 6 PVs.
The following code creates three PVs using the NFS storage provisioner,we create a pv.yaml.
apiVersion: v1
kind: PersistentVolume
metadata:
  name: nfs-pv1
spec:
  capacity:
    storage: 1Gi
  accessModes:
    - ReadWriteMany
  persistentVolumeReclaimPolicy: Retain
  storageClassName: nfs
  nfs:
    server: 192.168.1.100
    path: "/data/nfs/redis/pv1"

---
apiVersion: v1
kind: PersistentVolume
metadata:
  name: nfs-pv2
spec:
  capacity:
    storage: 1Gi
  accessModes:
    - ReadWriteMany
  persistentVolumeReclaimPolicy: Retain
  storageClassName: nfs
  nfs:
    server: 192.168.1.100
    path: "/data/nfs/redis/pv2"

---
apiVersion: v1
kind: PersistentVolume
metadata:
  name: nfs-pv3
spec:
  capacity:
    storage: 1Gi
  accessModes:
    - ReadWriteMany
  persistentVolumeReclaimPolicy: Retain
  storageClassName: nfs
  nfs:
    server: 192.168.1.100
    path: "/data/nfs/redis/pv3"

---
apiVersion: v1
kind: PersistentVolume
metadata:
  name: nfs-pv4
spec:
  capacity:
    storage: 1Gi
  accessModes:
    - ReadWriteMany
  persistentVolumeReclaimPolicy: Retain
  storageClassName: nfs
  nfs:
    server: 192.168.1.100
    path: "/data/nfs/redis/pv4"

---
apiVersion: v1
kind: PersistentVolume
metadata:
  name: nfs-pv5
spec:
  capacity:
    storage: 1Gi
  accessModes:
    - ReadWriteMany
  persistentVolumeReclaimPolicy: Retain
  storageClassName: nfs
  nfs:
    server: 192.168.1.100
    path: "/data/nfs/redis/pv5"

---
apiVersion: v1
kind: PersistentVolume
metadata:
  name: nfs-pv6
spec:
  capacity:
    storage: 1Gi
  accessModes:
    - ReadWriteMany
  persistentVolumeReclaimPolicy: Retain
  storageClassName: nfs
  nfs:
    server: 192.168.1.100
    path: "/data/nfs/redis/pv6"
[root@master1 redis]# kubectl create -f pv.yaml
persistentvolume/nfs-pv1 created
persistentvolume/nfs-pv2 created
persistentvolume/nfs-pv3 created
persistentvolume/nfs-pv4 created
persistentvolume/nfs-pv5 created
persistentvolume/nfs-pv6 created
[root@master1 redis]# kuebctl get pv
-bash: kuebctl: command not found
[root@master1 redis]# kubectl get pv
NAME      CAPACITY   ACCESS MODES   RECLAIM POLICY   STATUS      CLAIM   STORAGECLASS   REASON   AGE
nfs-pv1   1Gi        RWX            Retain           Available           nfs                     11s
nfs-pv2   1Gi        RWX            Retain           Available           nfs                     11s
nfs-pv3   1Gi        RWX            Retain           Available           nfs                     11s
nfs-pv4   1Gi        RWX            Retain           Available           nfs                     11s
nfs-pv5   1Gi        RWX            Retain           Available           nfs                     11s
nfs-pv6   1Gi        RWX            Retain           Available           nfs                     11s
Creating ConfigMap
Here we create a ConfigMap to store the Redis cluster configuration and complete some simple configurations. Creating a file redis.conf.
appendonly yes
cluster-enabled yes
cluster-config-file /var/lib/redis/nodes.conf
cluster-node-timeout 5000
dir /var/lib/redis
port 6379
[root@master1 redis]# kubectl create configmap redis-conf --from-file=redis.conf=redis.conf
configmap/redis-conf created

[root@master1 redis]#kubectl get configmap
NAME               DATA   AGE
redis-conf         1      14s
Creating Service
Headless services are usually used in conjunction with StatefulSet. Using headless services can expose breakpoints to other applications for their access .The particularity is only internal pods can communicate with each other. Not exposed to applications outside the Kubernetes cluster.
Creating a file service.yaml.
apiVersion: v1
kind: Service
metadata:
  labels:
    app: redis-svc
  name: redis-svc
spec:
  ports:
  - port: 6379
    protocol: TCP
    targetPort: 6379
  selector:
    app: redis-sts
  type: ClusterIP
  clusterIP: None
[root@master1 redis]# kubectl create -f service.yaml
service/redis-svc created

[root@master1 redis]# kubectl get service -o wide
NAME         TYPE        CLUSTER-IP   EXTERNAL-IP   PORT(S)    AGE     SELECTOR
kubernetes   ClusterIP   10.96.0.1    <none>        443/TCP    7d11h   <none>
redis-svc    ClusterIP   None         <none>        6379/TCP   11s     app=redis-sts
Creating StatefulSet
The StatefulSet offers ordered pod names starting from zero and recreates the pod with the same name whenever the pod dies or crashes. A pod can fail at any time. The persistent pod identifier uses this feature (recreating the pod with the same name) to match existing persistent volume (storage volume attached to the failed pod) to the newly created pod. We set podaffinity to distribute pods as evenly as possible.
Creating a file redis-statefuleset.yaml.
apiVersion: apps/v1
kind: StatefulSet
metadata:
  name: redis
spec:
  selector:
    matchLabels:
      app: redis
  replicas: 6
  serviceName: redis-service
  template:
    metadata:
      labels:
        app: redis
        appCluster: redis-cluster
    spec:
      terminationGracePeriodSeconds: 20
      affinity:
        podAntiAffinity:
          preferredDuringSchedulingIgnoredDuringExecution:
          - weight: 100
            podAffinityTerm:
              labelSelector:
                matchExpressions:
                - key: app
                  operator: In
                  values:
                  - redis
              topologyKey: kubernetes.io/hostname
      containers:
      - name: redis
        image: redis:6.2.3-alpine
        imagePullPolicy: IfNotPresent
        command:
          - "redis-server"
        args:
          - "/etc/redis/redis.conf"
          - "--protected-mode"
          - "no"
        ports:
            - name: redis
              containerPort: 6379
              protocol: "TCP"
            - name: cluster
              containerPort: 16379
              protocol: "TCP"
        volumeMounts:
          - name: "redis-conf"
            mountPath: "/etc/redis"
          - name: "redis-data"
            mountPath: "/var/lib/redis"
      volumes:
      - name: "redis-conf"
        configMap:
          name: "redis-conf"
          items:
            - key: "redis.conf"
              path: "redis.conf"
  volumeClaimTemplates:
  - metadata:
      name: redis-data
    spec:
      accessModes: [ "ReadWriteMany" ]
      storageClassName: "nfs"
      resources:
        requests:
          storage: 1Gi
kubectl apply -n redis -f redis-statefulset.yamlPods are not allocated optimally.The best allocation method i guess is to allocate 2 pods per node and the redis-pod relationship in each node is like master-slave.We see the has no pod in master node due to taint strategy:"Taints: node-role.kubernetes.io/master:PreferNoSchedule"
Anyway,If we don't have enough nodes we can delete the taint on master.
[root@master1 ~]# kubectl get pod -o wide
NAME          READY   STATUS        RESTARTS      AGE     IP               NODE    NOMINATED NODE   READINESS GATES
application   1/1     Terminating   1 (48s ago)   54s     10.244.104.4     node2   <none>           <none>
redis-0       1/1     Running       0             4m50s   10.244.104.1     node2   <none>           <none>
redis-1       1/1     Running       0             4m48s   10.244.166.129   node1   <none>           <none>
redis-2       1/1     Running       0             4m46s   10.244.104.2     node2   <none>           <none>
redis-3       1/1     Running       0             4m45s   10.244.166.130   node1   <none>           <none>
redis-4       1/1     Running       0             4m44s   10.244.104.3     node2   <none>           <none>
redis-5       1/1     Running       0             4m43s   10.244.166.131   node1   <none>           <none>
Initialize Redis cluster
We can initialize redis cluster manually or automatically.The advantage of setting it manually is that we can assign the relationship between two redis-pod.For example, set redis-0 as the master and redis-1 as the slave node of redis-0.
Here we initialize via automatically which means that the master and slave node is not specified, and redis is automatically allocated. This method is also recommended in the production environment.You can use following command to do this:
kubectl exec -it redis-0 -- redis-cli --cluster create --cluster-replicas 1 $(kubectl get pods -l app=redis -o jsonpath='{range.items[*]}{.status.podIP}:6379 {end}')
[root@master1 redis]# kubectl exec -it redis-0 -- redis-cli --cluster create --cluster-replicas 1 $(kubectl get pods -l app=redis -o jsonpath='{range.items[*]}{.status.podIP}:6379 {end}')
>>> Performing hash slots allocation on 6 nodes...
Master[0] -> Slots 0 - 5460
Master[1] -> Slots 5461 - 10922
Master[2] -> Slots 10923 - 16383
Adding replica 10.244.137.72:6379 to 10.244.166.129:6379
Adding replica 10.244.166.133:6379 to 10.244.166.130:6379
Adding replica 10.244.166.132:6379 to 10.244.166.131:6379
M: 49996c1ec0b9d7ef3505c4167e1f94d9fd41cf05 10.244.166.129:6379
   slots:[0-5460] (5461 slots) master
M: f467abc281156349190765c391e4e8f9feb8090b 10.244.166.130:6379
   slots:[5461-10922] (5462 slots) master
M: c374cb94dc3951e054cb5888fdaaa8fca9b80e74 10.244.166.131:6379
   slots:[10923-16383] (5461 slots) master
S: 65f148ebdf0285852f0112a71631ffd6eab9dde4 10.244.166.132:6379
   replicates c374cb94dc3951e054cb5888fdaaa8fca9b80e74
S: 5ae754badf4613c9d8916b39d0199bfebb04974d 10.244.137.72:6379
   replicates 49996c1ec0b9d7ef3505c4167e1f94d9fd41cf05
S: 3e46e7ae73057549620ccb539e264fd5b2afc1e6 10.244.166.133:6379
   replicates f467abc281156349190765c391e4e8f9feb8090b
Can I set the above configuration? (type 'yes' to accept): yes
>>> Nodes configuration updated
>>> Assign a different config epoch to each node
>>> Sending CLUSTER MEET messages to join the cluster
Waiting for the cluster to join
.
>>> Performing Cluster Check (using node 10.244.166.129:6379)
M: 49996c1ec0b9d7ef3505c4167e1f94d9fd41cf05 10.244.166.129:6379
   slots:[0-5460] (5461 slots) master
   1 additional replica(s)
S: 3e46e7ae73057549620ccb539e264fd5b2afc1e6 10.244.166.133:6379
   slots: (0 slots) slave
   replicates f467abc281156349190765c391e4e8f9feb8090b
S: 65f148ebdf0285852f0112a71631ffd6eab9dde4 10.244.166.132:6379
   slots: (0 slots) slave
   replicates c374cb94dc3951e054cb5888fdaaa8fca9b80e74
M: c374cb94dc3951e054cb5888fdaaa8fca9b80e74 10.244.166.131:6379
   slots:[10923-16383] (5461 slots) master
   1 additional replica(s)
S: 5ae754badf4613c9d8916b39d0199bfebb04974d 10.244.137.72:6379
   slots: (0 slots) slave
   replicates 49996c1ec0b9d7ef3505c4167e1f94d9fd41cf05
M: f467abc281156349190765c391e4e8f9feb8090b 10.244.166.130:6379
   slots:[5461-10922] (5462 slots) master
   1 additional replica(s)
[OK] All nodes agree about slots configuration.
>>> Check for open slots...
>>> Check slots coverage...
[OK] All 16384 slots covered.
Ok,we done,you can check cluster info like this:
[root@master1 redis]# kubectl exec -it redis-0 --redis-cli cluster info
cluster_state:ok
cluster_slots_assigned:16384
cluster_slots_ok:16384
cluster_slots_pfail:0
cluster_slots_fail:0
cluster_known_nodes:6
cluster_size:3
cluster_current_epoch:6
cluster_my_epoch:1
cluster_stats_messages_ping_sent:105
cluster_stats_messages_pong_sent:115
cluster_stats_messages_sent:220
cluster_stats_messages_ping_received:110
cluster_stats_messages_pong_received:105
cluster_stats_messages_meet_received:5
cluster_stats_messages_received:220
Setting up Redis-stat
redis-stat is a simple Redis monitoring tool written in Ruby.
It is based on INFO command of Redis, and thus generally won't affect the performance of the Redis instance unlike the other monitoring tools based on MONITOR command.
redis-stat allows you to monitor Redis instances
- either with vmstat-like output from the terminal
- or with the dashboard page served by its embedded web server.
We can run redis-stat following below command:
kubectl run redis-stat --image=docker.io/insready/redis-stat:latest -it -- redis-0.redis-service.default.svc.cluster.local:6379 redis-1.redis-service.default.svc.cluster.local:6379 redis-2.redis-service.default.svc.cluster.local:6379 redis-3.redis-service.default.svc.cluster.local:6379 redis-4.redis-service.default.svc.cluster.local:6379 redis-5.redis-service.default.svc.cluster.local:6379 --server=8089 --verbose
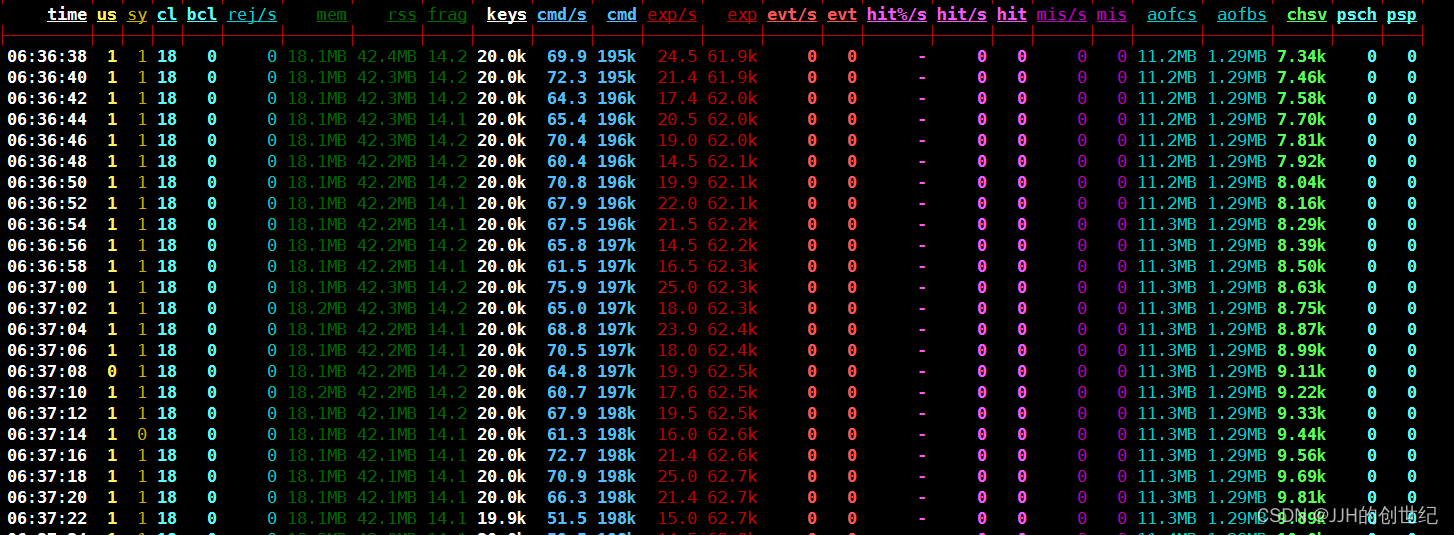
After running the command,We can see the printed information.Notice that the shell may take you tty because it is running on the front
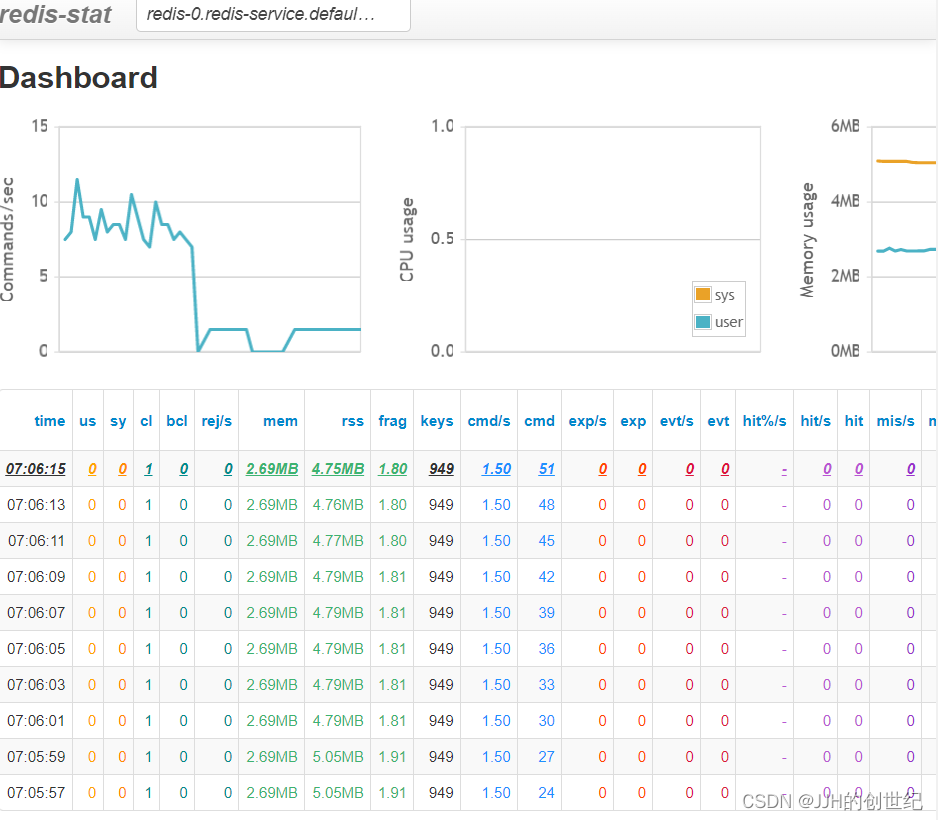
Then we expose this service by NodePort and you'll get a random NodePort that extranet can access it.
kubectl expose pod redis-stat --type NodePort --port 8089[root@master1 ~]# kubectl get service
NAME TYPE CLUSTER-IP EXTERNAL-IP PORT(S) AGE
kubernetes ClusterIP 10.96.0.1 <none> 443/TCP 9d
redis-service ClusterIP None <none> 6379/TCP 2d2h
redis-stat NodePort 10.100.234.60 <none> 8089:31719/TCP 22hWe enter "http://nodeip:nodeport" to browser and access it.
Setting up Application
Finally,we need a application to access our redis cluster and here i recommend you python for a easy test.We run below command and notice the middle command "Ctrl+d" which you need run it to exit(By default, it will enter the python interactive environment but we need shell interactive enviroment).Then install some necessary moduels.
kubectl run -it application --image=docker.io/library/python:3.11.3
Ctrl+d
kubectl exec -it application /bin/bash
pip3 install redis-py-cluster
pip3 install loguru
Usring domain name to connect redis cluster , and we the naming rules like:
<redis-service-name>.<namespace>.svc.cluster.local:6379
say, redis service name is redis-service and namespace is default then it should be
redis-service.default.svc.cluster.local:6379.
In this python file we try to keep writing to the redis cluster at a rate of 20 values per second and select a specific redis-master through the headless service via Round-Robin algorithm.
cat >write.py <<EOF
from rediscluster import ClusterBlockingConnectionPool,RedisCluster,ClusterConnectionPool
from string import ascii_letters
from time import sleep
from loguru import logger
import random

startup_nodes = [
    {'host': 'redis-service.default.svc.cluster.local', 'port': 6379},
]
pool = ClusterConnectionPool(startup_nodes=startup_nodes,skip_full_coverage_check=True,socket_connect_timeout=1)
while True:
	try:
		redis_client = RedisCluster(connection_pool=pool)
		if redis_client.ping():
			logger.info('获取Redis连接实例成功',redis_client.info())
		for i in range(100):
			sleep(0.05)
			key = ''.join(random.sample(ascii_letters, k=7))
			redis_client.set(key, random.randint(1, 100), ex=500)
			print("write:",key)
	except Exception as e:
		logger.error('Redis连接异常:{str(e)},traceback={traceback.format_exc()}')
		pool = ClusterConnectionPool(startup_nodes=startup_nodes,skip_full_coverage_check=True,socket_connect_timeout=1)

EOF
python3 write.py 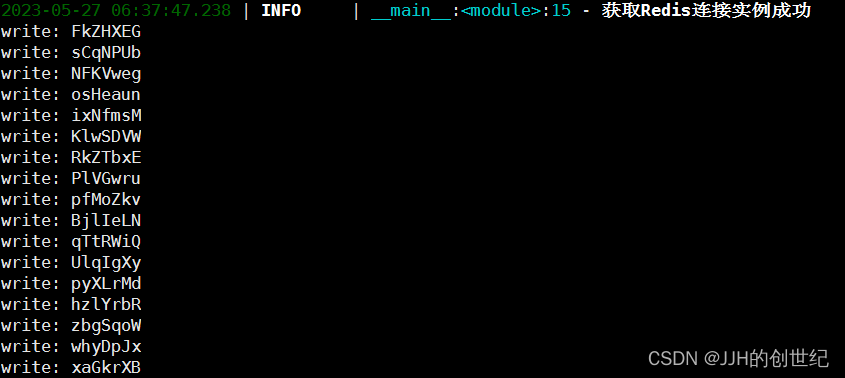
Test
Frist let we confirm the relationship of master-slave from each pod.We can do it by run three command like below:
[root@master1 ~]# kubectl exec -it redis-0 -- redis-cli -c cluster info
# Replication
role:master
connected_slaves:1
slave0:ip=10.244.104.3,port=6379,state=online,offset=87880,lag=1
master_failover_state:no-failover
master_replid:9f84ad5de9ac2716fa1f060f722daad77a4b8bb9
master_replid2:0000000000000000000000000000000000000000
master_repl_offset:87880
second_repl_offset:-1
repl_backlog_active:1
repl_backlog_size:1048576
repl_backlog_first_byte_offset:1
repl_backlog_histlen:87880

[root@master1 ~]# kubectl get pod -o wide
NAME          READY   STATUS    RESTARTS       AGE     IP               NODE      NOMINATED NODE   READINESS GATES
application   1/1     Running   1 (7m4s ago)   7m9s    10.244.137.87    master1   <none>           <none>
redis-0       1/1     Running   0              25m     10.244.104.1     node2     <none>           <none>
redis-1       1/1     Running   0              25m     10.244.166.129   node1     <none>           <none>
redis-2       1/1     Running   0              25m     10.244.104.2     node2     <none>           <none>
redis-3       1/1     Running   0              25m     10.244.166.130   node1     <none>           <none>
redis-4       1/1     Running   0              25m     10.244.104.3     node2     <none>           <none>
redis-5       1/1     Running   0              25m     10.244.166.131   node1     <none>           <none>
redis-stat    1/1     Running   0              5m57s   10.244.137.88    master1   <none>           <none>


[root@master1 ~]# kubectl exec -it redis-0 -- redis-cli -c cluster nodes
6f276ced03b6f3935d5b29aa43c6465ecdb34141 10.244.166.129:6379@16379 master - 0 1685164469000 2 connected 5461-10922
a9872afabcf4c0835d1f49bc0b103568b09dc869 10.244.104.3:6379@16379 slave 6b931feaa1eeca46ac8475b311181d471345ed7c 0 1685164469188 1 connect
4c47cb48811e4b8418eb3db24c75c6c9bc7abc53 10.244.166.130:6379@16379 slave 6e17bf904a2b9223ee9661a69d4dc540d5ae0536 0 1685164467581 3 conne
6e17bf904a2b9223ee9661a69d4dc540d5ae0536 10.244.104.2:6379@16379 master - 0 1685164468000 3 connected 10923-16383
a966facaa3333581aae91b8bc701124428aab5a5 10.244.166.131:6379@16379 slave 6f276ced03b6f3935d5b29aa43c6465ecdb34141 0 1685164468000 2 conne
6b931feaa1eeca46ac8475b311181d471345ed7c 10.244.104.1:6379@16379 myself,master - 0 1685164468000 1 connected 0-5460
So the relationship is:(master:slave)
- redis-0: redis-4
- redis-1: redis-5
- redis-2: redis-3
test1: Delete redis-0(master)
Expected: currently write data to redis-0 is terminated, redis-4 is promoted to master, redis-0 pod is rebuilt, and rejoins the cluster as redis-4's slave
Actually: currently writing data to redis-0 is terminated, redis-4 is promoted to master, redis-0 pod is rebuilt, and rejoins the cluster as redis-4's slave
Recovery time: 0-5s
Here are two situations when we delete redis-0: If redis-0 is being written data and it will be terminated.Nothing happen if redis-0 is waiting for a write.
kubectl delete pod redis-0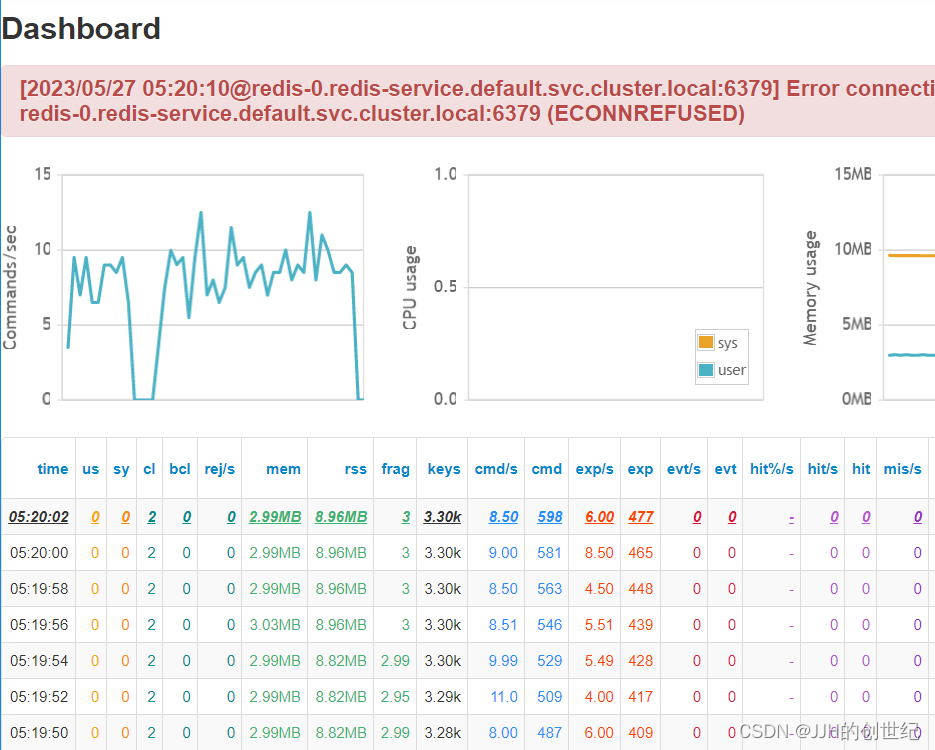
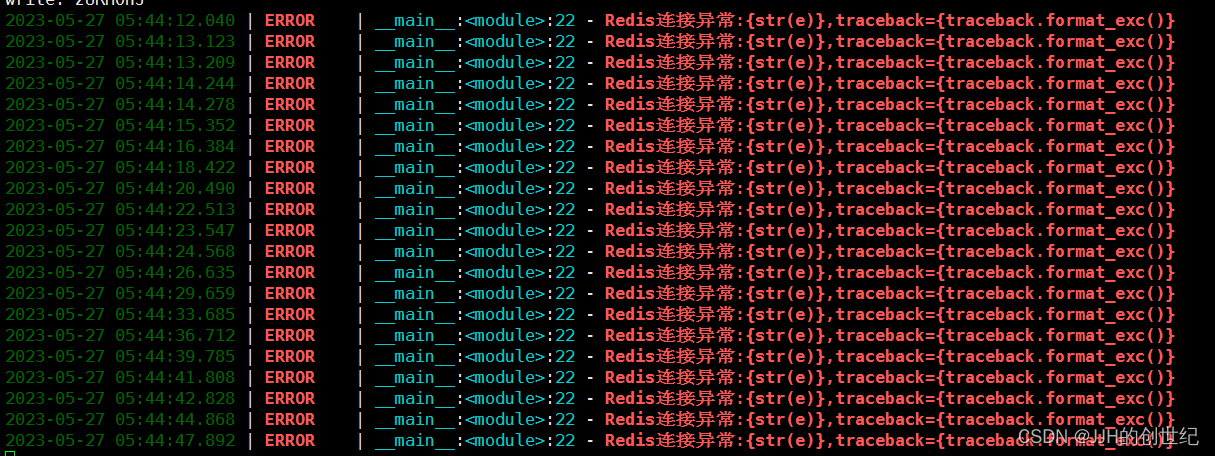
If redis-0 is being written data and it will be terminated.You'll see the program reports an exception and it will choose a new address and continue to run.
![]()
Let's check the status of the cluster,as you see,the redis-4 promoted to master and reids-0 down to its slaver and we also see that the ip address has changed after redis-0 rebuild.But how that happen? Pod restarted, ip changed, how to maintain cluster health?
At this point, you may be confused. So much mentioned above does not seem to reflect the role of StatefulSet. The stable flag redis-app-* provided by it is only used when initializing the cluster, and subsequent Redis Pod communication or configuration files .This flag is not used. I want to say, yes, the use of StatefulSet to deploy Redis in this article does not reflect its advantages.So why does the Redis Pod fail over normally without using the stable flag? This involves the mechanism of Redis itself. Because each node in the Redis cluster has its own NodeId (stored in the automatically generated nodes.conf), and the NodeId will not change follow the IP change, which is actually a fixed network symbol. That is to say, even if a Redis Pod is restarted, the Pod will still load the saved NodeId to maintain its identity.
[root@master1 ~]# kubectl get pod -o wide
NAME READY STATUS RESTARTS AGE IP NODE NOMINATED NODE READINESS GATES
application 1/1 Running 1 (7m4s ago) 7m9s 10.244.137.87 master1 <none> <none>
redis-0 1/1 Running 0 25m 10.244.104.1 node2 <none> <none>
redis-1 1/1 Running 0 25m 10.244.166.129 node1 <none> <none>
redis-2 1/1 Running 0 25m 10.244.104.2 node2 <none> <none>
redis-3 1/1 Running 0 25m 10.244.166.130 node1 <none> <none>
redis-4 1/1 Running 0 25m 10.244.104.3 node2 <none> <none>
redis-5 1/1 Running 0 25m 10.244.166.131 node1 <none> <none>
redis-stat 1/1 Running 0 5m57s 10.244.137.88 master1 <none> <none>
[root@master1 ~]# kubectl exec -it redis-0 -- redis-cli -c cluster nodes
6f276ced03b6f3935d5b29aa43c6465ecdb34141 10.244.166.129:6379@16379 master - 0 1685164469000 2 connected 5461-10922
a9872afabcf4c0835d1f49bc0b103568b09dc869 10.244.104.3:6379@16379 slave 6b931feaa1eeca46ac8475b311181d471345ed7c 0 1685164469188 1 connected
4c47cb48811e4b8418eb3db24c75c6c9bc7abc53 10.244.166.130:6379@16379 slave 6e17bf904a2b9223ee9661a69d4dc540d5ae0536 0 1685164467581 3 connected
6e17bf904a2b9223ee9661a69d4dc540d5ae0536 10.244.104.2:6379@16379 master - 0 1685164468000 3 connected 10923-16383
a966facaa3333581aae91b8bc701124428aab5a5 10.244.166.131:6379@16379 slave 6f276ced03b6f3935d5b29aa43c6465ecdb34141 0 1685164468000 2 connected
6b931feaa1eeca46ac8475b311181d471345ed7c 10.244.104.1:6379@16379 myself,master - 0 1685164468000 1 connected 0-5460
[root@master1 ~]# kubectl delete pod redis-0
pod "redis-0" deleted
NAME READY STATUS RESTARTS AGE IP NODE NOMINATED NODE READINESS GATES
application 1/1 Running 1 (14m ago) 14m 10.244.137.87 master1 <none> <none>
redis-0 1/1 Running 0 68s 10.244.104.8 node2 <none> <none>
redis-1 1/1 Running 0 32m 10.244.166.129 node1 <none> <none>
redis-2 1/1 Running 0 32m 10.244.104.2 node2 <none> <none>
redis-3 1/1 Running 0 32m 10.244.166.130 node1 <none> <none>
redis-4 1/1 Running 0 32m 10.244.104.3 node2 <none> <none>
redis-5 1/1 Running 0 32m 10.244.166.131 node1 <none> <none>
redis-stat 1/1 Running 0 12m 10.244.137.88 master1 <none> <none>
[root@master1 ~]# kubectl exec -it redis-0 -- redis-cli -c cluster nodes
6f276ced03b6f3935d5b29aa43c6465ecdb34141 10.244.166.129:6379@16379 master - 0 1685164469000 2 connected 5461-10922
a9872afabcf4c0835d1f49bc0b103568b09dc869 10.244.104.3:6379@16379 master 6b931feaa1eeca46ac8475b311181d471345ed7c 0 1685164469188 1 connected
4c47cb48811e4b8418eb3db24c75c6c9bc7abc53 10.244.166.130:6379@16379 slave 6e17bf904a2b9223ee9661a69d4dc540d5ae0536 0 1685164467581 3 connected
6e17bf904a2b9223ee9661a69d4dc540d5ae0536 10.244.104.2:6379@16379 master - 0 1685164468000 3 connected 10923-16383
a966facaa3333581aae91b8bc701124428aab5a5 10.244.166.131:6379@16379 slave 6f276ced03b6f3935d5b29aa43c6465ecdb34141 0 1685164468000 2 connected
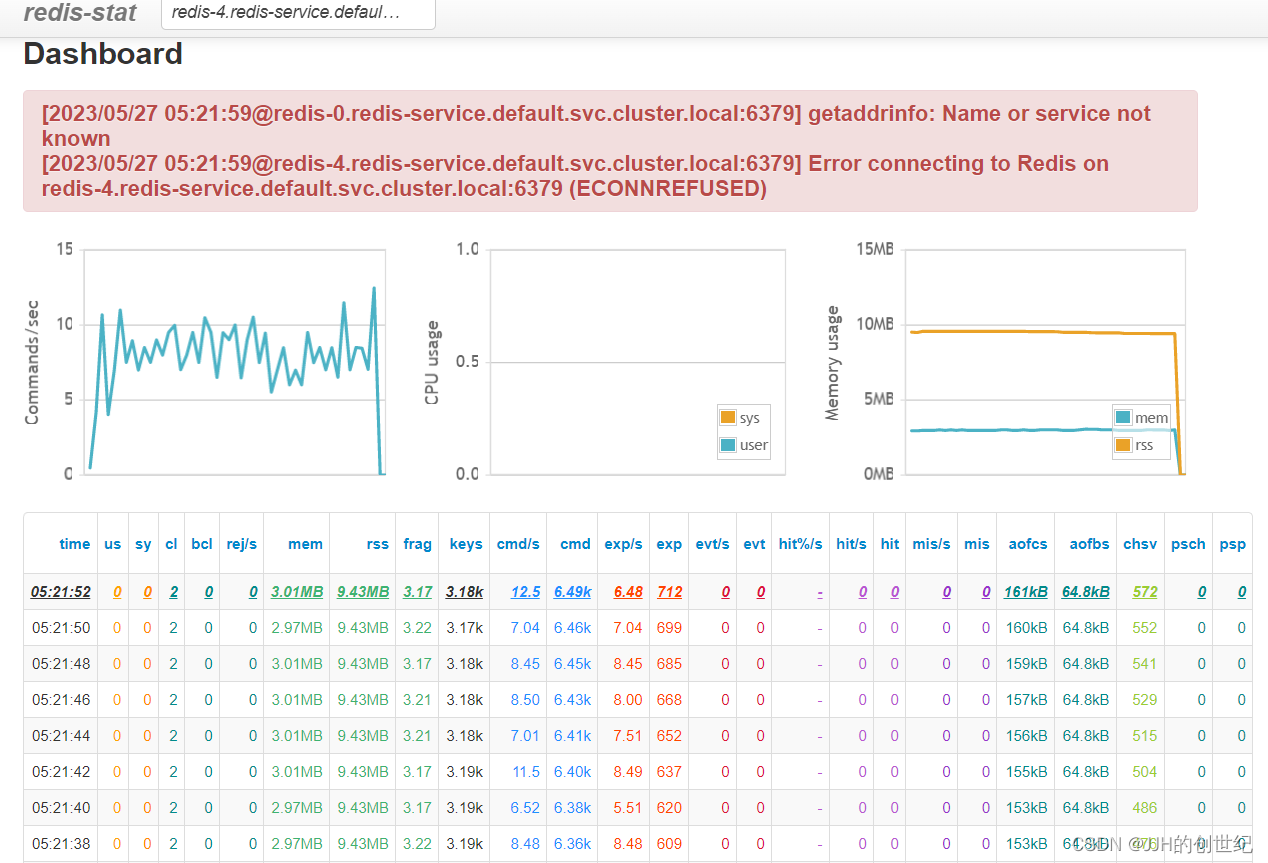
6b931feaa1eeca46ac8475b311181d471345ed7c 10.244.104.1:6379@16379 slave - 0 1685164468000 1 connected 0-5460Test2: Delete redis-0(master) and redis-4(slave)
Expected: Stop writing data to redis-0, its slave redis-4 stops synchronizing, redis-0 redis-4 pod is rebuilt, and randomly elects from the master
Actually: Stop writing data to redis-0, its slave redis-4 stops synchronizing, redis-0 redis-4 pod is rebuilt, and the slave and master is elected randomly
Recovery time: 10-20s

Test3:Simulate node1 crash
Expected:The nodes currently existing on node1 fail to write and read data, and the nodes existing on node2 can continue to read and write. After manual intervention (delete node1), the pod is transferred to node2, and the deleted pod is rebuilt and added to the cluster
Actually:The half of the total node of the redis cluster died so the redis cluster crashed.Cluster recovery after manually migrating nodes and pod recreation.
Recovery time: 2min-10mins
Pods on node1 are not transferred to node2 immediately(Status still Ruring but after 5 minutes turn to Terminating).Its follow the interruption time = 5 minutes waiting time(k8s default) + recreation time + service startup time + readiness probe detection time.
[root@master1 ~]# kubectl get pod -o wide --watch
NAME          READY   STATUS        RESTARTS      AGE   IP               NODE      NOMINATED NODE   READINESS GATES
application   1/1     Running       1 (45m ago)   45m   10.244.137.87    master1   <none>           <none>
redis-0       1/1     Running       0             19m   10.244.104.12    node2     <none>           <none>
redis-1       1/1     Terminating   0             63m   10.244.166.129   node1     <none>           <none>
redis-2       1/1     Running       0             63m   10.244.104.2     node2     <none>           <none>
redis-3       1/1     Terminating   0             63m   10.244.166.130   node1     <none>           <none>
redis-4       1/1     Running       0             19m   10.244.104.13    node2     <none>           <none>
redis-5       1/1     Terminating   0             63m   10.244.166.131   node1     <none>           <none>
redis-stat    1/1     Running       0             44m   10.244.137.88    master1   <none>           <none>
Check cluster info fail:
[root@master1 ~]# kubectl exec -it redis-0 -- redis-cli -c cluster info
cluster_state:fail
cluster_slots_assigned:16384
cluster_slots_ok:10922
cluster_slots_pfail:0
cluster_slots_fail:5462
cluster_known_nodes:6
cluster_size:3
cluster_current_epoch:8
cluster_my_epoch:8
cluster_stats_messages_ping_sent:1275
cluster_stats_messages_pong_sent:1265
cluster_stats_messages_fail_sent:5
cluster_stats_messages_sent:2545
cluster_stats_messages_ping_received:1265
cluster_stats_messages_pong_received:1271
cluster_stats_messages_fail_received:3
cluster_stats_messages_received:2539
[root@master1 ~]# kubectl exec -it redis-0 -- redis-cli -c cluster nodes
a966facaa3333581aae91b8bc701124428aab5a5 10.244.166.131:6379@16379 slave,fail 6f276ced03b6f3935d5b29aa43c6465ecdb34141 1685166253905 1685166251389 2 disconnected
6e17bf904a2b9223ee9661a69d4dc540d5ae0536 10.244.104.2:6379@16379 master - 0 1685166368855 3 connected 10923-16383
6b931feaa1eeca46ac8475b311181d471345ed7c 10.244.104.1:6379@16379 myself,master - 0 1685166368000 8 connected 0-5460
a9872afabcf4c0835d1f49bc0b103568b09dc869 10.244.104.13:6379@16379 slave 6b931feaa1eeca46ac8475b311181d471345ed7c 0 1685166368000 8 connected
6f276ced03b6f3935d5b29aa43c6465ecdb34141 10.244.166.129:6379@16379 master,fail - 1685166252597 1685166250000 2 disconnected 5461-10922
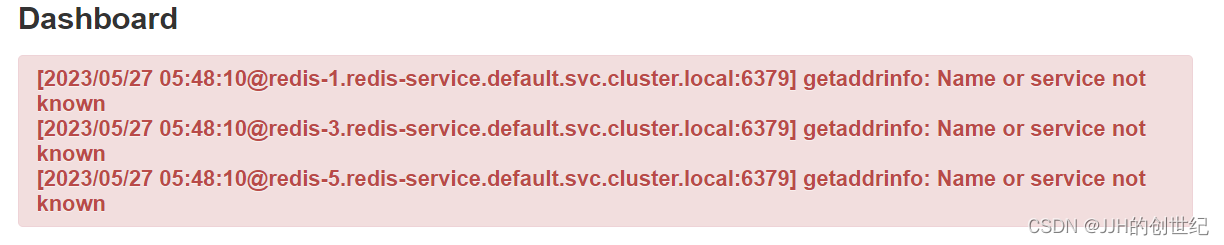
4c47cb48811e4b8418eb3db24c75c6c9bc7abc53 10.244.166.130:6379@16379 slave,fail 6e17bf904a2b9223ee9661a69d4dc540d5ae0536 1685166252093 1685166249579 3 connectedApplication connection fail.
Skipping default time(5m) we do below commands:
[root@master1 ~]# kubectl drain node1 --delete-local-data --force --ignore-daemonsets
Flag --delete-local-data has been deprecated, This option is deprecated and will be deleted. Use --delete-emptydir-data.
node/node1 cordoned
Warning: ignoring DaemonSet-managed Pods: calico-system/calico-node-74m9s, kube-system/kube-proxy-dgn8s
evicting pod default/redis-5
evicting pod default/redis-1
evicting pod default/redis-3
evicting pod calico-system/calico-typha-5c4c6c8dbb-slbn6
pod/calico-typha-5c4c6c8dbb-slbn6 evicted
....

[root@master1 ~]# kubectl delete node node1
Then we see pod transfer to node2.
[root@master1 ~]# kubectl get pod -o wide
NAME          READY   STATUS    RESTARTS      AGE   IP              NODE      NOMINATED NODE   READINESS GATES
application   1/1     Running   1 (46m ago)   46m   10.244.137.87   master1   <none>           <none>
redis-0       1/1     Running   0             20m   10.244.104.12   node2     <none>           <none>
redis-1       1/1     Running   0             41s   10.244.104.14   node2     <none>           <none>
redis-2       1/1     Running   0             64m   10.244.104.2    node2     <none>           <none>
redis-3       1/1     Running   0             38s   10.244.137.89   master1   <none>           <none>
redis-4       1/1     Running   0             20m   10.244.104.13   node2     <none>           <none>
redis-5       1/1     Running   0             25s   10.244.104.15   node2     <none>           <none>
redis-stat    1/1     Running   0             45m   10.244.137.88   master1   <none>           <none>
And we check redis cluster state:
[root@master1 ~]# kubectl exec -it redis-0 -- redis-cli -c cluster nodes
a966facaa3333581aae91b8bc701124428aab5a5 10.244.104.15:6379@16379 slave 6f276ced03b6f3935d5b29aa43c6465ecdb34141 0 1685166848513 2 connected
6e17bf904a2b9223ee9661a69d4dc540d5ae0536 10.244.104.2:6379@16379 master - 0 1685166848011 3 connected 10923-16383
6b931feaa1eeca46ac8475b311181d471345ed7c 10.244.104.1:6379@16379 myself,master - 0 1685166847000 8 connected 0-5460
a9872afabcf4c0835d1f49bc0b103568b09dc869 10.244.104.13:6379@16379 slave 6b931feaa1eeca46ac8475b311181d471345ed7c 0 1685166848613 8 connected
6f276ced03b6f3935d5b29aa43c6465ecdb34141 10.244.104.14:6379@16379 master - 0 1685166849014 2 connected 5461-10922
4c47cb48811e4b8418eb3db24c75c6c9bc7abc53 10.244.137.89:6379@16379 slave 6e17bf904a2b9223ee9661a69d4dc540d5ae0536 0 1685166848000 3 connected
[root@master1 ~]# kubectl exec -it redis-0 -- redis-cli -c cluster info
cluster_state:ok
cluster_slots_assigned:16384
cluster_slots_ok:16384
cluster_slots_pfail:0
cluster_slots_fail:0
cluster_known_nodes:6
cluster_size:3
cluster_current_epoch:8
cluster_my_epoch:8
cluster_stats_messages_ping_sent:1854
cluster_stats_messages_pong_sent:1820
cluster_stats_messages_fail_sent:5
cluster_stats_messages_sent:3679
cluster_stats_messages_ping_received:1820
cluster_stats_messages_pong_received:1850
cluster_stats_messages_fail_received:6
cluster_stats_messages_received:3676
Conclusion
- To Install Redis Cluster(3master-3slave) on Kubernetes cluster,i recommend you have least 3 worker node and better is 6 and make sure it's as evenly distributed as possible if nodes number less than 3.You may use podaffinity or nodeaffinity to achieve it
- Different node death situations will produce different recovery times.You can see more here
- We did not discuss scaling and autoscaling redis nodes on a k8s cluster.But you can follow these tips if want to do : set more nfs pv --> do kubectl scale to add pods --> join pods to redis-cluster --> reshard rediscluster.
reference documents
docker安装redis监控工具redis-stat - 简书
How to connect to redis-ha cluster in Kubernetes cluster? - Stack OverflowGitHub - junegunn/redis-stat: (UNMAINTAINED) A real-time Redis monitoring toolHow to connect to redis-ha cluster in Kubernetes cluster? - Stack Overflow


 被折叠的 条评论
为什么被折叠?
被折叠的 条评论
为什么被折叠?
 到【灌水乐园】发言


