


摘要
本文深入剖析Deep-Live-Cam的系统架构设计,从整体架构、核心模块、数据流、性能优化等多个维度进行详细讲解。通过系统化的分析和实践案例,帮助开发者深入理解Deep-Live-Cam的设计理念和实现方案。
1. 系统整体架构
1.1 架构概览
1.2 模块职责
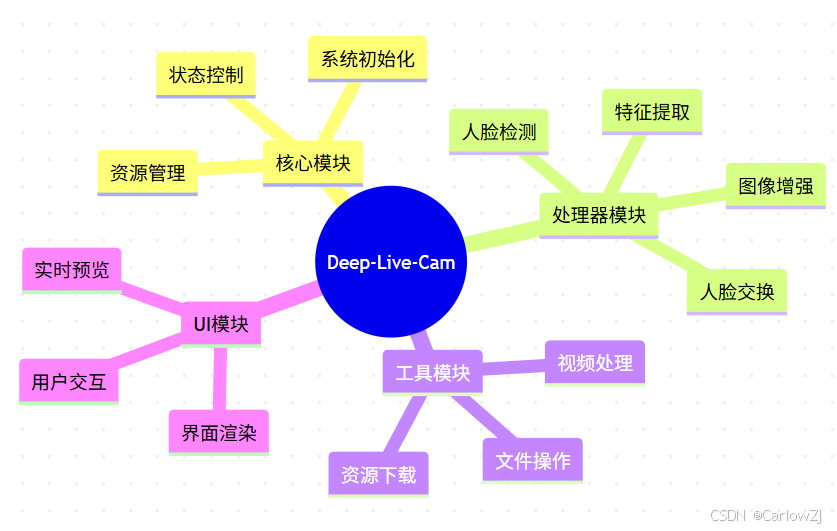
mindmap
  root((Deep-Live-Cam))
    核心模块
      系统初始化
      资源管理
      状态控制
    处理器模块
      人脸检测
      特征提取
      人脸交换
      图像增强
    工具模块
      视频处理
      文件操作
      资源下载
    UI模块
      界面渲染
      用户交互
      实时预览
2. 核心模块设计
2.1 Core模块
# core.py核心实现
class DeepLiveCam:
    def __init__(self):
        """
        初始化Deep-Live-Cam核心
        """
        self.execution_providers = []
        self.frame_processors = []
        self.globals = {}

    def initialize(self):
        """
        系统初始化
        """
        # 设置执行环境
        self._setup_environment()

        # 初始化处理器
        self._init_processors()

        # 加载模型
        self._load_models()

    def _setup_environment(self):
        """
        配置执行环境
        """
        # 设置线程数
        os.environ['OMP_NUM_THREADS'] = '1'

        # 设置日志级别
        os.environ['TF_CPP_MIN_LOG_LEVEL'] = '2'

    def _init_processors(self):
        """
        初始化处理器
        """
        for processor in self.frame_processors:
            processor.pre_check()
            processor.pre_start()
2.2 Face Analyser模块
# face_analyser.py核心实现
class FaceAnalyser:
    def __init__(self):
        """
        初始化人脸分析器
        """
        self.model = None
        self.face_detector = None

    def initialize(self):
        """
        初始化模型
        """
        # 加载人脸检测模型
        self.face_detector = insightface.app.FaceAnalysis(
            name='buffalo_l',
            providers=self.execution_providers
        )

        # 准备检测器
        self.face_detector.prepare(
            ctx_id=0,
            det_size=(640, 640)
        )

    def detect_faces(self, frame):
        """
        检测人脸
        :param frame: 输入帧
        :return: 检测到的人脸列表
        """
        return self.face_detector.get(frame)
3. 处理器模块设计
3.1 Face Swapper模块
# face_swapper.py核心实现
class FaceSwapper:
    def __init__(self):
        """
        初始化人脸交换器
        """
        self.model = None
        self.thread_lock = threading.Lock()

    def initialize(self):
        """
        初始化模型
        """
        with self.thread_lock:
            if self.model is None:
                model_path = os.path.join(
                    self.models_dir,
                    "inswapper_128_fp16.onnx"
                )
                self.model = insightface.model_zoo.get_model(
                    model_path,
                    providers=self.execution_providers
                )

    def swap_face(self, source_face, target_face, frame):
        """
        执行人脸交换
        :param source_face: 源人脸
        :param target_face: 目标人脸
        :param frame: 输入帧
        :return: 处理后的帧
        """
        return self.model.get(
            frame,
            target_face,
            source_face,
            paste_back=True
        )
3.2 Face Enhancer模块
# face_enhancer.py核心实现
class FaceEnhancer:
    def __init__(self):
        """
        初始化人脸增强器
        """
        self.model = None
        self.thread_semaphore = threading.Semaphore()

    def initialize(self):
        """
        初始化模型
        """
        model_path = os.path.join(
            self.models_dir,
            "GFPGANv1.4.pth"
        )

        # 选择设备
        device = self._select_device()

        # 初始化模型
        self.model = gfpgan.GFPGANer(
            model_path=model_path,
            upscale=1,
            device=device
        )

    def enhance_face(self, frame):
        """
        增强人脸
        :param frame: 输入帧
        :return: 增强后的帧
        """
        with self.thread_semaphore:
            _, _, enhanced_frame = self.model.enhance(
                frame,
                paste_back=True
            )
        return enhanced_frame
4. 数据流设计
4.1 视频处理流程
4.2 人脸处理流程
5. 性能优化
5.1 内存优化
# memory_optimization.py
class MemoryOptimizer:
    def __init__(self):
        """
        初始化内存优化器
        """
        self.max_memory = 16 * 1024 * 1024 * 1024  # 16GB

    def optimize(self):
        """
        执行内存优化
        """
        # 限制TensorFlow内存使用
        gpus = tensorflow.config.experimental.list_physical_devices('GPU')
        for gpu in gpus:
            tensorflow.config.experimental.set_memory_growth(gpu, True)

        # 设置进程内存限制
        if platform.system().lower() == 'windows':
            import ctypes
            kernel32 = ctypes.windll.kernel32
            kernel32.SetProcessWorkingSetSize(
                -1,
                ctypes.c_size_t(self.max_memory),
                ctypes.c_size_t(self.max_memory)
            )
5.2 GPU加速
# gpu_acceleration.py
class GPUAccelerator:
    def __init__(self):
        """
        初始化GPU加速器
        """
        self.device_priority = []

    def select_device(self):
        """
        选择最佳设备
        """
        if torch.cuda.is_available():
            if self._is_tensorrt_available():
                return torch.device("cuda"), "TensorRT+CUDA"
            return torch.device("cuda"), "CUDA"
        elif torch.backends.mps.is_available():
            return torch.device("mps"), "MPS"
        return torch.device("cpu"), "CPU"
6. 最佳实践
6.1 开发建议
-
模块化设计
- 保持模块独立性
- 定义清晰的接口
- 实现可扩展性
-
性能优化
- 使用GPU加速
- 优化内存使用
- 实现多线程处理
-
错误处理
- 完善的异常处理
- 日志记录
- 状态监控
6.2 部署建议
-
环境配置
- 使用虚拟环境
- 安装必要依赖
- 配置GPU驱动
-
资源管理
- 监控内存使用
- 控制GPU占用
- 优化磁盘空间
7. 常见问题
7.1 性能问题
-
CPU使用率过高
- 原因:未启用GPU加速
- 解决:检查CUDA配置
-
内存占用过大
- 原因:缓存未及时清理
- 解决:实现内存优化机制
7.2 集成问题
-
模型加载失败
- 原因:模型文件缺失
- 解决:检查模型路径
-
GPU加速失效
- 原因:驱动版本不匹配
- 解决:更新GPU驱动
8. 总结
本文详细介绍了Deep-Live-Cam的系统架构设计,包括:
- 整体架构设计
- 核心模块实现
- 数据流设计
- 性能优化方案
- 最佳实践建议
- 常见问题解决方案
9. 参考资料
10. 扩展阅读
- 深度学习模型部署
- 实时视频处理技术
- GPU加速原理
- 系统架构设计模式


 802
802

 被折叠的 条评论
为什么被折叠?
被折叠的 条评论
为什么被折叠?
 到【灌水乐园】发言


