NVIDIA DIGITS-2.0 + Ubuntu 14.04 + CUDA 7.0 + cuDNN 7.0 + Caffe 0.13.0环境配置
引言
DIGITS简介
DIGITS: Deep Learning GPU Training System,是由英伟达(NVIDIA)公司开发的第一个交互式深度学习GPU训练系统。目的在于整合现有的Deep Learning开发工具,实现深度神经网络(Deep Neural Network,DNN)设计、训练和可视化等任务变得简单化。DIGITS是基于浏览器的接口,因而通过实时的网络行为的可视化,可以快速设计最优的DNN。DIGITS是开源软件,可在GitHub上找到,因而开发人员可以扩展和自定义DIGITS。

DIGITS特性
-
提供了友好的用户界面,只需简单的点击即完成DNNs的训练。DIGITS是一个Web应用,用浏览器访问,上图是典型的工作流程图。
-
DIGITS用户接口提供了DNN优化工具。主控制台列出了现有的数据库和机器上可用的先前训练好的网络模型以及正在进行的训练活动。
-
DIGITS使可视化网络和快速对比精度变得简单。你选择一个模型,DIGITS显示训练状态和精度,并提供在网络训练时或训练完毕后加载和分类图像的选项。
-
由于DIGITS运行在一个web服务器上,团队用户可以很方便地分享数据库和网络配置,以及测试和分享结果。
-
DIGITS集成了流行的Caffe deep learning framework,并支持使用cuDNN进行GPU加速。
资源信息
- 在百度里搜索:NVIDIA DIGITS
- 软件首页(DIGITS):https://developer.nvidia.com/digits
- 硬件平台(英伟达搭建的环境,NVIDIA® DIGITS™ DevBox):
https://developer.nvidia.com/devbox - 相关文档:
http://docs.nvidia.com/deeplearning/index.html#axzz3juAVWoDb
登陆软件首页,注册后下载DIGITS(注意到注册邮箱里点击激活链接),也可以下载源码(基于Python)安装。
参考资料:
-
DIGITS 2支持多GPU自动扩展 实现深度学习性能倍增,原文链接:Easy Multi-GPU Deep Learning with DIGITS 2
-
EC2上的深度学习:CUDA 7/cuDNN/caffe/DIGITS实战教程,原文链接:GPU Powered DeepLearning with NVIDIA DIGITS on EC2
说明
- 如官方所述,DIGITS现在仅支持Ubuntu,当然也在其它Linux系统上测试成功,未见有在Windows上配置的案例;
- DIGITS尝试囊括更多的开源Deep Learning 框架,当前(digits-2.0)仅包括:Caffe, Torch, Theano, and BIDMach.
DIGITS安装
安装指导,官网说DIGITS的安装相当方便:1)访问digits home page注册并下载安装器安装;或者2)从GitHub上获取源代码安装。实际上,对于新手来说并非如此,下面介绍采用源码的安装方式。
说明1:本人将采用源码安装的软件的安装根目录为:/home/liu/sfw,即~/sfw,本文中记为yourpath。这样Caffe的安装路径:/home/liu/sfw/caffe,DIGITS的安装路径:/home/liu/sfw/digits;而CUDA默认安装根目录为/usr/local。
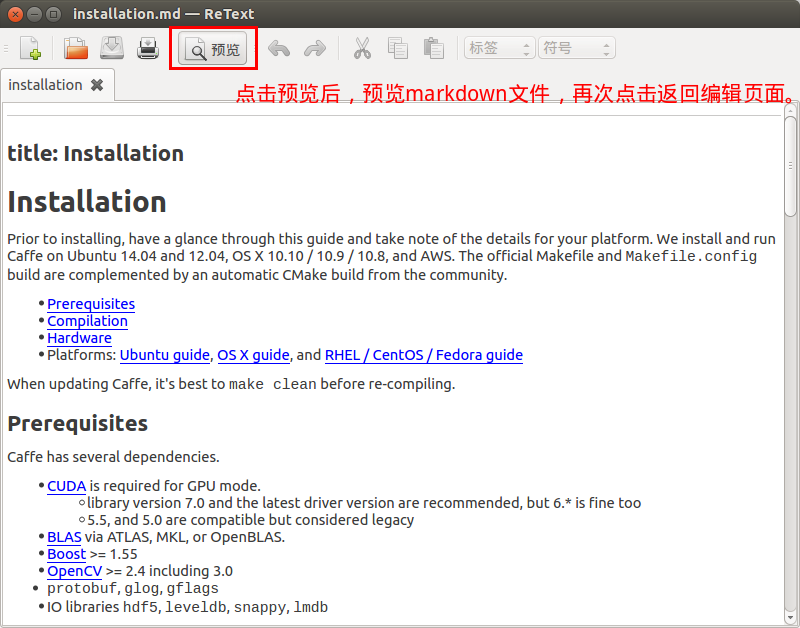
说明2:每个软件的安装方法可以查看官网的在线帮助,也可以查看源码中的文档。对于后者,多为“.md”即markdown文件,可以安装ReText查看,如下图为预览的Caffe的“installation.md”文件。
软硬件环境
硬件环境
笔记本× 1、CPU(Intel® Core™ i5-3210M CPU @ 2.50GHz × 4 )× 1、GPU(GeForce GT 635M/PCIe/SSE2 + IntelGMAHD3000)× 1。
软件环境
环境简介及下载链接:
- 操作系统:Ubuntu 14.04 LTS 64 bit(ubuntu-14.04.3-desktop-amd64.iso)
- CUDA:CUDA-7.0(cuda-repo-ubuntu1404-7-0-local_7.0-28_amd64.deb),支持CUDA的GPU
- cuDNN:cuDNN-7.0(cudnn-7.0-linux-x64-v3.0-rc.tgz)
- Caffe:Caffe-0.13.0(caffe-master.zip,必须是NVIDIA’s fork,原因点此)
- DIGITS:DIGITS-2.0(源码安装,DIGITS-master.zip)
操作系统安装
具体安装方法参见:U盘系统盘制作与系统安装(详细图解)。
DIGITS安装前准备
采用源码安装DIGITS前,事先要安装CUDA(必须)、cuDNN(用于GPU加速,建议安装),Caffe(运行DIGITS至少要有一个Deep Learning framework,也可以安装Theano,这里不介绍)。
安装CUDA7.0(“.deb”方式)
CUDA-7.0在Linux下的安装步骤参见官网手册:CUDA_Getting_Started_Linux,其中提及了“.run”、“.deb”等安装文件的安装方法,本人选择”deb”包的格式,因为它比较简单。
0.检查你的电脑是否支持CUDA:
检查GPU是否支持:输入如下命令,如果输出的GPU型号是NVIDIA的,并且在此http://developer.nvidia.com/cuda-gpus列表内,则支持。
<code class="language-bash hljs has-numbering" style="display: block; padding: 0px; color: inherit; box-sizing: border-box; font-family: 'Source Code Pro', monospace;font-size:undefined; white-space: pre; border-top-left-radius: 0px; border-top-right-radius: 0px; border-bottom-right-radius: 0px; border-bottom-left-radius: 0px; word-wrap: normal; background: transparent;">lspci | grep -i nvidia</code><ul class="pre-numbering" style="box-sizing: border-box; position: absolute; width: 50px; top: 0px; left: 0px; margin: 0px; padding: 6px 0px 40px; border-right-width: 1px; border-right-style: solid; border-right-color: rgb(221, 221, 221); list-style: none; text-align: right; background-color: rgb(238, 238, 238);"><li style="box-sizing: border-box; padding: 0px 5px;">1</li></ul>
1.下载安装文件:可以直接访问上面给出的官网链接下载,也可以在终端窗口输入如下命令下载。
<code class="language-bash hljs  has-numbering" style="display: block; padding: 0px; color: inherit; box-sizing: border-box; font-family: 'Source Code Pro', monospace;font-size:undefined; white-space: pre; border-top-left-radius: 0px; border-top-right-radius: 0px; border-bottom-right-radius: 0px; border-bottom-left-radius: 0px; word-wrap: normal; background: transparent;"><span class="hljs-comment" style="color: rgb(136, 0, 0); box-sizing: border-box;"># downloading the (currently) most recent version of CUDA 7</span>
<span class="hljs-built_in" style="color: rgb(102, 0, 102); box-sizing: border-box;">sudo</span> wget http://developer.download.nvidia.com/compute/cuda/repos/ubuntu1404/x86_64/cuda-repo-ubuntu1404_7.<span class="hljs-number" style="color: rgb(0, 102, 102); box-sizing: border-box;">0.28</span>_amd64.deb</code><ul class="pre-numbering" style="box-sizing: border-box; position: absolute; width: 50px; top: 0px; left: 0px; margin: 0px; padding: 6px 0px 40px; border-right-width: 1px; border-right-style: solid; border-right-color: rgb(221, 221, 221); list-style: none; text-align: right; background-color: rgb(238, 238, 238);"><li style="box-sizing: border-box; padding: 0px 5px;">1</li><li style="box-sizing: border-box; padding: 0px 5px;">2</li></ul>
2.安装依赖工具:需要连网。
<code class="language-bash hljs  has-numbering" style="display: block; padding: 0px; color: inherit; box-sizing: border-box; font-family: 'Source Code Pro', monospace;font-size:undefined; white-space: pre; border-top-left-radius: 0px; border-top-right-radius: 0px; border-bottom-right-radius: 0px; border-bottom-left-radius: 0px; word-wrap: normal; background: transparent;"><span class="hljs-comment" style="color: rgb(136, 0, 0); box-sizing: border-box;"># installation of required tools</span>
<span class="hljs-built_in" style="color: rgb(102, 0, 102); box-sizing: border-box;">sudo</span> apt-get install -y gcc g++ gfortran build-essential \
  git wget linux-image-generic libopenblas-dev python-dev \
  python-pip python-nose python-numpy python-scipy</code><ul class="pre-numbering" style="box-sizing: border-box; position: absolute; width: 50px; top: 0px; left: 0px; margin: 0px; padding: 6px 0px 40px; border-right-width: 1px; border-right-style: solid; border-right-color: rgb(221, 221, 221); list-style: none; text-align: right; background-color: rgb(238, 238, 238);"><li style="box-sizing: border-box; padding: 0px 5px;">1</li><li style="box-sizing: border-box; padding: 0px 5px;">2</li><li style="box-sizing: border-box; padding: 0px 5px;">3</li><li style="box-sizing: border-box; padding: 0px 5px;">4</li></ul>
3.安装CUDA:
<code class="language-bash hljs  has-numbering" style="display: block; padding: 0px; color: inherit; box-sizing: border-box; font-family: 'Source Code Pro', monospace;font-size:undefined; white-space: pre; border-top-left-radius: 0px; border-top-right-radius: 0px; border-bottom-right-radius: 0px; border-bottom-left-radius: 0px; word-wrap: normal; background: transparent;"><span class="hljs-comment" style="color: rgb(136, 0, 0); box-sizing: border-box;"># installing CUDA</span>
<span class="hljs-built_in" style="color: rgb(102, 0, 102); box-sizing: border-box;">sudo</span> dpkg -i cuda-repo-ubuntu1404-<span class="hljs-number" style="color: rgb(0, 102, 102); box-sizing: border-box;">7</span>-<span class="hljs-number" style="color: rgb(0, 102, 102); box-sizing: border-box;">0</span>-local_7.<span class="hljs-number" style="color: rgb(0, 102, 102); box-sizing: border-box;">0</span>-<span class="hljs-number" style="color: rgb(0, 102, 102); box-sizing: border-box;">28</span>_amd64.deb

<span class="hljs-built_in" style="color: rgb(102, 0, 102); box-sizing: border-box;">sudo</span> apt-get update
<span class="hljs-built_in" style="color: rgb(102, 0, 102); box-sizing: border-box;">sudo</span> apt-get install cuda</code><ul class="pre-numbering" style="box-sizing: border-box; position: absolute; width: 50px; top: 0px; left: 0px; margin: 0px; padding: 6px 0px 40px; border-right-width: 1px; border-right-style: solid; border-right-color: rgb(221, 221, 221); list-style: none; text-align: right; background-color: rgb(238, 238, 238);"><li style="box-sizing: border-box; padding: 0px 5px;">1</li><li style="box-sizing: border-box; padding: 0px 5px;">2</li><li style="box-sizing: border-box; padding: 0px 5px;">3</li><li style="box-sizing: border-box; padding: 0px 5px;">4</li><li style="box-sizing: border-box; padding: 0px 5px;">5</li></ul>
4.设置环境变量:
注意:此环境变量为64位系统下的,32位的把lib64改成lib即可。
方式1,仅修改用户变量
<code class="language-bash hljs  has-numbering" style="display: block; padding: 0px; color: inherit; box-sizing: border-box; font-family: 'Source Code Pro', monospace;font-size:undefined; white-space: pre; border-top-left-radius: 0px; border-top-right-radius: 0px; border-bottom-right-radius: 0px; border-bottom-left-radius: 0px; word-wrap: normal; background: transparent;"><span class="hljs-comment" style="color: rgb(136, 0, 0); box-sizing: border-box;"># setting the environment variables so CUDA will be found</span>

<span class="hljs-built_in" style="color: rgb(102, 0, 102); box-sizing: border-box;">echo</span> <span class="hljs-string" style="color: rgb(0, 136, 0); box-sizing: border-box;">"\nexport PATH=/usr/local/cuda-7.0/bin:<span class="hljs-variable" style="color: rgb(102, 0, 102); box-sizing: border-box;">$PATH</span>"</span> >> ~/.bashrc
<span class="hljs-built_in" style="color: rgb(102, 0, 102); box-sizing: border-box;">echo</span> <span class="hljs-string" style="color: rgb(0, 136, 0); box-sizing: border-box;">"\nexport LD_LIBRARY_PATH=/usr/local/cuda-7.0/lib64:<span class="hljs-variable" style="color: rgb(102, 0, 102); box-sizing: border-box;">$LD_LIBRARY_PATH</span>"</span> >> ~/.bashrc</code><ul class="pre-numbering" style="box-sizing: border-box; position: absolute; width: 50px; top: 0px; left: 0px; margin: 0px; padding: 6px 0px 40px; border-right-width: 1px; border-right-style: solid; border-right-color: rgb(221, 221, 221); list-style: none; text-align: right; background-color: rgb(238, 238, 238);"><li style="box-sizing: border-box; padding: 0px 5px;">1</li><li style="box-sizing: border-box; padding: 0px 5px;">2</li><li style="box-sizing: border-box; padding: 0px 5px;">3</li><li style="box-sizing: border-box; padding: 0px 5px;">4</li></ul>
方式2,修改所有用户变量
先使用sudo gedit /etc/profile打开“profile”文件,或者sudo gedit ~/.bashrc打开“./bashrc”文件,然后在打开的文件的末尾添加如下代码并保存:
<code class="language-bash hljs  has-numbering" style="display: block; padding: 0px; color: inherit; box-sizing: border-box; font-family: 'Source Code Pro', monospace;font-size:undefined; white-space: pre; border-top-left-radius: 0px; border-top-right-radius: 0px; border-bottom-right-radius: 0px; border-bottom-left-radius: 0px; word-wrap: normal; background: transparent;"><span class="hljs-comment" style="color: rgb(136, 0, 0); box-sizing: border-box;"># setting the environment variables so CUDA will be found</span>
<span class="hljs-comment" style="color: rgb(136, 0, 0); box-sizing: border-box;"># After open profile, Add follow code at the end of file</span>
<span class="hljs-keyword" style="color: rgb(0, 0, 136); box-sizing: border-box;">export</span> PATH=/usr/local/cuda-<span class="hljs-number" style="color: rgb(0, 102, 102); box-sizing: border-box;">7.0</span>/bin:<span class="hljs-variable" style="color: rgb(102, 0, 102); box-sizing: border-box;">$PATH</span>
<span class="hljs-keyword" style="color: rgb(0, 0, 136); box-sizing: border-box;">export</span> LD_LIBRARY_PATH=/usr/local/cuda-<span class="hljs-number" style="color: rgb(0, 102, 102); box-sizing: border-box;">7.0</span>/lib64:<span class="hljs-variable" style="color: rgb(102, 0, 102); box-sizing: border-box;">$LD_LIBRARY_PATH</span></code><ul class="pre-numbering" style="box-sizing: border-box; position: absolute; width: 50px; top: 0px; left: 0px; margin: 0px; padding: 6px 0px 40px; border-right-width: 1px; border-right-style: solid; border-right-color: rgb(221, 221, 221); list-style: none; text-align: right; background-color: rgb(238, 238, 238);"><li style="box-sizing: border-box; padding: 0px 5px;">1</li><li style="box-sizing: border-box; padding: 0px 5px;">2</li><li style="box-sizing: border-box; padding: 0px 5px;">3</li><li style="box-sizing: border-box; padding: 0px 5px;">4</li></ul>
5.加载新的环境变量:添加好环境变量后,需要加载新的环境变量,才能应用于系统。
加载更新环境变量source ~/.bashrc(方式1),source /etc/profile或source ~/.bashrc(方式2)。
=====重启系统!重启系统!重启系统!=======
<code class="language-bash hljs has-numbering" style="display: block; padding: 0px; color: inherit; box-sizing: border-box; font-family: 'Source Code Pro', monospace;font-size:undefined; white-space: pre; border-top-left-radius: 0px; border-top-right-radius: 0px; border-bottom-right-radius: 0px; border-bottom-left-radius: 0px; word-wrap: normal; background: transparent;"><span class="hljs-built_in" style="color: rgb(102, 0, 102); box-sizing: border-box;">sudo</span> reboot</code><ul class="pre-numbering" style="box-sizing: border-box; position: absolute; width: 50px; top: 0px; left: 0px; margin: 0px; padding: 6px 0px 40px; border-right-width: 1px; border-right-style: solid; border-right-color: rgb(221, 221, 221); list-style: none; text-align: right; background-color: rgb(238, 238, 238);"><li style="box-sizing: border-box; padding: 0px 5px;">1</li></ul>
6.安装samples并检查CPU:samples被默认安装在/home/liu下:
<code class="language-bash hljs  has-numbering" style="display: block; padding: 0px; color: inherit; box-sizing: border-box; font-family: 'Source Code Pro', monospace;font-size:undefined; white-space: pre; border-top-left-radius: 0px; border-top-right-radius: 0px; border-bottom-right-radius: 0px; border-bottom-left-radius: 0px; word-wrap: normal; background: transparent;"><span class="hljs-comment" style="color: rgb(136, 0, 0); box-sizing: border-box;"># installing the samples and checking the GPU</span>

cuda-install-samples-<span class="hljs-number" style="color: rgb(0, 102, 102); box-sizing: border-box;">7.0</span>.sh ~/
<span class="hljs-built_in" style="color: rgb(102, 0, 102); box-sizing: border-box;">cd</span> NVIDIA_CUDA-<span class="hljs-number" style="color: rgb(0, 102, 102); box-sizing: border-box;">7.0</span>_Samples/<span class="hljs-number" style="color: rgb(0, 102, 102); box-sizing: border-box;">1</span>_Utilities/deviceQuery
make
./deviceQuery</code><ul class="pre-numbering" style="box-sizing: border-box; position: absolute; width: 50px; top: 0px; left: 0px; margin: 0px; padding: 6px 0px 40px; border-right-width: 1px; border-right-style: solid; border-right-color: rgb(221, 221, 221); list-style: none; text-align: right; background-color: rgb(238, 238, 238);"><li style="box-sizing: border-box; padding: 0px 5px;">1</li><li style="box-sizing: border-box; padding: 0px 5px;">2</li><li style="box-sizing: border-box; padding: 0px 5px;">3</li><li style="box-sizing: border-box; padding: 0px 5px;">4</li><li style="box-sizing: border-box; padding: 0px 5px;">5</li><li style="box-sizing: border-box; padding: 0px 5px;">6</li></ul>
执行完./deviceQuery命令,终端输出如下类似信息,有GPU型号、驱动版本和运行版本、计算能力……诸多信息:
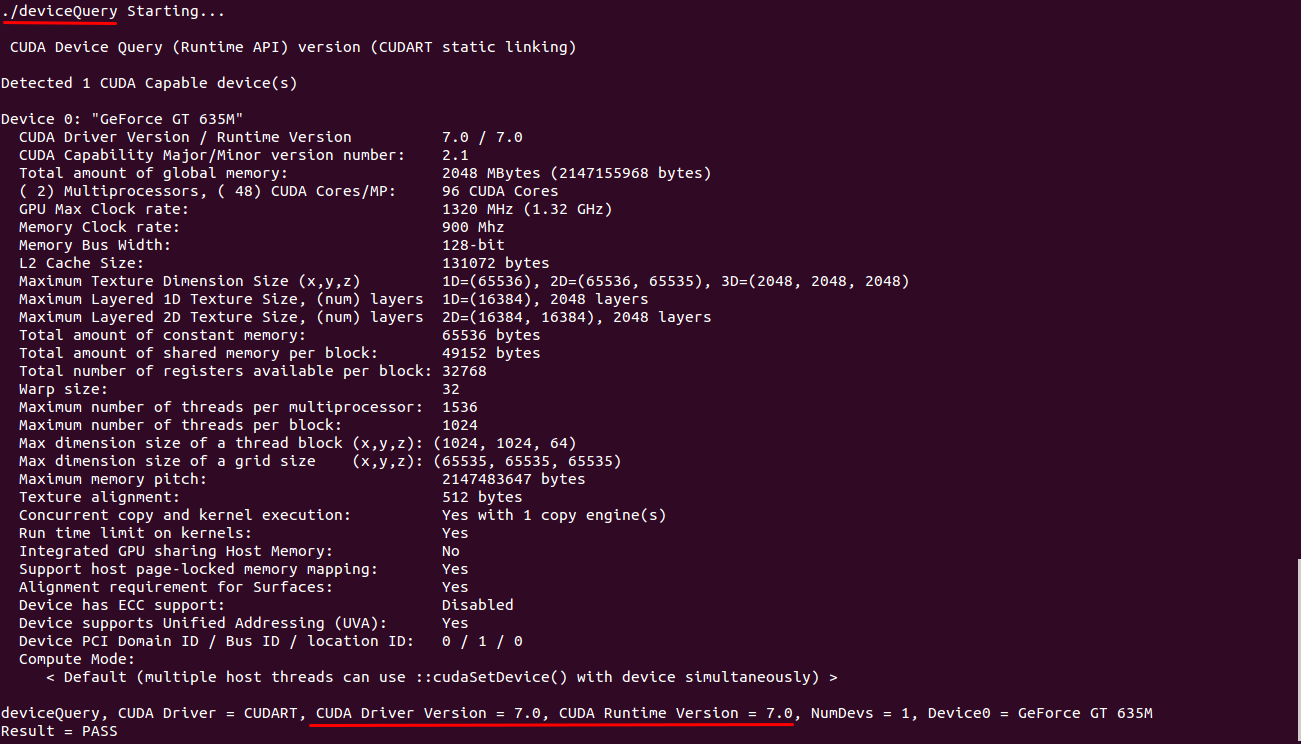
至此CUDA安装成功。
显卡切换
如果你用的是具有双显卡的PC机,比如本人的Intel集成显卡+NVIDIA的独立显卡,可以使用nvidia-prime来切换使用哪个显卡。双击/usr/share/applications/NVIDIA X Server Settings启动NVIDIA X Server 设置,如下图,但不像网上说的有nvidia-prime那一项:
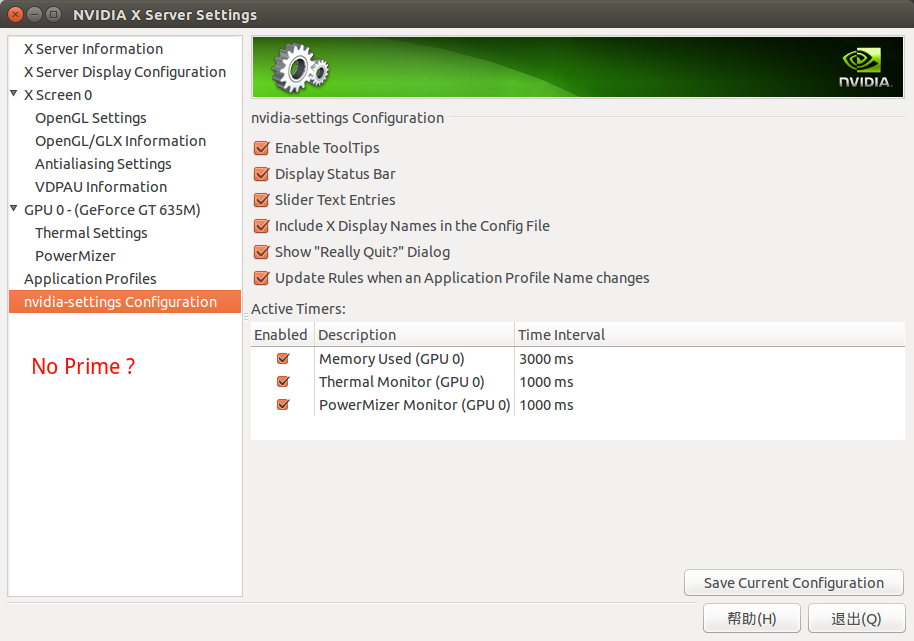
于是自己安装NVIDIA-prime指示器,命令如下:
<code class="hljs lasso has-numbering" style="display: block; padding: 0px; color: inherit; box-sizing: border-box; font-family: 'Source Code Pro', monospace;font-size:undefined; white-space: pre; border-top-left-radius: 0px; border-top-right-radius: 0px; border-bottom-right-radius: 0px; border-bottom-left-radius: 0px; word-wrap: normal; background: transparent;">sudo add<span class="hljs-attribute" style="box-sizing: border-box;">-apt</span><span class="hljs-attribute" style="box-sizing: border-box;">-repository</span> ppa:nilarimogard/webupd8
sudo apt<span class="hljs-attribute" style="box-sizing: border-box;">-get</span> update
sudo apt<span class="hljs-attribute" style="box-sizing: border-box;">-get</span> install prime<span class="hljs-attribute" style="box-sizing: border-box;">-indicator</span>
sudo reboot</code><ul class="pre-numbering" style="box-sizing: border-box; position: absolute; width: 50px; top: 0px; left: 0px; margin: 0px; padding: 6px 0px 40px; border-right-width: 1px; border-right-style: solid; border-right-color: rgb(221, 221, 221); list-style: none; text-align: right; background-color: rgb(238, 238, 238);"><li style="box-sizing: border-box; padding: 0px 5px;">1</li><li style="box-sizing: border-box; padding: 0px 5px;">2</li><li style="box-sizing: border-box; padding: 0px 5px;">3</li><li style="box-sizing: border-box; padding: 0px 5px;">4</li></ul>
重启系统后,在右上方托盘区可见NVIDIA或Intel的图标,点击即可切换。
安装cuDNN7.0
cuDNN的安装很简单:
1.解压:进入“cudnn-7.0-linux-x64-v3.0-rc.tgz”所在目录,将文件解压,如下:
<code class="language-bash hljs  has-numbering" style="display: block; padding: 0px; color: inherit; box-sizing: border-box; font-family: 'Source Code Pro', monospace;font-size:undefined; white-space: pre; border-top-left-radius: 0px; border-top-right-radius: 0px; border-bottom-right-radius: 0px; border-bottom-left-radius: 0px; word-wrap: normal; background: transparent;"><span class="hljs-comment" style="color: rgb(136, 0, 0); box-sizing: border-box;">#注意修改成你的目录</span>
<span class="hljs-built_in" style="color: rgb(102, 0, 102); box-sizing: border-box;">cd</span> /home/liu/sfw
<span class="hljs-comment" style="color: rgb(136, 0, 0); box-sizing: border-box;">#解压</span>
gzip <span class="hljs-operator" style="box-sizing: border-box;">-d</span> cudnn-<span class="hljs-number" style="color: rgb(0, 102, 102); box-sizing: border-box;">7.0</span>-linux-x64-v3.<span class="hljs-number" style="color: rgb(0, 102, 102); box-sizing: border-box;">0</span>-rc.tgz
tar xf cudnn-<span class="hljs-number" style="color: rgb(0, 102, 102); box-sizing: border-box;">7.0</span>-linux-x64-v3.<span class="hljs-number" style="color: rgb(0, 102, 102); box-sizing: border-box;">0</span>-rc.tar</code><ul class="pre-numbering" style="box-sizing: border-box; position: absolute; width: 50px; top: 0px; left: 0px; margin: 0px; padding: 6px 0px 40px; border-right-width: 1px; border-right-style: solid; border-right-color: rgb(221, 221, 221); list-style: none; text-align: right; background-color: rgb(238, 238, 238);"><li style="box-sizing: border-box; padding: 0px 5px;">1</li><li style="box-sizing: border-box; padding: 0px 5px;">2</li><li style="box-sizing: border-box; padding: 0px 5px;">3</li><li style="box-sizing: border-box; padding: 0px 5px;">4</li><li style="box-sizing: border-box; padding: 0px 5px;">5</li></ul>
2.copy文件至CUDA安装目录:解压后,在你的目录下生成一个“cuda”文件夹,对于cuDNN6.5的版本解压后生成“cudnn-6.5-linux-x64-v2”文件。使用如下命令copy,注意第二个有个-a参数,否则,拷贝过去的文件失去了链接。
<code class="language-bash hljs  has-numbering" style="display: block; padding: 0px; color: inherit; box-sizing: border-box; font-family: 'Source Code Pro', monospace;font-size:undefined; white-space: pre; border-top-left-radius: 0px; border-top-right-radius: 0px; border-bottom-right-radius: 0px; border-bottom-left-radius: 0px; word-wrap: normal; background: transparent;"><span class="hljs-comment" style="color: rgb(136, 0, 0); box-sizing: border-box;"># copy the library files into CUDA's include and lib folders</span>
<span class="hljs-built_in" style="color: rgb(102, 0, 102); box-sizing: border-box;">sudo</span> cp cuda/include/cudnn.h /usr/local/cuda/include
<span class="hljs-built_in" style="color: rgb(102, 0, 102); box-sizing: border-box;">sudo</span> cp <span class="hljs-operator" style="box-sizing: border-box;">-a</span> cuda/lib64/libcudnn* /usr/local/cuda/lib64</code><ul class="pre-numbering" style="box-sizing: border-box; position: absolute; width: 50px; top: 0px; left: 0px; margin: 0px; padding: 6px 0px 40px; border-right-width: 1px; border-right-style: solid; border-right-color: rgb(221, 221, 221); list-style: none; text-align: right; background-color: rgb(238, 238, 238);"><li style="box-sizing: border-box; padding: 0px 5px;">1</li><li style="box-sizing: border-box; padding: 0px 5px;">2</li><li style="box-sizing: border-box; padding: 0px 5px;">3</li></ul>
cuDNN安装完成。
安装Caffe-0.13.0
官网的安装方法:http://caffe.berkeleyvision.org/installation.html。
下载好Caffe-0.13.0后,解压文件caffe-master.zip生成“caffe-master”文件夹,并将其重命名为“caffe”,放在yourpath根目录下下,如:/home/liu/sfw。
1.首先安装一些依赖库:CUDA(已安装)、BLAS 、Boost、OpenCV等等,见官网的安装方法:http://caffe.berkeleyvision.org/installation.html,或自述文件(installation.md)。
<code class="language-bash hljs  has-numbering" style="display: block; padding: 0px; color: inherit; box-sizing: border-box; font-family: 'Source Code Pro', monospace;font-size:undefined; white-space: pre; border-top-left-radius: 0px; border-top-right-radius: 0px; border-bottom-right-radius: 0px; border-bottom-left-radius: 0px; word-wrap: normal; background: transparent;"><span class="hljs-built_in" style="color: rgb(102, 0, 102); box-sizing: border-box;">sudo</span> apt-get install libprotobuf-dev libleveldb-dev \
  libsnappy-dev libopencv-dev libboost-all-dev libhdf5-serial-dev \
  libgflags-dev libgoogle-glog-dev liblmdb-dev protobuf-compiler \
  libatlas-base-dev</code><ul class="pre-numbering" style="box-sizing: border-box; position: absolute; width: 50px; top: 0px; left: 0px; margin: 0px; padding: 6px 0px 40px; border-right-width: 1px; border-right-style: solid; border-right-color: rgb(221, 221, 221); list-style: none; text-align: right; background-color: rgb(238, 238, 238);"><li style="box-sizing: border-box; padding: 0px 5px;">1</li><li style="box-sizing: border-box; padding: 0px 5px;">2</li><li style="box-sizing: border-box; padding: 0px 5px;">3</li><li style="box-sizing: border-box; padding: 0px 5px;">4</li></ul>
2.安装其它的依赖库:查看“requirements.txt”文件,请注意将下面的路径替换为你的路径。
<code class="language-bash hljs  has-numbering" style="display: block; padding: 0px; color: inherit; box-sizing: border-box; font-family: 'Source Code Pro', monospace;font-size:undefined; white-space: pre; border-top-left-radius: 0px; border-top-right-radius: 0px; border-bottom-right-radius: 0px; border-bottom-left-radius: 0px; word-wrap: normal; background: transparent;"><span class="hljs-built_in" style="color: rgb(102, 0, 102); box-sizing: border-box;">cd</span> ~/sfw/caffe/python
<span class="hljs-keyword" style="color: rgb(0, 0, 136); box-sizing: border-box;">for</span> req <span class="hljs-keyword" style="color: rgb(0, 0, 136); box-sizing: border-box;">in</span> $(cat requirements.txt); <span class="hljs-keyword" style="color: rgb(0, 0, 136); box-sizing: border-box;">do</span> <span class="hljs-built_in" style="color: rgb(102, 0, 102); box-sizing: border-box;">sudo</span> pip install <span class="hljs-variable" style="color: rgb(102, 0, 102); box-sizing: border-box;">$req</span>; <span class="hljs-keyword" style="color: rgb(0, 0, 136); box-sizing: border-box;">done</span></code><ul class="pre-numbering" style="box-sizing: border-box; position: absolute; width: 50px; top: 0px; left: 0px; margin: 0px; padding: 6px 0px 40px; border-right-width: 1px; border-right-style: solid; border-right-color: rgb(221, 221, 221); list-style: none; text-align: right; background-color: rgb(238, 238, 238);"><li style="box-sizing: border-box; padding: 0px 5px;">1</li><li style="box-sizing: border-box; padding: 0px 5px;">2</li></ul>
2.修改配置文件并编译:终端进入“caffe”文件夹,复制一份Makefile.config文件,然后修改Makefile.config文件,如不使用GPU,可以去掉#GPU_ONLY=1的注释符:#,请根据需要自行修改,这里采用默认值,不做修改。然后进行编译:
<code class="language-bash hljs  has-numbering" style="display: block; padding: 0px; color: inherit; box-sizing: border-box; font-family: 'Source Code Pro', monospace;font-size:undefined; white-space: pre; border-top-left-radius: 0px; border-top-right-radius: 0px; border-bottom-right-radius: 0px; border-bottom-left-radius: 0px; word-wrap: normal; background: transparent;"><span class="hljs-built_in" style="color: rgb(102, 0, 102); box-sizing: border-box;">cd</span> ~/sfw/caffe
cp Makefile.config.example Makefile.config

<span class="hljs-comment" style="color: rgb(136, 0, 0); box-sizing: border-box;"># for a faster build, compile in parallel by doing make all -j8 where 8 is the number of parallel threads for compilation (a good choice for the number of threads is the number of cores in your machine).</span>

make all
make py
make test
make runtest</code><ul class="pre-numbering" style="box-sizing: border-box; position: absolute; width: 50px; top: 0px; left: 0px; margin: 0px; padding: 6px 0px 40px; border-right-width: 1px; border-right-style: solid; border-right-color: rgb(221, 221, 221); list-style: none; text-align: right; background-color: rgb(238, 238, 238);"><li style="box-sizing: border-box; padding: 0px 5px;">1</li><li style="box-sizing: border-box; padding: 0px 5px;">2</li><li style="box-sizing: border-box; padding: 0px 5px;">3</li><li style="box-sizing: border-box; padding: 0px 5px;">4</li><li style="box-sizing: border-box; padding: 0px 5px;">5</li><li style="box-sizing: border-box; padding: 0px 5px;">6</li><li style="box-sizing: border-box; padding: 0px 5px;">7</li><li style="box-sizing: border-box; padding: 0px 5px;">8</li><li style="box-sizing: border-box; padding: 0px 5px;">9</li></ul>
编译时间比较漫长,可以使用多线程,需要知道你的电脑的线程数,下面这样会快好多:
<code class="language-bash hljs  has-numbering" style="display: block; padding: 0px; color: inherit; box-sizing: border-box; font-family: 'Source Code Pro', monospace;font-size:undefined; white-space: pre; border-top-left-radius: 0px; border-top-right-radius: 0px; border-bottom-right-radius: 0px; border-bottom-left-radius: 0px; word-wrap: normal; background: transparent;">make all -j4
make py -j4
make test -j4
make runtest -j4</code><ul class="pre-numbering" style="box-sizing: border-box; position: absolute; width: 50px; top: 0px; left: 0px; margin: 0px; padding: 6px 0px 40px; border-right-width: 1px; border-right-style: solid; border-right-color: rgb(221, 221, 221); list-style: none; text-align: right; background-color: rgb(238, 238, 238);"><li style="box-sizing: border-box; padding: 0px 5px;">1</li><li style="box-sizing: border-box; padding: 0px 5px;">2</li><li style="box-sizing: border-box; padding: 0px 5px;">3</li><li style="box-sizing: border-box; padding: 0px 5px;">4</li></ul>
编译中没有错误提示,说明正确。
3.添加环境变量:方法同CUDA(安装CUDA7.0(“.deb”方式)),只是环境变量名称及路径需要变化,如:
<code class="language-bash hljs  has-numbering" style="display: block; padding: 0px; color: inherit; box-sizing: border-box; font-family: 'Source Code Pro', monospace;font-size:undefined; white-space: pre; border-top-left-radius: 0px; border-top-right-radius: 0px; border-bottom-right-radius: 0px; border-bottom-left-radius: 0px; word-wrap: normal; background: transparent;"><span class="hljs-comment" style="color: rgb(136, 0, 0); box-sizing: border-box;"># Add environment</span>
<span class="hljs-built_in" style="color: rgb(102, 0, 102); box-sizing: border-box;">echo</span> <span class="hljs-operator" style="box-sizing: border-box;">-e</span> <span class="hljs-string" style="color: rgb(0, 136, 0); box-sizing: border-box;">"\nexport CAFFE_HOME=/home/liu/sfw/caffe"</span> >> ~/.bashrc
<span class="hljs-comment" style="color: rgb(136, 0, 0); box-sizing: border-box;"># load the new environmental variables</span>
<span class="hljs-built_in" style="color: rgb(102, 0, 102); box-sizing: border-box;">source</span> ~/.bashrc</code><ul class="pre-numbering" style="box-sizing: border-box; position: absolute; width: 50px; top: 0px; left: 0px; margin: 0px; padding: 6px 0px 40px; border-right-width: 1px; border-right-style: solid; border-right-color: rgb(221, 221, 221); list-style: none; text-align: right; background-color: rgb(238, 238, 238);"><li style="box-sizing: border-box; padding: 0px 5px;">1</li><li style="box-sizing: border-box; padding: 0px 5px;">2</li><li style="box-sizing: border-box; padding: 0px 5px;">3</li><li style="box-sizing: border-box; padding: 0px 5px;">4</li></ul>
或者:
<code class="language-bash hljs  has-numbering" style="display: block; padding: 0px; color: inherit; box-sizing: border-box; font-family: 'Source Code Pro', monospace;font-size:undefined; white-space: pre; border-top-left-radius: 0px; border-top-right-radius: 0px; border-bottom-right-radius: 0px; border-bottom-left-radius: 0px; word-wrap: normal; background: transparent;"><span class="hljs-comment" style="color: rgb(136, 0, 0); box-sizing: border-box;"># Add environment</span>
<span class="hljs-built_in" style="color: rgb(102, 0, 102); box-sizing: border-box;">sudo</span> gedit /etc/profile

<span class="hljs-comment" style="color: rgb(136, 0, 0); box-sizing: border-box;"># After open profile, Add follow code at the end</span>

<span class="hljs-comment" style="color: rgb(136, 0, 0); box-sizing: border-box;"># Set Caffe environment</span>
<span class="hljs-keyword" style="color: rgb(0, 0, 136); box-sizing: border-box;">export</span> CAFFE_HOME=<span class="hljs-string" style="color: rgb(0, 136, 0); box-sizing: border-box;">"/home/liu/sfw/caffe"</span>
<span class="hljs-comment" style="color: rgb(136, 0, 0); box-sizing: border-box;"># load the new environmental variables</span>
<span class="hljs-built_in" style="color: rgb(102, 0, 102); box-sizing: border-box;">source</span> /etc/profile</code><ul class="pre-numbering" style="box-sizing: border-box; position: absolute; width: 50px; top: 0px; left: 0px; margin: 0px; padding: 6px 0px 40px; border-right-width: 1px; border-right-style: solid; border-right-color: rgb(221, 221, 221); list-style: none; text-align: right; background-color: rgb(238, 238, 238);"><li style="box-sizing: border-box; padding: 0px 5px;">1</li><li style="box-sizing: border-box; padding: 0px 5px;">2</li><li style="box-sizing: border-box; padding: 0px 5px;">3</li><li style="box-sizing: border-box; padding: 0px 5px;">4</li><li style="box-sizing: border-box; padding: 0px 5px;">5</li><li style="box-sizing: border-box; padding: 0px 5px;">6</li><li style="box-sizing: border-box; padding: 0px 5px;">7</li><li style="box-sizing: border-box; padding: 0px 5px;">8</li><li style="box-sizing: border-box; padding: 0px 5px;">9</li></ul>
这样caffe就安装好了!如果在make runtest时提示“Core dumped”,现象截图及解决办法见一个小问题(Caffe&cuDNN)。
安装DIGITS
1.解压文件:终于可以安装DIGITS了,解压下载好的DIGITS-master.zip文件生成“DIGITS-master”文件夹,将其重命名为“digits”,并copy到你的目录yourpath,如/home/liu/sfw下面。
2.安装DIGITS:命令如下,注意修改路径。
<code class="language-bash hljs  has-numbering" style="display: block; padding: 0px; color: inherit; box-sizing: border-box; font-family: 'Source Code Pro', monospace;font-size:undefined; white-space: pre; border-top-left-radius: 0px; border-top-right-radius: 0px; border-bottom-right-radius: 0px; border-bottom-left-radius: 0px; word-wrap: normal; background: transparent;"><span class="hljs-built_in" style="color: rgb(102, 0, 102); box-sizing: border-box;">cd</span> /home/liu/sfw/digits
<span class="hljs-built_in" style="color: rgb(102, 0, 102); box-sizing: border-box;">sudo</span> apt-get install graphviz gunicorn
<span class="hljs-keyword" style="color: rgb(0, 0, 136); box-sizing: border-box;">for</span> req <span class="hljs-keyword" style="color: rgb(0, 0, 136); box-sizing: border-box;">in</span> $(cat requirements.txt); <span class="hljs-keyword" style="color: rgb(0, 0, 136); box-sizing: border-box;">do</span> <span class="hljs-built_in" style="color: rgb(102, 0, 102); box-sizing: border-box;">sudo</span> pip install <span class="hljs-variable" style="color: rgb(102, 0, 102); box-sizing: border-box;">$req</span>; <span class="hljs-keyword" style="color: rgb(0, 0, 136); box-sizing: border-box;">done</span></code><ul class="pre-numbering" style="box-sizing: border-box; position: absolute; width: 50px; top: 0px; left: 0px; margin: 0px; padding: 6px 0px 40px; border-right-width: 1px; border-right-style: solid; border-right-color: rgb(221, 221, 221); list-style: none; text-align: right; background-color: rgb(238, 238, 238);"><li style="box-sizing: border-box; padding: 0px 5px;">1</li><li style="box-sizing: border-box; padding: 0px 5px;">2</li><li style="box-sizing: border-box; padding: 0px 5px;">3</li></ul>
如果网络不好,或软件源服务关闭等等可能造成某些依赖库无法下载和安装,终端会有大片红色文字,请更改软件源确认网络连接正常,重新执行上述命令。
启动DIGITS
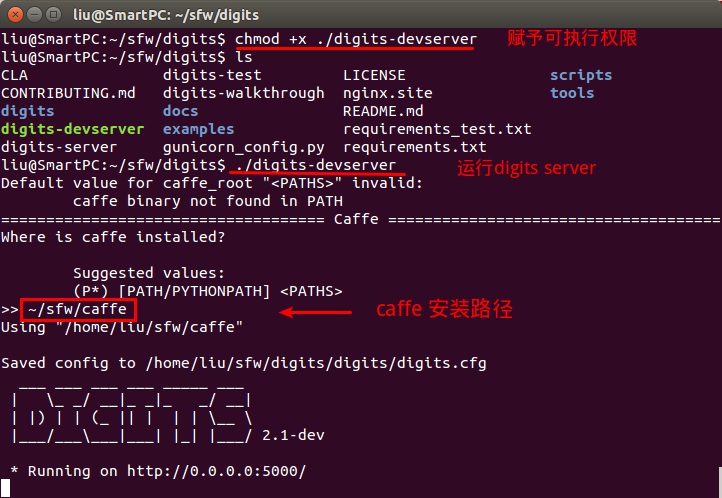
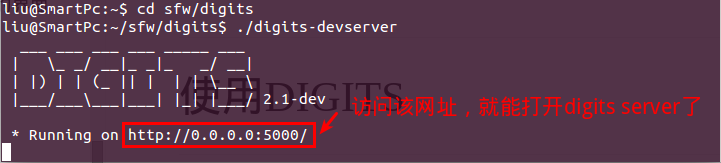
进入digits文件夹,给文件“./digits-devserver”赋予可执行权限,然后./digits-devserver运行digits:
<code class="language-bash hljs  has-numbering" style="display: block; padding: 0px; color: inherit; box-sizing: border-box; font-family: 'Source Code Pro', monospace;font-size:undefined; white-space: pre; border-top-left-radius: 0px; border-top-right-radius: 0px; border-bottom-right-radius: 0px; border-bottom-left-radius: 0px; word-wrap: normal; background: transparent;"><span class="hljs-built_in" style="color: rgb(102, 0, 102); box-sizing: border-box;">cd</span> ~/sfw/digits
chmod +x ./digits-devserver
./digits-devserver</code><ul class="pre-numbering" style="box-sizing: border-box; position: absolute; width: 50px; top: 0px; left: 0px; margin: 0px; padding: 6px 0px 40px; border-right-width: 1px; border-right-style: solid; border-right-color: rgb(221, 221, 221); list-style: none; text-align: right; background-color: rgb(238, 238, 238);"><li style="box-sizing: border-box; padding: 0px 5px;">1</li><li style="box-sizing: border-box; padding: 0px 5px;">2</li><li style="box-sizing: border-box; padding: 0px 5px;">3</li></ul>
第一次运行会提示输入caffe的安装路径:
运行时可能会提示启动失败:$ImportError: /usr/lib/liblapack.so.3: undefined symbol: ATL_chemv
在stackoverflow找到了原因及解决方法,命令如下:
<code class="language-bash hljs has-numbering" style="display: block; padding: 0px; color: inherit; box-sizing: border-box; font-family: 'Source Code Pro', monospace;font-size:undefined; white-space: pre; border-top-left-radius: 0px; border-top-right-radius: 0px; border-bottom-right-radius: 0px; border-bottom-left-radius: 0px; word-wrap: normal; background: transparent;"><span class="hljs-built_in" style="color: rgb(102, 0, 102); box-sizing: border-box;">sudo</span> apt-get remove libopenblas-base</code><ul class="pre-numbering" style="box-sizing: border-box; position: absolute; width: 50px; top: 0px; left: 0px; margin: 0px; padding: 6px 0px 40px; border-right-width: 1px; border-right-style: solid; border-right-color: rgb(221, 221, 221); list-style: none; text-align: right; background-color: rgb(238, 238, 238);"><li style="box-sizing: border-box; padding: 0px 5px;">1</li></ul>
然后在终端输入./digits-devserver,即可成功启动:
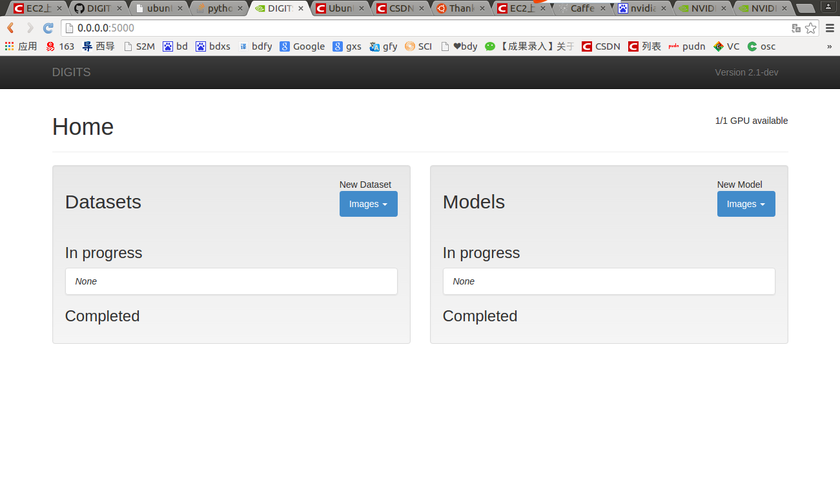
久违的界面终于出来了:
配置DIGITS
上述步骤,是按默认配置启动digits,如果你想自定义配置,可以在启动前输入:
<code class="language-bash hljs  has-numbering" style="display: block; padding: 0px; color: inherit; box-sizing: border-box; font-family: 'Source Code Pro', monospace;font-size:undefined; white-space: pre; border-top-left-radius: 0px; border-top-right-radius: 0px; border-bottom-right-radius: 0px; border-bottom-left-radius: 0px; word-wrap: normal; background: transparent;">Most values are <span class="hljs-keyword" style="color: rgb(0, 0, 136); box-sizing: border-box;">set</span> silently by default. If you need more control over your configuration, try one of these commands:
<span class="hljs-comment" style="color: rgb(136, 0, 0); box-sizing: border-box;"># Set more options before starting the server</span>
./digits-devserver --config
<span class="hljs-comment" style="color: rgb(136, 0, 0); box-sizing: border-box;"># Advanced usage</span>
python -m digits.config.edit --verbose</code><ul class="pre-numbering" style="box-sizing: border-box; position: absolute; width: 50px; top: 0px; left: 0px; margin: 0px; padding: 6px 0px 40px; border-right-width: 1px; border-right-style: solid; border-right-color: rgb(221, 221, 221); list-style: none; text-align: right; background-color: rgb(238, 238, 238);"><li style="box-sizing: border-box; padding: 0px 5px;">1</li><li style="box-sizing: border-box; padding: 0px 5px;">2</li><li style="box-sizing: border-box; padding: 0px 5px;">3</li><li style="box-sizing: border-box; padding: 0px 5px;">4</li><li style="box-sizing: border-box; padding: 0px 5px;">5</li></ul>
使用DIGITS
digits官方自带例子(MNIST)
参见GettingStarted或源码包中的“GettingStarted.md”文件。
下载MNIST数据集
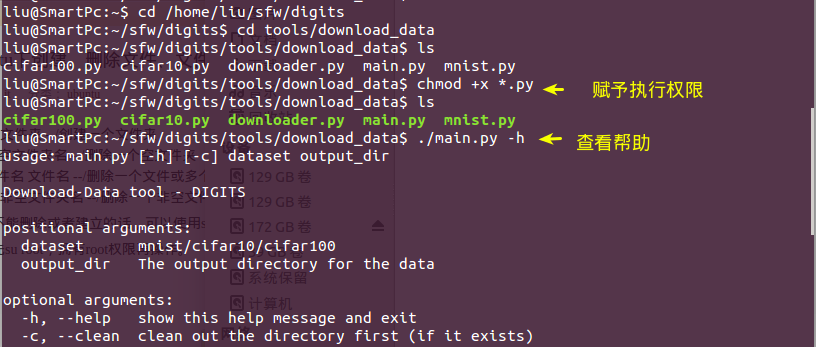
DIGITS提供了下载数据集MNIST和CIFAR的工具,在/digits/tools/download_data目录下,包含如下文件:
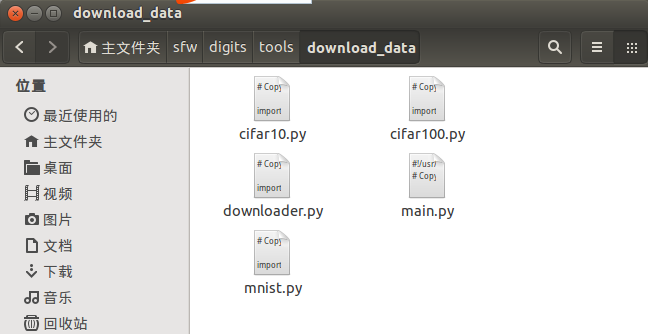
执行其中的main.py程序即可:
主要代码如下:
<code class="language-bash hljs has-numbering" style="display: block; padding: 0px; color: inherit; box-sizing: border-box; font-family: 'Source Code Pro', monospace;font-size:undefined; white-space: pre; border-top-left-radius: 0px; border-top-right-radius: 0px; border-bottom-right-radius: 0px; border-bottom-left-radius: 0px; word-wrap: normal; background: transparent;"><span class="hljs-comment" style="color: rgb(136, 0, 0); box-sizing: border-box;">#首次使用赋予执行权限</span>
chmod +x *.py
<span class="hljs-comment" style="color: rgb(136, 0, 0); box-sizing: border-box;">#查看帮助</span>
./main.py -h
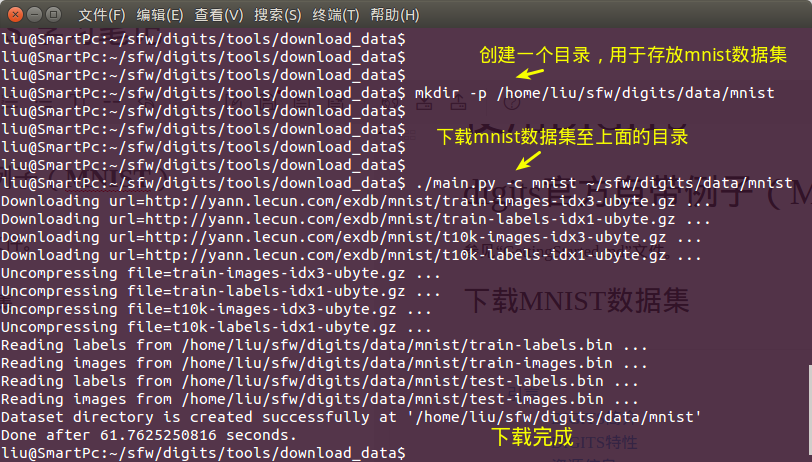
<span class="hljs-comment" style="color: rgb(136, 0, 0); box-sizing: border-box;">#创建一个目录用于存放MNIST数据集</span>
mkdir -p /home/liu/sfw/digits/data/mnist
<span class="hljs-comment" style="color: rgb(136, 0, 0); box-sizing: border-box;">#下载数据集至上述目录</span>
./main.py -c mnist ~/sfw/digits/data/mnist</code><ul class="pre-numbering" style="box-sizing: border-box; position: absolute; width: 50px; top: 0px; left: 0px; margin: 0px; padding: 6px 0px 40px; border-right-width: 1px; border-right-style: solid; border-right-color: rgb(221, 221, 221); list-style: none; text-align: right; background-color: rgb(238, 238, 238);"><li style="box-sizing: border-box; padding: 0px 5px;">1</li><li style="box-sizing: border-box; padding: 0px 5px;">2</li><li style="box-sizing: border-box; padding: 0px 5px;">3</li><li style="box-sizing: border-box; padding: 0px 5px;">4</li><li style="box-sizing: border-box; padding: 0px 5px;">5</li><li style="box-sizing: border-box; padding: 0px 5px;">6</li><li style="box-sizing: border-box; padding: 0px 5px;">7</li><li style="box-sizing: border-box; padding: 0px 5px;">8</li></ul>
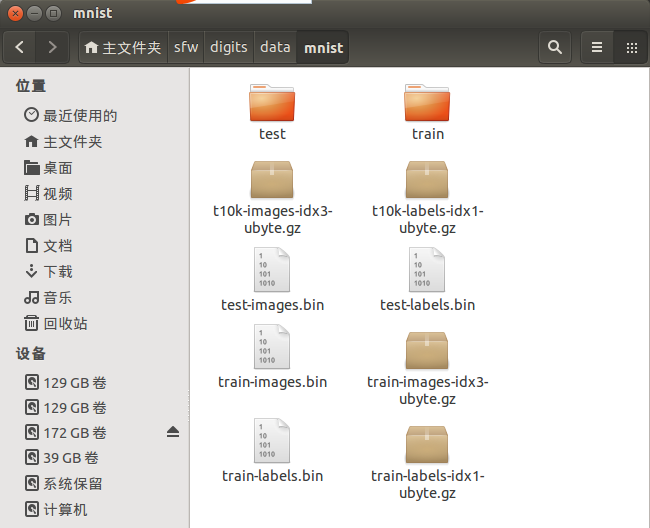
执行后,可以在/digits/data/mnist目录下看到下载好的数据集,如下图:
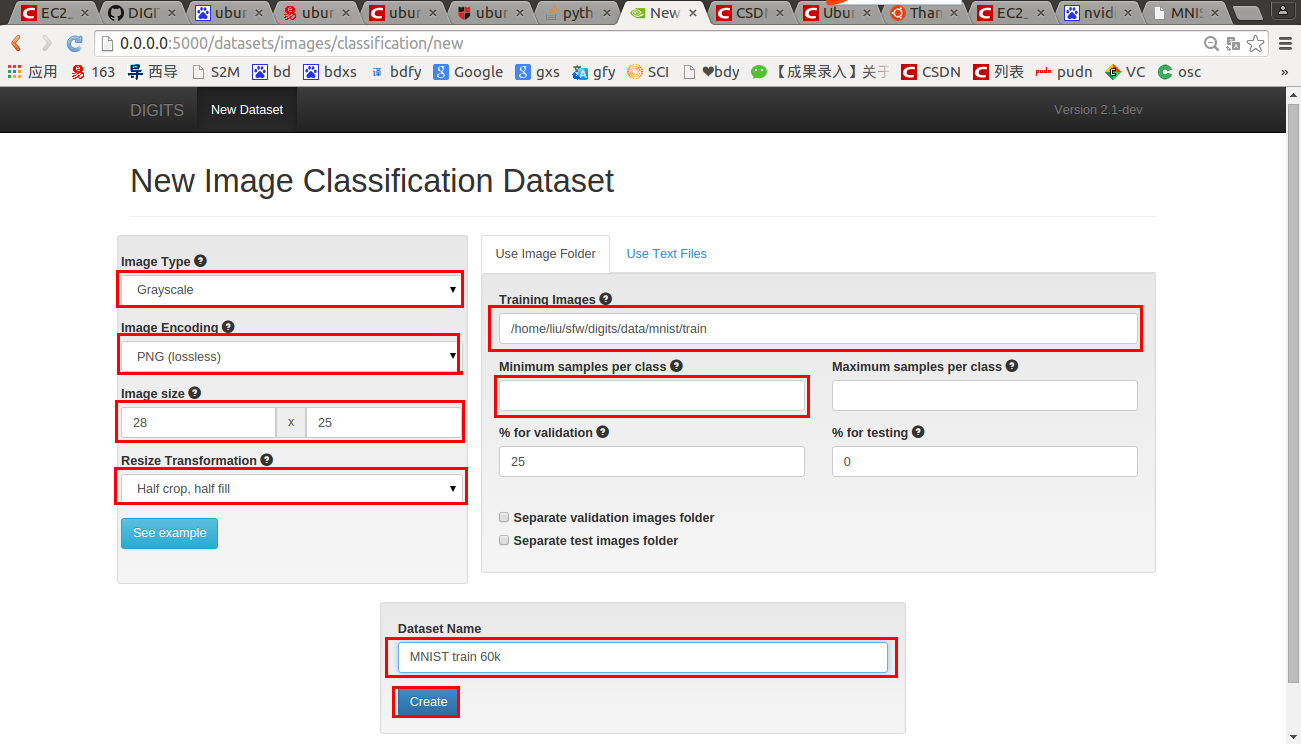
在DIGITS server上创建数据集
这里按照“GettingStarted.md”文件中所述,创建数据集为分类数据集:在digits server首页的DataSets区域点击Images,选择Classfication,在弹出的窗口填写训练数据集信息,这里为60000个样本(“GettingStarted.md”里的例子样本数为10k),信息见下图:
数据集创建过程:
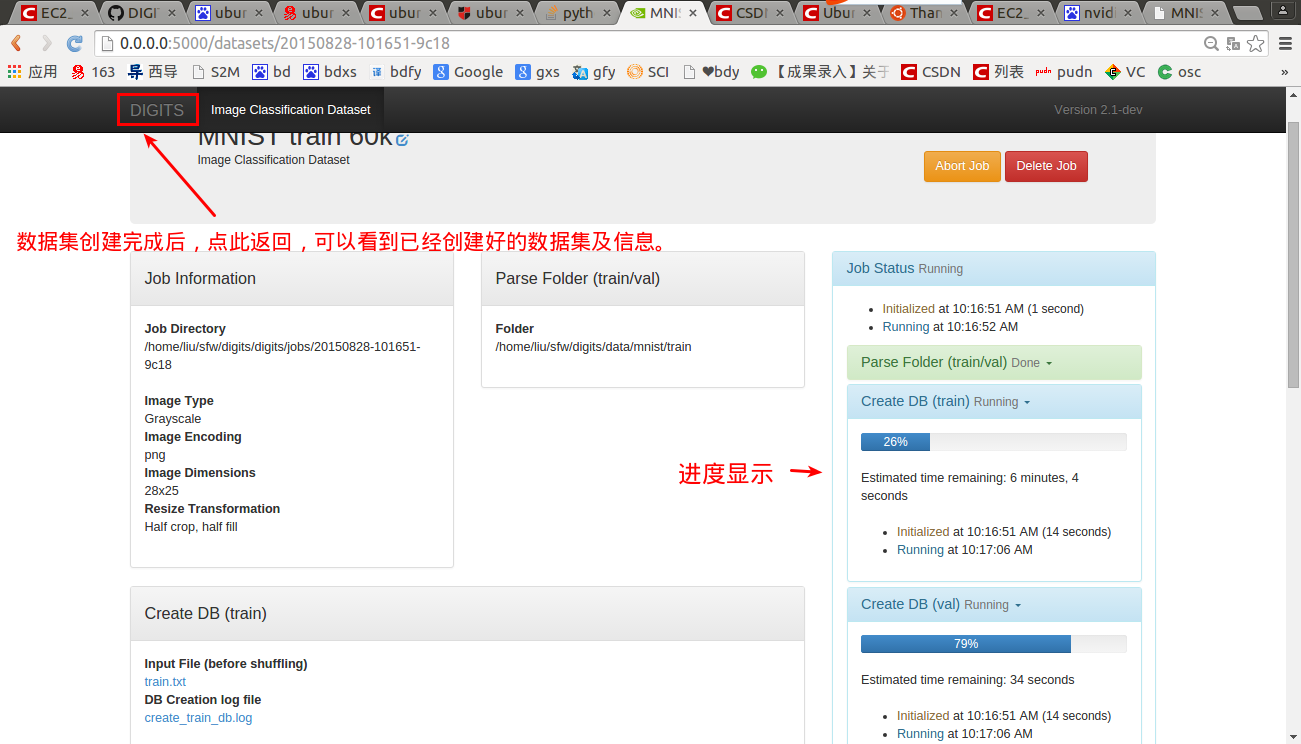
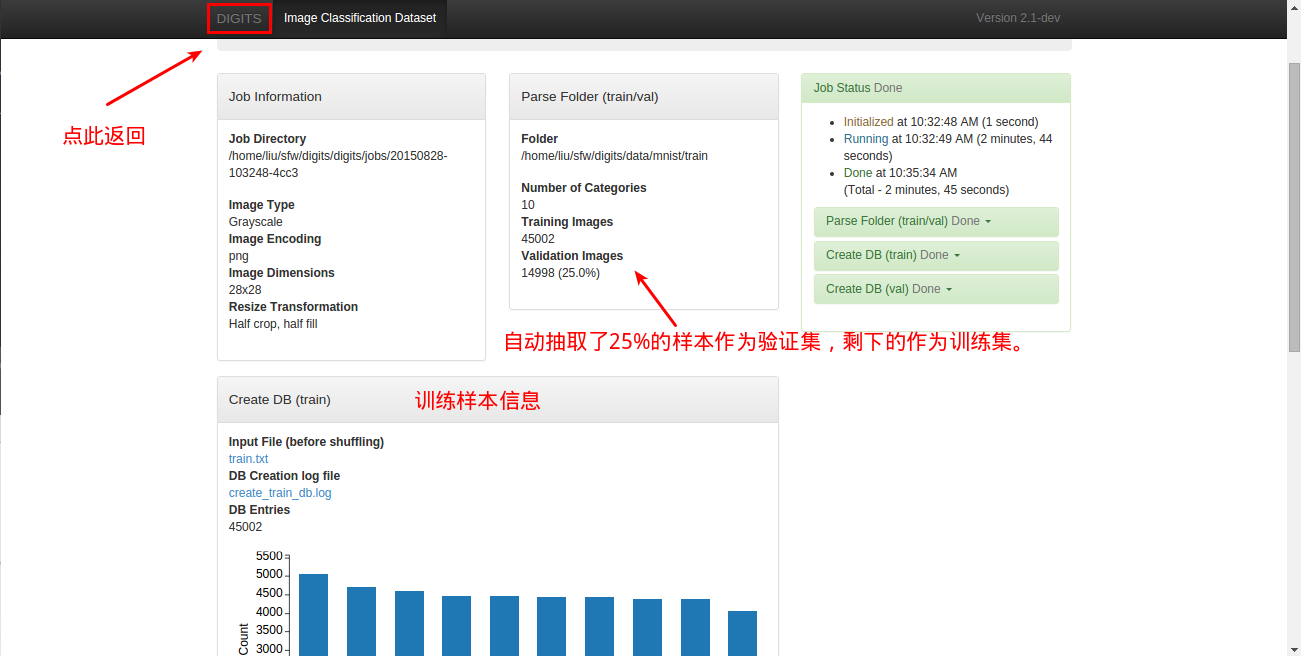
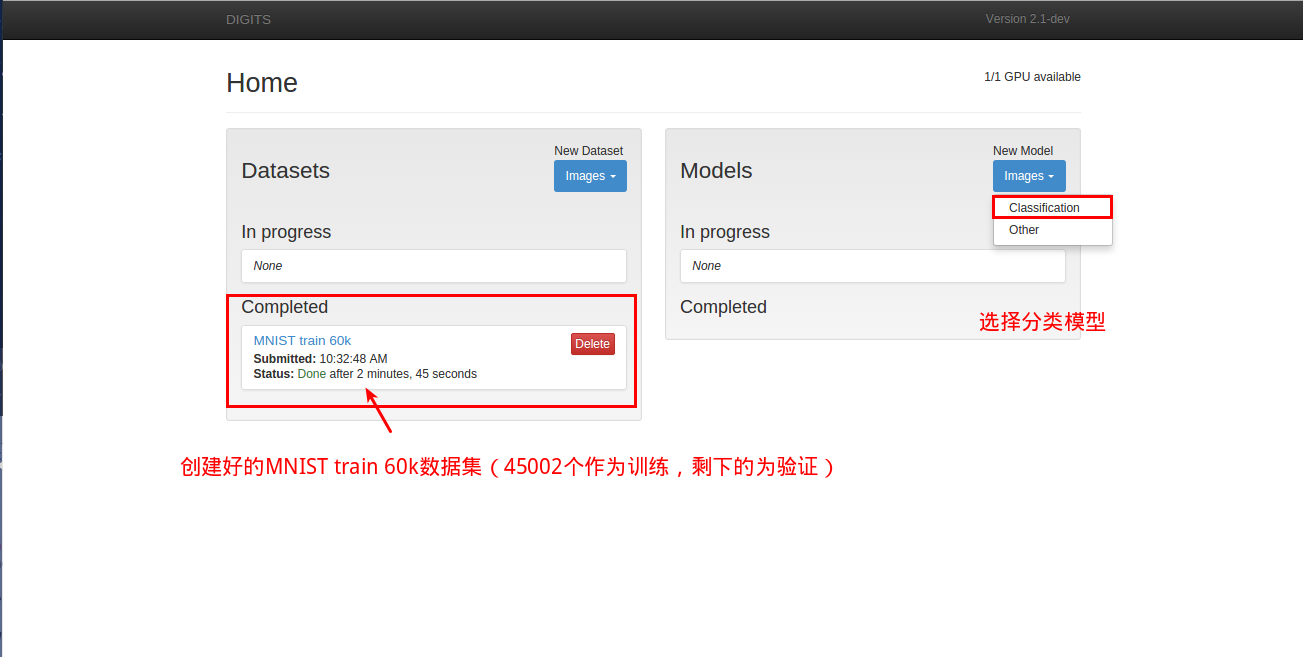
点击左上角的“DIGITS”返回查看创建好的MNIST train 60k数据集:
在DIGITS server上创建深度网络模型并训练
如上图,在Models区域点击Images,选择Classfication。在弹出的页面填写信息,数据集选择:MNIST train 60k,模型命名为:LeNet on MNIST 60k,如下图:
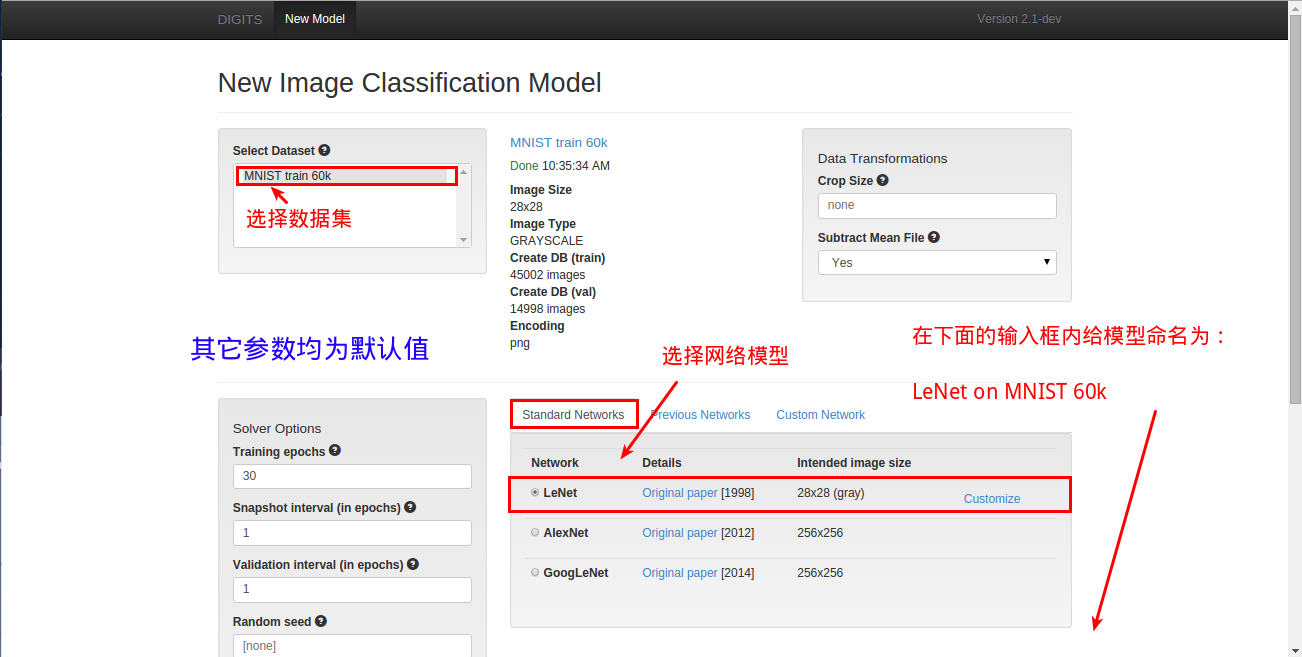
点击蓝色按钮“Create”后,任务即开始执行!
一个小问题(Caffe&cuDNN)
原以为可以兴奋地看到结果,然而失望了,报出了错误:
<code class="hljs http has-numbering" style="display: block; padding: 0px; color: inherit; box-sizing: border-box; font-family: 'Source Code Pro', monospace;font-size:undefined; white-space: pre; border-top-left-radius: 0px; border-top-right-radius: 0px; border-bottom-right-radius: 0px; border-bottom-left-radius: 0px; word-wrap: normal; background: transparent;"><span class="hljs-attribute" style="box-sizing: border-box;">ERROR</span>: <span class="hljs-string" style="color: rgb(0, 136, 0); box-sizing: border-box;">Check failed: status == CUDNN_STATUS_SUCCESS (6 vs. 0) CUDNN_STATUS_ARCH_MISMATCH</span></code><ul class="pre-numbering" style="box-sizing: border-box; position: absolute; width: 50px; top: 0px; left: 0px; margin: 0px; padding: 6px 0px 40px; border-right-width: 1px; border-right-style: solid; border-right-color: rgb(221, 221, 221); list-style: none; text-align: right; background-color: rgb(238, 238, 238);"><li style="box-sizing: border-box; padding: 0px 5px;">1</li></ul>
如下图:
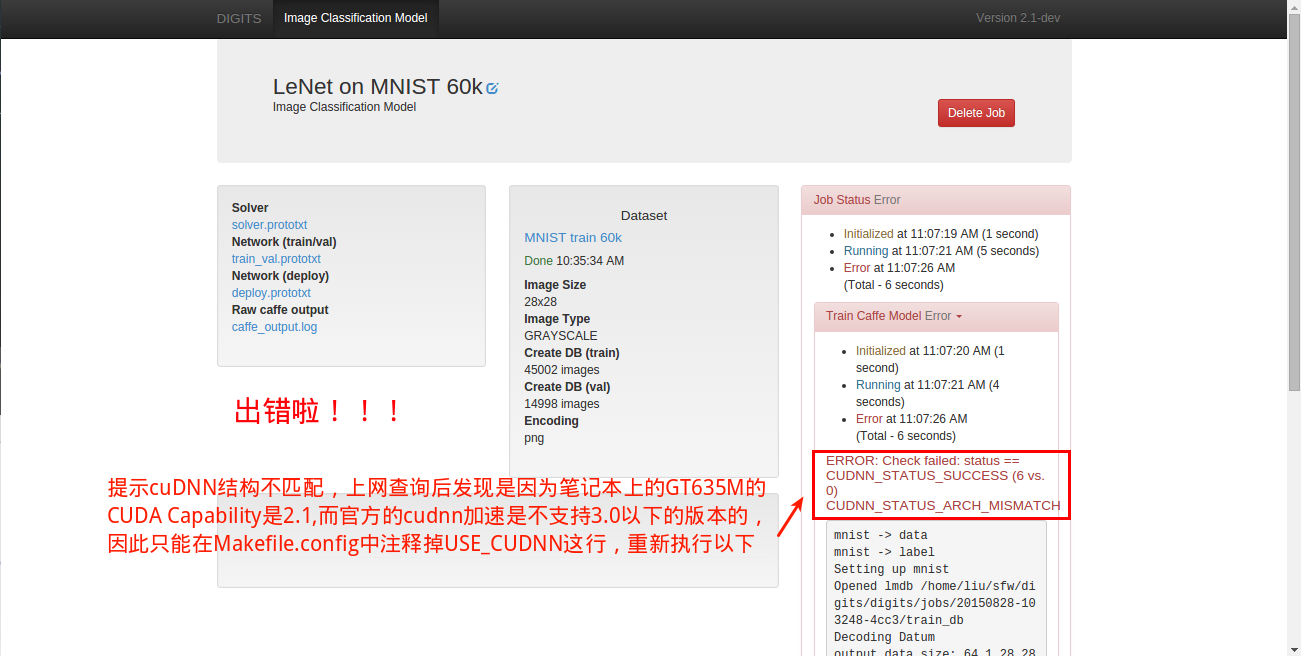
其实,在安装Caffe时,当运行make runtest时就有个小问题,报出了“Check failure”,不过让我直接忽略了,没想到又回来了,哈哈。
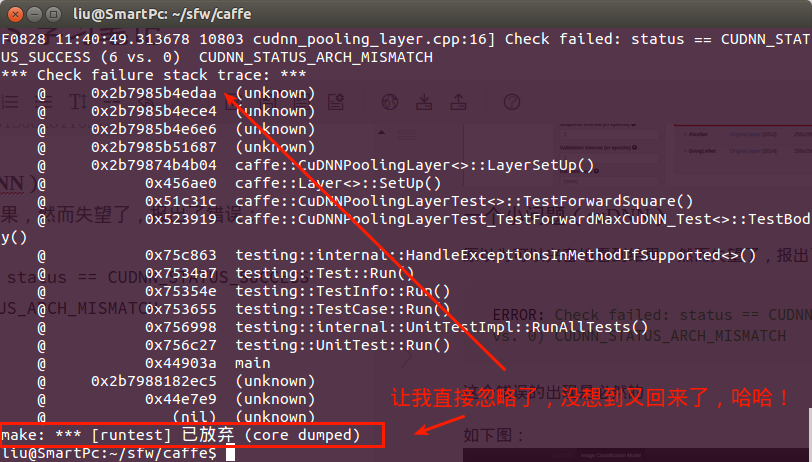
这是因为笔记本上的GT635M的计算能力CUDA Capability是2.1,而官方的cuDNN加速是不支持3.0以下的版本的,因此只能在Makefile.config中注释掉USE_CUDNN这行,重新执行以下编译。
<code class="language-bash hljs  has-numbering" style="display: block; padding: 0px; color: inherit; box-sizing: border-box; font-family: 'Source Code Pro', monospace;font-size:undefined; white-space: pre; border-top-left-radius: 0px; border-top-right-radius: 0px; border-bottom-right-radius: 0px; border-bottom-left-radius: 0px; word-wrap: normal; background: transparent;">make clean
make all -j4
make test -j4
make runtest -j4</code><ul class="pre-numbering" style="box-sizing: border-box; position: absolute; width: 50px; top: 0px; left: 0px; margin: 0px; padding: 6px 0px 40px; border-right-width: 1px; border-right-style: solid; border-right-color: rgb(221, 221, 221); list-style: none; text-align: right; background-color: rgb(238, 238, 238);"><li style="box-sizing: border-box; padding: 0px 5px;">1</li><li style="box-sizing: border-box; padding: 0px 5px;">2</li><li style="box-sizing: border-box; padding: 0px 5px;">3</li><li style="box-sizing: border-box; padding: 0px 5px;">4</li></ul>
注:访问CUDA GPUs查看GPU的计算能力,在页面选择GPU的型号,如Geforce GT 635M,如下图:

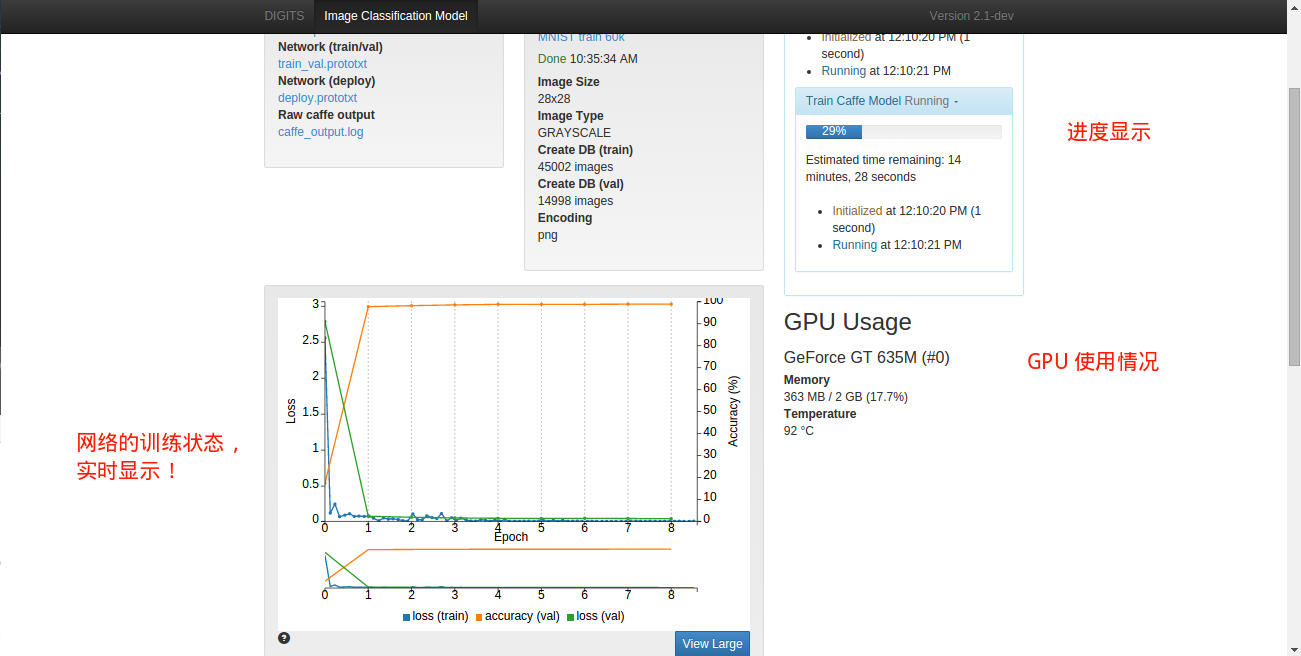
编译完成后,删除之前建的LetNet on MNIST 60k任务,然后仿造上述步骤,重新新建一个任务,执行后,如下图:
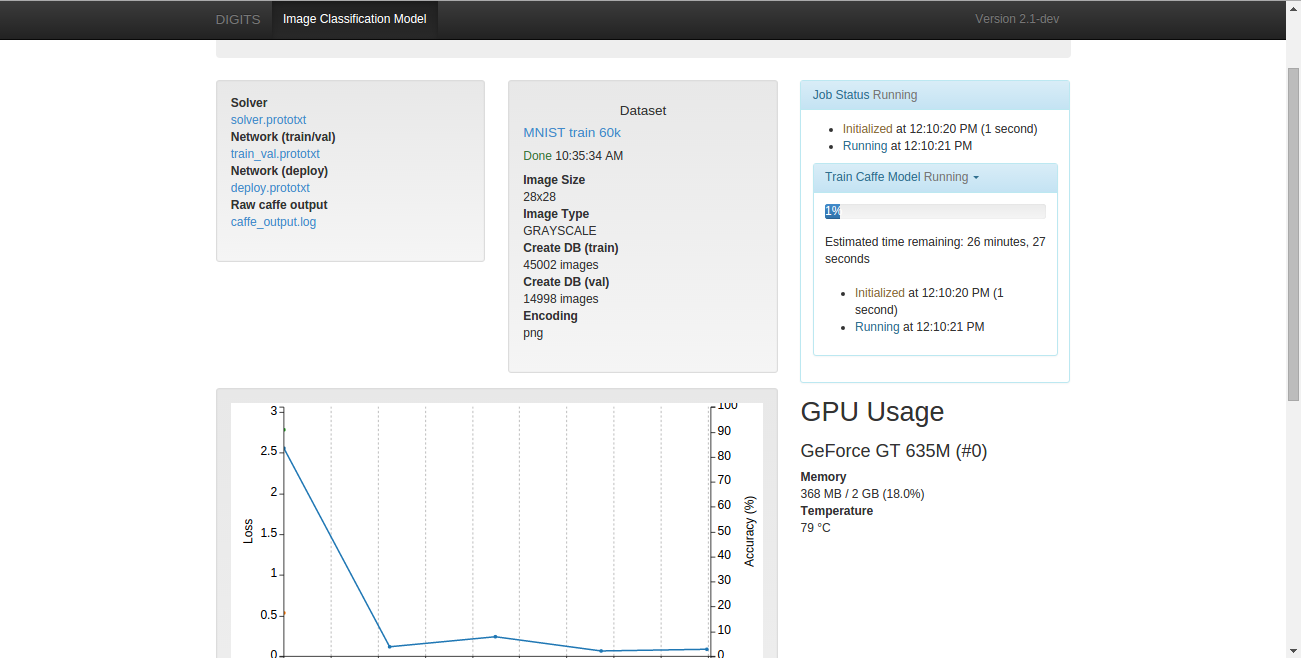
运行过程,网络的训练状态,GPU的状态等信息会实时显示:
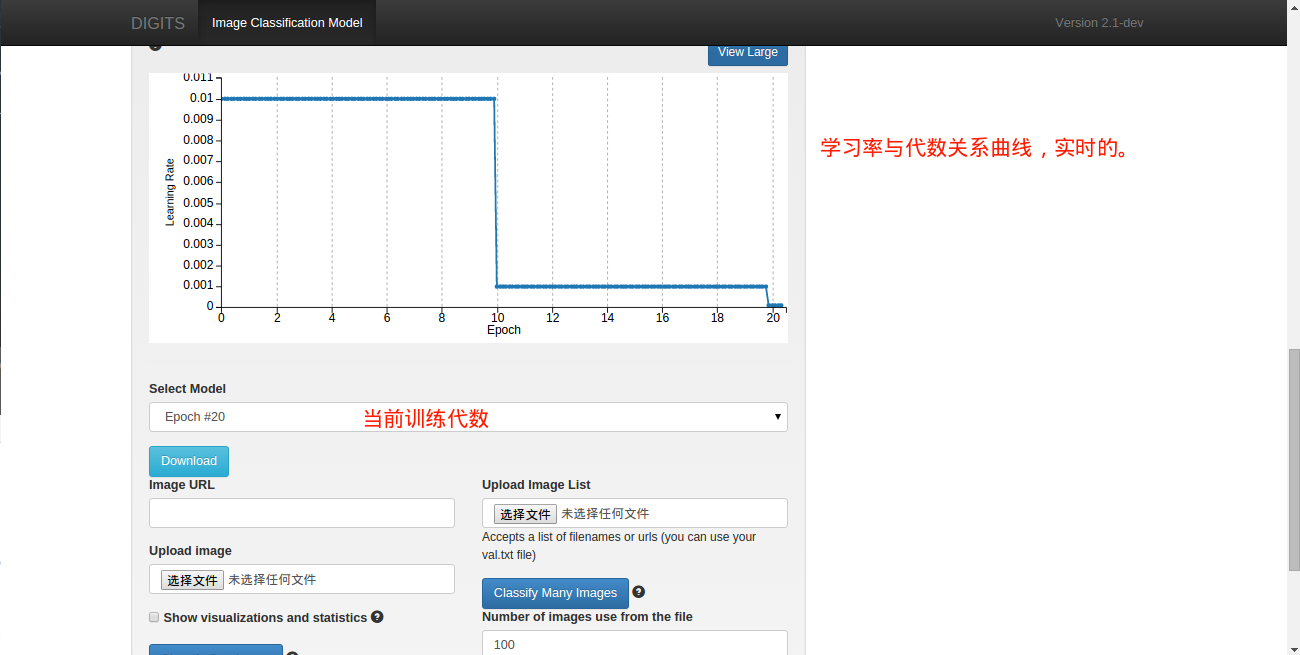
学习率与训练代数关系
使用DIGITS server 进行分类操作(MNIST)
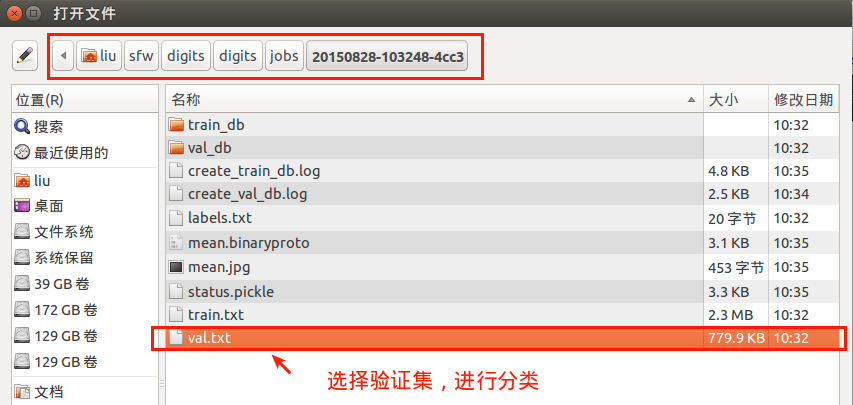
训练结束后,可以对手写体数字图像进行分类,可以对单个图像分类,也可以同时分类多幅图像,这里以上述步骤中生成的“MNIST train 60k”数据集中的验证集为例。
在“Upload Image List”区域点击选择文件按钮,选择验证集的 list文件val.txt:
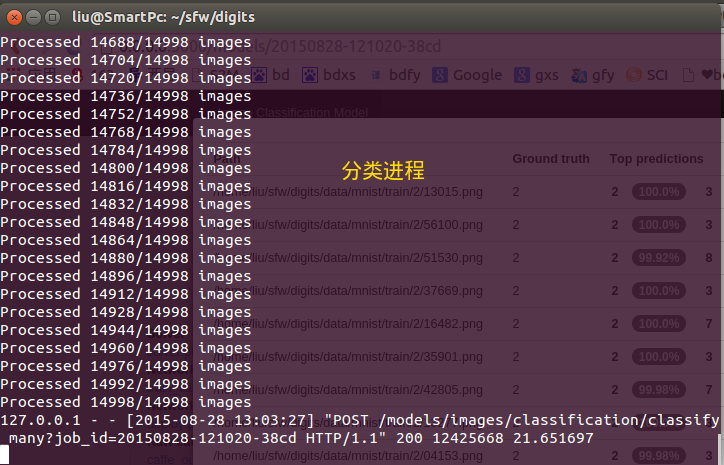
选择好后,点击Classify Many Images按钮,即可对多幅图像分类,这时,界面上没有显示进度,在终端中显示,如下图:
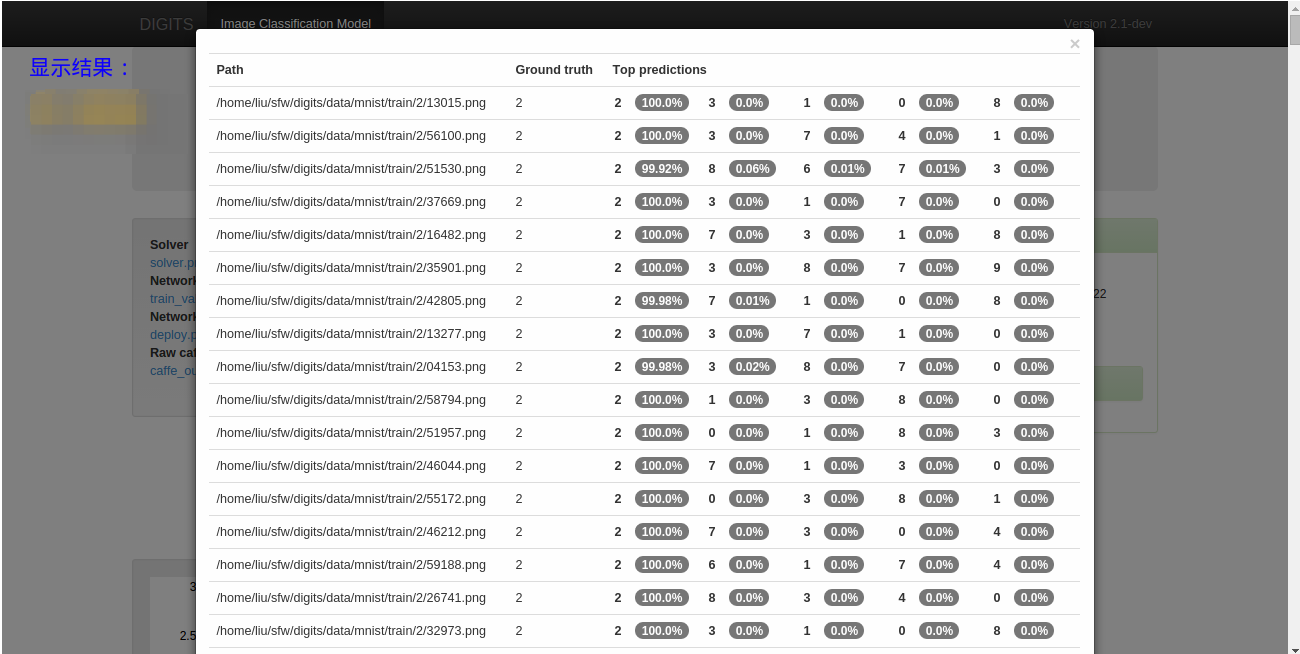
对所选图像分类完成后,弹出分类结果页面:
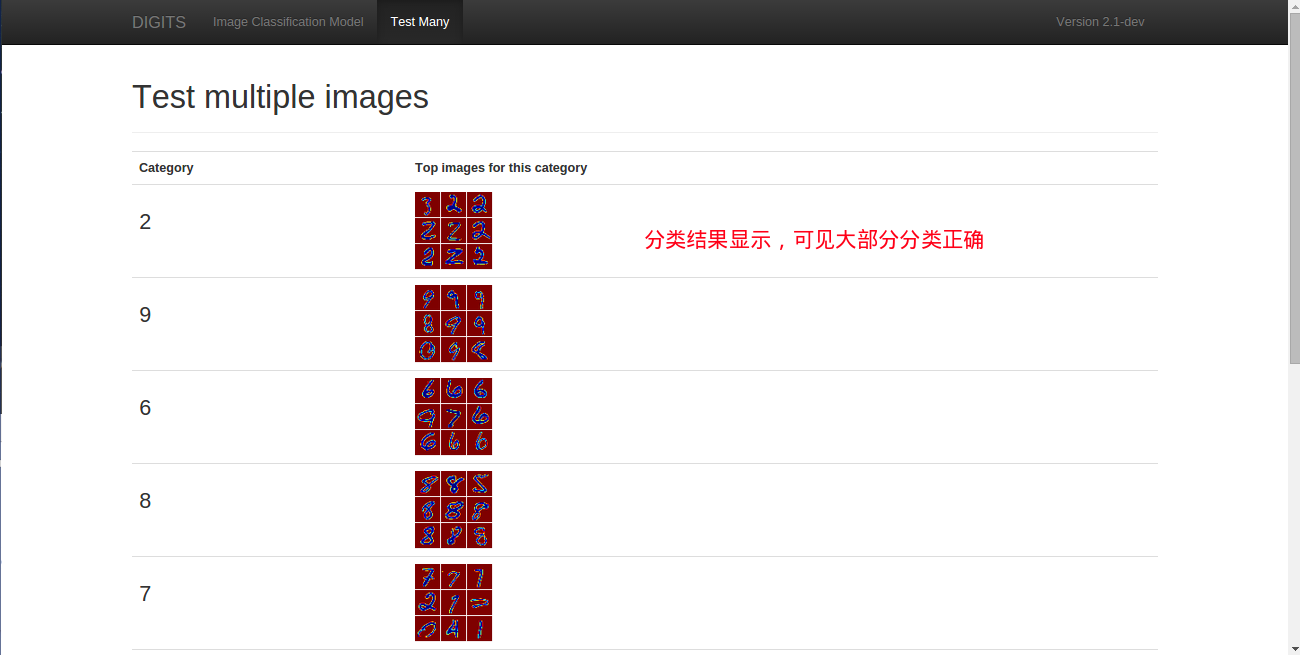
可视化分类结果:
结语
本文记录了本人安装配置NVIDIA DIGITS步骤与方法,软件环境为Ubuntu 14.04 + CUDA 7.0 + cuDNN 7.0 + Caffe 0.13.0 + DIGITS 2.0。并以DIGITS自述文件中的例子为例,简单介绍了DIGITS的用法。
可见,DIGITS的源码安装方式还是有一定难度,特别是对Linux不熟悉的使用者。DIGITS的使用很方便,只需进行简单的点击操作,即可完成数据集创建、网络模型创建、网络训练、网络训练状态的实时显示、用训练好的网络进行图像分类等任务,使得不熟悉深度学习的人员也可以在深度学习的大海中轻而易举地航行,这正式DIGITS的设计目的所在。
DIGITS除了支持Caffe,还支持Theano,本文并未介绍Theano,不过会陆续补充,关于Theano的一些信息,也可以在本人的其它博客里找到。


 2577
2577

 被折叠的 条评论
为什么被折叠?
被折叠的 条评论
为什么被折叠?
 到【灌水乐园】发言


