


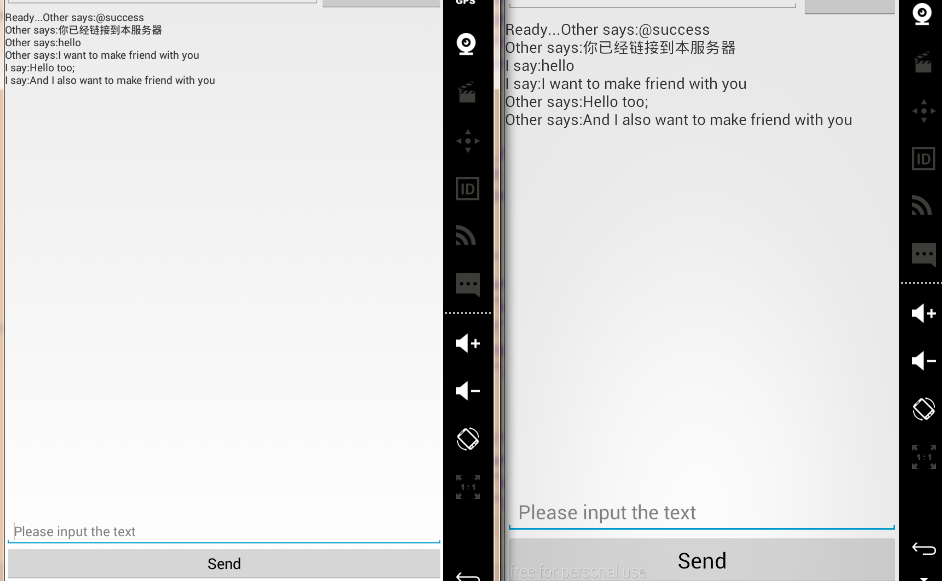
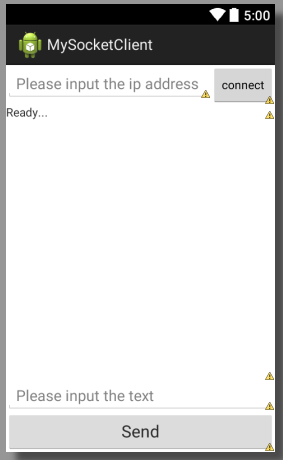
上篇博客是对socket服务端的笔记,而本文则是我对socket客户端的一些笔记,客户端是在Android手机上。先给大家看看最后的效果吧。
首先是界面代码:
activity_main.xml
<LinearLayout
    xmlns:android="http://schemas.android.com/apk/res/android"
    xmlns:tools="http://schemas.android.com/tools"
    android:layout_width="match_parent"
    android:layout_height="match_parent"
    android:orientation="vertical" >

    <LinearLayout
        android:layout_width="fill_parent"
        android:layout_height="wrap_content"
        android:orientation="horizontal"
        >
        <EditText
            android:id="@+id/ip_ed"
            android:layout_width="wrap_content"
            android:layout_height="wrap_content"
            android:inputType="text"
            android:hint="Please input the ip address"
            android:layout_weight="2"
            />
        <Button
            android:id="@+id/connect"
            android:layout_width="wrap_content"
            android:layout_height="wrap_content"
            android:layout_weight="1"
            android:textSize="14sp"
            android:text="connect"/>
    </LinearLayout>

    <ScrollView
        android:layout_width="match_parent"
        android:layout_height="wrap_content"
        android:layout_weight="5">
        <TextView
            android:id="@+id/display_text"
            android:layout_width="fill_parent"
            android:layout_height="fill_parent"
            android:text="Ready..."/>
    </ScrollView>

    <EditText
        android:id="@+id/send_text"
        android:layout_width="fill_parent"
        android:layout_height="wrap_content"
        android:inputType="text"
        android:hint="Please input the text"
        />

    <Button
        android:id="@+id/btn_send"
        android:layout_width="fill_parent"
        android:layout_height="wrap_content"
        android:text="Send"
        android:textSize="20sp"/>

</LinearLayout>
大概就长这样—
这里就不详述界面代码了,下面进入功能代码
MainActivity.java
import java.io.BufferedReader;
import java.io.BufferedWriter;
import java.io.IOException;
import java.io.InputStreamReader;
import java.io.OutputStreamWriter;
import java.net.Socket;
import java.net.UnknownHostException;

import android.app.Activity;
import android.os.AsyncTask;
import android.os.Bundle;
import android.view.Menu;
import android.view.MenuItem;
import android.view.View;
import android.widget.Button;
import android.widget.EditText;
import android.widget.TextView;
import android.widget.Toast;

public class MainActivity extends Activity {

    EditText ip;
    EditText input_text;
    TextView text;
    Button btn_connect, btn_send;

    @Override
    protected void onCreate(Bundle savedInstanceState) {
        super.onCreate(savedInstanceState);
        setContentView(R.layout.activity_main);

        ip = (EditText) findViewById(R.id.ip_ed);
        input_text = (EditText) findViewById(R.id.send_text);

        text = (TextView) findViewById(R.id.display_text);
        btn_connect = (Button) findViewById(R.id.connect);
        btn_send = (Button) findViewById(R.id.btn_send);

        btn_connect.setOnClickListener(new View.OnClickListener() {

            @Override
            public void onClick(View v) {
                connect();
            }
        });

        btn_send.setOnClickListener(new View.OnClickListener() {

            @Override
            public void onClick(View v) {
                send();
            }
        });
    }

    /*******************************************************/

    Socket socket = null;
    BufferedWriter writer = null;
    BufferedReader reader = null;

    public void connect() {
        AsyncTask<Void, String, Void> read = new AsyncTask<Void, String, Void>() {

            @Override
            protected Void doInBackground(Void... params) {
                try {
                    socket = new Socket(ip.getText().toString(), 12345);
                    writer = new BufferedWriter(new OutputStreamWriter(
                            socket.getOutputStream()));
                    reader = new BufferedReader(new InputStreamReader(
                            socket.getInputStream()));
                    publishProgress("@success");
                } catch (UnknownHostException e) {
                    Toast.makeText(MainActivity.this,
                            "Can't Connect the Server", Toast.LENGTH_LONG)
                            .show();
                } catch (IOException e) {
                    Toast.makeText(MainActivity.this,
                            "Can't Connect the Server", Toast.LENGTH_LONG)
                            .show();
                }

                try {
                    String line;
                    while ((line = reader.readLine()) != null) {
                        publishProgress(line);
                    }
                } catch (IOException e) {
                    e.printStackTrace();
                }

                return null;
            }

            @Override
            protected void onProgressUpdate(String... values) {
                if (values[0].equals("@success")) {
                    Toast.makeText(MainActivity.this, "Success to connect",
                            Toast.LENGTH_LONG).show();
                }
                text.append("Other says:" + values[0] + "\n");
                super.onProgressUpdate(values);
            }
        };
        read.execute();
    }

    public void send() {
        try {
            text.append("I say:" + input_text.getText().toString() + "\n");
            writer.write(input_text.getText().toString() + "\n");
            writer.flush();
            input_text.setText("");
        } catch (IOException e) {
            e.printStackTrace();
        }
    }
}
这里的重点就是两个button按钮事件,一个是连接操作,一个是发送操作。发送操作非常简单,即将EditText中的字符输出到加到TextView.text中去即可,当然你还必须将其写入到缓冲中去,因为其他的socket用户也要能接收到你发送的信息。最后flush()刷新下缓冲区的数据。
连接操作则首先是要创建一个socket,IP地址为本机的IP地址,端口号为服务端设置的端口号,这里又涉及的Android中一个非常重要的知识点AsyncTask,这里我不解释,之后我认真学习后再整理下笔记。这里就简单提下原理,doInBackground()完成读写缓冲区的数据,第一次连接会将@success这个字符串通过函数publishProgress传递给onProgressUpdate(),再通过该函数更新UI线程。由于我是在AsyncTask中创建了一个新的socket,就我们所知这个socket相当于ChatSocket是一个线程,故只要线程未结束,这个AsyncTask便一直在后台运行着,这时需要对socket通信有所了解,不了解的同学可以看 Android的socket通信
这张图还是要给大家看的
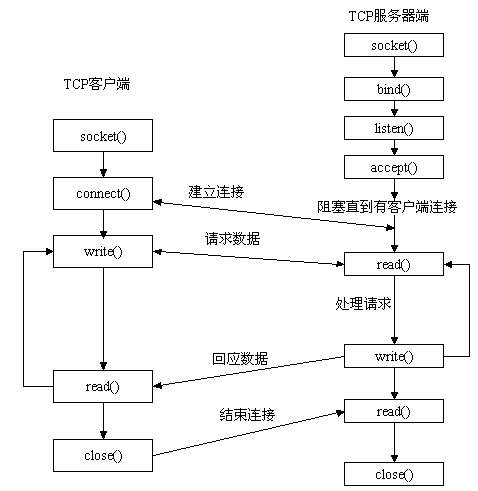
我们在代码中可以看到每次某个客户发送数据的时候都会使用到write(),向服务端请求了一个数据,然后服务端处理请求后会write()【见Android中socket的实例分析(一)的out()】。故onProgressUpdate()每次都会read()一个values[0]输出。
至此Android关于Socket的学习就告一段落了。


 693
693

 被折叠的 条评论
为什么被折叠?
被折叠的 条评论
为什么被折叠?
 到【灌水乐园】发言


