


迁移wordpress
WordPress.com is a limited version of WordPress run by Automattic. Here, you can create a blog or website in moments without worrying about hosting and managing your WordPress. However, to use many more complex plugins and functionality, and to have the full breadth of customization you desire, you may at some point decide to use the full WordPress platform available from WordPress.org and “self-host” it – host it on your own server, or pay a company for hosting services.
WordPress.com是由Automattic运行的WordPress的受限版本。 在这里,您可以立即创建博客或网站,而不必担心托管和管理WordPress。 但是,要使用许多更复杂的插件和功能,并拥有所需的完整自定义范围,您可能会在某个时候决定使用WordPress.org上提供的完整WordPress平台并对其进行“自我托管” –将其托管在您自己的服务器,或向公司付费以提供托管服务。
Moving your blog from the “managed hosting” at WordPress.com to a self-hosted installation of the full WordPress platform requires a little planning, and some time, but can definitely be worth it in the end.
将您的博客从WordPress.com上的“托管托管”迁移到完整WordPress平台的自托管安装需要一些计划,并且需要一些时间,但最终绝对值得。
For the most part, getting your content out of WordPress.com is a fairly easy task. What is not easy, though, is matching your design from WordPress.com, and trying to replicate what you had on that platform on the new one.
在大多数情况下,将内容从WordPress.com中删除是一件相当容易的事情。 不过,不容易的是匹配WordPress.com上的设计,并尝试在新平台上复制该平台上的内容。
If you happened to choose one of the themes that are built for WordPress.com by the team at Automattic, then you may be out of luck if it’s not available in the WordPress.org repository. Consider launching a new theme design for your site along with the move. However, if that’s not an option and you are very attached to your current WordPress.com site’s appearance, there are two ways you can go about replicating this look on your own hosting.
如果您碰巧选择了Automattic团队为WordPress.com构建的主题之一,那么如果WordPress.org存储库中没有该主题,那么您可能会很走运。 考虑在迁移过程中为您的网站启动新的主题设计。 但是,如果这不是一个选择,并且您对当前WordPress.com网站的外观非常满意,则可以通过两种方法在自己的主机上复制此外观。
- The first way is to look for a free or paid version of a theme which is as close in design as possible to the one you chose originally, and then setup a child theme to modify the CSS to get it looking as similar as you can to the old one. 第一种方法是寻找主题的免费或付费版本,该主题在设计上与您最初选择的主题尽可能接近,然后设置子主题以修改CSS,以使其外观与您想要的相似。旧的。
- The second way is to hire a developer and get a theme custom-coded for you to match your original design. 第二种方法是聘请开发人员,并为您自定义编码的主题以匹配您的原始设计。
As for exporting other features, some, like menus, are only possible if you export using the “all content” option, and will require minor tweaks upon import to the new WordPress installation. Most plugins that you had before (and thousands more) can be found in the WordPress.org repository, and with thanks to the Jetpack plugin, you can enable the social functions, subscriber, and statistics from WordPress.com. This will allow you to take advantage of the desktop and mobile apps to help publish and manage your site on the go.
至于导出其他功能,某些功能(如菜单)仅在使用“所有内容”选项进行导出时才可行,并且在导入到新的WordPress安装中时需要进行一些细微调整。 您以前拥有的大多数插件(以及成千上万种)都可以在WordPress.org存储库中找到,并且借助Jetpack插件,您可以从WordPress.com启用社交功能,订阅者和统计信息。 这将使您能够利用台式机和移动应用程序来随时随地发布和管理您的网站。
There are some elements that are not currently possible to export: custom fonts, widgets, and some site settings (such as the site permalink structure). For the most part, you will be able to replace the fonts with something similar after the content import, or even use a fonts plugin or custom inclusion to add the same one back in. You will read about handling the migration of your permalink structure later in this post.
当前无法导出某些元素:自定义字体,小部件和某些站点设置(例如站点永久链接结构)。 在大多数情况下,导入内容后,您将能够用类似的字体替换字体,甚至可以使用字体插件或自定义包含来添加相同的字体。稍后,您将了解有关处理永久链接结构的信息。在这篇文章中。
Lastly, if you used a custom domain name on WordPress.com and will be using it with the new site as well, don’t forget to change your name servers, or even transfer the domain name away from WordPress.com to another provider so you can continue to use the domain for the future without needing to login to WordPress.com to alter settings.
最后,如果您在WordPress.com上使用了自定义域名,并且还将在新网站上使用它,请不要忘记更改名称服务器,甚至将域名从WordPress.com转移到另一个提供商,因此您可以在将来继续使用该域,而无需登录WordPress.com更改设置。
In order to do the export in the quickest amount of time, this step-by-step guide requires two things. The first is a functioning site on WordPress.com that contains at least one blog post or page (so we have something to export), preferably with images uploaded and embedded in the post. The second is a new WordPress install on your favorite hosting provider.
为了在最短的时间内完成导出,此分步指南需要两件事。 第一个是WordPress.com上的正常运行站点,其中至少包含一个博客帖子或页面(因此我们有一些要导出的内容),最好在帖子中上传并嵌入图像。 第二个是您最喜欢的托管服务提供商上的新WordPress安装。
入门 (Getting Started)
First, log in to your WordPress.com account.
首先,登录到您的WordPress.com帐户。
First you need to make sure your site has been set to “public”. This gives the necessary permissions that allow the import on your installation to download the images and other media attached in the posts and pages. Without this step, you will need to access your media library, and download a copy of each item in the media library and manually upload and reattach to each post and page (a time consuming job).
首先,您需要确保您的网站已设置为“公开”。 这将提供必要的权限,以允许安装上的导入下载帖子和页面中附带的图像和其他媒体。 没有此步骤,您将需要访问媒体库,并下载媒体库中每个项目的副本,然后手动上传并重新附加到每个帖子和页面上(这是一项耗时的工作)。
To do this go to My Site > Settings > Privacy, and select Public, then save settings.
为此,请转到我的网站>设置>隐私,然后选择公开,然后保存设置。
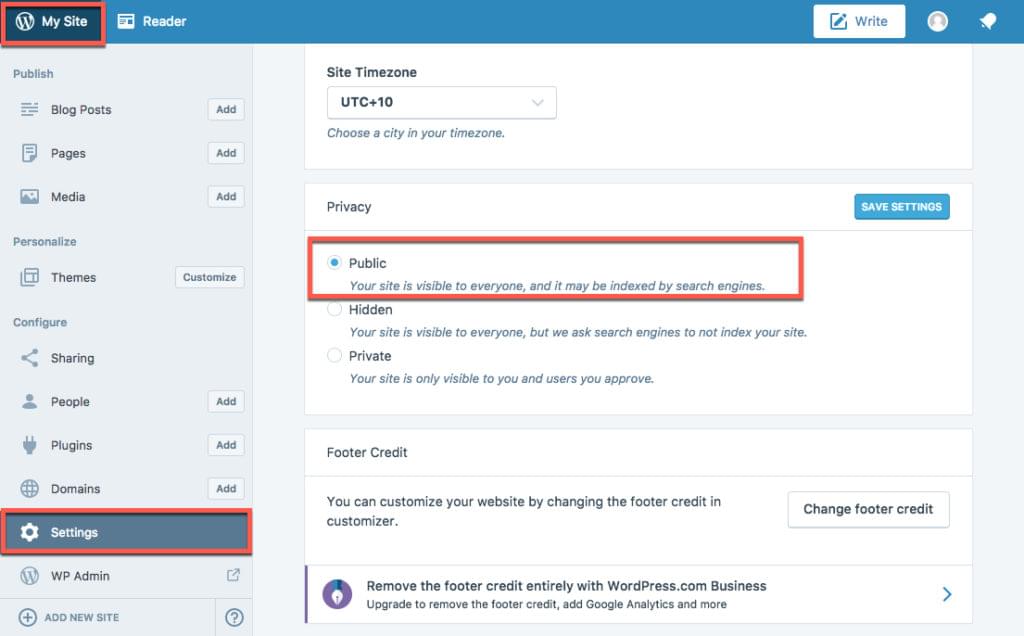
Note that the above image is of my own WordPress.com account where I manage a few different sites. From this account dashboard, you can also perform exports. The only difference is the fact that WordPress sends an email with a link to the finished file for download.
请注意,上图是我自己的WordPress.com帐户,在其中我管理着几个不同的站点。 您也可以从此帐户仪表板执行导出。 唯一的区别是WordPress发送一封带有完成文件链接的电子邮件供下载。
After accessing the admin area of the particular site in question, under the “Tools” menu, select the submenu “Start Export”.
访问相关站点的管理区域后,在“工具”菜单下,选择子菜单“开始导出”。

From here you will need to decide what exactly you would like to export. You could export all elements in one go, but for bigger sites, I recommend splitting this up, and only exporting portions of the site at once (i.e. pages, then posts), and for even bigger sites, exporting based on authors, or published posts followed by drafts, etc. The key here is to plan what to export, and then manage the files for importing.
从这里,您将需要确定要导出的内容。 您可以一次性导出所有元素,但对于较大的网站,我建议将其拆分,仅一次导出网站的一部分(即页面,然后是帖子),对于较大的网站,建议根据作者导出或发布帖子,然后是草稿等。此处的关键是计划要导出的内容,然后管理要导入的文件。

There are elements that you won’t have on your self-installed sites. If you don’t wish to install the Jetpack plugin, for instance, exporting the Feedback, Testimonial, or Projects/Portfolio sections will be unnecessary. They are part of WordPress.com (and of the Jetpack plugin on self-hosted WordPress) and not a standard part of the WordPress platform.
在您自己安装的网站上没有的元素。 例如,如果您不想安装Jetpack插件,则无需导出“反馈”,“个人鉴定”或“项目/投资组合”部分。 它们是WordPress.com(以及自托管WordPress上的Jetpack插件)的一部分,而不是WordPress平台的标准部分。
If you did want a portfolio section and have original content in your WordPress.com site, but didn’t want to use Jetpack, because of differences in table names, I suggest installing Jetpack for the migration, then afterwards install your prefered portfolio plugin, and copy and paste content into the new area. After that, you could delete Jetpack’s content before finally deactivating and uninstalling the unwanted plugin.
如果您确实想要一个投资组合部分并在WordPress.com网站上拥有原始内容,但又不想使用Jetpack,由于表名的差异,我建议安装Jetpack进行迁移,然后再安装首选的投资组合插件,并将内容复制并粘贴到新区域。 之后,您可以删除Jetpack的内容,然后最后停用并卸载不需要的插件。
By default, you won’t see the testimonial and Projects sections in the export list, if they aren’t enabled in the settings page, so don’t worry if you don’t have them enabled. If you weren’t using them, then they will not be included in the export of “all content” or individual exports.
默认情况下,如果在“设置”页面中未启用“鉴定”和“项目”部分,则不会在导出列表中看到它们,因此请不要担心是否未启用它们。 如果您不使用它们,则它们将不会包含在“所有内容”的导出或单个导出中。

One main reason I recommend splitting out the posts from the pages for larger sites is that sometimes the images don’t get imported correctly, or they get corrupted in some way. So, breaking it down into sections makes for easier troubleshooting if required, and less wasted time from having to delete all posts and pages and start again. But the caveat to this is that you can’t export menus separately – the only option is via the “all content” export feature if you need to export and import your menus rather than rebuilding them.
我建议从较大网站的页面上拆分帖子的主要原因之一是,有时图像无法正确导入,或者它们以某种方式被破坏。 因此,将其分为几个部分,可以在需要时更轻松地进行故障排除,并减少了必须删除所有帖子和页面并重新开始的浪费时间。 但是需要注意的是,您不能单独导出菜单-唯一的选择是通过“所有内容”导出功能,如果您需要导出和导入菜单而不是重建菜单。
Just make your selection, and click “Download Export File”. There really is no right or wrong here, if you don’t like the import, just dump and delete the posts/pages, and create a new export file and do it again.
只需做出选择,然后单击“下载导出文件”。 如果您不喜欢导入,那么这里确实没有对与错,只要转储并删除帖子/页面,然后创建一个新的导出文件,然后再做一次即可。
An XML file will be downloaded to your computer.
XML文件将下载到您的计算机。
使用导出的数据从WordPress.com迁移 (Migrating from WordPress.com Using Your Exported Data)
Now that you have made sure your old site is public accessible and you have your exported content, log in to your new hosted WordPress website. For best results, install the theme and plugins that add the same functionality as your old site. You also need to change the permalink settings to match your WordPress.com site structure for the blog.
现在,您已经确保旧站点可以公共访问并且您拥有导出的内容,请登录到新的托管WordPress网站。 为了获得最佳结果,请安装与旧站点添加相同功能的主题和插件。 您还需要更改永久链接设置,以匹配博客的WordPress.com网站结构。
Change the settings to day and name, this matches the default WordPress.com permalink structure. If in the future you want to change this, you should also setup a 301 redirect plugin, add a header and footer plugin to insert your Google Analytics tracking codes, and setup a Google Search Console account to monitor broken links, and old page structures that need redirecting or creation, as well as other important notifications from Google about your site, this ultimately will help the search engines and users find the changed URLs. But during the import, you’ll want things to work as similarly to your old WordPress.com site as possible for simplicity’s sake.
将设置更改为日期和名称,这与默认的WordPress.com永久链接结构匹配。 如果将来要更改此设置,则还应该设置301重定向插件,添加页眉和页脚插件以插入Google Analytics(分析)跟踪代码,并设置Google Search Console帐户以监控断开的链接以及需要重定向或创建,以及Google关于您网站的其他重要通知,这最终将帮助搜索引擎和用户找到更改的URL。 但是在导入过程中,为简单起见,您将希望事情与旧的WordPress.com网站尽可能类似。

Now it is time to import your content! To do this, navigate to “Tools” then “Import”. The first time you do this, you will install the WordPress importer plugin. The next time you use it, you will just see “Run Importer”.
现在是时候导入您的内容了! 为此,请导航至“工具”,然后导航至“导入”。 首次执行此操作时,将安装WordPress导入程序插件。 下次使用它时,您只会看到“ Run Importer”。

Select your XML file from your computer, and click “upload file and import”.
从计算机中选择XML文件,然后单击“上传文件并导入”。

You are immediately presented with the ability import the existing users into the site (select nothing), to assign the posts to a new user (enter a new username) or to assign it to your admin user. Be careful here; if you have more than one author you need to select nothing, so that all previous authors are added to the site, with their correct posts assigned to them. Choosing a user will override any previous author information from the export.
您将立即获得将现有用户导入站点(不选择任何内容),将帖子分配给新用户(输入新用户名)或将其分配给管理员用户的能力。 这里要小心 ; 如果您有一位以上的作者,则无需选择任何内容 ,以便将所有以前的作者添加到该网站,并为其分配正确的帖子。 选择用户将覆盖导出中所有以前的作者信息。
In this example, I have only one user, and don’t wish to make another user, but instead want to re-assign all posts and pages to my new admin user. In the highlighted box below, I will select my current admin user. Also tick “Download and import file attachments”, this is needed to get your media out of your WordPress.com account into your new media library.
在此示例中,我只有一个用户,并且不希望再成为另一个用户,而是希望将所有帖子和页面重新分配给我的新管理员用户。 在下面突出显示的框中,我将选择当前的管理员用户。 还要勾选“下载并导入文件附件”,这是将媒体从WordPress.com帐户移至新媒体库所必需的。
Now hit submit and wait and wait till you see the next notification. The time this will take depends on how much content you have, the size and quantity of your media, and other networking factors of your hosting platform.
现在点击提交并等待,直到您看到下一个通知。 这将花费的时间取决于您拥有多少内容,媒体的大小和数量以及托管平台的其他网络因素。

When it has finished importing it will remind you to update any imported users. By default, as a security measure all new imported users will be made “Subscribers”. You can then change their roles, passwords, etc from the Users section.
导入完成后,它将提醒您更新所有导入的用户。 默认情况下,作为一项安全措施,所有新导入的用户都将被称为“订户”。 然后,您可以从“用户”部分更改其角色,密码等。

We are almost done, now we need to verify things went smoothly and the next steps needed to get everything running right.
我们差不多完成了,现在我们需要验证一切是否顺利进行,以及下一步需要一切正常运行。
First, double-check that the correct number of posts and pages and other custom post types are now inside your new site.
首先,仔细检查新站点中现在是否包含正确数量的帖子和页面以及其他自定义帖子类型。

Then check that the images and attachments were imported into your media library.
然后检查图像和附件是否已导入媒体库。

Create the menu (or assign the menu to the correct area in the theme if you imported it), assign widgets, and copy over any data that was in your widget areas from the old WordPress.com site, because as noted above, this is not included in the export file.
创建菜单(如果导入菜单,则将菜单分配给主题中的正确区域),分配窗口小部件,并复制旧WordPress.com网站中窗口小部件区域中的任何数据,因为如上所述,这是不包含在导出文件中。
Lastly we need to verify that the images embedded in your posts are actually loaded from your new site’s media library, and not still being loaded from the WordPress.com site.
最后,我们需要验证您帖子中嵌入的图像是否实际上是从新网站的媒体库中加载的,而仍不是从WordPress.com网站中加载的。
To do this, I first check that the site loads on the frontend and that the content is appearing. When hovering over featured images, they match the correct URL of the new site. I next verify each of the posts/pages in the editor, using text mode. The reason for this is to look for the site url in the image attachments. If this is wrong, it will stand out to you (you could also use the search field in your browser to highlight the URL wordpress.com, to save some time – it shouldn’t appear on the new site). Whereas if you look in visual mode you won’t see the difference until that image is either deleted, or you change the privacy setting on the WordPress.com site to private.
为此,我首先检查网站是否在前端加载并且内容是否正在显示。 将鼠标悬停在精选图片上时,它们会与新网站的正确网址匹配。 接下来,我将使用文本模式验证编辑器中的每个帖子/页面。 这样做的原因是在图像附件中查找站点URL。 如果这是错误的,它将对您特别突出(您也可以在浏览器中使用搜索字段突出显示URL wordpress.com ,以节省时间-它不应出现在新网站上)。 而如果您以可视模式查看,则直到该图像被删除,或者将WordPress.com网站上的隐私设置更改为私有,您都看不到差异。
After all checks are done, and you have confirmed that all your data is moved across, you can simply make your WordPress.com account hidden. Don’t delete it, because as I mentioned earlier, if you want to use JetPack for stats and the desktop and mobile apps, you will need a WordPress.com account to activate and sync to your new site. You can also enable other services offered by WordPress.com, such as VaultPress (backups) and Akismet (spam protection) if you desire.
完成所有检查后,并确认所有数据都已转移,您只需隐藏WordPress.com帐户即可。 不要删除它,因为正如我前面提到的,如果您想使用JetPack进行统计以及桌面和移动应用程序使用,则需要一个WordPress.com帐户来激活并同步到您的新站点。 如果需要,您还可以启用WordPress.com提供的其他服务,例如VaultPress(备份)和Akismet(垃圾邮件防护)。
But wait, don’t forget that your users will still be going to https://twentyseventeendemo.wordpress.com/, (your WordPress.com sub-domain) and you need to setup a redirect to the new address (this only applies if you didn’t buy and map a custom domain name). You don’t have access to the server so you will have to use the paid option found here to pay for the redirection to take place. https://wordpress.com/domains/add/site-redirect/ it only costs a couple of dollars each year. Like when you move to a new house and have your mail redirected, you can choose to keep paying for this re-direction, or, sometime in the future, stop. I suggest you have a plan in place as to what you are wanting to do, and start updating your links around the web to point to the new correct location for your site. This includes reaching out to old contacts and give them the new link. It will save your bottom dollar in the long run, and is the perfect time to talk to those contacts about your business, blog or services.
但是,请不要忘记,您的用户仍然会转到https://twentyseventeendemo.wordpress.com/ (您的WordPress.com子域),并且您需要将重定向设置为新地址(仅适用于如果您未购买并映射自定义域名)。 您无权访问服务器,因此必须使用此处找到的付费选项来支付进行重定向的费用。 https://wordpress.com/domains/add/site-redirect/每年只需花费几美元。 就像您搬到新房子并重定向邮件一样,您可以选择继续为此重定向付费,或者在将来的某个时候停止。 我建议您对要执行的操作制定一个计划,然后开始更新网络上的链接以指向您网站的新正确位置。 这包括与旧的联系人联系并为他们提供新的链接。 从长远来看,这将节省您的基础成本,并且是与这些联系人谈论您的业务,博客或服务的最佳时机。
故障排除技巧 (Troubleshooting Tips)
As mentioned earlier, for bigger sites I like to export sections of the site instead of using the all content export. One common problem is the importing of images. If you site is really big, just dumping the posts and starting again can be painful after an error. Thankfully, other solutions exist in the form of plugins that aid in downloading of your externally linked images, importing them into the media library and attaching it to the posts instead. One plugin I recommend is Image Teleporter. It can help import images (beyond just helping with migration errors), as they suggest in their page, it can also be used to bring in embedded images from services like Flickr, Instagram, or Pinterest, so they are hosted locally for a faster site.
如前所述,对于较大的网站,我喜欢导出网站的某些部分,而不是使用所有内容导出。 一个常见的问题是图像的导入。 如果您的网站确实很大,则在出错后仅转储帖子并重新开始可能会很痛苦。 值得庆幸的是,其他解决方案以插件的形式存在,可以帮助您下载外部链接的图像,将其导入媒体库并将其附加到帖子。 我推荐的一个插件是Image Teleporter 。 正如它们在页面中建议的那样,它可以帮助导入图像(不仅可以解决迁移错误),还可以用于从Flickr,Instagram或Pinterest等服务中引入嵌入式图像,因此可以将它们托管在本地以实现更快的站点。
Does the WordPress Importer plugin repeatedly fail for your bigger sites? If so, the developers over at Human Made that work mainly on VIP WordPress customers developed a WordPress import fork that works really well for larger WordPress imports. Recently it also came to my attention that you can perform migrations using the VaultPress backups from your WordPress.com account. To do this you need to be on a paid tier that includes backups, but from this, instead of restoring backups to the WordPress.com site, you can restore to your self-hosted, Jetpack connected site. This is a method of importing to a self-hosted environment that I will be testing in the future.
WordPress Importer插件是否会在较大的网站上反复失败? 如果是这样,Human Made的主要针对VIP WordPress客户的开发人员开发了WordPress导入分支 ,该插件对于大型WordPress导入确实非常有效。 最近,我还注意到您可以使用WordPress.com帐户中的VaultPress备份执行迁移。 为此,您需要处于包含备份的付费层,但是从此,您无需将备份还原到WordPress.com站点,而可以还原到自托管的Jetpack连接站点。 这是一种导入到我以后将要测试的自托管环境中的方法。
Have any personal experiences with moving from WordPress.com to a self-hosted installation? Share them in the comments below!
从WordPress.com迁移到自托管安装有任何个人经验吗? 在下面的评论中分享它们!
翻译自: https://www.sitepoint.com/migrating-from-wordpress-com/
迁移wordpress


 4639
4639

 被折叠的 条评论
为什么被折叠?
被折叠的 条评论
为什么被折叠?
 到【灌水乐园】发言


