


wordpress 自定义
WordPress is used on a large portion of sites on the web. It allows us to create a variety of different types of sites, but one of the most important components of any website is always the home page. The perfect landing page will help you to reduce bounce rates, boosting traffic and customers. In this article, we’ll cover how we can create a custom home page (or landing page) of a WordPress website.
WordPress在网络上的大部分网站上都使用。 它允许我们创建各种不同类型的网站,但是任何网站最重要的组成部分之一始终是主页。 完美的目标网页将帮助您降低跳出率,增加流量和客户。 在本文中,我们将介绍如何创建WordPress网站的自定义主页(或登录页面)。
There are many ways to achieve this goal, this is just one way.
有很多方法可以实现这一目标,这只是一种方法 。
本文将介绍的内容概述 (Overview of What We Will Cover in This Article)
First, we’ll complete these basic steps:
首先,我们将完成以下基本步骤:
- Show a slider on the index page of WordPress. 在WordPress的索引页面上显示一个滑块。
- Show three panels for displaying a description of the products. 显示三个面板,以显示产品说明。
- Show two rows which contain details about your products with images and text side by side. 并排显示两行,其中包含有关您的产品的详细信息以及图像和文字。
- Panels, showing your team members. 面板,显示您的团队成员。
Then, we’ll look at the following advanced topics:
然后,我们将研究以下高级主题:
Fetching the content from another page (for example from an About Us page).
从另一个页面(例如从“ 关于我们”页面)中获取内容。
- Creating a sidebar for the front page only. 仅为首页创建侧边栏。
- The most important aspect will be that we can change the images of the slider from the ‘WordPress Customizer’ option. We won’t need any plugins to add a slider or create a slideshow of images. 最重要的方面是我们可以从“ WordPress Customizer”选项中更改滑块的图像。 我们不需要任何插件即可添加滑块或创建图像幻灯片。
我们需要的东西 (Things We’ll Need)
Kirki toolkit for providing options for the theme.
提供主题选项的Kirki工具包。
Flexslider for providing the slider option.
Flexslider用于提供滑块选项。
Maria Antonietta Perna has covered Kirki in a previous article, if you’re looking for a good introduction on the topic.
如果您正在寻找有关该主题的出色介绍,Maria Antonietta Perna 在上一篇文章中已经介绍了Kirki 。
注意 (Note)
For the sake of modularity, I’ve created a folder named library and put all the function files inside it so that it becomes easy to edit only the component that is necessary. Feel free to fork my theme at GitHub. In this theme, I’ve called all the files inside the library folder from the functions.php file. I’ve used Foundation CSS Framework for this theme.
为了实现模块化,我创建了一个名为library的文件夹,并将所有功能文件放入其中,以便轻松编辑仅需要的组件。 随时在GitHub上发布我的主题。 在这个主题中,我从functions.php文件中调用了库文件夹中的所有文件。 我已经将Foundation CSS Framework用于该主题。
You’ll find a file named theme-options.php inside the library folder which we will be editing the most in this tutorial. Open that file in your favorite text editor and get prepared to get your hands dirty!
您会在库文件夹中找到一个名为theme-options.php的文件,在本教程中我们将对其进行最多的编辑。 在您喜欢的文本编辑器中打开该文件,并准备好动手!
柯基 (Kirki)
Kirki is not a framework. It’s a toolkit allowing WordPress developers to use the Customizer and take advantage of its advanced features and flexibility by abstracting the code and making it easier for everyone to create a beautiful and meaningful user experience.
Kirki不是框架。 它是一个工具包,可让WordPress开发人员使用定制程序,并通过抽象化代码并使所有人更轻松地创建美好而有意义的用户体验,来利用其高级功能和灵活性。
We can use Kirki to add configurations, fields, sections and panels to the customizer. This does not replace the WordPress Customizer API. Kirki’s API is simply a wrapper for the default WordPress methods, simplifying the syntax and allowing you to write more with less code and taking advantage of some of its most advanced features.
我们可以使用Kirki将配置,字段,部分和面板添加到定制程序。 这不会替代WordPress Customizer API。 Kirki的API只是默认WordPress方法的包装,简化了语法,并允许您用更少的代码编写更多内容,并利用其某些最高级的功能。
Download Kirki files from GitHub and put it in a folder named ‘kirki’ inside of your theme folder.
从GitHub下载Kirki文件,并将其放在主题文件夹内名为“ kirki”的文件夹中。
First, you’ll have to create a new configuration. Configurations have a unique ID and all fields that use the same config_id will inherit the properties of that configuration.
首先,您必须创建一个新配置。 配置具有唯一的ID,并且所有使用相同config_id字段config_id将继承该配置的属性。
Once you add your configuration you can then add panels, sections and fields. Please note that you should have at least one section in your customizer in order to be able to add fields. Fields can’t be ‘orphan’, they have to be grouped in a section.
添加配置后,即可添加面板,部分和字段。 请注意,您的定制程序中至少应包含一个部分,以便能够添加字段。 字段不能为“孤立”字段,必须将其分组。
组态 (Configuration)
Kirki allows you to create configurations for your plugins or themes and group them by an ID. All fields that are then linked to that ID will inherit the configuration properties.
Kirki允许您为插件或主题创建配置,并按ID进行分组。 然后链接到该ID的所有字段都将继承配置属性。
Kirki::add_config( 'my_theme', array(
    'capability'    => 'edit_theme_options',
    'option_type'   => 'option',
    'option_name'   => 'my_theme',
) );capability: any valid WordPress capability. See the WordPress Codex for details.capability:任何有效的WordPress功能。 有关详细信息,请参见WordPress Codex 。option_type: can be either option or theme_mod.option_type:可以是option或theme_mod。option_name: If you’re using options instead of theme mods then you can use this to specify an option name. All your fields will then be saved as an array under that option in the WordPress database.option_name:如果您使用选项而不是主题mod,则可以使用它来指定选项名称。 然后,您所有的字段都将在该选项下保存为数组在WordPress数据库中。
面板 (Panels)
Panels are wrappers for sections, a way to group multiple sections together.
面板是部分的包装,这是将多个部分组合在一起的一种方式。
Kirki::add_panel( 'panel_id', array(
    'priority'    => 10,
    'title'       => __( 'My Title', 'textdomain' ),
    'description' => __( 'My Description', 'textdomain' ),
) );
栏目 (Sections)
Sections are wrappers for fields, a way to group multiple fields together. All fields must belong to a section, no field can be an orphan.
节是字段的包装,这是将多个字段组合在一起的一种方式。 所有字段都必须属于一个部分,任何字段都不能是孤立的。
Kirki::add_section( 'section_id', array(
    'title'          => __( 'My Title', 'textdomain' ),
    'description'    => __( 'My Description', 'textdomain' ),
    'panel'          => '', // Not typically needed.
    'priority'       => 160,
    'capability'     => 'edit_theme_options',
    'theme_supports' => '', // Rarely needed.
) );
领域 (Fields)
Fields are the options such as text box and check box that are provided so that the users can input custom text inside it. Each field must be associated with a specific section only.
字段是提供的选项,例如文本框和复选框,以便用户可以在其中输入自定义文本。 每个字段必须仅与特定部分相关联。
function my_custom_text_settings( $fields ) {

    // Add the controls
    $fields[] = array(
        'label'       => __( 'My custom control', 'translation_domain' ),
        'section'     => 'my_section',
        'settings'    => 'my_setting',
        'type'        => 'text',
        'priority'    => 10,
        'option_type' => 'theme_mod',
        'capability'  => 'edit_theme_options',
    );

    $fields[] = array(
        'label'       => __( 'My custom control 2', 'translation_domain' ),
        'section'     => 'my_section',
        'settings'    => 'my_setting_2',
        'type'        => 'text',
        'priority'    => 20,
        'option_type' => 'theme_mod',
        'capability'  => 'edit_theme_options',
    );

    return $fields;

}
add_filter( 'kirki/fields', 'my_custom_text_settings' );
Enough of the introduction. Now let’s customize our theme!
足够的介绍。 现在,让我们自定义我们的主题!
将Kirki与我们的主题融为一体 (Integrating Kirki with Our Theme)
The first thing we’ll need to do is to integrate Kirki with our theme. To do so, open your theme-options.php file which you’ll find in the library folder and add the following code to it:
我们需要做的第一件事是将Kirki与我们的主题集成在一起。 为此,请打开在库文件夹中找到的theme-options.php文件,并向其中添加以下代码:
// Integrating Kirki with our theme
include_once( get_template_directory() . '/kirki/kirki.php' );
The above code links the Kirki files with our theme. Please note that as mentioned earlier, the files that we downloaded from the GitHub source should be placed in a folder named ‘kirki’ inside the theme folder.
上面的代码将Kirki文件与我们的主题链接在一起。 请注意,如前所述,我们从GitHub源下载的文件应放在主题文件夹内名为'kirki'的文件夹中 。
创建配置 (Creating the Configuration)
As stated previously, we need to create a configuration which we can use with our options. Add the following code to your theme-options.php file.
如前所述,我们需要创建一个可以与我们的选项一起使用的配置 。 将以下代码添加到theme-options.php文件中。
// Adding the configuration
Kirki::add_config( 'mc', array(
    'capability'    => 'edit_theme_options',
    'option_type'   => 'option',
    'option_name'   => 'mc',
) );
We’ve successfully created a configuration for our theme. Now, we would be using mc as our option_name in our options.
我们已经成功为主题创建了配置。 现在,我们将在选项中使用mc作为option_name 。
设计 (Design)
Let’s now look at the design of our landing page. Our home page will consist of the following:
现在让我们看一下目标网页的设计。 我们的主页将包括以下内容:
Product Slider (for showing a slideshow of your product pages).
产品滑块 (用于显示产品页面的幻灯片)。
Description Boxes (for showing some information about your company).
说明框 (用于显示有关您公司的一些信息)。
Product Details (for showing some details about your products).
产品详细信息 (用于显示有关产品的一些详细信息)。
Team Showcase (for showing details about your team members).
团队展示 (用于显示有关您的团队成员的详细信息)。
We’ll be covering how to do these points one-by-one for our home page.
我们将在我们的主页上一一介绍如何做这些要点。
注意 (Note)
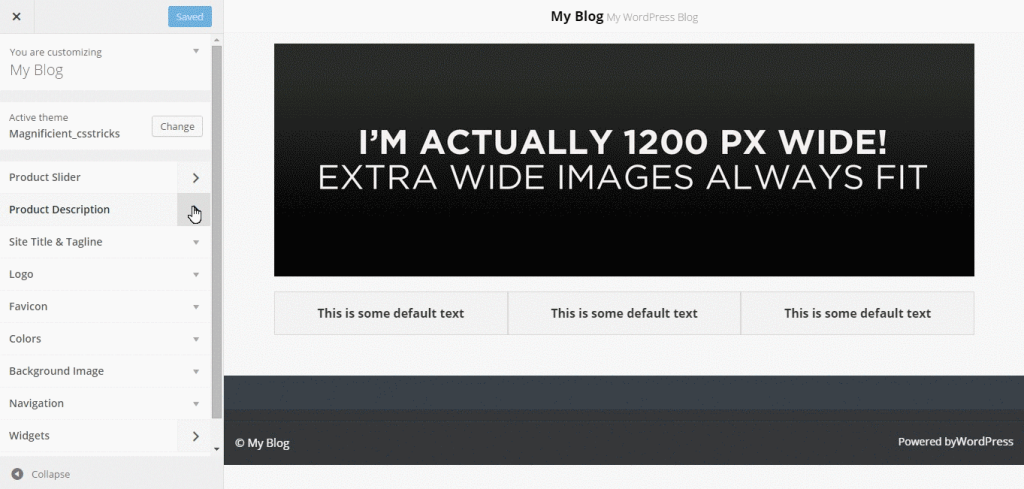
All options will be customizable through the WordPress Customizer option. You will need to visit Appearance > Customize option inside your WordPress Admin panel to customize these options.
所有选项都可以通过WordPress Customizer选项进行自定义 。 您将需要访问WordPress管理面板中的外观>自定义选项,以自定义这些选项。
为首页创建自定义模板 (Creating a Custom Template for the Front Page)
We wouldn’t want to change our index.php file since we can create a custom template for our front page. In this custom template, we will add our code so that it shows our customized front page. So, we’ll create a custom template which will show the contents in the front page.
我们不想更改index.php文件,因为我们可以为首页创建自定义模板 。 在此自定义模板中,我们将添加代码,以便显示我们的自定义首页。 因此,我们将创建一个自定义模板 ,该模板将在首页显示内容。
Create a new file inside your theme folder called homepage.php and add the following:
在主题文件夹中创建一个名为homepage.php的新文件,并添加以下内容:
/**
Template Name: Custom Homepage
**/
Inside this file, we add the code to show the slider.
在此文件内,我们添加代码以显示滑块。
We have to set this to our static front page. But, initially there isn’t a page that will be using this template. We will have to create a new page which will use this template. Follow the following steps:
我们必须将此设置为静态首页 。 但是,最初没有页面将使用此模板。 我们将不得不创建一个使用此模板的新页面。 请按照以下步骤操作:
- Create a new page (**Pages > Add new**). 创建一个新页面(**页面>添加新**)。
- Add a title to the page (eg. **My Custom Homepage**). 在页面上添加标题(例如,“我的自定义首页”)。
- Select **Custom Homepage** from the **Template** dropdown under **Page Attributes**. 从“页面属性”下的“模板”下拉列表中选择“自定义首页”。
- Click on the **Publish** button. 点击“发布”按钮。

Now, set the Static Front Page option inside the WordPress Customizer to A static page and select My Custom Homepage (or if you’ve used any other name for the page, select that one) from the dropdown below it.
现在,将WordPress Customizer中的Static Front Page选项设置为A static page,然后从其下面的下拉菜单中选择My Custom Homepage (或者,如果您对该页面使用了其他名称,请选择该名称)。

Don’t forget to click on the Save & Publish button of the Customizer.
不要忘记单击定制程序的“ 保存并发布”按钮。
You won’t notice any visible changes inside the Customizer yet, since we haven’t added any code to our homepage.php file. Open homepage.php and let’s start adding code to it!
由于我们尚未在homepage.php文件中添加任何代码,因此您不会在Customizer内注意到任何可见的更改。 打开homepage.php ,让我们开始向其中添加代码!
Let’s add the following code:
让我们添加以下代码:
// Add the header
get_header();

// Add the footer
get_footer();
The above code includes our header.php and footer.php files from our current theme directory. If you refresh your Customizer now, you will probably see only the navigation and the footer menus.
上面的代码包括我们当前主题目录中的header.php和footer.php文件。 如果现在刷新定制程序,则可能只会看到导航和页脚菜单。
产品滑块 (Product Slider)
A Product Slider shows your most creative or your best-selling products. These are the products that a visitor sees first on your website. Creating a Product Slider involves the following steps:
产品滑块可显示您最具创意或最畅销的产品。 这些是访问者首先在您的网站上看到的产品。 创建产品滑块涉及以下步骤:
- Creating a set of sliders (generally 5). 创建一组滑块(通常为5个)。
- Adding a background image to the slider. 将背景图像添加到滑块。
- Adding a caption to the slider. 向滑块添加标题。
创建一组滑块 (Creating a Set of Sliders)
As mentioned previously, we’re using FlexSlider for showing a slider in our theme. So, first, we will need to download Flexslider from GitHub. We will only need to use the jquery.flexslider.js, flexslider.css, the bg_play_pause.png and the fonts folder. Copy these resources into your theme folder.
如前所述,我们正在使用FlexSlider在主题中显示滑块。 因此,首先,我们需要从GitHub下载Flexslider。 我们只需要使用jquery.flexslider.js , flexslider.css , bg_play_pause.png和fonts文件夹。 将这些资源复制到主题文件夹中。
注意 (Note)
If you’re working along with the theme I provided, you can copy jquery.flexslider.js inside the vendor folder, present inside the js folder, the flexslider.css file inside the css folder, the bg_play_pause.png file inside the images folder and the contents of the fonts folder (from the GitHub source of Flexslider) inside the fonts folder which is already inside the theme folder.
如果您正在与我提供的主题一起使用,则可以将jquery.flexslider.js复制到vendor文件夹中(位于js文件夹中), flexslider.css文件(位于css文件夹中)和bg_play_pause.png文件(位于images文件夹中)和字体文件夹的字体里面的内容(从Flexslider的GitHub的源)的文件夹,其已经是主题文件夹内。
Now, we will need to enqueue these files with our theme. We’ll add the following enqueue code to the enqueue-scripts.php file present inside the library folder:
现在,我们需要使用主题将这些文件放入队列。 我们将以下排队代码添加到库文件夹中存在的enqueue-scripts.php文件中:
// adding flexslider scripts file in the footer
wp_register_script( 'flexslider-js', get_template_directory_uri() . '/js/vendor/jquery.flexslider.js', array( 'jquery' ), '', true );

wp_enqueue_script( 'flexslider-js' );
Next, we enqueue the CSS file inside our enqueue-style.php, inside the library folder using the following code:
接下来,使用以下代码将CSS文件放入enqueue-style.php ,并放入库文件夹中:
// flexslider stylesheet
wp_register_style( 'magnificient-flexslider-stylesheet', get_stylesheet_directory_uri() . '/css/flexslider.css', array(), '' );

wp_enqueue_style( 'magnificient-flexslider-stylesheet' );
Congratulations! You have successfully enqueued the Flexslider files with your theme. You can check whether the enqueue has been successful by checking the source of your page. You can check the source of your page by right clicking on your page and clicking on view page source. Search for flexslider and you will find that the JS and CSS files has been successfully enqueued.
恭喜你! 您已成功将Flexslider文件与主题排队。 您可以通过检查页面的来源来检查入队是否成功。 您可以通过右键单击页面并单击查看页面源来检查页面的源 。 搜索flexslider ,您将发现JS和CSS文件已成功入队。
注意 (Note)
If you’re not using the theme which I provided, you may need to edit the following parts: /js/vendor/jquery.flexslider.js and /css/flexslider.css and replace it with the path to your JS and CSS files.
如果您没有使用我提供的主题,则可能需要编辑以下部分: /js/vendor/jquery.flexslider.js和/css/flexslider.css并将其替换为JS和CSS文件的路径。
First of all, let’s create a Panel inside our WordPress Customizer which will show the images, links and captions for our slider.
首先,让我们在WordPress自定义程序中创建一个面板 ,该面板将显示滑块的图像,链接和标题。
Open up theme-options.php again and add the following code to it:
再次打开theme-options.php并添加以下代码:
// Adding the Product Slider panel
Kirki::add_panel( 'product_slider', array(
    'priority'    => 10,
    'title'       => __( 'Product Slider', 'magnificient' ),
    'description' => __( 'A slider to show the products', 'magnificient' ),
) );
The above code adds a Product Slider panel to our Customizer but it will not be visible since no sections have this panel and no fields contain any sections related to this panel. Confusing? Let’s proceed and it will become clearer.
上面的代码将“ 产品滑块”面板添加到了我们的“ 定制器”中,但是由于没有任何部分具有此面板,并且没有字段包含与此面板相关的任何区域,因此该代码不可见。 令人困惑? 让我们继续,它将变得更加清晰。
Next, we need to add a section named Product Slider for Homepage. This can be done by adding the following code to the theme-options.php file:
接下来,我们需要添加一个名为Product Slider for Homepage的部分 。 这可以通过将以下代码添加到theme-options.php文件中来完成:
// Adding the Product Slider for Homepage section
Kirki::add_section( 'product_slider_for_homepage', array(
    'title'          => __( 'Product Slider for Homepage', 'magnificient' ),
    'description'    => __( 'This slider will be shown on the front page of your website', 'magnificient' ),
    'panel'          => 'product_slider', // Not typically needed.
    'priority'       => 160,
    'capability'     => 'edit_theme_options',
    'theme_supports' => '', // Rarely needed.
) );
The above code adds the Product Slider for Homepage section inside the Product Slider panel.
上面的代码在“ 产品滑块”面板内添加了“ 用于主页的产品滑块”部分。
Next, we add a field for showing images. We can create an image field using the following code:
接下来,我们添加一个用于显示图像的字段。 我们可以使用以下代码创建图像字段 :
// Adding the Product Slider image 1 field
Kirki::add_field( 'mc', array(
    'type'        => 'image',
    'settings'     => 'product_slider_image_1',
    'label'       => __( 'Product Slider image 1', 'magnificient' ),
    'description' => __( 'This image will be the first image for the Product Slider.', 'magnificient' ),
    'section'     => 'product_slider_for_homepage',
    'default'     => '',
    'priority'    => 10,
) );
Now, if we refresh our Customizer, we will see the Product Slider panel has appeared.
现在,如果刷新Customizer ,我们将看到出现了Product Slider面板。

Through the image field, we can add images which will be shown in the slider. We will create four more similar fields so that we can have at least five images for the slider. The following code will add four more image fields:
通过图像字段,我们可以添加将在滑块中显示的图像。 我们将再创建四个相似的字段,以便滑块至少可以有五个图像。 以下代码将添加四个其他图像字段:
// Adding the Product Slider image 2 field
Kirki::add_field( 'mc', array(
    'type'        => 'image',
    'settings'     => 'product_slider_image_2',
    'label'       => __( 'Product Slider image 2', 'magnificient' ),
    'description' => __( 'This image will be the second image for the Product Slider.', 'magnificient' ),
    'section'     => 'product_slider_for_homepage',
    'default'     => '',
    'priority'    => 10,
) );

// Adding the Product Slider image 3 field
Kirki::add_field( 'mc', array(
    'type'        => 'image',
    'settings'     => 'product_slider_image_3',
    'label'       => __( 'Product Slider image 3', 'magnificient' ),
    'description' => __( 'This image will be the third image for the Product Slider.', 'magnificient' ),
    'section'     => 'product_slider_for_homepage',
    'default'     => '',
    'priority'    => 10,
) );

// Adding the Product Slider image 4 field
Kirki::add_field( 'mc', array(
    'type'        => 'image',
    'settings'     => 'product_slider_image_4',
    'label'       => __( 'Product Slider image 4', 'magnificient' ),
    'description' => __( 'This image will be the fourth image for the Product Slider.', 'magnificient' ),
    'section'     => 'product_slider_for_homepage',
    'default'     => '',
    'priority'    => 10,
) );

// Adding the Product Slider image 5 field
Kirki::add_field( 'mc', array(
    'type'        => 'image',
    'settings'     => 'product_slider_image_5',
    'label'       => __( 'Product Slider image 5', 'magnificient' ),
    'description' => __( 'This image will be the fifth image for the Product Slider.', 'magnificient' ),
    'section'     => 'product_slider_for_homepage',
    'default'     => '',
    'priority'    => 10,
) );
We can upload images through these fields and then display them on the landing page.
我们可以通过这些字段上传图像,然后将其显示在登录页面上。
将背景图像添加到滑块 (Adding a Background Image to the Slider)
Now, we’ll be adding code for the Product Slider. Add the following code next to <?php get_header(); ?> inside a <?php tag:
现在,我们将为Product Slider添加代码。 在<?php get_header(); ?>旁边添加以下代码<?php get_header(); ?> <?php <?php get_header(); ?> <?php标记内的<?php get_header(); ?> :
// Getting  the images
$product_slider_image_1 = Kirki::get_option( mc, product_slider_image_1 );
$product_slider_image_2 = Kirki::get_option( mc, product_slider_image_2 );
$product_slider_image_3 = Kirki::get_option( mc, product_slider_image_3 );
$product_slider_image_4 = Kirki::get_option( mc, product_slider_image_4 );
$product_slider_image_5 = Kirki::get_option( mc, product_slider_image_5 );
These lines fetches the images for each slide that we had saved inside our Customizer. In our next step, we will check if any of these images exists or not. If any of them exists, we will call our slider.
这些行将获取我们保存在定制器中的每张幻灯片的图像。 在下一步中,我们将检查这些图像是否存在。 如果其中任何一个存在,我们将称为滑块。
// Check if any image exists
if ( $product_slider_image_1 || $product_slider_image_2 || $product_slider_image_3 || $product_slider_image_4 || $product_slider_image_5 ) {
This line checks whether any image inside any slide exists or not. If the image(s) exist, then flexslider is called. Now, we’ll echo out the images for each slide using the code below:
此行检查幻灯片中是否存在任何图像。 如果存在图像,则调用flexslider 。 现在,我们将使用以下代码回显每张幻灯片的图像:
<div class="product-slider">
<ul class="slides">
<?php if ( $product_slider_image_1 ) { echo '<li><img src="'. $product_slider_image_1 .'" class="product-slider-image-1"></li>'; } ?>
<?php if ( $product_slider_image_2 ) { echo '<li><img src="'. $product_slider_image_2 .'" class="product-slider-image-2"></li>'; } ?>
<?php if ( $product_slider_image_3 ) { echo '<li><img src="'. $product_slider_image_3 .'" class="product-slider-image-3"></li>'; } ?>
<?php if ( $product_slider_image_4 ) { echo '<li><img src="'. $product_slider_image_4 .'" class="product-slider-image-4"></li>'; } ?>
<?php if ( $product_slider_image_5 ) { echo '<li><img src="'. $product_slider_image_5 .'" class="product-slider-image-5"></li>'; } ?>
</ul>
</div>Next, we just have to add the JavaScript for the Flexslider to work.
接下来,我们只需要添加JavaScript即可使Flexslider正常工作。
<script type="text/javascript">
    (function($) {
        $(window).load(function() {
            $('.product-slider').flexslider({
                animation: "slide",
                controlNav: false,
                directionNav: false,
                slideshowSpeed: 3000,
            });
        });
    })(jQuery);
</script>
向滑块添加标题 (Adding a Caption to the Slider)
We can also add a caption to our slides. We just have to add a new field in our customizer that will accept the caption (text) for each slide and echo it out.
我们还可以在幻灯片上添加标题。 我们只需要在我们的定制器中添加一个新字段即可接受每张幻灯片的标题(文本)并回显它。
Let’s add the field first.
让我们先添加字段。
// Adding the Product Slider caption 1 field
Kirki::add_field( 'mc', array(
    'type'        => 'text',
    'settings'     => 'product_slider_caption_1',
    'label'       => __( 'Product Slider caption 1', 'magnificient' ),
    'description' => __( 'This caption will be the description for the first slide.', 'magnificient' ),
    'section'     => 'product_slider_for_homepage',
    'default'     => __( 'This is some default text', 'magnificient' ),
    'priority'    => 10,
) );
We can do a similar thing for four other slides.
我们可以为另外四张幻灯片做类似的事情。
Now, in the frontend, inside our Custom Homepage template, we need to edit our code a little to display these captions.
现在,在前端的“ 自定义首页”模板内,我们需要稍微修改代码以显示这些标题。
First, we need to store the captions in the variables:
首先,我们需要将标题存储在变量中:
//Getting the captions
$product_slider_caption_1 = Kirki::get_option( mc, product_slider_caption_1 );
$product_slider_caption_2 = Kirki::get_option( mc, product_slider_caption_2 );
$product_slider_caption_3 = Kirki::get_option( mc, product_slider_caption_3 );
$product_slider_caption_4 = Kirki::get_option( mc, product_slider_caption_4 );
$product_slider_caption_5 = Kirki::get_option( mc, product_slider_caption_5 );
Then, replace the following code:
然后,替换以下代码:
<div class="product-slider">
<ul class="slides">
<?php if ( $product_slider_image_1 ) { echo '<li><img src="'. $product_slider_image_1 .'" class="product-slider-image-1"></li>'; } ?>
<?php if ( $product_slider_image_2 ) { echo '<li><img src="'. $product_slider_image_2 .'" class="product-slider-image-2"></li>'; } ?>
<?php if ( $product_slider_image_3 ) { echo '<li><img src="'. $product_slider_image_3 .'" class="product-slider-image-3"></li>'; } ?>
<?php if ( $product_slider_image_4 ) { echo '<li><img src="'. $product_slider_image_4 .'" class="product-slider-image-4"></li>'; } ?>
<?php if ( $product_slider_image_5 ) { echo '<li><img src="'. $product_slider_image_5 .'" class="product-slider-image-5"></li>'; } ?>
</ul>
</div>with the following code:
使用以下代码:
<div class="product-slider">
<ul class="slides">
<?php if ( $product_slider_image_1 )
{
?>
<li>
<img src="<?php echo $product_slider_image_1; ?>" class="product-slider-image-1" />
<?php if ( $product_slider_caption_1 ) { echo '<p class="flex-caption">'. $product_slider_caption_1 .'</p>'; } ?>
</li>
<?php
}
?>
<?php if ( $product_slider_image_2 )
{
?>
<li>
<img src="<?php echo $product_slider_image_2; ?>" class="product-slider-image-2" />
<?php if ( $product_slider_caption_2 ) { echo '<p class="flex-caption">'. $product_slider_caption_2 .'</p>'; } ?>
</li>
<?php
}
?>
<?php if ( $product_slider_image_3 )
{
?>
<li>
<img src="<?php echo $product_slider_image_3; ?>" class="product-slider-image-3" />
<?php if ( $product_slider_caption_3 ) { echo '<p class="flex-caption">'. $product_slider_caption_3 .'</p>'; } ?>
</li>
<?php
}
?>
<?php if ( $product_slider_image_4 )
{
?>
<li>
<img src="<?php echo $product_slider_image_4; ?>" class="product-slider-image-4" />
<?php if ( $product_slider_caption_4 ) { echo '<p class="flex-caption">'. $product_slider_caption_4 .'</p>'; } ?>
</li>
<?php
}
?>
<?php if ( $product_slider_image_5 )
{
?>
<li>
<img src="<?php echo $product_slider_image_5; ?>" class="product-slider-image-5" />
<?php if ( $product_slider_caption_5 ) { echo '<p class="flex-caption">'. $product_slider_caption_5 .'</p>'; } ?>
</li>
<?php
}
?>
</ul>
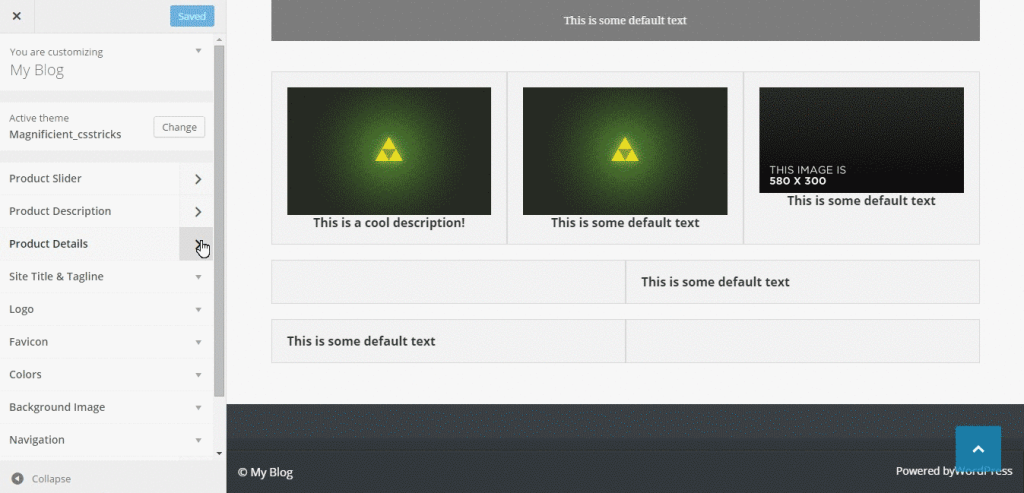
</div>说明框 (Description Boxes)
Description boxes can provide useful descriptions about our products. These boxes are positioned just below the slider so that it catches the attention of our visitors. These boxes are helpful if you want to show details about your products. Typically, there can be three to four boxes (or panels), but you can have more if you wish.
描述框可以提供有关我们产品的有用描述。 这些框位于滑块的正下方,因此引起了访问者的注意。 如果要显示有关产品的详细信息,这些框将很有帮助。 通常,可以有三到四个框(或面板),但是如果需要,可以有更多的框。
In this tutorial, we’re creating three boxes and are using the data-equalizer property of Foundation CSS Framework to provide uniform height for each panel.
在本教程中,我们将创建三个框,并使用Foundation CSS Framework的data-equalizer属性为每个面板提供统一的高度。
Let’s get to work!
让我们开始工作吧!
创建面板 (Creating the Panel)
At first, we would be creating a separate panel for showing the description boxes. We can also provide all the options under the same panel (in the first panel we created), but it’s a good habit to keep things separate for later use.
首先,我们将创建一个单独的面板来显示描述框。 我们还可以在同一面板(在我们创建的第一个面板中)下提供所有选项,但是将它们分开以备后用是一个好习惯。
We need to add the following code inside our theme-options.php file:
我们需要在theme-options.php文件中添加以下代码:
// Adding the Product Description panel
Kirki::add_panel( 'product_description', array(
    'priority'    => 10,
    'title'       => __( 'Product Description', 'magnificient' ),
    'description' => __( 'Panels to show description of the products', 'magnificient' ),
) );
创建部分 (Creating the Section)
We will now create two sections for the Product Description. We’ll upload the images on one section and add the description in another section.
现在,我们将为产品描述创建两个部分。 我们将在一个部分上载图像,并在另一部分中添加描述。
First, create a section for the images using the following code:
首先,使用以下代码为图像创建一个部分:
// Adding the Product Images for Homepage section
Kirki::add_section( 'product_images_for_homepage', array(
    'title'          => __( 'Product Images for Homepage', 'magnificient' ),
    'description'    => __( 'These images will be shown on the product description panels on the  front page of your website', 'magnificient' ),
    'panel'          => 'product_images', // Not typically needed.
    'priority'       => 160,
    'capability'     => 'edit_theme_options',
    'theme_supports' => '', // Rarely needed.
) );
We then create a section for the description:
然后,我们为描述创建一个部分:
// Adding the Product Description for Homepage section
Kirki::add_section( 'product_description_for_homepage', array(
    'title'          => __( 'Product Description for Homepage', 'magnificient' ),
    'description'    => __( 'These panels will be shown on the front page of your website', 'magnificient' ),
    'panel'          => 'product_description', // Not typically needed.
    'priority'       => 160,
    'capability'     => 'edit_theme_options',
    'theme_supports' => '', // Rarely needed.
) );
创建字段 (Creating the Fields)
Next, we need to create three fields (since there will be three boxes and hence three images) for image input and after that we’ll be creating three fields for the product descriptions. The code looks like the following:
接下来,我们需要为图像输入创建三个字段(因为将有三个框,因此会有三个图像),然后我们将为产品描述创建三个字段。 该代码如下所示:
// Adding the Product Description Image 1 field
Kirki::add_field( 'mc', array(
    'type'        => 'image',
    'settings'     => 'product_description_image_1',
    'label'       => __( 'Product Description image 1', 'magnificient' ),
    'description' => __( 'This image will be the first image for the Product Description.', 'magnificient' ),
    'section'     => 'product_images_for_homepage',
    'default'     => '',
    'priority'    => 10,
) );

// Adding the Product Description Image 2 field
Kirki::add_field( 'mc', array(
    'type'        => 'image',
    'settings'     => 'product_description_image_2',
    'label'       => __( 'Product Description image 2', 'magnificient' ),
    'description' => __( 'This image will be the second image for the Product Description.', 'magnificient' ),
    'section'     => 'product_images_for_homepage',
    'default'     => '',
    'priority'    => 10,
) );

// Adding the Product Description Image 3 field
Kirki::add_field( 'mc', array(
    'type'        => 'image',
    'settings'     => 'product_description_image_3',
    'label'       => __( 'Product Description image 3', 'magnificient' ),
    'description' => __( 'This image will be the third image for the Product Description.', 'magnificient' ),
    'section'     => 'product_images_for_homepage',
    'default'     => '',
    'priority'    => 10,
) );

// Adding the Product Description Textarea 1 field
Kirki::add_field( 'mc', array(
    'type'        => 'textarea',
    'settings'     => 'product_description_textarea_1',
    'label'       => __( 'Product Description textarea 1', 'magnificient' ),
    'description' => __( 'This description will be the description for the first product.', 'magnificient' ),
    'section'     => 'product_description_for_homepage',
    'default'     => __( 'This is some default text', 'magnificient' ),
    'priority'    => 10,
) );

// Adding the Product Description Textarea 2 field
Kirki::add_field( 'mc', array(
    'type'        => 'textarea',
    'settings'     => 'product_description_textarea_2',
    'label'       => __( 'Product Description textarea 2', 'magnificient' ),
    'description' => __( 'This description will be the description for the second product.', 'magnificient' ),
    'section'     => 'product_description_for_homepage',
    'default'     => __( 'This is some default text', 'magnificient' ),
    'priority'    => 10,
) );

// Adding the Product Description Textarea 3 field
Kirki::add_field( 'mc', array(
    'type'        => 'textarea',
    'settings'     => 'product_description_textarea_3',
    'label'       => __( 'Product Description textarea 3', 'magnificient' ),
    'description' => __( 'This description will be the description for the third product.', 'magnificient' ),
    'section'     => 'product_description_for_homepage',
    'default'     => __( 'This is some default text', 'magnificient' ),
    'priority'    => 10,
) );
显示输出 (Displaying the Output)
Now we will need to display the output on our custom template by using the following code.
现在,我们需要使用以下代码在自定义模板上显示输出。
$product_description_image_1 = Kirki::get_option( mc, product_description_image_1 );
$product_description_textarea_1 = Kirki::get_option( mc, product_description_textarea_1 );
if ( $product_description_image_1 ) {
    echo '<img src="'. $product_description_image_1 .'" class="product-description-image">';
}
if ( $product_description_textarea_1 ) {
    echo '<h6 class="product-description-textarea text-center">'. product_description_textarea_1 .'</h6>';
}
This displays the output for the first box. Similarly, we’ll do the same for the other two boxes.
这将显示第一个框的输出。 类似地,我们将对其他两个框执行相同的操作。
$product_description_image_2 = Kirki::get_option( mc, product_description_image_2 );
$product_description_textarea_2 = Kirki::get_option( mc, product_description_textarea_2 );
if ( $product_description_image_2 ) {
    echo '<img src="'. $product_description_image_2 .'" class="product-description-image">';
}
if ( $product_description_textarea_2 ) {
    echo '<h6 class="product-description-textarea text-center">'. $product_description_textarea_2 .'</h6>';
}

$product_description_image_3 = Kirki::get_option( mc, product_description_image_3 );
$product_description_textarea_3 = Kirki::get_option( mc, product_description_textarea_3 );
if ( $product_description_image_3 ) {
    echo '<img src="'. $product_description_image_3 .'" class="product-description-image">';
}
if ( $product_description_textarea_3 ) {
    echo '<h6 class="product-description-textarea text-center">'. $product_description_textarea_3 .'</h6>';
}
Now go to your Customizer and add the images and the description and you’ll see the page displaying your input!
现在转到“定制器”并添加图像和描述,您将看到显示输入内容的页面!
产品详情 (Product Details)
This part contains two rows where there’s an image on one side and a description on the other side. This part or section of this page can be used as a visual for the most important aspects of the products to the visitors.
这部分包含两行,其中一面有图像,另一面有描述。 此页面的这一部分或部分可以用作向访客展示产品最重要方面的视觉效果。
创建面板 (Creating the Panel)
Let’s create a panel first. We’ll call it Product Details.
首先创建一个面板。 我们将其称为“ 产品详细信息” 。
// Adding the Product Details panel
Kirki::add_panel( 'product_details', array(
    'priority'    => 10,
    'title'       => __( 'Product Details', 'magnificient' ),
    'description' => __( 'Panels to show details of the products', 'magnificient' ),
) );
创建部分 (Creating the Section)
We’ll make a section for the fields using the code below:
我们将使用以下代码为字段创建一个部分:
// Adding the Product Details for Homepage section
Kirki::add_section( 'product_details_for_homepage', array(
    'title'          => __( 'Product Details for Homepage', 'magnificient' ),
    'description'    => __( 'This will show the details on the front page of your website', 'magnificient' ),
    'panel'          => 'product_details', // Not typically needed.
    'priority'       => 160,
    'capability'     => 'edit_theme_options',
    'theme_supports' => '', // Rarely needed.
) );
创建字段 (Creating the Fields)
Similar to the previously covered concepts, we’ll create two image fields and two text area fields using the code below.
与先前介绍的概念类似,我们将使用以下代码创建两个图像字段和两个文本区域字段。
// Adding the Product Details image 1 field
Kirki::add_field( 'mc', array(
    'type'        => 'image',
    'settings'     => 'product_details_image_1',
    'label'       => __( 'Product Details image 1', 'magnificient' ),
    'description' => __( 'This image will be the first image for the Product Details.', 'magnificient' ),
    'section'     => 'product_details_for_homepage',
    'default'     => '',
    'priority'    => 10,
) );

// Adding the Product Details image 2 field
Kirki::add_field( 'mc', array(
    'type'        => 'image',
    'settings'     => 'product_details_image_2',
    'label'       => __( 'Product Details image 2', 'magnificient' ),
    'description' => __( 'This image will be the second image for the Product Details.', 'magnificient' ),
    'section'     => 'product_details_for_homepage',
    'default'     => '',
    'priority'    => 10,
) );

// Adding the Product Details textarea 1 field
Kirki::add_field( 'mc', array(
    'type'        => 'textarea',
    'settings'     => 'product_details_textarea_1',
    'label'       => __( 'Product Details textarea 1', 'magnificient' ),
    'description' => __( 'This description will be the details for the first product.', 'magnificient' ),
    'section'     => 'product_details_for_homepage',
    'default'     => __( 'This is some default text', 'magnificient' ),
    'priority'    => 10,
) );

// Adding the Product Details textarea 2 field
Kirki::add_field( 'mc', array(
    'type'        => 'textarea',
    'settings'     => 'product_details_textarea_2',
    'label'       => __( 'Product Details textarea 2', 'magnificient' ),
    'description' => __( 'This description will be the details for the second product.', 'magnificient' ),
    'section'     => 'product_details_for_homepage',
    'default'     => __( 'This is some default text', 'magnificient' ),
    'priority'    => 10,
) );
显示输出 (Showing the Output)
We need to show the output on the custom homepage template. Open up your homepage.php file and add the following code:
我们需要在自定义首页模板上显示输出。 打开您的homepage.php文件,并添加以下代码:
<?php
    $product_details_image_1 = Kirki::get_option( mc, product_details_image_1 );
    $product_details_textarea_1 = Kirki::get_option( mc, product_details_textarea_1 );
    if ( $product_details_image_1 || $product_details_textarea_1 ) {
?>
        <div class="row" data-equalizer id="product-details-one">
            <div class="large-6 columns panel" data-equalizer-watch id="product-image">
                <?php
                    if ( $product_details_image_1 ) {
                        echo '<img src="'. $product_details_image_1 .'" />';
                    }
                ?>
            </div>
            <div class="large-6 columns panel" data-equalizer-watch id="product-description">
                <?php
                    if ( $product_details_textarea_1 ) {
                        echo '<h6>'. $product_details_textarea_1 .'</h6>';
                    }
                ?>
            </div>
        </div>
<?php
    }
?>
Just do the same for the other row too. Then, go to your Customizer and refresh it.
对另一行也是如此。 然后,转到您的定制程序并刷新它。
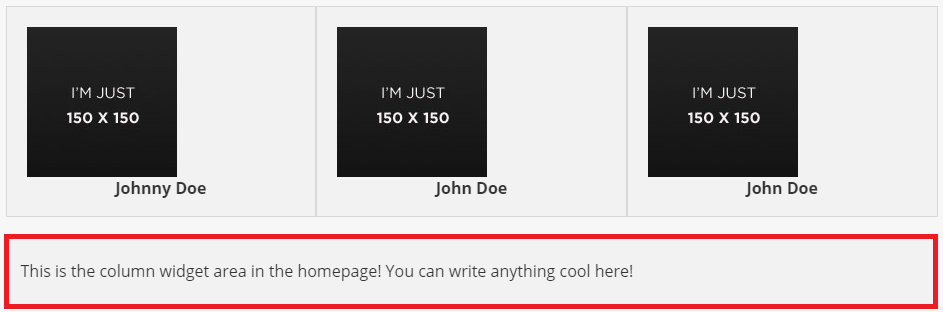
团队展示 (Team Showcase)
This section of the page is used to provide some information about your team. This section should is useful, because it lets our visitors get to know who they will be working with.
页面的此部分用于提供有关您的团队的一些信息。 本部分应该是有用的,因为它可以使我们的访问者了解将与谁一起工作。
Typically, this section might consist of a lot of team members. In this example, we’ll be only providing options for three members, but you can extend it as needed.
通常,此部分可能由很多团队成员组成。 在此示例中,我们将仅提供三个成员的选项,但是您可以根据需要扩展它。
创建面板 (Creating the Panel)
We’ll create a new panel and call it Team Showcase.
我们将创建一个新面板,并将其命名为Team Showcase 。
// Adding the Team Showcase panel
Kirki::add_panel( 'team_showcase', array(
    'priority'    => 10,
    'title'       => __( 'Team Showcase', 'magnificient' ),
    'description' => __( 'A section to show your team', 'magnificient' ),
) );
创建部分 (Creating the Section)
Next, we’ll create a section that has options for the team showcase.
接下来,我们将创建一个部分,其中包含用于团队展示的选项。
// Adding the Team Showcase for Homepage section
Kirki::add_section( 'team_showcase_for_homepage', array(
    'title'          => __( 'Team Showcase for Homepage', 'magnificient' ),
    'description'    => __( 'This will show the team members on the front page of your website', 'magnificient' ),
    'panel'          => 'team_showcase', // Not typically needed.
    'priority'       => 160,
    'capability'     => 'edit_theme_options',
    'theme_supports' => '', // Rarely needed.
) );
创建字段 (Creating the Fields)
There will be a total of six fields which consist of three image fields for the avatars and three text fields for the names of the members.
总共将有六个字段,其中包括用于化身的三个图像字段和用于成员名称的三个文本字段。
// Adding the Team Showcase image 1 field
Kirki::add_field( 'mc', array(
    'type'        => 'image',
    'settings'     => 'team_showcase_image_1',
    'label'       => __( 'Team Showcase image 1', 'magnificient' ),
    'description' => __( 'This image will be the first image for the Team Showcase.', 'magnificient' ),
    'section'     => 'team_showcase_for_homepage',
    'default'     => '',
    'priority'    => 10,
) );

// Adding the Team Showcase image 2 field
Kirki::add_field( 'mc', array(
    'type'        => 'image',
    'settings'     => 'team_showcase_image_2',
    'label'       => __( 'Team Showcase image 2', 'magnificient' ),
    'description' => __( 'This image will be the second image for the Team Showcase.', 'magnificient' ),
    'section'     => 'team_showcase_for_homepage',
    'default'     => '',
    'priority'    => 10,
) );

// Adding the Team Showcase image 3 field
Kirki::add_field( 'mc', array(
    'type'        => 'image',
    'settings'     => 'team_showcase_image_3',
    'label'       => __( 'Team Showcase image 3', 'magnificient' ),
    'description' => __( 'This image will be the third image for the Team Showcase.', 'magnificient' ),
    'section'     => 'team_showcase_for_homepage',
    'default'     => '',
    'priority'    => 10,
) );

// Adding the Team Showcase text 1 field
Kirki::add_field( 'mc', array(
    'type'        => 'text',
    'settings'     => 'team_showcase_text_1',
    'label'       => __( 'Team Member 1', 'magnificient' ),
    'description' => __( 'Name of the first member.', 'magnificient' ),
    'section'     => 'team_showcase_for_homepage',
    'default'     => __( 'John Doe', 'magnificient' ),
    'priority'    => 10,
) );

// Adding the Team Showcase text 2 field
Kirki::add_field( 'mc', array(
    'type'        => 'text',
    'settings'     => 'team_showcase_text_2',
    'label'       => __( 'Team Member 2', 'magnificient' ),
    'description' => __( 'Name of the second member.', 'magnificient' ),
    'section'     => 'team_showcase_for_homepage',
    'default'     => __( 'John Doe', 'magnificient' ),
    'priority'    => 10,
) );

// Adding the Team Showcase text 3 field
Kirki::add_field( 'mc', array(
    'type'        => 'text',
    'settings'     => 'team_showcase_text_3',
    'label'       => __( 'Team Member 3', 'magnificient' ),
    'description' => __( 'Name of the third member.', 'magnificient' ),
    'section'     => 'team_showcase_for_homepage',
    'default'     => __( 'John Doe', 'magnificient' ),
    'priority'    => 10,
) );
显示输出 (Showing the Output)
We’ll now display the images and names of the three members of the team on our Custom Homepage template. Open up homepage.php and insert the following:
现在,我们将在“ 自定义首页”模板上显示团队三名成员的图像和姓名。 打开homepage.php并插入以下内容:
Let’s first store the values of the images and the text in the variables.
首先,将图像和文本的值存储在变量中。
// For team member 1
$team_showcase_image_1 = Kirki::get_option( mc, team_showcase_image_1 );
$team_showcase_text_1 = Kirki::get_option( mc, team_showcase_text_1 );

// For team member 2
$team_showcase_image_2 = Kirki::get_option( mc, team_showcase_image_2 );
$team_showcase_text_2 = Kirki::get_option( mc, team_showcase_text_2 );

// For team member 3
$team_showcase_image_3 = Kirki::get_option( mc, team_showcase_image_3 );
$team_showcase_text_3 = Kirki::get_option( mc, team_showcase_text_3 );
Then, we can show each member using the code below:
然后,我们可以使用以下代码显示每个成员:
//Team Member 1
if ( $team_showcase_image_1 ) { echo '<img src="'. $team_showcase_image_1 .'" />'; }
if ( $team_showcase_text_1 ) { echo '<h6 class="team-showcase-member text-center">'. $team_showcase_text_1 .'</h6>'; }
//Team Member 2
if ( $team_showcase_image_1 ) { echo '<img src="'. $team_showcase_image_1 .'" />'; }
if ( $team_showcase_text_1 ) { echo '<h6 class="team-showcase-member text-center">'. $team_showcase_text_1 .'</h6>'; }
//Team Member 3
if ( $team_showcase_image_1 ) { echo '<img src="'. $team_showcase_image_1 .'" />'; }
if ( $team_showcase_text_1 ) { echo '<h6 class="team-showcase-member text-center">'. $team_showcase_text_1 .'</h6>'; }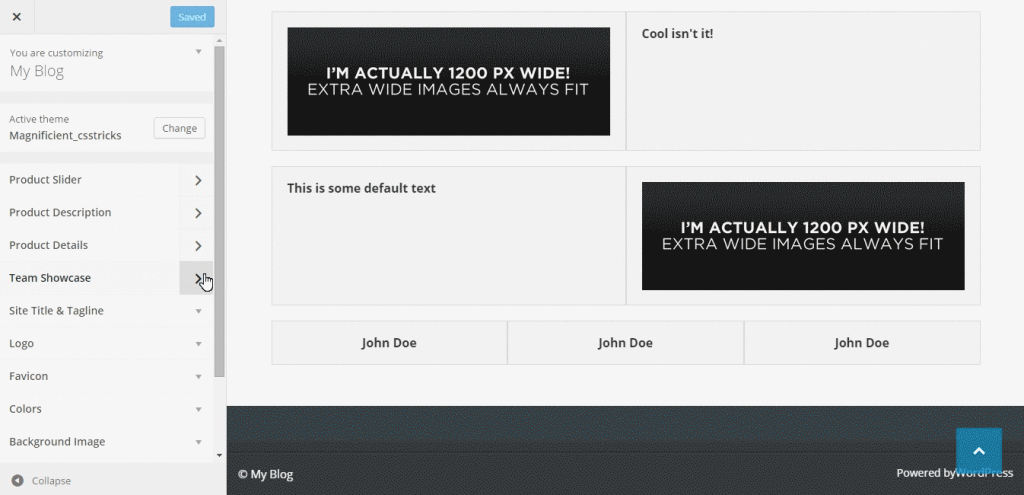
进阶主题 (Advanced Topics)
从另一个页面获取内容 (Fetching the Content from Another Page)
We can also fetch the content of another page into our home page. This is particularly useful if you want to show some information about your company and you already have an About Us page. You don’t need to write the same content all over again. You can just fetch that content using Kirki.
我们还可以将另一个页面的内容提取到我们的主页中。 如果您想显示有关您公司的一些信息并且已经有了“ 关于我们”页面,则此功能特别有用。 您无需重新编写相同的内容。 您可以使用Kirki获取该内容。
We can create a separate panel for providing this option, let’s do this!
我们可以创建一个单独的面板来提供此选项,让我们开始吧!
Here’s the code for the panel:
这是面板的代码:
// Adding the Frontpage Separate Page Content panel
Kirki::add_panel( 'front_page_separate_page_content', array(
    'priority'    => 10,
    'title'       => __( 'Frontpage Separate Page Content', 'magnificient' ),
    'description' => __( 'A section to fetch content from another page', 'magnificient' ),
) );
And here’s the code for the section:
这是该部分的代码:
// Adding the Frontpage Separate Page Content for Homepage section
Kirki::add_section( 'front_page_separate_page_content_for_homepage', array(
    'title'          => __( 'Frontpage Separate Page Content for Homepage', 'magnificient' ),
    'description'    => __( 'This will show the separate page content on the front page of your website', 'magnificient' ),
    'panel'          => 'front_page_separate_page_content', // Not typically needed.
    'priority'       => 160,
    'capability'     => 'edit_theme_options',
    'theme_supports' => '', // Rarely needed.
) );
Next, we’ll show a dropdown from where the admin can choose which page to show on the front page. We can use the dropdown-pages option of Kirki.
接下来,我们将显示一个下拉菜单,管理员可以从中选择要显示在首页上的页面。 我们可以使用Kirki的dropdown-pages选项。
We can add the field using the following:
我们可以使用以下内容添加字段:
// Adding the Separate Page Content dropdown field
Kirki::add_field( 'mc', array(
    'type'        => 'dropdown-pages',
    'settings'     => 'front_page_separate_page_content_dropdown',
    'label'       => __( 'Frontpage Separate Page Content', 'kirki' ),
    'description' => __( 'Select the page whose content will be shown on the front page inside the frontpage separate page section', 'kirki' ),
    'section'     => 'front_page_separate_page_content_for_homepage',
    'default'     => '',
    'priority'    => 10,
) );
This enables the option inside the WordPress Customizer. We can now edit our homepage.php file to show the content. Open up that file and copy the following code where you want this content to be shown:
这将启用WordPress Customizer中的选项。 现在,我们可以编辑homepage.php文件以显示内容。 打开该文件,然后将以下代码复制到要显示此内容的位置:
$front_page_separate_page_content_dropdown = Kirki::get_option( mc, front_page_separate_page_content_dropdown );
if ( $front_page_separate_page_content_dropdown ) {
    $front_page_separate_page_content_dropdown_content = get_post_field('post_content', $front_page_separate_page_content_dropdown);
    echo $front_page_separate_page_content_dropdown_content;
}
仅为首页创建侧边栏 (Creating a Sidebar for the Frontpage Only)
Creating a sidebar for your theme is simple if you follow the WordPress Codex. Rather than go into too much detail here, I would just add the sidebar to this theme by using the following code inside the library/widget-areas.php file.
如果您遵循WordPress Codex,则为主题创建侧边栏很简单。 与其在这里不做过多说明,我只是通过在library / widget-areas.php文件中使用以下代码,将边栏添加到该主题。
Open up widget-areas.php and add the following:
打开widget-areas.php并添加以下内容:
// Frontpage Sidebar
register_sidebar(array('name'=> 'Frontpage Sidebar',
    'id' => 'frontpage-sidebar',
    'description' => __(  'This is the sidebar which will be visible only on the frontpage (homepage) of your website.', 'magnificient' ),
    'before_widget' => '<article id="%1$s" class="panel widget %2$s">',
    'after_widget' => '</article>',
    'before_title' => '<h4>',
    'after_title' => '</h4>'
));
注意 (Note)
The widget-areas.php file located inside the library folder contains all the widget areas for this theme, so I’ve added the sidebar code there.
位于库文件夹中的widget-areas.php文件包含该主题的所有小部件区域,因此我在此处添加了侧边栏代码。
Then, we just have to edit our homepage.php file to show this widget area on that page. Open up your homepage.php and add the following code:
然后,我们只需要编辑我们的homepage.php文件即可在该页面上显示此小部件区域。 打开homepage.php并添加以下代码:
<?php dynamic_sidebar("frontpage-sidebar"); ?>
Now, when you add a widget in this sidebar, it will be shown on the frontpage only.
现在,当您在此侧边栏中添加小部件时,它将仅显示在首页上。
结语 (Wrapping It Up)
In this tutorial, I’ve explained how to make a landing page for your WordPress website using the Kirki toolkit. You can decorate this with some CSS and customize it just the way you like. It would be great have any cool ideas about implementing this toolkit and let me know in the comments section below. If you encounter any problems or have any questions, just let me know and I’ll be glad to help.
在本教程中,我已经说明了如何使用Kirki工具包为您的WordPress网站创建登录页面。 您可以使用一些CSS装饰它并按照自己的方式自定义它。 对于实现此工具包有任何很酷的想法,并在下面的评论部分中告诉我,将是很棒的。 如果您遇到任何问题或疑问,请告诉我,我们将很乐意为您提供帮助。
翻译自: https://www.sitepoint.com/designing-a-custom-home-page-for-your-wordpress-website/
wordpress 自定义


 4825
4825

 被折叠的 条评论
为什么被折叠?
被折叠的 条评论
为什么被折叠?
 到【灌水乐园】发言


