


Google is providing a host of (relatively) new features that allow you to add “rich snippet” metadata to your web content. For those who design, write, and manage WordPress blogs, this is a powerful tool that can help you build your personal brand much more efficiently — the reason being that Google will display your author information in search results if you’ve properly labeled your metadata via the rich snippets markup!
Google提供了许多(相对)新功能,可让您向网络内容中添加“丰富摘要”元数据。 对于那些设计,编写和管理WordPress博客的人来说,这是一个功能强大的工具,可以帮助您更有效地建立自己的品牌-原因是,如果您正确标记了元数据,那么Google会在搜索结果中显示您的作者信息。通过丰富的代码片段标记!
The reward for adding rich snippets of metadata is that as you get more blogs published with your name, your face or logo keeps popping up in search results. This is just one more crucial way to get your personal brand in front of people, and it’s easy to achieve in WordPress.
添加丰富的元数据片段的好处是,当您获得更多以您的名字发布的博客时,您的面Kong或徽标会不断出现在搜索结果中。 这只是让您的个人品牌在人们面前崭露头角的另一种至关重要的方法,而且在WordPress中很容易实现。
什么是丰富网页摘要? (What Are Rich Snippets?)
Normally, HTML markup is used for displaying content in a web browser. “Rich snippets” are a format of HTML that allow you to carefully define pieces of information within a web page so that search engines and other programs know what the heck the data is good for.
通常,HTML标记用于在Web浏览器中显示内容。 “丰富的摘要”是HTML的一种格式,可让您仔细定义网页中的信息,以便搜索引擎和其他程序知道数据有什么用处。
Here’s an example of how you might normally introduce yourself:
这是一个通常如何自我介绍的示例:
<p>Hi there! My name is Tara Hornor! Nice to meet you.</p>
<p>Hi there! My name is Tara Hornor! Nice to meet you.</p>
Using Rich Snippets, we can tell search engines who I am using code like this:
使用Rich Snippets,我们可以告诉搜索引擎我正在使用以下代码:
<p>Hi there! My name is <span itemprop="name">Tara Hornor</span>! Nice to meet you.</p>
<p>Hi there! My name is <span itemprop="name">Tara Hornor</span>! Nice to meet you.</p>
You can define scores of items like logos, birthdays, product IDs, and much, much more. But, today I’m really only interested in me…or at least my standing as an author, so that my picture shows up prominently in Google search results.
您可以定义项目的分数,例如徽标,生日,产品ID等。 但是,今天我真的只对我感兴趣……或者至少对我的作者身份很感兴趣,这样我的照片就可以在Google搜索结果中突出显示。
For much more information on rich snippets, here’s everything you ever wanted to know:
有关丰富网页摘要的更多信息,以下是您想知道的所有信息:
入门 (Getting Started)
For you non-web developer types out there, don’t worry about getting your hands a little dirty with some coding. I’ll walk you through it in baby steps.
对于您的非Web开发人员来说,不用担心编写一些代码会有点脏。 我将以小步骤逐步指导您。
Note: You will need access to the “Appearance” -> “Editor” area of WordPress, which means you’ll need to be an Admin for the site. You can still complete Steps 1-3 on your own and refer your admin to Steps 4-5 if you are not an admin yourself.
注意:您将需要访问WordPress的“外观”->“编辑器”区域,这意味着您需要成为该站点的管理员。 如果您自己不是管理员,您仍然可以自己完成第1-3步,并向管理员介绍第4-5步。
步骤1:您的Google+专页 (Step 1: Your Google+ Page)
You’re going to need a Google+ page for this to work. If you haven’t got one already, go set up a page really fast (it just takes a few minutes), and come back to this walkthrough.
您需要一个Google+信息页才能正常工作。 如果还没有,请快速建立页面(只需几分钟),然后返回此演练。
步骤2:促成… (Step 2: Contributor To…)
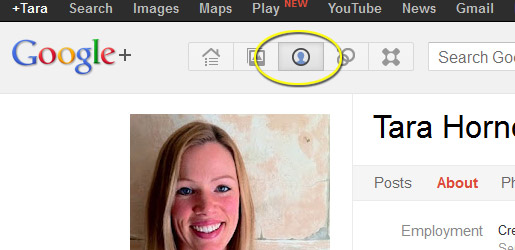
To tell Google that you’re officially a contributor (author) for a site, you have to update the “Contributor to” field on your About page. Log in to your G+ page and click on the “About” tab:
要告诉Google您是网站的正式贡献者(作者),您必须更新“关于”页面上的“贡献者”字段。 登录您的Google+页面,然后点击“关于”标签:
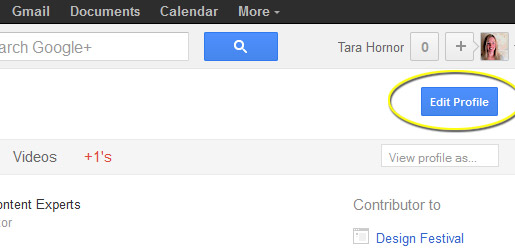
Now click the “Edit Profile” button in the upper-right part of the screen:
现在,单击屏幕右上方的“编辑配置文件”按钮:
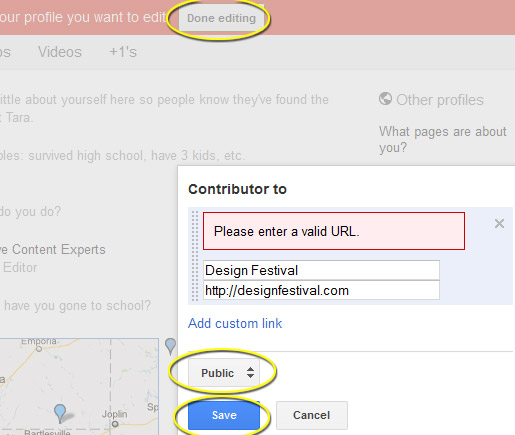
Click on the “Contributor to” section. When you hover your mouse over the field, it will highlight the entire section:
单击“贡献者”部分。 将鼠标悬停在该字段上时,它将突出显示整个部分:

It’s very important to not include the “www” to the URL, as this will break the connection and Google will give you an error.
请勿在网址中包含“ www”,这一点非常重要,因为这会断开连接,并且Google会给您一个错误。
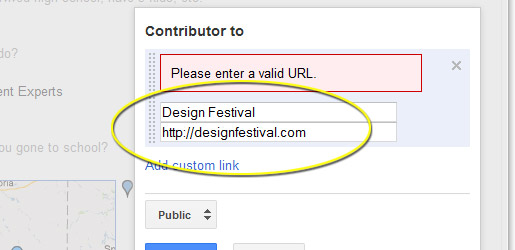
Make sure the link is set to “Public,” and hit save to complete. You’ll need to click the “Done Editing” button as well in the upper-right.
确保链接设置为“公共”,然后单击“保存”以完成。 您还需要单击右上角的“完成编辑”按钮。
步骤3:WordPress个人资料 (Step 3: WordPress Profile)
Log in to your WordPress website, go to the “Users” -> “Profile” section, and paste your G+ URL into the “Website” field:
登录到您的WordPress网站,转到“用户”->“个人资料”部分,然后将您的G + URL粘贴到“网站”字段中:

NOTE: Make sure you add “?rel=author” to the end of your G+ URL. This is very important. Now, my URL looks like this:
注意:确保在G + URL的末尾添加“?rel = author”。 这很重要。 现在,我的网址看起来像这样:
https://plus.google.com/u/0/117883511520701899763?rel=author
https://plus.google.com/u/0/117883511520701899763?rel=author
步骤4:WordPress编辑器 (Step 4: WordPress Editor)
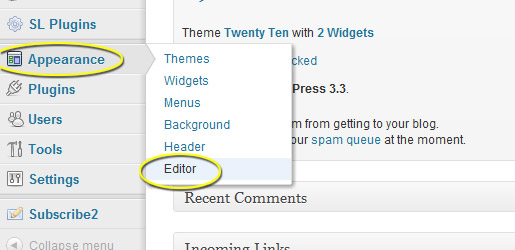
Next, we need to update your WordPress blog so that it automagically connects your G+ profile to your blog. If you don’t have admin access to your blog, then you’ll have to stop here. You will need to be able to access the “Appearance” -> “Editor” options within WordPress to complete this feature.
接下来,我们需要更新您的WordPress博客,以便它自动将您的G +个人资料连接到您的博客。 如果您没有博客的管理员访问权限,则必须在此处停止。 您需要能够访问WordPress中的“外观”->“编辑器”选项才能完成此功能。
Sign into your WordPress blog as an admin, and cruise on over to the “Appearance” -> “Editor” option (I’m using WordPress 3.3.1 for this tutorial):
以管理员身份登录WordPress博客,然后浏览至“外观”->“编辑器”选项(我在本教程中使用WordPress 3.3.1):
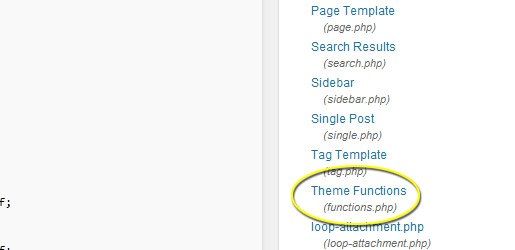
99% of the time, you will need to edit the “single.php” file, but your theme may have the info you need in the “content.php”, “loop.php”, “functions.php”, or other file. In our example, we’re going to “functions.php”.
99%的时间,您将需要编辑“ single.php”文件,但是您的主题可能在“ content.php”,“ loop.php”,“ functions.php”或其他文件中具有所需的信息。文件。 在我们的示例中,我们将转到“ functions.php”。
What you’re looking for as you skim through your PHP files is the point where the WordPress theme posts the author content and date of the post. This is usually in the same area as the title of the post. In some themes, you can simply paste the following code and call it good:
在浏览PHP文件时,您正在寻找的是WordPress主题发布作者内容和发布日期的地方。 通常与帖子标题位于同一区域。 在某些主题中,您只需粘贴以下代码并将其命名为好:
<a href="<?php the_author_url(); ?>" rel="author"><?php the_author('display_name'); ?></a>
<a href="<?php the_author_url(); ?>" rel="author"><?php the_author('display_name'); ?></a>
This calls your author website (updated in Step 3), and makes your name the link to your profile page. Most importantly, the href has the rel=”author” code, that tells Google that you are the author of the page.
这将呼叫您的作者网站(在第3步中进行了更新),并使您的名字成为您个人资料页面的链接。 最重要的是,href具有rel =“ author”代码,该代码告诉Google您是页面的作者。
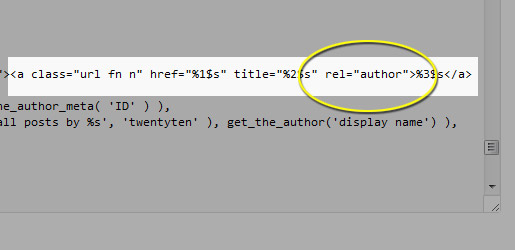
For the rest of us, using the default Twenty Ten theme in WordPress, here’s where the content I want to edit is displayed:
对于我们其余的人,使用WordPress中默认的二十一主题,此处是我要编辑的内容的显示位置:
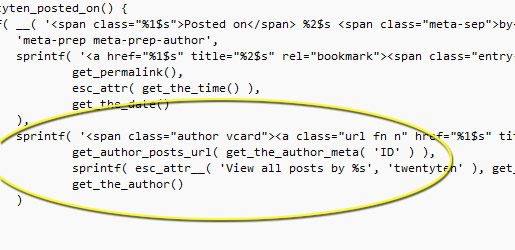
In this example, we only need to make a single small change. In the part of the function that calls the href for the author URL, add the rel=”author” code:
在此示例中,我们只需要进行一个小的更改。 在该函数的调用作者URL的href的部分中,添加rel =” author”代码:
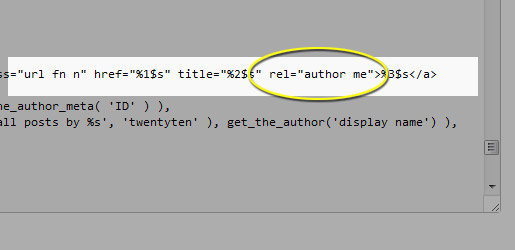
You can cover all of your bases by adding “me” to the rel=”author” so that Google can connect other information, like the author’s name to the profile:
您可以通过在rel =“ author”上添加“ me”来覆盖所有基础,以便Google可以将其他信息(例如作者的姓名与个人资料联系起来):
Now, we need to tell WordPress which URL to grab. By default, WordPress will link readers to your archive of posts, which is not what we want anymore. We want WordPress to link to the “website” field from the author profile page. To do this, we need to change this line of code:
现在,我们需要告诉WordPress要获取哪个URL。 默认情况下,WordPress会将读者链接到您的帖子存档,这不再是我们想要的。 我们希望WordPress从作者个人资料页面链接到“网站”字段。 为此,我们需要更改以下代码行:
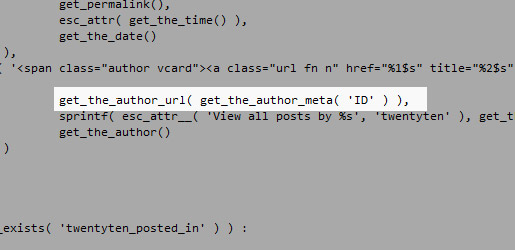
You’re changing the line from:
您将从以下位置更改行:
get_author_post_url( get_the_author_meta( 'ID' ) ),
get_author_post_url( get_the_author_meta( 'ID' ) ),
To the code for grabbing the Author’s website:
抓取作者网站的代码:
get_the_author_url( get_the_author_meta( 'ID' ) ),
get_the_author_url( get_the_author_meta( 'ID' ) ),
Once those updates are completed, save the file and you’re done!
这些更新完成后,保存文件即可完成操作!
步骤5:测试结果 (Step 5: Testing The Results)
To test the results, you can go to Google’s Rich Snippet Test page: http://www.google.com/webmasters/tools/richsnippets
要测试结果,您可以转到Google的Rich Snippet Test页面: http : //www.google.com/webmasters/tools/richsnippets
Paste the URL of a post with the author’s name on it, and hit the “Preview” button:
贴上带有作者姓名的帖子的URL,然后单击“预览”按钮:
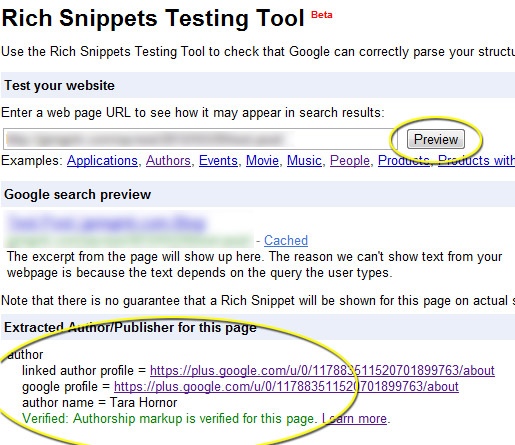
You’ll see the green confirmation at the bottom of the test, showing that the authorship has been verified.
您将在测试的底部看到绿色的确认,表明作者身份已通过验证。
Congrats! You’re now an officially verified author for the blog, and your face, logo, and other metadata will begin showing up in search results. You’re on you way to personal brand domination!
恭喜! 您现在是该博客的经过官方验证的作者,并且您的脸部,徽标和其他元数据将开始出现在搜索结果中。 您正在走向个人品牌统治!
Have you grown your personal or company brand using rich snippets? Will you share any Google search queries to show off your results?
您是否使用丰富的摘要发展了个人或公司品牌? 您会分享任何Google搜索查询来炫耀您的结果吗?
翻译自: https://www.sitepoint.com/add-rich-snippet-support-in-wordpress-and-dominate-your-personal-brand/


 537
537


 被折叠的 条评论
为什么被折叠?
被折叠的 条评论
为什么被折叠?
 到【灌水乐园】发言


