


 本文介绍了如何通过配置Cron任务来自动创建AWS EC2实例的备份,确保99.999%的正常运行时间。文章详细阐述了所需的安全凭证、工具安装和脚本编写过程,包括X.509证书、EC2 API工具、Java JDK的安装以及备份脚本的创建。文章以中级Linux用户为目标读者,提供了自动化备份的计划和实施步骤。
亚马逊ec2 实例删除
第一部分:使用Cron计划快照 (Part One: Scheduling Snapshots Using Cron)
Skill Level: IntermediateOperating System(s): Linux
技能级别:中级操作系统: Linux
哲学 (Philosophy)
99.999% Uptime. That is a wonderful goal, and in order to get there we must plan for the inevitable outages and problems that cause our servers to break.
正常运行时间为99.999%。 这是一个绝妙的目标,为了达到目标,我们必须为不可避免的停机和导致服务器故障的问题进行计划。
The best we can do is to be prepared with the Three P’s: Planning, Process, and Practice.
我们能做的最好的事情就是准备三个P:计划,流程和实践。
So how do we plan for the worst? Make backups, of course! The best kind are those that:
那么我们如何计划最坏的情况呢? 当然要备份! 最好的是:
- Run automatically, 自动运行
- Are stored someplace other than the server that is being backed up, 存储在备份服务器以外的其他地方,
- Fast and easy to restore, 快速简便地还原,
- Don’t cost a fortune to run or keep. 无需花费大量财富即可运行或保留。
Since we are on AWS, that is very easy to accomplish.
由于我们使用的是AWS,因此非常容易实现。
计划 (The Plan)
Configure a daily event to create a backup copy of our entire EC2 instance.
配置每日活动以创建整个EC2实例的备份副本。
We will use the cron command to schedule an AWS Elastic Block Store (EBS) snapshot, which makes a point-in-time image of the entire filesystem at the time the snapshot is run, and may be used later to recover the instance in the event of a failure. Note that only AWS instances that are EBS-backed may use this method.
我们将使用cron命令安排一个AWS Elastic Block Store(EBS)快照,该快照将在运行快照时为整个文件系统创建一个时间点映像,以后可用于在快照中恢复实例。故障事件。 请注意,只有具有EBS支持的AWS实例可以使用此方法。
先决条件: (Prerequisites:)
access to your AWS Account» Security Credentials page
访问您的AWS账户 »“安全凭证”页面
access to the AWS Management Console Web GUI
root access to a running AWS EC2 EBS-backed Linux instance – for example:
对正在运行的由AWS EC2 EBS支持的Linux实例的root访问权限–例如:
ssh -i AWSKeyPair.pem ec2-user@{yourInstance_FQDN_or_IP}
% sudo su
root@yourInstance#
安装所需的工具 (Install the Needed Tools)
In order to do this we will need the following things:
为此,我们需要执行以下操作:
AWS X.509证书和私钥文件 (AWS X.509 Certificate and Private Key Files)
These two files allow your server to execute AWS EC2 instance commands securely.
这两个文件使您的服务器可以安全地执行AWS EC2实例命令。
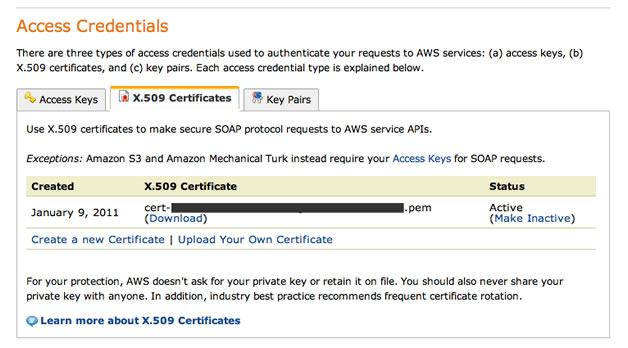
They are obtained from the AWS Account » Security Credentials page. Towards the bottom of the page locate three tabs: “Access Keys”, “X.509 Certificates”, and “Key Pairs”. Once found, click the middle one, “X.509 Certificates“.
它们是从“ AWS账户” »“安全凭证”页面获得的。 在页面底部找到三个选项卡:“访问密钥”,“ X.509证书”和“密钥对”。 找到后,单击中间的“ X.509证书 ”。
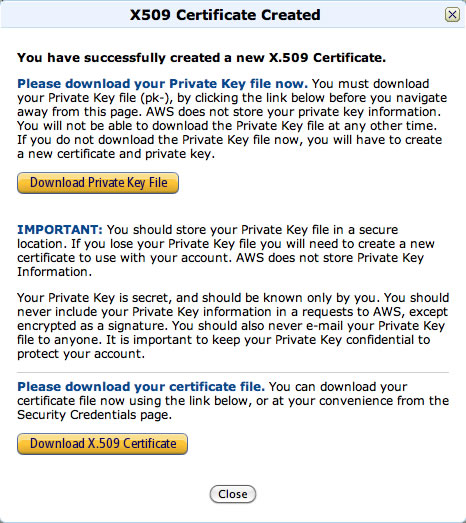
Next, click the link for “Create a new Certificate” and a new window will appear with two orange download buttons, “Download Private Key File” and “Download X.509 Certificate”. You get only one opportunity to download your Private Key File, so be careful to note where this file downloads to! Also download your certificate file, which you may download again at any time. The private key file will be in the form of:pk-{your_specific_32_character_random_string}.pem
接下来,单击“创建新证书”的链接,将出现一个带有两个橙色下载按钮的新窗口,分别是“下载私钥文件”和“下载X.509证书”。 您只有一次下载私钥文件的机会,因此请注意该文件的下载位置! 还要下载您的证书文件,您可以随时再次下载。 私钥文件的格式为: pk-{your_specific_32_character_random_string}.pem
and the certificate file will look like:cert-{your_specific_32_character_random_string}.pem
证书文件将类似于: cert-{your_specific_32_character_random_string}.pem
Next, upload the two files to your AWS EC2 instance:
接下来,将两个文件上传到您的AWS EC2实例:
~/Downloads% scp -i AWSKeyPair.pem pk-*.pem ec2-user@{yourInstance_FQDN_or_IP}:
~/Downloads% scp -i AWSKeyPair.pem cert-*.pem ec2-user@{yourInstance_FQDN_or_IP}:
Finally, you will need to copy the two files to your root user’s home directory:
最后,您需要将两个文件复制到root用户的主目录中:
root@yourInstance# cd
root@yourInstance# mkdir .ec2/
root@yourInstance# chmod 700 .ec2/
root@yourInstance# cp ~ec2-user/*.pem .ec2/
root@yourInstance# ls -l .ec2/
Amazon EC2 API工具 (Amazon EC2 API Tools)
These are the actual commands that run on your instance to allow you to create the snapshot (and restore it too).
这些是在实例上运行的实际命令,可让您创建快照(并还原快照)。
root@yourInstance# yum install aws-apitools-ec2 ec2-utilsThe above command installs the API Tools into /opt/aws/apitools/ec2-1.4.4.2 and creates a symlink to it:lrwxrwxrwx 1 root root 13 Oct 20 01:57 /opt/aws/apitools/ec2 -> ./ec2-1.4.4.2
上面的命令将API工具安装到/opt/aws/apitools/ec2-1.4.4.2中,并创建一个符号链接:lrwxrwxrwx lrwxrwxrwx 1 root root 13 Oct 20 01:57 /opt/aws/apitools/ec2 -> ./ec2-1.4.4.2
The yum command above also installs the three EC2 utility commands:/etc/udev/rules.d/51-ec2-hvm-devices.rules /opt/aws/bin/ec2-metadata /sbin/ec2udev
上面的yum命令还安装了三个EC2实用程序命令: /etc/udev/rules.d/51-ec2-hvm-devices.rules /opt/aws/bin/ec2-metadata /sbin/ec2udev
If yum is not available, you may download and manually install both: API Tools: http://aws.amazon.com/developertools/351 EC2 Utilities: http://aws.amazon.com/code/1825?_encoding=UTF8&jiveRedirect=1
如果yum不可用,则可以下载并手动安装两者:API工具: http : //aws.amazon.com/developertools/351 EC2实用工具: http : //aws.amazon.com/code/1825 ? _encoding=UTF8& jiveRedirect = 1
获取Java JDK的最新Sun / Oracle版本 (Get the latest Sun/Oracle version of the Java JDK)
Download the appropriate rpm from: http://www.oracle.com/technetwork/java/javase/downloads/jdk-7u1-download-513651.html
从以下位置下载适当的rpm: http : //www.oracle.com/technetwork/java/javase/downloads/jdk-7u1-download-513651.html
Intel x86 arch: http://download.oracle.com/otn-pub/java/jdk/7u1-b08/jdk-7u1-linux-i586.rpm AMD x64 arch: http://download.oracle.com/otn-pub/java/jdk/7u1-b08/jdk-7u1-linux-x64.rpm
Intel x86架构: http : //download.oracle.com/otn-pub/java/jdk/7u1-b08/jdk-7u1-linux-i586.rpm AMD x64架构: http : //download.oracle.com/otn -pub / java / jdk / 7u1-b08 / jdk-7u1-linux-x64.rpm
root@yourInstance# wget -Ojdk-7u1-linux-i586.rpm http://download.oracle.com/otn-pub/java/jdk/7u1-b08/jdk-7u1-linux-i586.rpmTo Install:
安装:
root@yourInstance# rpm -i jdk-7u1-linux-i586.rpmor, to Upgrade:
或升级:
root@yourInstance# rpm -U jdk-7u1-linux-i586.rpmTo set the $JAVA_HOME environment variable properly for this command-line session only:
要仅为此命令行会话正确设置$ JAVA_HOME环境变量,请执行以下操作:
root@yourInstance# export JAVA_HOME=/usr/java/latest剧本 (Scripts)
These scripts help automate each step of the process, providing key bits of the workflow that allow us to quickly get the job done.
这些脚本有助于自动化流程的每个步骤,提供工作流程的关键点,使我们能够快速完成工作。
IMPORTANT: Please create each of these scripts in the /opt/bin directory, making sure to insert your specific values wherever you see curly brackets {}.
重要说明:请在/opt/bin目录中创建每个脚本,并确保在出现大括号{}的位置插入特定的值。
Also, please be sure to set execute permissions properly on all of the new scripts:
另外,请确保在所有新脚本上正确设置执行权限:
root@yourInstance# chmod 750 /opt/bin/*/ opt / bin / instanceid (/opt/bin/instanceid)
The instanceid script simply gets the specific ID of this AWS instance, which we will need for later steps.
instanceid脚本仅获取此AWS实例的特定ID,我们将在以后的步骤中使用该ID。
#!/bin/sh
#
### /opt/bin/instanceid
#
/opt/aws/bin/ec2-metadata -i | /bin/awk '{print $2}'
/ opt / bin / ec2do (/opt/bin/ec2do)
The core shell script is ec2do, which allows any other calling script to get working access to the AWS API tools without any special setup. We do this because the cron scheduling command has a notoriously limited environment, so any environment variable that you set in ~/.bash_profile will normally not be loaded by a script run from cron.
核心外壳脚本是ec2do ,它允许任何其他调用脚本无需任何特殊设置即可有效访问AWS API工具。 我们这样做是因为cron schedule命令的环境非常有限,因此,在〜/ .bash_profile中设置的任何环境变量通常都不会由cron运行的脚本加载。
Please be sure to modify the example below to include your 32-character X.509 random key.
请确保修改下面的示例以包含32个字符的X.509随机密钥。
#!/bin/bash
#
### /opt/bin/ec2do
#
## EXAMPLE:
## ec2-describe-volumes
## Becomes:
## ec2do describe-volumes
#
export EC2_HOME='/opt/aws/apitools/ec2'  # Make sure you use the API tools, not the AMI tools
export EC2_BIN=$EC2_HOME/bin
export EC2_PRIVATE_KEY=/root/.ec2/pk-{your_32_char_rand}.pem
export EC2_CERT=/root/.ec2/cert-{your_32_char_rand}.pem
export PATH=$PATH:$EC2_BIN
export JAVA_HOME=/usr/java/latest
$EC2_BIN/ec2-$*
/ opt / bin /卷 (/opt/bin/volumes)
#!/bin/sh
#
### /opt/bin/volumes
#
/opt/bin/ec2do describe-volumes | /bin/grep ATTACHMENT | /bin/grep `/opt/bin/instanceid`
Outputs one or more lines like the following:ATTACHMENT vol-424ebd4a i-2c765a02 /dev/sda1 attached 2011-08-29T19:08:20+0000ATTACHMENT vol-88c73d2f i-2c765a02 /dev/sdb1 attached 2011-08-29T19:08:20+0000
输出类似以下内容的一行或多行内容: ATTACHMENT vol-424ebd4a i-2c765a02 /dev/sda1 attached 2011-08-29T19:08:20+0000 ATTACHMENT vol-88c73d2f i-2c765a02 /dev/sdb1 attached 2011-08-29T19:08:20+0000
The second column contains the {volumeID}’s you will need to create the snapshots.
第二列包含创建快照所需的{volumeID}。
If you have gotten this far, then you have successfully installed your X.509 keys and used the API Tools to get information about this instance. Congratulations! If you do not get output from this command, please stop and recheck each of the previous steps. It is ESSENTIAL that the
/opt/bin/ec2do describe-volumescommand return information.如果到此为止,那么您已经成功安装了X.509密钥并使用API工具获取有关此实例的信息。 恭喜你! 如果未从此命令获得输出,请停止并重新检查前面的每个步骤。
/opt/bin/ec2do describe-volumes命令返回信息是/opt/bin/ec2do describe-volumes。
/ opt / bin / volsnap (/opt/bin/volsnap)
The /opt/bin/volsnap command is the actual script that runs the backup snapshots, and is really quite simple. One line to get the current date, and one line for each volume to backup.
/opt/bin/volsnap命令是运行备份快照的实际脚本,实际上非常简单。 一行获取当前日期,每行备份一行。
Please replace {volumeID_X} with the actual volume ID’s returned from the /opt/bin/volumes command above. Also replace {yourInstance} with the hostname or any other identifying string you care to use.
请用以上/opt/bin/volumes命令返回的实际卷ID替换{volumeID_X}。 另外,用您要使用的主机名或任何其他标识字符串替换{yourInstance}。
#!/bin/sh
#
### /opt/bin/volsnap
#
DATE=`/bin/date '+%Y%m%d%H%M%S'`
/opt/bin/ec2do create-snapshot {volumeID_1} --description "{yourInstance}-{volumeID_1}-$DATE"
/opt/bin/ec2do create-snapshot {volumeID_2} --description "{yourInstance}-{volumeID_2}-$DATE"
Obviously, a much more complex script than this can be written (and has been), but that is a tad beyond the scope of this tutorial ;-}
显然,可以编写(并且已经编写)的脚本要比编写的脚本复杂得多,但这超出了本教程的范围;-}
Run the script now manually to verify that it is working:
现在手动运行脚本以验证其是否正常运行:
root@yourInstance# /opt/bin/volsnapYou should see something that looks similar to this:SNAPSHOT snap-36380592 vol-424ebd4a pending 2011-10-20T03:46:57+0000 510579120428 8
您应该看到类似于以下内容: SNAPSHOT snap-36380592 vol-424ebd4a pending 2011-10-20T03:46:57+0000 510579120428 8
Log into the AWS console and navigate to EC2 » Snapshots and you should be able to see the snapshots you just ran.
登录AWS控制台并导航至“ EC2»快照”,您应该能够看到刚运行的快照。
You can also run:
您还可以运行:
/opt/bin/ec2do describe-snapshots安排备份 (Scheduling the Backup)
Finally, we have made it to the last step – automating out backup script.
最后,我们进入了最后一步–自动化备份脚本。
root@yourInstance# crontab -e

11 00 * * * /opt/bin/volsnap > /var/log/volsnap.log 2>&1
The above cron entry will run the backup script every night at 11 minutes after midnight and record any output in the /var/log/volsnap.log file.
上面的cron条目将在每天午夜12点后的晚上运行备份脚本,并将所有输出记录在/var/log/volsnap.log文件中。
摘要 (Summary)
Congratulations! Great job – you have automated your backups. In the next part of our series you will learn how to use a snapshot to recover a failed instance completely and easily.
恭喜你! 做得好–您已使备份自动化。 在本系列的下一部分中,您将学习如何使用快照完全轻松地恢复失败的实例。
资源链接 (Resource Links)
http://aws.amazon.com/ec2/faqs/http://docs.amazonwebservices.com/AWSEC2/latest/CommandLineReference/From Zero to Cloud: Setting up an EC2 Sandbox, Part 2
http://aws.amazon.com/ec2/faqs/ http://docs.amazonwebservices.com/AWSEC2/latest/CommandLineReference/ 从零到云:设置EC2沙箱,第2部分
Image via Shutswis / Shutterstock
翻译自: https://www.sitepoint.com/automating-amazon-ec2-instance-backup-and-recovery-part-one-2/
亚马逊ec2 实例删除


 494
494

 被折叠的 条评论
为什么被折叠?
被折叠的 条评论
为什么被折叠?
 到【灌水乐园】发言


