


使用路径和钢笔工具 (Working with Paths and the Pen Tool)
Becoming comfortable with the Pen Tool often takes a while for vector graphic newbies. Unlike pencil-and-paper doodling (or comparatively, using a pencil- or brush-type tool in a typical drawing program), where your hand (or mouse) guides the drawn path, the pen tool creates shapes based on a series of points and their corresponding "direction lines" (Illustrator term) or "handles" (Freehand term).
对于矢量图形新手来说,习惯使用钢笔工具通常需要一段时间。 不同于铅笔和纸的涂鸦(或者在典型的绘图程序中使用铅笔或画笔类型的工具),手写(或鼠标)引导绘制的路径,而笔工具则基于一系列点来创建形状及其相应的“方向线”(插图项)或“句柄”(徒手的术语)。
Drawing a complex shape with a pencil or brush tool usually involves clicking once to start the shape, then holding the mouse button down, and dragging the mouse to follow the lines of the shape. Drawing the same shape with a pen tool involves a series of clicks and drags to set the anchor points and define curve directions. It sounds complicated, but once you get the hang of it, you’ll never look back!
使用铅笔或画笔工具绘制复杂的形状通常需要单击一次以开始形状,然后按住鼠标按钮并拖动鼠标以跟随形状的线条。 使用钢笔工具绘制相同的形状需要一系列的单击和拖动操作以设置锚点并定义曲线方向。 听起来很复杂,但是一旦掌握了它,就永远不会回头!
Select the Pen Tool, and go for it:
选择钢笔工具,然后进行以下操作:
Illustrator:
插图画家:
Freehand:
写意:
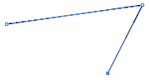
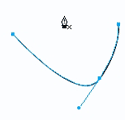
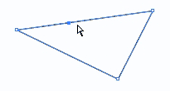
Click once on the document, then move the cursor and click again. This creates a line that connects the two points.
在文档上单击一次,然后移动光标并再次单击。 这将创建一条连接两个点的线。
By clicking again, you can start to create a shape:
再次单击,您可以开始创建形状:
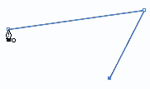
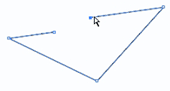
To "close" the path to actually make a shape, move the cursor to the original point. When the cursor turns to a pen shape with a small circle, click on the point and the shape will be closed off. If the cursor doesn’t change, it means that you aren’t quite on top of the original point, so you’ll end up just creating another point without closing the shape.
要“闭合”实际形成形状的路径,请将光标移动到原始点。 当光标变成带有小圆圈的笔形时,单击该点,形状将被关闭。 如果光标没有变化,则意味着您不在原始点的顶部,因此最终您将只创建另一个点而不关闭形状。
What you’ve learned so far:
到目前为止,您已经学到了什么:
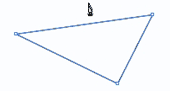
Clicking with the pen tool creates corner points.
用钢笔工具单击会创建角点 。
- Each new click creates a connected line segment with the previous point. 每次新单击都会创建一个与上一个点相连的线段。
Bringing the cursor back to the original point and clicking will close the path to create a shape.
将光标返回到原始点,然后单击将关闭创建形状的路径。
Now, let’s move on to curves.
现在,让我们继续进行曲线。
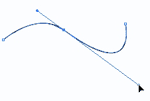
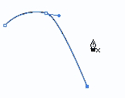
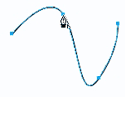
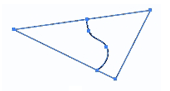
With the same Pen Tool, click once to create a starting "corner" point. Then, click again — but this time, hold the mouse down and drag. A curve will form. You can continue to hold and drag in different directions to see how the curve is affected. The resulting tangent line can be referred to as a "direction line" or a "handle."
使用相同的钢笔工具,单击一次以创建一个起始“角”点。 然后,再次单击-但这次,按住鼠标并拖动。 将形成一条曲线。 您可以继续按住并向不同方向拖动以查看曲线的影响方式。 所得的切线可以称为“方向线”或“手柄”。
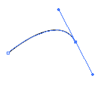
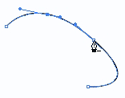
The location at which you place the next point will affect the shape of the resulting curve, as you can see in the examples below:
在下一个示例中可以看到,下一个点的放置位置将影响所得曲线的形状。
The black arrow tool selects the entire path (so that you can move it around and resize it). Use the "white arrow tool" (known as the Direct Selection Tool in Illustrator and the Subselect Tool in Freehand) to tweak individual points and direction lines.
黑色箭头工具会选择整个路径(以便您可以四处移动并调整其大小)。 使用“白色箭头工具”(在Illustrator中被称为直接选择工具,在徒手绘制中被称为“子选择工具”)微调各个点和方向线。
Illustrator:
插图画家:
Freehand:
写意:
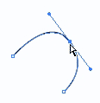
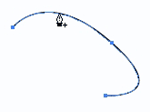
With the white arrow tool, select the point on the curve that you wish to tweak:
使用白色箭头工具,选择要调整的曲线上的点:
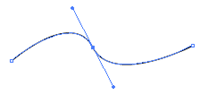
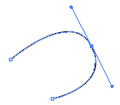
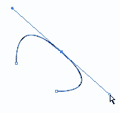
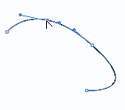
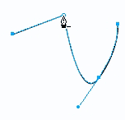
Now, grab one of the direction line handles and pull. You’ll see the curves adjust; the entire curve shifts so that the direction line remains tangent to the curve. The side of the curve that you’re pulling grows more pronounced the further out you drag the handle.
现在,抓住方向线手柄之一并拉动。 您会看到曲线调整; 整个曲线会移动,以便方向线与曲线保持切线。 拖动手柄的距离越远,弯曲的那一侧越明显。
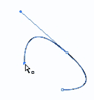
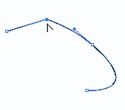
In another example, you can see how pulling out both handles makes the curve "wider."
在另一个示例中,您可以看到拔出两个控柄如何使曲线“变宽”。
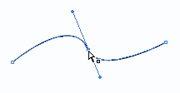
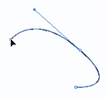
The white arrow tool can also be used to move individual points around:
白色箭头工具还可用于在以下位置移动单个点:
Now you also know how to:
现在您还知道如何:
- Use the pen tool to create curved points (by clicking and dragging). 使用钢笔工具创建弯曲点(通过单击和拖动)。
- Use the white arrow tool to tweak points and direction lines. 使用白色箭头工具调整点和方向线。
But there are many more ways that you can work with paths…
但是,您可以使用多种方法来处理路径…
其他路径工具的旋风之旅 (A Whirlwind Tour of Other Path Tools)
You may add points to an existing path. In both Illustrator and Freehand, first select the path that you want to add points to, then hover over the path with the pen tool. You’ll see the cursor change to a pen with a plus (+) sign. Click once and a new point will be added, with direction handles that follow the existing curve. (Illustrator also has the "Add Anchor Point Tool," hidden behind the Pen Tool, which does the same thing but doesn’t require you to select a path first.)
您可以将点添加到现有路径。 在Illustrator和Freehand中,首先选择要向其添加点的路径,然后使用钢笔工具将鼠标悬停在该路径上。 您会看到光标变为带加号(+)的笔。 单击一次,将添加一个新点,其方向控制柄将遵循现有曲线。 (Illustrator的钢笔工具后面还隐藏了“添加锚点工具”,该工具具有相同的功能,但不需要您首先选择路径。)

In Illustrator, to delete an anchor point, you may also use the Pen Tool to hover over a point until the cursor changes to a pen with a minus (-) sign. Click once and the anchor point will be deleted. Once again, Illustrator does have a separate Delete Anchor Point Tool, hidden behind the Pen Tool.
在Illustrator中,要删除锚点,还可以使用钢笔工具将鼠标悬停在一个点上,直到光标变为带有减号(-)的笔。 单击一次,锚点将被删除。 再一次,Illustrator确实有一个单独的“删除锚点工具”,它隐藏在“笔工具”的后面。
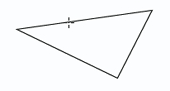
Also hidden behind the Pen Tool in Illustrator is the Convert Direction Point Tool, which looks like a caret, or just the angle part of an arrow.
在Illustrator中,钢笔工具的后面还隐藏着“转换方向点工具”,它看起来像插入符号,或者只是箭头的角度部分。
When you use this tool, clicking on a curve point will convert it into a corner point; clicking and dragging on corner points will convert them into curve points. In the diagram below, we converted a curve point into a corner point.
当您使用此工具,单击曲线点会将其转换成一个角点; 单击并拖动拐角点会将其转换为曲线点。 在下图中,我们将曲线点转换为角点。
Freehand has combined these functions into the Pen Tool. In Freehand, when you select the Pen Tool and hover over an existing point, you’ll see the cursor change to a pen with the same caret symbol used in Illustrator for the Convert Direction Point tool. This functions in the same way as the tool did in Illustrator, and converts a curve point to a corner point (and vice versa).
Freehand已将这些功能组合到钢笔工具中。 在Freehand中,当您选择“钢笔工具”并将鼠标悬停在现有点上时,您会看到光标变为具有与Illustrator中“转换方向点”工具相同的插入符号的笔。 此功能的功能与Illustrator中工具的功能相同, 并将曲线点转换为角点(反之亦然)。
After you click the point once to convert it, the cursor will change to the pen with a minus sign, giving you the option you to delete the point completely. (Contrast this with the above instructions for Illustrator, where you actually choose different tools for those different functions. Freehand puts all those tools into one.)
单击一次要转换的点后,光标将变为带减号的笔,使您可以选择完全删除该点。 (将其与Illustrator的上述说明进行对比,您实际上在其中为这些不同的功能选择了不同的工具。徒手将所有这些工具合二为一。)
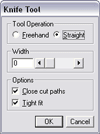
Another useful thing you might want to do to a path is to cut it. In Illustrator, the Scissors and Knife tools allow you to cut paths and shapes. In Freehand, the Knife tool combines both functions. Sound complicated? It can be…
您可能想对路径做的另一件事是削减路径。 在Illustrator中,“剪刀和刀”工具使您可以剪切路径和形状。 在Freehand中,“刀”工具结合了这两个功能。 听起来复杂吗? 有可能…

The Illustrator Scissors tool and the Freehand Knife tool do the same job: cut a path into pieces. To use either, select the tool, and then click anywhere on a path. You’ll notice that it looks like a point has been added to the path. Big deal, right? Well, if you use the white arrow tool and move things around, you’ll see that in actuality, you now have two line segments:
Illustrator剪刀工具和Freehand Knife工具完成相同的工作:将路径切成碎片。 要使用两者之一,请选择该工具,然后单击路径上的任意位置。 您会注意到,似乎已将点添加到路径中。 没关系吧? 好吧,如果您使用白色箭头工具并四处移动,则实际上您会看到两个线段:
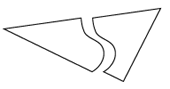
Illustrator’s Knife Tool allows you to divide a shape into two distinct shapes. Just select the shape with the black arrow tool, then, with the Knife Tool, draw a dividing line — straight or curved — and the shape will be divided into two pieces along the corresponding path!
Illustrator的“刀子工具”使您可以将形状分为两个不同的形状。 只需使用黑色箭头工具选择形状,然后使用“刀”工具绘制一条直线或弯曲的分隔线,然后该形状将沿相应的路径分成两部分!
To achieve this same functionality in Freehand, double-click on the Knife tool to get to the options, and check the "Close cut paths" option.
要在Freehand中实现相同的功能,请双击“刀”工具以获取选项,然后选中“关闭剪切路径”选项。
They’re the basics of manipulating paths. In the next section, we’ll take you step-by-step through an easy, practical example where you can apply all your new knowledge… and even learn a few more tricks along the way!
它们是操纵路径的基础。 在下一节中,我们将逐步引导您通过一个简单而实际的示例,在其中您可以应用所有新知识……甚至在此过程中学习更多技巧!
使用路径的简单徽标 (Easy Logos Using Paths)
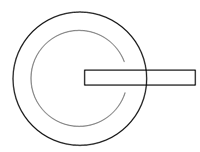
Let’s say that you work for Gateway, and you need to duplicate the Gateway "spotted-g" logo:
假设您为Gateway工作,并且需要复制Gateway“ spotted-g”徽标:
Gateway and the Spotted G Gateway logo are trademarks of Gateway, Inc. We’ve used them here for the purposes of illustration only – no infringement of the trademark is intended.
Gateway和Spotted G Gateway徽标是Gateway,Inc.的商标。我们在此使用它们只是出于说明的目的–并不打算侵犯该商标。
With Illustrator or Freehand, this will be quite a snap!
使用Illustrator或Freehand,这非常容易!
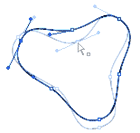
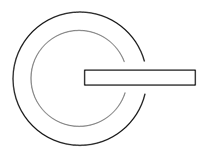
First, use the Pen Tool to create the basic shape.
首先,使用钢笔工具创建基本形状。
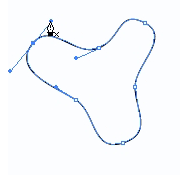
The shape is obviously not quite perfect, so we’ll use the white arrow tool to tweak the lines and points…
形状显然不是很完美,因此我们将使用白色箭头工具来调整线条和点。
Note: there are a number of additional steps the perfectionist could have taken to get a perfectly even curved-triangle shape. For example, you could have created a 3-sided triangle with the polygon tool first and used the Convert Direction Tool to "curve" the points. In Freehand, you could have skipped this step by modifying the Object Properties of a triangle to have curved corners. Then, you could have used the Pen Tool — or Add Anchor Points Tool — to add three more points on the sides of the now-curved triangle. These points could be moved "inward" by hand, or by using the white arrow tool to select only those three side points, then using the Scale tool to move them towards the center. Perhaps you may want to try this process; for the purposes of this educational tutorial, doing things freehand — no pun intended — is fine.
注意:完美主义者可能采取了许多其他步骤来获得完美均匀的弯曲三角形形状。 例如,您可以先使用多边形工具创建一个3边三角形,然后使用“转换方向”工具“弯曲”这些点。 在Freehand中,您可以通过修改三角形的“对象属性”以使其具有弯角而跳过此步骤。 然后,您可以使用钢笔工具(或“添加锚点”工具)在现在弯曲的三角形的侧面上再添加三个点。 可以手动将这些点“向内”移动,或者使用白色箭头工具仅选择这三个侧点,然后使用“缩放”工具将其移向中心。 也许您可能想尝试此过程; 就本教学教程而言,徒手做事(无双关语)是可以的。
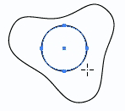
Now, use the Ellipse Tool to create a circle. Here’s another tip: to make a perfect circle or square, hold the Shift key down while you draw. Holding the shift key generally "constrains" movements in most graphics programs. We also held down the Alt key (Mac — Option key) to draw the circle from the center, instead of the corner.
现在,使用椭圆工具创建一个圆。 这是另一个提示:要绘制出完美的圆形或正方形,请在绘制时按住Shift键。 按住Shift键通常可以“约束”大多数图形程序中的移动。 我们还按住Alt键(Mac-Option键)可以从中心而不是角落画圆。
Create another circle, centered inside the first.
创建另一个圆,以第一个圆为中心。
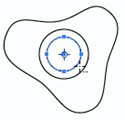
Note: There are plenty of ways that you can create two circles within each other. In Illustrator, one way is to draw two circles, then click on the center of one of the circles and move it over the center of the other circles. You’ll notice that the top circle "snaps" to the middle of the other circle when you get close enough. This method works for other polygons that have "centers." Another way that works in both Illustrator and Freehand is to select the two circles, then use the Align Palette to line up the centers. Yet another way is to draw the first circle, select it, and switch to the Scale tool. Hold the Shift key — to keep it a perfect circle — then start dragging to make a smaller circle. Hold down the Alt (PC) or Option (Mac) key while you’re dragging… then let go of the mouse. Holding down the Alt/Option key makes a copy of the object, which is a useful trick for other purposes.
注意:有很多方法可以相互创建两个圆。 在Illustrator中,一种方法是绘制两个圆,然后单击其中一个圆的中心,然后将其移动到其他圆的中心上。 您会注意到,当距离足够近时,顶部圆会“捕捉”到另一个圆的中间。 此方法适用于其他具有“中心”的多边形。 在Illustrator和Freehand中都可以使用的另一种方法是选择两个圆,然后使用“对齐调色板”将中心对齐。 还有一种方法是绘制第一个圆,选择它,然后切换到“缩放”工具。 按住Shift键(使其保持完整的圆圈),然后开始拖动以使其更小。 拖动时按住Alt(PC)或Option(Mac)键…然后放开鼠标。 按住Alt / Option键可复制对象,这对于其他目的是一个有用的技巧。
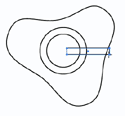
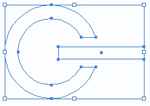
Now, use the Rectangle Tool to make the long rectangular section of the logo.
现在,使用矩形工具制作徽标的长矩形部分。
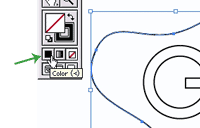
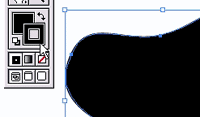
With the basic shapes in place, we’ll first fill the curvy shape with black. In Illustrator, select the shape, and in the Tools Palette, click the Color button to fill the shape with color.
设置好基本形状后,我们将首先用黑色填充弯曲的形状。 在Illustrator中,选择形状,然后在“工具选项板”中,单击“颜色”按钮以用颜色填充形状。
In Freehand, select the shape, then use the paint bucket color dropdown to fill the shape with color.
在“手绘”中,选择形状,然后使用“油漆桶”颜色下拉菜单用颜色填充形状。
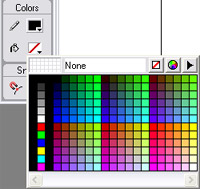
You may also get rid of the outline (stroke). In Freehand, use the pencil dropdown (above the paint bucket) to choose the "no color" option. In Illustrator, first click on the Stroke icon (outlined box), then click the "no color" option.
您也可以摆脱轮廓(中风)。 在Freehand中,使用铅笔下拉菜单(位于油漆桶上方)选择“无颜色”选项。 在Illustrator中,首先单击“笔触”图标(轮廓框),然后单击“无颜色”选项。

At this point, hide the curvy shape by hitting Ctrl-3 (PC) or Command-3 (Mac) in Illustrator, or going to View > Hide Selection in Freehand. This will allow us to work with the other shapes without getting distracted.
此时,通过在Illustrator中按Ctrl-3(PC)或Command-3(Mac),或转到“手绘”中的“视图”>“隐藏选择”来隐藏弯曲的形状。 这将使我们能够处理其他形状而不会分散注意力。
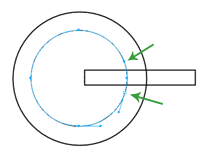
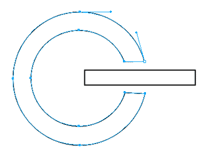
Ok, it’s time to work with the other shapes: use the knife tool to cut the circle path just a little above and below the rectangle.
好了,是时候使用其他形状了:使用刀工具在矩形的上方和下方切一些圆形路径。
Use the black arrow tool to select the cut segment and delete it.
使用黑色箭头工具选择剪切的片段并将其删除。
Do the same to the other circle.
对另一个圈子也一样。
Now, use the pen tool to connect the endpoints of the shape.
现在,使用钢笔工具连接形状的端点。
Just to demonstrate that there are lots of ways you can do things, here’s another way to achieve the same effect in Illustrator:
只是为了证明您有很多方法可以做事,这是在Illustrator中实现相同效果的另一种方法:
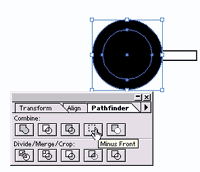
First, fill the larger circle with black (so that you can see it more easily).
首先,用黑色填充较大的圆圈(以便您更容易看到它)。
Select both circles: use the black arrow tool and drag across the corner of the circles so that both are selected. Open the Pathfinder palette in Illustrator. Choose the "Minus Front" command. The two circles will be combined into one doughnut shape.
选择两个圆圈:使用黑色箭头工具并在圆圈的角上拖动,以将两个都选中。 在Illustrator中打开“探路者”面板。 选择“减号”命令。 两个圆圈将组合成一个甜甜圈形状。
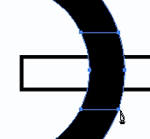
Now, use the Knife Tool to cut two lines across the ring shape slightly above and below the rectangle.
现在,使用“刀具”工具在矩形上方和下方的环形区域上切割两条线。
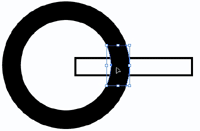
Select the new cutout piece and hit Backspace to delete it.
选择新的抠图片段,然后按Backspace键将其删除。
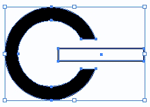
Same effect; different method!
效果相同; 不同的方法!
We’re almost there! Select both shapes and set the fill color to white.
我们快到了! 选择两个形状并将填充颜色设置为白色。
Finally, unhide the curvy shape. In Illustrator, hit Ctrl-Alt-3 (PC) or Command-Option-3 (Mac). In Freehand, go to View > Show All. The black curvy shape will reappear, and the logo is complete!
最后,取消隐藏曲线形状。 在Illustrator中,按Ctrl-Alt-3(PC)或Command-Option-3(Mac)。 在手绘中,转到查看>全部显示。 黑色弯曲的形状将重新出现,徽标完成!

摘要 (Summary)
In this lengthy tutorial, you learned:
在这个冗长的教程中,您了解了:
- The difference between raster and vector graphics 栅格和矢量图形之间的区别
- How to make basic shapes in Illustrator and Freehand 如何在Illustrator和Freehand中制作基本形状
- How to resize shapes using the black arrow to select objects and drag on their corner handles 如何使用黑色箭头调整形状大小以选择对象并在其角手柄上拖动
- How to use the pen tool to create corner points (by clicking) 如何使用钢笔工具创建角点(通过单击)
- That each new click creates a connected line segment with the previous point 每次新点击都会与上一个点创建一个连接的线段
- That bringing the cursor back to the original point and clicking will close the path to create a shape 将光标移回原始点并单击将关闭创建形状的路径
- How to use the pen tool to create curved points (by clicking and dragging) 如何使用钢笔工具创建弯曲点(通过单击和拖动)
- How to use the white arrow tool to tweak points and direction lines 如何使用白色箭头工具调整点和方向线
- How to add, delete and convert points using the Pen Tool and its derivatives 如何使用钢笔工具及其派生工具添加,删除和转换点
- How to use the Scissors and/or Knife Tools 如何使用剪刀和/或刀工具
- How to use the Shift key to make perfect circles or squares 如何使用Shift键制作完美的圆形或正方形
- How to align two circles so that they’re centered 如何对齐两个圆使其居中
- How to use the Alt key when moving objects to make copies of the object 移动对象以制作对象副本时如何使用Alt键
- How to change the fill and stroke colors of objects 如何更改对象的填充和描边颜色
- How to "Hide" and "Unhide" objects 如何“隐藏”和“取消隐藏”对象
Many of these concepts are transferable across other graphics programs that use vector graphics. For example, you’ll find that Photoshop, Freehand, and Flash all have vector/path tools that work almost identically to Illustrator and Freehand.
这些概念中的许多可在使用矢量图形的其他图形程序之间转移。 例如,您会发现Photoshop,Freehand和Flash都具有矢量/路径工具,它们的工作原理与Illustrator和Freehand几乎相同。
Happy vectoring!
矢量快乐!
If you enjoyed reading this post, you’ll love Learnable; the place to learn fresh skills and techniques from the masters. Members get instant access to all of SitePoint’s ebooks and interactive online courses, like Illustrator Basics.
如果您喜欢阅读这篇文章,您会喜欢Learnable的 ; 向大师学习新鲜技能的地方。 会员可以立即访问所有SitePoint的电子书和交互式在线课程,例如Illustrator Basics 。
翻译自: https://www.sitepoint.com/graphics-illustrator-freehand-2/


 9019
9019

 被折叠的 条评论
为什么被折叠?
被折叠的 条评论
为什么被折叠?
 到【灌水乐园】发言


