


photoshop cs2
If you’re a regular Photoshop user, chances are that you’ve played around with the Unsharp Mask filter (Filters > Sharpen > Unsharp Mask…). It’s a handy way to give your photograph a smoother, cleaner look, especially if it has been softened as a result of having other filters applied to it.
如果您是普通的Photoshop用户,则很有可能使用过“不 锐化 蒙版”滤镜(“ 滤镜” >“ 锐化” >“不锐化 蒙版…” )。 这是使您的照片更平滑,更干净的一种便捷方法,尤其是在由于应用了其他滤镜而使其变柔和的情况下。
However, there may be times when using the Unsharp Mask filter doesn’t produce satisfactory results — with larger images or noisy images, for example. In this article, I’ll walk you through a sequence of steps that will give you more control over the Unsharp Mask filter and the areas of an image that you apply it to.
但是,有时使用“锐化蒙版”滤镜无法产生令人满意的结果-例如,对于较大的图像或嘈杂的图像。 在本文中,我将引导您完成一系列步骤,这些步骤将使您对“钝化蒙版”滤镜及其应用的图像区域有更多的控制。
The PSD file I’ve used in this article is available as a downloadable zip archive (7.5MB), if you’d like to play along at home. Here’s what the image looks like.
如果您想在家中玩,我在本文中使用的PSD文件可以作为可下载的zip存档(7.5MB)获得。 这是图像的外观。
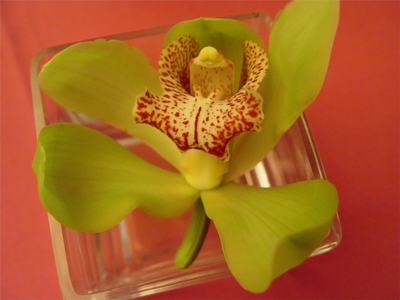
The original image that needs sharpening up!
需要锐化的原始图像!
As you can see, it’s a nice picture, but it’s lost some of its crispness. We’ll bring that back with this series of steps.
如您所见,这是一张不错的图片,但是却失去了一些清晰度。 我们将通过一系列步骤将其带回来。
1. In the Channels palette, click on the Red, Green, and Blue layers individually to find the channel that has the greatest contrast. In this case, the Green channel looks like it will work the best. Hide the other channels and leave only the Green channel showing, then press Ctrl-A (Command-A on a Mac) and Ctrl-C (Command-C) to copy the channel.
1.在“通道”调板中,分别单击“红色”,“绿色”和“蓝色”层以找到对比度最大的通道。 在这种情况下,绿色通道看起来将是最好的。 隐藏其他频道并仅显示绿色频道,然后按Ctrl-A(在Mac上为Command-A)和Ctrl-C(Command-C)以复制该频道。
2. Click on the RGB layer to return to the full-color image. Return to the Layers palette, and paste with Ctrl-V (Command-V). You should now have two layers: the original layer, and a grayscale layer.
2.单击RGB层以返回全彩色图像。 返回“图层”调板,并使用Ctrl-V(Command-V)粘贴。 现在,您应该有两层:原始层和灰度层。
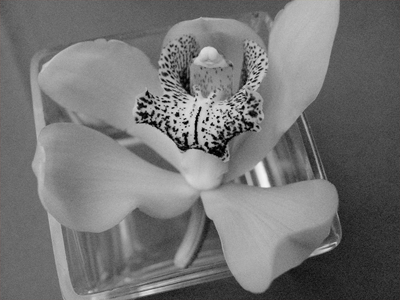
A grayscale layer based on the green channel
基于绿色通道的灰度层
The next few steps will smooth the surfaces in the image, and increase the contrast even further, all of which will help us later on.
接下来的几个步骤将使图像中的表面变得平滑,并进一步提高对比度,所有这些都将在以后为我们提供帮助。
3. First, create a duplicate of the grayscale layer as a backup by typing Ctrl-J (Command-J on a Mac). Then click on the newly created layer, and select Filter > Blur > Surface Blur. Increase the Radius and Threshold values until most of the surfaces are smoothed out.
3.首先,通过键入Ctrl-J(在Mac上为Command-J),创建灰度层的副本作为备份。 然后单击新创建的图层,然后选择“ 滤镜” >“ 模糊” >“ 表面模糊” 。 增加“半径”和“阈值”值,直到大多数表面被平滑为止。
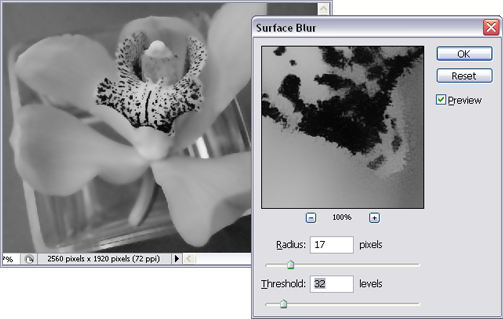
Using the Surface Blur
使用表面模糊
4. Create a duplicate of this layer as a backup, and select Image > Adjustments > Levels, or press the shortcut Ctrl-L (Command-L on a Mac). Drag the black and white sliders directly below the graph towards the center to increase the contrast. If necessary, also drag the gray slider along until you have an image that has as high a contrast as possible around the edges of shapes, but little variation on the surfaces.
4.创建此图层的副本作为备份,然后选择“ 图像” >“ 调整” >“ 色阶” ,或按快捷键Ctrl-L(在Mac上为Command-L)。 将图表正下方的黑色和白色滑块向中心拖动以增加对比度。 如有必要,还拖动灰色滑块,直到获得的图像在形状的边缘具有尽可能高的对比度,而在表面上几乎没有变化。
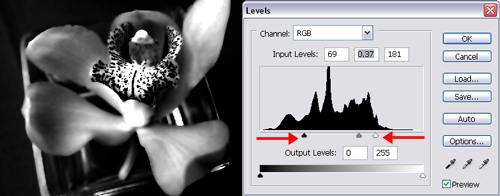
Increasing the contrast using Levels
使用色阶增加对比度
5. Create a backup of that layer. You’ll now have the original color layer, the grayscale layer, a blurred layer, the higher contrast layer, and a copy of the high contrast layer.
5.创建该层的备份。 现在,您将拥有原始颜色层,灰度层,模糊层,较高对比度的层以及高对比度层的副本。
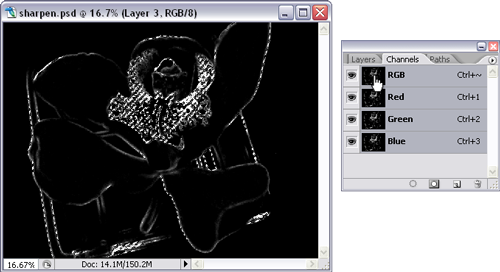
6. Select Filter > Stylized > Find Edges. Photoshop will automatically run the filter and change the layer so that the edges are defined. If the two previous steps were applied properly, you should now have very distinct edges. The image below compares the results of applying the Find Edges filter to the modified (blurred/levels change) image, to the image that results when the filter is used on the original grayscale image. You’ll want your image to look more like the one on the left. Once again, duplicate this layer as a backup.
6.选择过滤器 > 风格化 > 查找边缘 。 Photoshop将自动运行滤镜并更改图层,以便定义边缘。 如果正确地应用了前两个步骤,那么您现在应该具有非常不同的边缘。 下图比较了将“查找边缘”滤镜应用于修改后的(模糊/级别变化)图像的结果以及将滤镜用于原始灰度图像时得到的图像的结果。 您将希望图像看起来更像左侧的图像。 再次复制此层作为备份。

Using the Find Edges filter
使用“查找边缘”过滤器
7. At this point, if you still don’t have enough contrast in your image, you might want to delete the last few layers and try again by reapplying the Surface Blur, the Levels command, and the Find Edges filter. Adjust the values at each step to try to achieve that high-contrast look. When you’re happy with the result, create a backup duplicate layer.
7.此时,如果图像中的对比度仍然不足,则可能要删除最后几层,然后通过重新应用“表面模糊”,“色阶”命令和“查找边缘”过滤器再试一次。 调整每一步的值以尝试获得高对比度的外观。 当您对结果满意时,请创建一个备份重复图层。
8. Next, select Filter > Blur > Gaussian Blur. Increase the Radius until the small, fine lines created in the Find Edges filter are blurred into a solid color. This will blur the distinct, hard lines too, but as long as the darker lines are still visible (even if blurry), you needn’t worry about it. Once you’re done, duplicate this layer as well.
8.接下来,选择滤镜 > 模糊 > 高斯模糊 。 增大半径,直到在“查找边缘”滤镜中创建的细小线条模糊成纯色。 这也会使清晰的硬线也变得模糊,但是只要较暗的线仍然可见(即使模糊),您也不必担心。 完成后,也请复制此层。
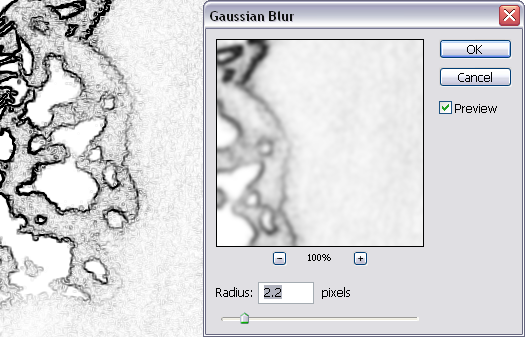
Applying a Gaussian Blur.
应用高斯模糊。
9. Once again, apply the Levels command to the newly created layer using Ctrl-L (Command-L on a Mac). Bring the black and white sliders directly below the graph inwards, until the outlines are very strong and the lighter grays have almost all turned to white.
9.再次使用Ctrl-L(在Mac上为Command-L)将“色阶”命令应用于新创建的图层。 将黑色和白色滑块向内直接移到图形下方,直到轮廓非常强烈并且较浅的灰色几乎全部变为白色为止。
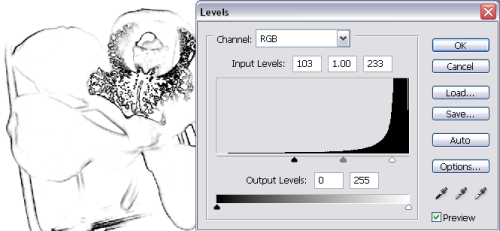
Applying Levels again.
再次应用关卡。
10. With that layer selected, press Ctrl-I to invert the image (Command-I on a Mac). At this stage it might seem like we’re simply creating abstract artwork, but bear with me — we’re nearly there!
10.选择该层后,按Ctrl-I反转图像(在Mac上为Command-I)。 在这个阶段,似乎我们只是在创建抽象作品,但请忍受我-我们快要准备好了!

Inverting the image.
反转图像。
11. Open the Channels palette, hold down Ctrl (Command on a Mac) and click on the RGB layer. This will create a selection based on that channel; you’ll see dotted lines around the white areas.
11.打开“通道”调板,按住Ctrl(在Mac上为Command),然后单击RGB层。 这将基于该频道创建一个选择; 您会在白色区域周围看到虚线。
Creating a selection.
创建一个选择。
12. Now, go back to the Layers palette and click on the eye icon for each of the layers, hiding them all. Then click the eye icon to show the original layer (the bottom-most layer, which is the one we began working with). You should still see the dotted lines of the selection in your document window. With this selection active, go to Filter > Sharpen > Unsharp Mask, and experiment with the settings until the image looks sufficiently sharper.
12.现在,返回到“图层”调板,然后单击每个图层的眼睛图标,将其全部隐藏。 然后单击眼睛图标以显示原始层(最底层,这是我们开始使用的层)。 您仍应在文档窗口中看到所选内容的虚线。 启用此选项后,转到“ 滤镜” >“ 锐化” >“ 锐化 蒙版” ,并尝试设置,直到图像看起来足够清晰。
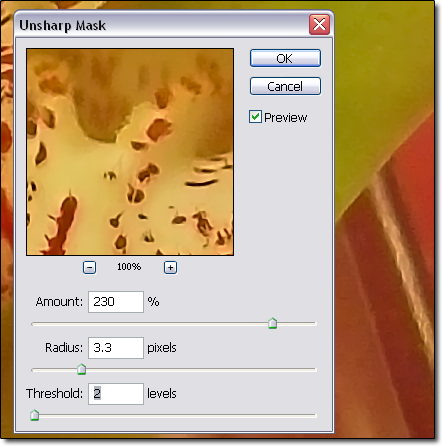
Applying the Unsharp Mask filter
应用不锐化蒙版滤镜
13. Finally, click OK to apply the filter. Whew, we’re done! The result of this sharpening technique is shown below.
13.最后,单击确定以应用过滤器。 哇,我们完成了! 这种锐化技术的结果如下所示。
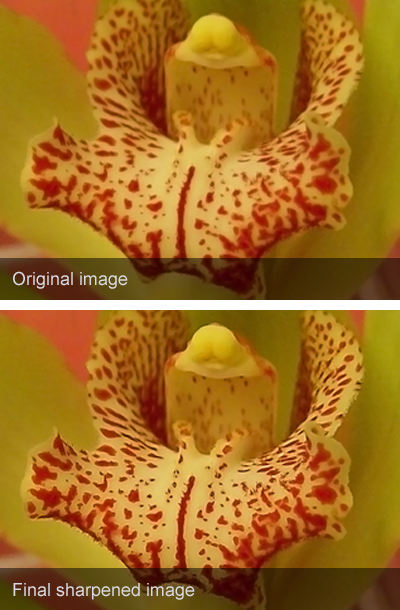
The final sharpened image
最终的锐化图像
摘要 (Summary)
Sometimes, simply applying the Unsharp Mask filter won’t give you the best results, as other pixels throughout the image might be adversely affected.
有时,仅应用“不锐化蒙版”滤镜无法获得最佳效果,因为整个图像中的其他像素可能会受到不利影响。
In this article, the purpose of steps 1-10 (creating a grayscale image, blurring it, increasing the contrast, finding the edges, refining the edges, and inverting the image) was to create a controlled selection of the outlines of the image, so that we could then apply the Unsharp Mask filter and affect only the edges of the image. Experiment and compare the basic Unsharp Mask with this series of steps, and I think you’ll find that the extra time is worth it!
在本文中,步骤1-10(创建灰度图像,使其模糊,增加对比度,查找边缘,细化边缘和反转图像)的目的是创建图像轮廓的受控选择,这样我们便可以应用“锐化蒙版”滤镜并仅影响图像的边缘。 通过一系列步骤进行实验并比较基本的反锐化蒙版,我想您会发现额外的时间是值得的!
If you enjoyed this article, make sure you keep an eye out for my book, The Photoshop Anthology: 101 Web Design Tips, Tricks & Techniques, which is due out next month. It’s SitePoint’s first full-color title, and is packed full of Photoshop tips and techniques just like this one, with a focus especially for web designers. Enjoy!
如果您喜欢这篇文章,请确保留意我的书《 Photoshop Anthology:101 Web设计技巧,窍门和技巧》 ,该书将于下个月发布。 这是SitePoint的第一个全彩色标题,并且包含了许多与此类似的Photoshop提示和技术,尤其是针对Web设计师。 请享用!
photoshop cs2


 1435
1435

 被折叠的 条评论
为什么被折叠?
被折叠的 条评论
为什么被折叠?
 到【灌水乐园】发言


