


three.js 光

Sometimes I tactically check Pinterest for inspiration and creative exploration. Although one could also call it chronic procrastinating, I always find captivating ideas for new WebGL projects. That’s the way I started my last water distortion effect.
有时我会在战术上检查Pinterest灵感和创造性探索。 尽管也可以称其为长期拖延,但我总是为新的WebGL项目找到迷人的想法。 这就是我开始上次水失真效果的方式。
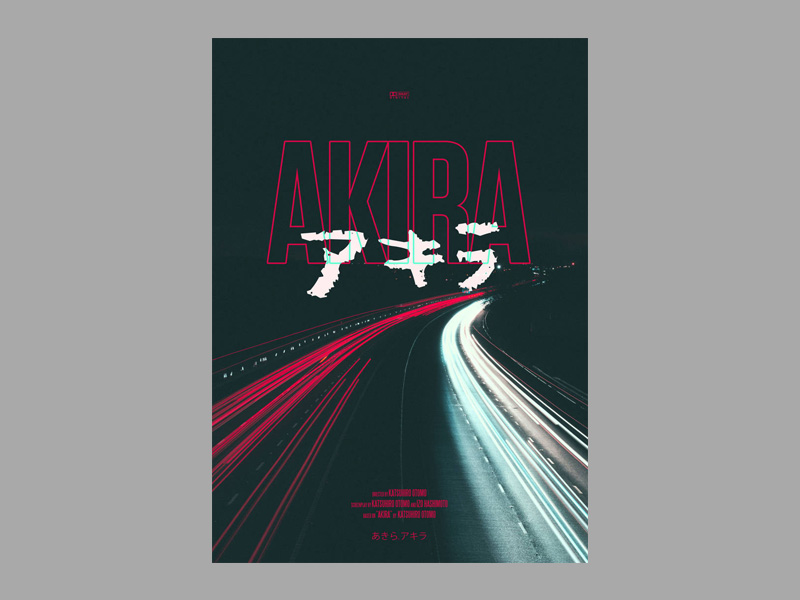
Today’s tutorial is inspired by this alternative Akira poster. It has this beautiful traffic time lapse with infinite lights fading into the distance:
今天的教程受到了Akira替代海报的启发。 它具有无与伦比的灯光逐渐消失在远处的美丽交通时间流逝:
Based on this creative effect, I decided to re-create the poster vibe but make it real-time, infinite and also customizable. All in the comfort of your browser!
基于这种创意效果,我决定重新创建海报氛围,但使其实时,无限且可自定义。 一切都在您舒适的浏览器中!
Through this article, we’ll use Three.js and learn how to:
通过本文,我们将使用Three.js并学习如何:
- instantiate geometries to create thousands (up to millions) of lights 实例化几何形状以创建数千个(多达数百万个)光源
- make the lights move in an infinite loop使灯光无限循环
- create frame rate independent animations to keep them consistent on all devices创建独立于帧速率的动画,以使其在所有设备上保持一致
- and finally, create modular distortions to ease the creation of new distortions or changes to existing ones最后,创建模块化变形以减轻新变形或对现有变形的更改
It’s going to be an intermediate tutorial, and we’re going to skip over the basic Three.js setup. This tutorial assumes that you are familiar with the basics of Three.js.
这将是一个中级教程,我们将跳过基本的Three.js设置。 本教程假定您熟悉Three.js的基础知识。
准备道路和摄像头 (Preparing the road and camera)
To begin we’ll create a new Road class to encapsulate all the logic for our plane. It’s going to be a basic PlaneBufferGeometry with its height being the road’s length.
首先,我们将创建一个新的Road类来封装飞机的所有逻辑。 这将是一个基本的PlaneBufferGeometry ,其高度为道路的长度。
We want this plane to be flat on the ground and going further way. But Three.js creates a vertical plane at the center of the scene. We’ll rotate it on the x-axis to make it flat on the ground (y-axis).
我们希望这架飞机可以平放在地面上,并且走得更远。 但是Three.js在场景的中心创建了一个垂直平面。 我们将其沿x轴旋转以使其平整于地面(y轴)。
We’ll also move it by half it’s length on the z-axis to position the start of the plane at the center of the scene.
我们还将在z轴上将其移动一半的长度,以将平面的起点定位在场景的中心。
We’re moving it on the z-axis because position translation happens after the rotation. While we set the plane’s length on the y-axis, after the rotation, the length is on the z-axis.
我们正在z轴上移动它,因为位置平移发生在旋转之后。 当我们在y轴上设置平面的长度时,旋转之后,长度在z轴上。
export class Road {
  constructor(webgl, options) {
    this.webgl = webgl;
    this.options = options;
  }
  init() {
    const options = this.options;
    const geometry = new THREE.PlaneBufferGeometry(
      options.width,
      options.length,
      20,
      200
    );
    const material = new THREE.ShaderMaterial({
       	fragmentShader,
        vertexShader,
        uniforms: {
           uColor:  new THREE.Uniform(new THREE.Color(0x101012))
        }
    });
    const mesh = new THREE.Mesh(geometry, material);

    mesh.rotation.x = -Math.PI / 2;
    mesh.position.z = -options.length / 2;

    this.webgl.scene.add(mesh);
  }
}
const fragmentShader = `
    uniform vec3 uColor;
	void main(){
        gl_FragColor = vec4(uColor,1.);
    }
`;
const vertexShader = `
	void main(){
        vec3 transformed = position.xyz;
        gl_Position = projectionMatrix * modelViewMatrix * vec4(transformed.xyz, 1.);
	}
`
After rotating our plane, you’ll notice that it disappeared. It’s exactly lined up with the camera. We’ll have to move the camera a bit up the y-axis for a better shot of the plane.
旋转飞机后,您会注意到它消失了。 它与相机完全对齐。 为了更好地拍摄飞机,我们必须将相机稍微向y轴方向移动。
We’ll also instantiate and initiate our plane and move it on the z-axis a bit to avoid any issues when we add the distortion later on:
我们还将实例化并初始化我们的平面,然后在z轴上稍微移动一下,以避免以后添加变形时出现任何问题:
class App {
	constructor(container, options){
		super(container);

        this.camera.position.z = -4;
        this.camera.position.y = 7;
        this.camera.position.x = 0;

        this.road = new Road(this, options);
	}
	init(){
        this.road.init();
        this.tick();
	}
}
If something is not working or looking right, zooming out the camera in the z-axis can help bring things into perspective.
如果某些地方无法正常工作或看起来不正确,则在Z轴上缩小相机范围可以帮助您透视事物。
创造灯光 (Creating the lights)
For the lights, we’ll create a CarLights class with a single tube geometry. We’ll use this single tube geometry as a base for all other lights.
对于灯光,我们将创建具有单个灯管几何形状的CarLights类。 我们将使用此单管几何作为所有其他光源的基础。
All our tubes are going to have different lengths and radii. So, we’ll set the original tube’s length and radius to 1. Then, in the tube’s vertex shader, we’ll multiply the original length/radius by the desired values, resulting in the tube getting its final length and radius.
我们所有的管子都将具有不同的长度和半径。 因此,我们将原始管的长度和半径设置为1。然后,在管的顶点着色器中,将原始长度/半径乘以所需的值,从而得到管的最终长度和半径。
Three.js makes TubeGeometries using a Curve. To give it that length of 1, we’ll create the tube with a lineCurve3 with its endpoint at -1 in the z-axis.
Three.js使用Curve制作TubeGeometries 。 为了使其长度为1,我们将创建一个带有lineCurve3的管,其端点在z轴上为-1。
import * as THREE from "three";
export class CarLights {
  constructor(webgl, options) {
    this.webgl = webgl;
    this.options = options;
  }
  init() {
      const options = this.options;
    let curve = new THREE.LineCurve3(
      new THREE.Vector3(0, 0, 0),
      new THREE.Vector3(0, 0, -1)
    );
    let baseGeometry = new THREE.TubeBufferGeometry(curve, 25, 1, 8, false);
    let material = new THREE.MeshBasicMaterial({ color: 0x545454 });
    let mesh = new THREE.Mesh(baseGeometry, material);

      this.mesh = mesh;
    this.webgl.scene.add(mesh);
  }
}
实例化灯光 (Instantiating the lights)
Although some lights are longer or thicker than others, they all share the same geometry. Instead of creating a bunch of meshes for each light, and causing lots of draw calls, we can take advantage of instantiation.
尽管有些灯光比其他灯光更长或更粗,但是它们都共享相同的几何形状。 我们可以利用实例化来代替为每个灯光创建一堆网格并引起大量绘制调用。
Instantiation is the equivalent of telling WebGL “Hey buddy, render this SAME geometry X amount of times”. This process allows you to reduce the amount of draw calls to 1.
实例化等效于告诉WebGL“嗨,哥们,渲染这个SAME几何X倍的次数”。 此过程使您可以将绘制调用的数量减少到1。
Although it’s the same result, rendering X objects, the process is very different. Let’s compare it with buying 50 chocolates at a store:
尽管渲染X对象的结果相同,但是过程却大不相同。 让我们将其与在商店购买50个巧克力进行比较:
A draw call is the equivalent of going to the store, buying only one chocolate and then coming back. Then we repeat the process for all 50 chocolates. Paying for the chocolate (rendering) at the store is pretty fast, but going to the store and coming back (draw calls) takes a little bit of time. The more draw calls, the more trips to the store, the more time.
开奖电话相当于去商店,只买一种巧克力然后再回来。 然后,我们对所有50种巧克力重复该过程。 在商店购买巧克力(渲染)的速度非常快,但是去商店再回来(抽奖)会花费一些时间。 抽奖电话越多,到商店的行程越多,时间就越多。
With instantiation, we’re going to the store and buying all 50 chocolates and coming back. You still have to go and come back from the store (draw call) one time. But you saved up those 49 extra trips.
通过实例化,我们将去商店购买所有50种巧克力,然后再回来。 您仍然必须一次从商店回来(抽奖)。 但是您节省了那49次额外的旅行。
A fun experiment to test this even further: Try to delete 50 different files from your computer, then try to delete just one file of equivalent size to all 50 combined. You’ll notice that even though it’s the same combined file size, the 50 files take more time to be deleted than the single file of equivalent size 😉
一个有趣的实验来进一步测试:尝试从计算机中删除50个不同的文件,然后尝试删除仅一个大小相等于全部50个文件的文件。 您会注意到,即使合并文件的大小相同,删除50个文件所花费的时间也要多于相同大小的单个文件😉
Coming back to the code: to instantiate we’ll copy our tubeGeometry over to an InstancedBufferGeometry. Then we’ll tell it how many instances we’ll need. In our case, it’s going to be a number multiplied by 2 because we want two lights per “car”.
回到代码:实例化我们将把tubeGeometry复制到InstancedBufferGeometry 。 然后,我们告诉它需要多少个实例。 在我们的例子中,它将是一个数字乘以2,因为我们希望每辆“汽车”两盏灯。
Next we’ll have to use that instanced geometry to create our mesh.
接下来,我们将不得不使用instanced几何来创建我们的网格。
class CarLights {
    ...
	init(){
        ...
        let baseGeometry = new THREE.TubeBufferGeometry(curve, 25, 1, 8, false);
        let instanced = new THREE.InstancedBufferGeometry().copy(geometry);
        instanced.maxInstancedCount = options.nPairs * 2;
        ...
        // Use "Instanced" instead of "geometry"
        var mesh = new THREE.Mesh(instanced, material);
    }
}
Although it looks the same, Three.js now rendered 100 tubes in the same position. To move them to their respective positions we’ll use an InstancedBufferAttribute.
尽管外观相同,但是Three.js现在在相同位置渲染了100个试管。 为了将它们移动到各自的位置,我们将使用InstancedBufferAttribute 。
While a regular BufferAttribute describes the base shape, for example, it’s position, uvs, and normals, an InstanceBufferAttribute describes each instance of the base shape. In our case, each instance is going to have a different aOffset and a different radius/length aMetrics.
常规BufferAttribute描述基本形状(例如, position , uv s和normal , InstanceBufferAttribute描述基本形状的每个实例。 在我们的例子中,每个实例将具有不同的aOffset和不同的radius / length aMetrics 。
When it’s time each instance passes through the vertex shader. WebGL is going to give us the values corresponding to each instance. Then we can position them using those values.
时间到了,每个实例都通过顶点着色器。 WebGL将为我们提供与每个实例相对应的值。 然后,我们可以使用这些值定位它们。
We’ll loop over all the light pairs and calculate their XYZ position:
我们将遍历所有灯对并计算其XYZ位置:
- For the X-axis we’ll calculate the center of its lane. The width of the car, how separated the lights are, and a random offset. 对于X轴,我们将计算其车道的中心。 汽车的宽度,灯光的分隔距离和随机偏移量。
- For its Y-axis, we’ll push it up by its radius to make sure it’s on top of the road. 对于其Y轴,我们将其沿半径向上推以确保其位于道路顶部。
- Finally, we’ll give it a random Z-offset based on the length of the road, putting some lights further away than others. 最后,我们将根据道路长度为它提供一个随机的Z偏移,使某些灯光比其他灯光更远。
At the end of the loop, we’ll add the offset twice. Once per each light, with only the x-offset as a difference.
在循环的最后,我们将偏移量加两次。 每个光源一次,仅x偏移量有所不同。
class CarLights {
    ...
    init(){
        ...
        let aOffset = [];

            let sectionWidth = options.roadWidth / options.roadSections;

            for (let i = 0; i < options.nPairs; i++) {
              let radius = 1.;
              // 1a. Get it's lane index
              // Instead of random, keep lights per lane consistent
              let section = i % 3;

              // 1b. Get its lane's centered position
              let sectionX =
                section * sectionWidth - options.roadWifth / 2 + sectionWidth / 2;
              let carWidth = 0.5 * sectionWidth;
              let offsetX = 0.5 * Math.random();

              let offsetY = radius * 1.3;

              aOffset.push(sectionX - carWidth / 2 + offsetX);
              aOffset.push(offsetY);
              aOffset.push(-offsetZ);

              aOffset.push(sectionX + carWidth / 2 + offsetX);
              aOffset.push(offsetY);
              aOffset.push(-offsetZ);
            }
        // Add the offset to the instanced geometry.
        instanced.addAttribute(
          "aOffset",
          new THREE.InstancedBufferAttribute(new Float32Array(aOffset), 3, false)
        );
        ...
    }
}
Now that we’ve added our aOffset attribute, let’s go ahead and use it on a vertex shader like a regular bufferAttribute.
现在我们已经添加了aOffset属性,让我们继续在顶点着色器上使用它,就像常规的bufferAttribute 。
We’ll replace our MeshBasicMaterial with a shaderMaterial and create a vertex shader where we’ll add aOffset to the position:
我们将取代我们MeshBasicMaterial与shaderMaterial和创建顶点着色器,我们将添加aOffset的位置:
class TailLights {
	init(){
		...
		const material = new THREE.ShaderMaterial({
			fragmentShader,
            vertexShader,
            	uniforms: {
                    uColor: new THREE.Uniform(new THREE.Color('0xfafafa'))
                }
		})
		...
	}
}
const fragmentShader = `
uniform vec3 uColor;
  void main() {
      vec3 color = vec3(uColor);
      gl_FragColor = vec4(color,1.);
  }
`;

const vertexShader = `
attribute vec3 aOffset;
  void main() {
		vec3 transformed = position.xyz;

		// Keep them separated to make the next step easier!
	   transformed.z = transformed.z + aOffset.z;
        transformed.xy += aOffset.xy;

        vec4 mvPosition = modelViewMatrix * vec4(transformed,1.);
        gl_Position = projectionMatrix * mvPosition;
	}
`;[https://codesandbox.io/s/infinite-lights-02-road-and-lights-coznb ]
[https://codesandbox.io/s/infinite-lights-02-road-and-lights-coznb]
Depending from where you look at the tubes, you’ll notice that they might look odd. By default, Three.js’ materials don’t render the backside of faces side:THREE.FontSide.
根据观察管的位置,您会注意到它们可能看起来很奇怪。 默认情况下,Three.js的材质不渲染面side:THREE.FontSide的背面。
While we could fix it by changing it to side: THREE.DoubleSide to render all sides, our tubes are going to be small and fast enough that you won’t be able to notice the back faces aren’t rendered. We can keep it like that for the sake of performance.
虽然我们可以通过将其更改为side: THREE.DoubleSide来修复它side: THREE.DoubleSide可以渲染所有侧面,但我们的管子又小又快,以至于您将无法注意到未渲染背面。 为了性能起见,我们可以保持这种状态。
赋予管不同的长度和半径 (Giving tubes a different length and radius)
Creating our tube with a length and radius of 1 was crucial for this section to work. Now we can set the radius and length of each instance only by multiplying on the vertex shader 1 * desiredRadius = desiredRadius.
创建长度和半径为1的管对于此部分的工作至关重要。 现在,我们只能通过在顶点着色器上乘以1 * desiredRadius = desiredRadius的半径来设置每个实例的半径和长度。
Let’s use the same loop to create a new instancedBufferAttribute called aMetrics. We’ll store the length and radius of each instance here.
让我们使用同一循环创建一个名为aMetrics的新instancedBufferAttribute 。 我们将在此处存储每个实例的长度和半径。
Remember that wee push to the array twice. One for each of the items in the pair.
请记住,两次将数组推入数组。 一对中的每个项目一个。
class TailLights {
	...
	init(){
	...
	let aMetrics =[];
	for (let i = 0; i < totalLightsPairs; i++) {
     // We give it a minimum value to make sure the lights aren't too thin or short.
     // Give it some randomness but keep it over 0.1
      let radius = Math.random() * 0.1 + 0.1;
     // Give it some randomness but keep it over length *0.02
      let length =
        Math.random() * options.length * 0.08 + options.length * 0.02;

      aMetrics.push(radius);
      aMetrics.push(length);

      aMetrics.push(radius);
      aMetrics.push(length);
    }
    instanced.addAttribute(
      "aMetrics",
      new THREE.InstancedBufferAttribute(new Float32Array(aMetrics), 2, false)
    );
    ...
}
Note that we multiplied the position by aMetrics before adding any aOffset. This expands the tubes from their center, and then moves them to their position.
请注意,我们乘上位置aMetrics添加任何前aOffset 。 这将使管从其中心扩展,然后将其移动到其位置。
...
const vertexShader = `
attribute vec3 aOffset;
attribute vec2 aMetrics;
  void main() {
    vec3 transformed = position.xyz;

            float radius = aMetrics.r;
            float len = aMetrics.g;

            // 1. Set the radius and length
            transformed.xy *= radius;
            transformed.z *= len;

    // 2. Then move the tubes
   transformed.z = transformed.z + aOffset.z;
   transformed.xy += aOffset.xy;

   vec4 mvPosition = modelViewMatrix * vec4(transformed,1.);
   gl_Position = projectionMatrix * mvPosition;
}
`;定位灯(Positioning the lights)
We want to have two roads of lights coming from different directions. Let’s create the second TailLights and move each to their respective position. To center them both, we’ll move them by half the middle island’s width and half the road’s width.
我们希望有两条来自不同方向的光路。 让我们创建第二个TailLights并将每个TailLights移至各自的位置。 为了使它们居中,我们将它们移动中间岛屿宽度的一半和道路宽度的一半。
We’ll also give each light its color, and modify the material to use that instead:
我们还将为每种光源赋予其颜色,并修改材质以使用该颜色:
class App {
    constructor(){
        this.leftLights  = new TailLights(this, options, 0xff102a);
        this.rightLights = new TailLights(this, options, 0xfafafa);
    }
	init(){
		...

        this.leftLights.init();
        this.leftLights.mesh.position.setX(
           -options.roadWidth / 2 - options.islandWidth / 2
        );
        this.rightLights.init();
        this.rightLights.mesh.position.setX(
           options.roadWidth / 2 + options.islandWidth / 2
        );

	}
}
class TailLights {
constuctor(webgl, options, color){
this.color = color;
...
}
init(){
...
const material = new THREE.ShaderMaterial({
fragmentShader,
vertexShader,
uniforms: {
uColor: new THREE.Uniform(new THREE.Color(this.color))
}
})
...
}
}Looking great! We can already start seeing how the project is coming together!
看起来很棒! 我们已经可以开始看到项目是如何组合在一起的!
移动和循环灯光 (Moving and looping the lights)
Because we created the tube’s curve on the z-axis, moving the lights is only a matter of adding and subtracting from the z-axis. We’ll use the elapsed time uTime because time is always moving and it’s pretty consistent.
因为我们在z轴上创建了管的曲线,所以移动灯光仅是在z轴上添加和减去的问题。 我们将使用经过的时间uTime因为时间总是在移动,并且非常一致。
Let’s begin with adding a uTime uniform and an update method. Then our App class can update the time on both our CarLights. And finally, we’ll add time to the z-axis on the vertex shader:
让我们从添加uTime制服和更新方法开始。 然后,我们的App类可以更新两个CarLights上的时间。 最后,我们将时间添加到顶点着色器的z轴上:
class TailLights {
	init(){
		...
		cosnt material = new THREE.ShaderMaterial({
			fragmentShader, vertexShader,
            	uniforms: {
                    uColor: new THREE.Uniform(new THREE.Color(this.color)),
                    uTime: new THREE.Uniform(0),
                }
		})
		...
	}
        update(t){
            this.mesh.material.uniforms.uTime.value = t;
        }
}
const vertexShader = `
attribute vec3 aOffset;
attribute vec2 aMetrics;
  void main() {
    vec3 transformed = position.xyz;

    float radius = aMetrics.r;
    float len = aMetrics.g;
    transformed.xy *= radius;
    transformed.z *= len;

            // 1. Add time, and it's position to make it move
            float zOffset = uTime + aOffset.z;

            // 2. Then place them in the correct position
            transformed.z += zOffset;

    transformed.xy += aOffset.xy;

    vec4 mvPosition = modelViewMatrix * vec4(transformed,1.);
    gl_Position = projectionMatrix * mvPosition;
	}
`;
class App {
...
update(delta) {
let time = this.clock.elapsedTime;
this.leftLights.update(time);
this.rightLights.update(time);
}
}It moves ultra-slow, but it moves!
它移动得非常慢,但是它移动!
Let’s create a new uniform uSpeed and multiply it with uTime to make the animation go faster. Because each road has to go to a different side we’ll also add it to the CarLights constructor to make it customizable.
让我们创建一个新的统一uSpeed并将其与uTime相乘以使动画运行更快。 由于每条道路都必须走到另一侧,因此我们还将其添加到CarLights构造函数中以使其可自定义。
class TailLights {
  constructor(webgl, options, color, speed) {
    ...
    this.speed = speed;
  }
	init(){
		...
		cosnt material = new THREE.ShaderMaterial({
			fragmentShader, vertexShader,
            	uniforms: {
                    uColor: new THREE.Uniform(new THREE.Color(this.color)),
                    uTime: new THREE.Uniform(0),
                    uSpeed: new THREE.Uniform(this.speed)
                }
		})
		...
	}
    ...
}
const vertexShader = `
attribute vec3 aOffset;
attribute vec2 aMetrics;
  void main() {
    vec3 transformed = position.xyz;

    // 1. Set the radius and length
    float radius = aMetrics.r;
    float len = aMetrics.g;
    transformed.xy *= radius;
    transformed.z *= len;

    // 2. Add time, and it's position to make it move
        	float zOffset = uTime * uSpeed + aOffset.z;

    // 2. Then place them in the correct position
    transformed.z += zOffset;

    transformed.xy += aOffset.xy;

    vec4 mvPosition = modelViewMatrix * vec4(transformed,1.);
    gl_Position = projectionMatrix * mvPosition;
}
`;
Now that it’s fast, let’s make it loop.
现在它很快了,让我们循环一下。
We’ll use the modulo operator mod to find the remainder of z-offset zOffset divided by the total road length uTravelLength. Getting only the remainder makes zOffset loop whenever it goes over uTravelLength.
我们将使用模运算符mod来求出z偏移zOffset的余数除以总道路长度uTravelLength 。 只要获取余数, zOffset就会在uTravelLength zOffset循环。
Then, we’ll subtract that from the z-axis and also add the length len to make it loop outside of the camera’s view. And that’s looping tubes!
然后,我们将从z轴上减去该长度,还添加长度len使其在相机视图之外循环。 那就是循环管!
Let’s go ahead and add the uTravelLength uniform to our material:
让我们继续,将uTravelLength制服添加到我们的材料中:
class TailLights {
	init(){
		...
		cosnt material = new THREE.ShaderMaterial({
			fragmentShader, vertexShader,
            	uniforms: {
                    uColor: new THREE.Uniform(new THREE.Color(this.color)),
                    uTime: new THREE.Uniform(0),
                    uSpeed: new THREE.Uniform(this.speed)
                    uTime: new THREE.Uniform(0),
                }
		})
		...
	}
}
And let’s modify the vertex shaders zOffset to make it loop:
让我们修改顶点着色器zOffset使其循环:
const vertexShader = `
attribute vec3 aOffset;
attribute vec2 aMetrics;
uniform float uTime;
uniform float uSpeed;
uniform float uTravelLength;
  void main() {
    vec3 transformed = position.xyz;

    float radius = aMetrics.r;
    float len = aMetrics.g;
    transformed.xy *= radius;
    transformed.z *= len;

        float zOffset = uTime * uSpeed + aOffset.z;
        // 1. Mod by uTravelLength to make it loop whenever it goes over
        // 2. Add len to make it loop a little bit later
        zOffset = len - mod(zOffset , uTravelLength);

   // Keep them separated to make the next step easier!
   transformed.z = transformed.z +zOffset ;
   transformed.xy += aOffset.xy;

   vec4 mvPosition = modelViewMatrix * vec4(transformed,1.);
   gl_Position = projectionMatrix * mvPosition;
}
`;If you have a hawk’s eye for faulty code, you’ll noticed the loop isn’t perfect. Behind the camera, the tubes go beyond the road’s limits (push the camera back to see it in action). But for our use case, it does the job. Imperfect details outside of the camera don’t matter.
如果您对错误的代码有敏锐的眼光,您会发现该循环并不完美。 摄像头后面的管道超出了道路的限制(将摄像头推回以查看其运行情况)。 但是对于我们的用例,它可以完成工作。 相机外部不完美的细节并不重要。
走得更快更远 (Going faster and beyond)
When holding left click we want our scene to go Speed Racer mode. Faster, and with a wider camera view.
按住鼠标左键时,我们希望场景进入Speed Racer模式。 更快,相机视野更广。
Because the tube’s speed is based on time, we’ll add an extra offset to time whenever the left click is down. To make this transition extra smooth, we’ll use linear interpolation (lerp) for the speedUp variable.
由于显像管的速度是基于时间的,因此只要单击鼠标左键,我们就会为时间增加一个额外的偏移量。 为了使过渡更加平滑,我们对speedUp变量使用线性插值(lerp) 。
Note: We keep the timeOffset separate from the actual clock’s time. Mutating the clock’s time is never a good idea.
注意:我们将timeOffset与实际时钟的时间分开。 改变时钟的时间绝不是一个好主意。
function lerp(current, target, speed = 0.1, limit = 0.001) {
  let change = (target - current) * speed;
  if (Math.abs(change) < limit) {
    change = target - current;
  }
  return change;
}

class App {
	constructor(){
		...
		this.speedUpTarget = 0.;
		this.speedUp = 0;
		this.timeOffset = 0;
		this.onMouseDown = this.onMouseDown.bind(this);
		this.onMouseUp = this.onMouseUp.bind(this);
	}
	init(){
		...
        this.container.addEventListener("mousedown", this.onMouseDown);
        this.container.addEventListener("mouseup", this.onMouseUp);
        this.container.addEventListener("mouseout", this.onMouseUp);
	}
  onMouseDown(ev) {
    this.speedUpTarget = 0.1;
  }
  onMouseUp(ev) {
    this.speedUpTarget = 0;
  }
  update(delta){

      // Frame-dependent
    this.speedup += lerp(
      this.speedUp,
      this.speedUpTarget,
        // 10% each frame
      0.1,
      0.00001
    );
      // Also frame-dependent
    this.timeOffset += this.speedUp;


    let time = this.clock.elapsedTime + this.timeOffset;
    ...

  }
}
This is a totally functional and valid animation for our super speed mode; after all, it works. But it’ll work differently depending on your Frames Per Second (FPS).
对于我们的超高速模式,这是完全功能有效的动画。 毕竟,它有效。 但它的工作方式会有所不同,具体取决于您的每秒帧数(FPS)。
帧速率独立加速 (Frame rate independent speed up)
The issue with the code above is that every frame we are adding a flat amount to the speed. This animation’s speed depends on the frame rate.
上面代码的问题是,我们在每一帧速度上都增加了固定量。 该动画的速度取决于帧频。
It means if your frame rate suddenly becomes lower, or your frame rate was low to begin with, the animation is going to become slower as well. And if your frame rate is higher, the animation is going to speed up.
这意味着如果您的帧速率突然变低,或者开始时帧速率很低,动画也会变慢。 而且,如果您的帧速率更高,动画将加快速度。
Resulting in the animations running faster or slower or depending on how many frames per second your computer can achieve, a frame rate dependent animation that takes 2 seconds at 30ps, takes 1 second at 60fps.
导致动画运行得更快或更慢,或者取决于计算机每秒可以实现多少帧,取决于帧速率的动画在30ps时花费2秒,在60fps时花费1秒。
Our goal is to animate things using real-time. For all computers, the animations should always take X amount of seconds.
我们的目标是使用实时动画。 对于所有计算机,动画应始终花费X秒钟的时间。
Looking back at our code, we have two animations that are frame rate dependent:
回顾我们的代码,我们有两个动画与帧速率有关:
the
speedUp‘s linear interpolation by 0.1 each framespeedUp的线性插值每帧0.1adding
speedUptotimeOffseteach frame增加
speedUp到timeOffset每帧
Adding speedUp to timeOffset is a linear process; it only depends on the speedup variable. So, we can make it frame rate independent by multiplying it by how many seconds have passed since the last frame (delta).
将speedUp添加到timeOffset是一个线性过程。 它仅取决于speedup变量。 因此,我们可以通过将其乘以自上一帧( delta )以来经过的秒数,来使其独立于帧速率。
This one-line change makes the addition one this.speedUp per second. You might need to bump up the speed since the change makes the addition happen through a whole second.
这一行更改使每秒增加一个this.speedUp 。 您可能需要提高速度,因为更改使添加过程持续了整整一秒钟。
class App {
	update(delta){
		...
         this.timeOffset += this.speedup * delta;
		...
	}
 }
Making the speedUp linear interpolation frame rate independent requires a little bit more math.
使speedUp线性插值帧速率独立需要更多的数学运算。
In the previous case, adding this.speedUp was a linear process, only dependent on the speedUp value. To make it frame rate independent we used another linear process: multiplying it by delta.
在前一种情况下,添加this.speedUp是一个线性过程,仅取决于speedUp值。 为了使其独立于帧速率,我们使用了另一个线性过程:将其乘以delta 。
In the case of linear interpolation (lerp), we are trying to move towards the target 10% of the difference each time. This is not a linear process but an exponential process. To make it frame rate independent, we need another exponential process that involves delta.
在线性插值(lerp)的情况下,我们试图每次都向目标差异的10%移动。 这不是一个线性过程,而是一个指数过程。 为了使其独立于帧速率,我们需要另一个涉及delta指数过程。
We’ll use the functions found in this article about making lerp frame rate independent.
我们将使用本文提供的有关使lerp帧速率独立的功能。
Instead of moving towards the target 10% each frame, we’ll move towards the target based on an exponential function based on time delta instead.
与其将目标移至每个帧10%的目标,不如根据基于时间delta的指数函数向目标移动。
let coefficient = 0.1;
let lerpT = Math.exp(-coefficient * delta);
this.speedup += lerp(
      this.speedup,
      this.speedupTarget,
      lerpT,
      0.00001
    );
This modification completely changes how our coefficient works. Now, a coefficient of 1.0 moves halfway to the target each second.
此修改完全改变了系数的工作方式。 现在,系数1.0每秒移动到目标的一半。
If we want to use our old coefficients 0.1 that we know already works fine for 60fps, we can convert the old coefficient into the new ones like this:
如果我们想用我们的老系数0.1 ,我们知道已经正常工作了60fps的,我们可以把旧的系数转换成新的是这样的:
let coefficient = -60*Math.log2(1 - 0.1);Plot twist: Math is actually hard. Although there are some great links out there explaining how all the math makes sense, some of it still flies over my head. If you know more about the theory of why all of this works. Feel free to reach out or type it in the comments. I would love to have a chat!
情节转折:数学实际上很难。 尽管有一些很好的链接可以解释所有数学的意义,但其中有些仍然让我难以忘怀。 如果您了解所有这些为何起作用的理论。 随意接触或在评论中键入它。 我想聊天!
Repeat the process for the Camera’s Field Of View camera.fov. And we also get a frame rate independent animation for the fov. We’ll reuse the same lerpT to make it easier.
对“相机的视场” camera.fov重复该过程。 我们还为fov获得了独立于帧率的动画。 我们将重用相同的lerpT使其变得更容易。
class App {
	constructor(){
		...
        this.fovTarget = 90;
        ...
	}
  onMouseDown(ev) {
    this.fovTarget = 140;
    ...
  }
  onMouseUp(ev) {
    this.fovTarget = 90;
     ...
  }
  update(delta){
      ...
    let fovChange = lerp(this.camera.fov, this.fovTarget, lerpT );
    if (fovChange !== 0) {
      this.camera.fov += fovChange * delta * 6.;
      this.camera.updateProjectionMatrix();
    }
    ...

  }
}
Note: Don’t forget to update its transformation matrix after you are done with the changes or it won’t update in the GPU.
注意:完成更改后,不要忘记更新其转换矩阵,否则它不会在GPU中更新。
模块化失真(Modularized distortion)
The distortion of each object happens on the vertex shader. And as you can see, all objects share the same distortion. But GLSL doesn’t have a module system unless you add something like glslify. If you want to reuse and swap pieces of GLSL code, you have to create that system yourself with JavaScript.
每个对象的变形都发生在顶点着色器上。 如您所见,所有对象共享相同的变形。 但是GLSL没有模块系统,除非您添加glslify之类的东西。 如果要重用和交换GLSL代码,则必须使用JavaScript自己创建该系统。
Alternatively, if you have only one or two shaders that need distortion, you can always hard code the distortion GLSL code on each mesh’s shader. Then, update each one every time you make a change to the distortion. But try to keep track of updating more than two shaders and you start going insane quickly.
或者,如果只有一个或两个需要变形的着色器,则始终可以在每个网格的着色器上对变形GLSL代码进行硬编码。 然后,每当您更改变形时更新一次。 但是尝试跟踪更新两个以上的着色器,您很快就会发疯。
In my case, I chose to keep my sanity and create my own little system. This way I could create multiple distortions and play around with the values for the different demos.
就我而言,我选择保持理智并创建自己的小系统。 这样,我可以创建多个变形并尝试不同演示的值。
Each distortion is an object with three main properties:
每个变形都是具有三个主要属性的对象:
distortion_uniforms: The uniforms this distortion is going to need. Each mesh takes care of adding these into their material.distortion_uniforms制服:将需要这种畸变的制服。 每个网格负责将其添加到其材质中。distortion_chunk: The GLSL code that exposesgetDistortionfunction for the shaders that implement it.getDistortionreceives a normalized valueprogressindicating how far into the road is the point. It returns the distortion of that specific position.distortion_chunkgetDistortion:GLSL代码为实现它的着色器公开了getDistortion函数。getDistortion接收到归一化的值progress,该progress指示该点距道路多远。 它返回该特定位置的变形。(Optional)
getJS: The GLSL code ported to JavaScript. This is useful for creating JS interactions following the curve. Like the camera rotating to face the road as we move along.(可选)
getJS:GLSL代码移植到JavaScript。 这对于在曲线之后创建JS交互很有用。 就像相机在我们前进时旋转以面对道路一样。
const distortion_uniforms = {
  uDistortionX: new THREE.Uniform(new THREE.Vector2(80, 3)),
  uDistortionY: new THREE.Uniform(new THREE.Vector2(-40, 2.5))
};

const distortion_vertex = `
#define PI 3.14159265358979
  uniform vec2 uDistortionX;
  uniform vec2 uDistortionY;

    float nsin(float val){
    return sin(val) * 0.5+0.5;
    }
  vec3 getDistortion(float progress){
        progress = clamp(progress, 0.,1.);
        float xAmp = uDistortionX.r;
        float xFreq = uDistortionX.g;
        float yAmp = uDistortionY.r;
        float yFreq = uDistortionY.g;
        return vec3(
            xAmp * nsin(progress* PI * xFreq   - PI / 2. ) ,
            yAmp * nsin(progress * PI *yFreq - PI / 2.  ) ,
            0.
        );
    }
`;

const myCustomDistortion = {
    uniforms: distortion_uniforms,
    getDistortion: distortion_vertex,
}
Then, you pass the distortion object as a property in the options given when instantiating the main App class like so:
然后,将实例化主App类时给定的options的失真对象作为属性传递,如下所示:
const myApp = new App(
	container,
	{
        ... // Bunch of other options
		distortion: myCustomDistortion,
        ...
    }
)
...
From here each object can take the distortion from the options and use it as it needs.
从这里开始,每个对象都可以distortion options的distortion ,并根据需要使用它。
Both, the CarLights and Road classes are going to add distortion.uniforms to their material and modify their shader using Three.js’ onBeforeCompile:
CarLights和Road类都将向其材质添加distortion.uniforms CarLights并使用Three.js的onBeforeCompile修改其着色器:
const material = new THREE.ShaderMaterial({
	...
	uniforms: Object.assign(
		{...}, // The original uniforms of this object
		options.uniforms
	)
})

material.onBeforeCompile = shader => {
  shader.vertexShader = shader.vertexShader.replace(
    "#include


    ",
    options.distortion.getDistortion
  );
};
Before Three.js sends our shaders to webGL it checks it’s custom GLSL to inject any ShaderChunks your shader needs. onBeforeCompile is a function that happens before Three.js compiles your shader into valid GLSL code. Making it easy to extend any built-in materials.
在Three.js将我们的着色器发送到webGL之前,它会检查它是否是自定义GLSL来注入您的着色器所需的任何ShaderChunks 。 onBeforeCompile是在Three.js将着色器编译为有效的GLSL代码之前发生的函数。 使扩展任何内置材料变得容易。
In our case, we’ll use onBeforeCompile to inject our distortion’s code. Only to avoid the hassle of injecting it another way.
在我们的例子中,我们将使用onBeforeCompile注入失真的代码。 只是为了避免以另一种方式注入麻烦。
As it stands now, we aren’t injecting any code. We first need to add #include <getDistortion_vertex> to our shaders.
就目前而言,我们没有注入任何代码。 我们首先需要将#include <getDistortion_vertex>添加到我们的着色器中。
In our CarLights vertex shader we need to map its z-position as its distortion progress. And we’ll add the distortion after all other math, right at the end:
在我们的CarLights顶点着色器中,我们需要随着变形的progress映射其z位置。 最后,我们将在所有其他数学运算之后添加失真:
// Car Lights Vertex shader
const vertexShader = `
attribute vec3 aOffset;
attribute vec2 aMetrics;
uniform float uTime;
uniform float uSpeed;
uniform float uTravelLength;
#include


  void main() {
	...


		// Map z-position to progress: A range of 0 to 1.
        float progress = abs(transformed.z / uTravelLength);
        transformed.xyz += getDistortion(progress);


        vec4 mvPosition = modelViewMatrix * vec4(transformed,1.);
        gl_Position = projectionMatrix * mvPosition;
	}
`;
In our Road class, although we see it flat going towards negative-z because we rotated it, this mesh rotation happens after the vertex shader. In the eyes of our shader, our plane is still vertical y-axis and placed in the center of the scene.
在我们的Road类中,尽管由于旋转而看到平面朝着负z方向移动,但是此网格旋转发生在顶点着色器之后。 在着色器的眼睛中,我们的平面仍然是垂直的y-axis并位于场景的中心。
To get the correct distortion, we need to map the y-axis as progress. First, we’ll un-center it uTravelLength /2., and then we’ll normalize it.
为了获得正确的失真,我们需要将y-axis映射为进度。 首先,我们将uTravelLength /2.取消居中uTravelLength /2. ,然后将其标准化。
Also, instead of adding the y-distortion to the y-axis, we’ll add it to the z-axis instead. Remember, in the vertex shader, the rotation hasn’t happened yet.
另外,我们没有将y失真添加到y-axis ,而是将其添加到了z-axis 。 请记住,在顶点着色器中,旋转尚未发生。
// Road Vertex shader
const vertexShader = `
uniform float uTravelLength;
#include


	void main(){
        vec3 transformed = position.xyz;

	// Normalize progress to a range of 0 to 1
    float progress = (transformed.y + uTravelLength / 2.) / uTravelLength;
    vec3 distortion  = getDistortion(progress);
    transformed.x += distortion.x;
	// z-axis is becomes the y-axis after mesh rotation.
    transformed.z += distortion.y;
    gl_Position = projectionMatrix * modelViewMatrix * vec4(transformed.xyz, 1.);
	}
`;
An there you have the final result for this tutorial!
在那里,您将获得本教程的最终结果!
画龙点睛(Finishing touches)
There are a few ways you can expand and better sell the effect of an infinite road in the middle of the night. Like creating more interesting curves and fading the objects into the background with some fog effect to make the lights seem like they are glowing.
您有几种方法可以扩展并更好地在深夜销售无限道路的效果。 就像创建更多有趣的曲线并将对象带有某种雾化效果淡入背景以使灯光看起来像是在发光。
最后的想法 (Final Thoughts)
I find that re-creating things from outside of the web and simply doing some creative coding, opens me up to a wider range of interesting ideas.
我发现从网络外部重新创建事物并仅进行一些创造性的编码,就使我接触到更多有趣的想法。
In this tutorial, we learned how to instantiate geometries, create frame rate independent animations and modulized distortions. And we brought it all together to re-create and put some motion into this awesome poster!
在本教程中,我们学习了如何实例化几何形状,创建独立于帧频的动画和调制失真。 然后我们将所有这些重新组合在一起,以重新制作这张海报,并将其付诸实践!
Hopefully, you’ve also liked working through this tutorial! Let me know what you think in the comments and feel free to reach out to me!
希望您也喜欢阅读本教程! 让我知道您在评论中的想法,并随时与我联系!
翻译自: https://tympanus.net/codrops/2019/11/13/high-speed-light-trails-in-three-js/
three.js 光


 480
480

 被折叠的 条评论
为什么被折叠?
被折叠的 条评论
为什么被折叠?
 到【灌水乐园】发言


