


If you’ve used the mailbox cleanup tool, then you’ll have seen the AutoArchive button, but you may be wary of how it works and what it’ll do. Here’s what it does and how you can put it to use.
如果您使用了邮箱清理工具 ,那么您将看到“自动存档”按钮,但是您可能会对其自动工作的方式以及将要执行的操作保持警惕。 这是它的作用以及如何使用它。
Clicking the AutoArchive button causes a process to swing through all of the folders in Outlook and apply any AutoArchive rules you’ve set up (don’t worry, the default AutoArchive rule is to do nothing, so you can’t do any harm by clicking the button). But if you want to move your older items to an archive where they’re out of the way, AutoArchive is how you automate the process. Let’s go through setting it up and running it.
单击“自动存档”按钮将导致一个过程在Outlook中的所有文件夹中移动并应用您设置的所有自动存档规则(不用担心,默认的自动存档规则是不执行任何操作,因此不会造成任何伤害点击按钮)。 但是,如果您希望将较旧的项目移到不影响它们的存档中,则可以使用AutoArchive自动执行该过程。 让我们来完成设置并运行它。
如何打开自动存档 (How to Turn On AutoArchive)
First, you need to turn on AutoArchive and choose its settings. Go to File > Options > Advanced and then click the “AutoArchive Settings” button.
首先,您需要打开自动存档并选择其设置。 转到“文件”>“选项”>“高级”,然后单击“自动存档设置”按钮。

As long as the “Run AutoArchive every” option is switched off (which is the default), AutoArchive will never run.
只要“运行每个自动存档”选项处于关闭状态(默认设置),自动存档就永远不会运行。
Once you turn the “Run AutoArchive every” option on, all of the options are now available.
启用“每隔运行一次自动存档”选项后,所有选项现在都可用。
Unlike Folder Cleanup, which has one window of settings in File Options and then allows you to run those settings against any folder you like as a manual task, the AutoArchive settings shown here are the default settings. Each folder that has AutoArchive switched on can use these default settings, or you can use different settings for different folders if you want. We’ll go through how to do that later on, but for now, let’s look at the default settings.
与“ 文件夹清理”不同,后者在“文件选项”中具有一个设置窗口,然后允许您对手动执行的任何文件夹运行这些设置,此处显示的“自动存档”设置是默认设置。 启用了自动存档的每个文件夹都可以使用这些默认设置,也可以根据需要为不同的文件夹使用不同的设置。 稍后我们将介绍如何执行此操作,但现在让我们来看一下默认设置。
如何设置自动存档 (How To Set Up AutoArchive)
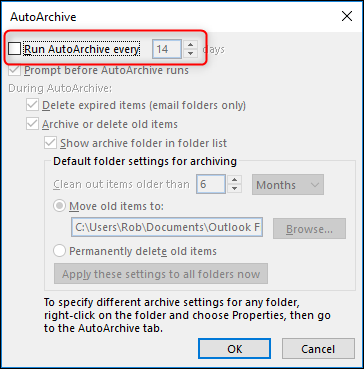
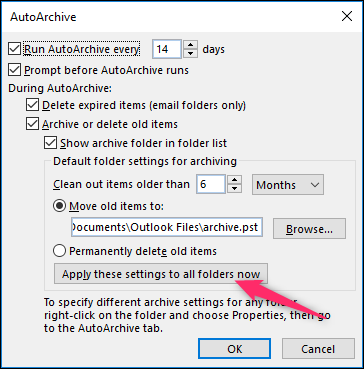
The first thing to notice is that once AutoArchive is turned on, it will run every 14 days. You can change that using the Up and Down arrows or by typing a number in, and you can select any value from 1 to 60 days. You can type in any two-digit number, but if it’s more than 60, Outlook will display an error message when you click “OK,” and you’ll have to change the value before you can save.
首先要注意的是,一旦打开自动存档,它将每14天运行一次。 您可以使用向上和向下箭头或通过键入数字来更改该值,并且可以选择1到60天之间的任何值。 您可以输入任何两位数字,但是如果该数字超过60,则在单击“确定”时,Outlook将显示错误消息,并且必须先更改该值,然后才能保存。
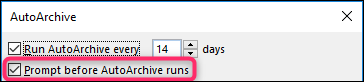
The next option—“Prompt before AutoArchive runs”—gives you the choice of having Outlook show you a prompt before the AutoArchive happens. This prompt lets you review the settings or cancel this run of the AutoArchive if you want.
下一个选项“自动存档运行前提示”使您可以选择让Outlook在自动存档发生之前向您显示提示。 通过此提示,您可以查看设置或取消运行自动存档。
The rest of the settings relate to what items will be archived, and what happens during the archive process. The first option here—“Delete expired items (email folder only)”—relates to emails which have had an expiry date added to them. This won’t affect tasks or events, even if you turn AutoArchive on for those folders.
其余设置与将要归档的项目以及在归档过程中发生的事情有关。 此处的第一个选项“删除过期的项目(仅电子邮件文件夹)”与添加了过期日期的电子邮件相关。 即使您为这些文件夹打开了自动存档,这也不会影响任务或事件。
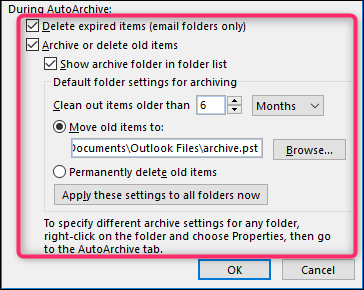
The rest of the settings apply to all items, not just email. This means calendar events, tasks, notes, and journal entries.
其余设置适用于所有项目,而不仅仅是电子邮件。 这意味着日历事件,任务,便笺和日记帐分录。
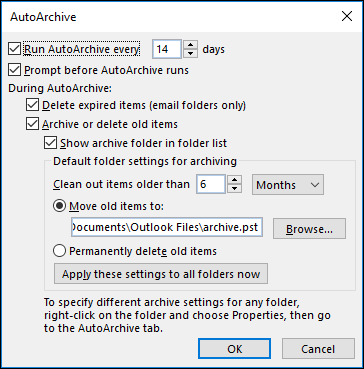
Assuming you leave “Archive or delete old items” switched on, the default settings are for Outlook to move items older than 6 months to a new, separate .pst file named Archive (by default), and make this visible in the navigation pane in Outlook so you can access the archived items whenever you want. You can change the “Clean out items older than” value to anything from 1 day to 60 months, pick a different .pst file to archive the items in, or choose to “Permanently delete old items.”
假设您保持“存档或删除旧项目”为打开状态,则Outlook的默认设置是将6个月以上的项目移动到名为Archive(默认)的新的单独.pst文件中,并在以下位置的导航窗格中显示该文件: Outlook,因此您可以随时访问已存档的项目。 您可以将“清除早于”的值更改为1天到60个月之间的任何值,选择其他.pst文件来存档项目,或选择“永久删除旧项目”。
Be warned that this deletion bypasses the Deleted Items folder, and your items will be deleted from Outlook entirely. You may still be able to access it on your mail server, depending on your settings, but you shouldn’t rely on this. Only choose this option if you want to delete the items forever.
请注意,此删除将绕过Deleted Items文件夹,并且您的项目将从Outlook中完全删除。 您可能仍然可以在邮件服务器上访问它,具体取决于您的设置,但是您不应依赖此设置。 仅当您要永久删除项目时才选择此选项。
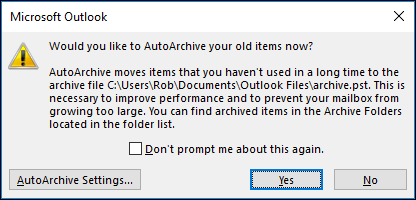
When you click “OK,” AutoArchive will be turned on. It will run in line with the “Run AutoArchive every” value you’ve chosen (every 14 days by default), starting today. So once you turn it on you should expect it to run quite quickly. In our tests, it took less than ten minutes between switching it on and receiving the prompt telling us AutoArchive was going to run. AutoArchive only runs by default on a few folders, so if you want it to run on specific folders—or you want to customize how it runs on different folders—keep reading.
当您单击“确定”时,自动存档将打开。 从今天开始,它将与您选择的“每次运行自动存档”值一致(默认为每14天运行一次)。 因此,一旦打开它,就应该期望它运行得很快。 在我们的测试中,从打开电源到收到提示告诉我们AutoArchive将要运行的时间,花了不到十分钟。 默认情况下,AutoArchive仅在几个文件夹上运行,因此,如果要在特定文件夹上运行它,或者要自定义它在不同文件夹上的运行方式,请继续阅读。
如何打开和自定义不同文件夹的自动存档 (How to Turn On and Customize AutoArchive for Different Folders)
When you turn AutoArchive on, it only runs by default against the following folders:
当您打开自动存档时,默认情况下,它仅对以下文件夹运行:
- Sent Items 发送的邮件
- Deleted Items 删除的项目
- Calender 压延机
- Tasks 任务
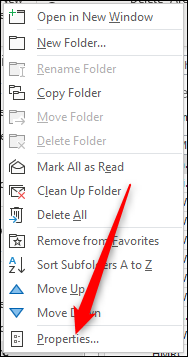
If you want it to run on any other folder, you’ll need to turn it on for each folder (or turn it off on any of those four folders against which you don’t want it to run). Do this by right-clicking the folder in the Navigation pane and clicking “Properties.”
如果希望它在其他任何文件夹上运行,则需要为每个文件夹将其打开(或在不希望对其运行的四个文件夹中的任何一个上将其关闭)。 通过右键单击“导航”窗格中的文件夹并单击“属性”来执行此操作。
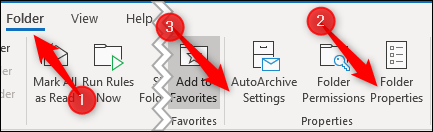
You can also access folder properties by selecting Folder > Folder Properties in the ribbon. (For folders like Calendar and Tasks that don’t show up in the Navigation pane, this is the only way to access the folder properties.) There’s also the option to go straight to the AutoArchive Settings, which saves you a step once you’re inside the Folder Properties.
您还可以通过选择功能区中的“文件夹”>“文件夹属性”来访问文件夹属性。 (对于“日历”和“任务”之类的未显示在“导航”窗格中的文件夹,这是访问文件夹属性的唯一方法。)还有一个选项可以直接转到“自动存档设置”,一旦在“文件夹属性”中。
In the Folder Properties window, click the AutoArchive tab to access the settings for that folder.
在“文件夹属性”窗口中,单击“自动存档”选项卡以访问该文件夹的设置。
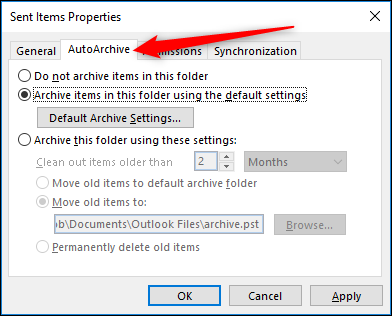
For most folders, the “Do not archive items in this folder” setting will be on by default. This means that when the AutoArchive process runs, the folder will be ignored and no items in it will be archived. If you want the folder to be included, switch on the “Archive items in this folder using the default settings” option.
对于大多数文件夹,默认情况下将启用“不在此文件夹中归档项目”设置。 这意味着在运行自动存档过程时,该文件夹将被忽略,并且其中的任何项目都不会被存档。 如果要包含该文件夹,请打开“使用默认设置在此文件夹中存档项目”选项。
Alternatively, if you want the AutoArchive settings for this folder to be different from the defaults, switch on “Archive this folder using these settings” and amend the settings to your preference.
或者,如果您希望此文件夹的自动存档设置与默认设置不同,请打开“使用这些设置存档此文件夹”,然后根据自己的喜好修改设置。
If at any point you want to return all folders to use the default settings, you can go back to File > Options > Advanced > AutoArchive Settings and click the “Apply these settings to all folders now” button. That will change all folders that have the “Archive this folder using these settings” switched on to have “Archive items in this folder using the default settings” switched on instead.
如果您想随时返回所有文件夹以使用默认设置,则可以返回“文件”>“选项”>“高级”>“自动存档设置”,然后单击“立即将这些设置应用于所有文件夹”按钮。 这将更改所有已打开“使用这些设置存档此文件夹”的文件夹,而将“使用默认设置将此文件夹存档的项目”打开。
Once you’ve got the AutoArchive default settings, and the settings per folder, set up the way you want, you can leave the process to quietly work in the background, freeing up space for you and keeping your folders from getting too bloated.
有了AutoArchive的默认设置以及每个文件夹的设置后,就可以按照自己的方式进行设置了,您可以让该过程在后台安静地工作,从而为您腾出空间,并防止文件夹太过膨胀。
翻译自: https://www.howtogeek.com/392717/what-is-autoarchive-in-outlook-and-how-does-it-work/


 2526
2526


 被折叠的 条评论
为什么被折叠?
被折叠的 条评论
为什么被折叠?
 到【灌水乐园】发言


