


圆形路标
Instruments for Apple's Xcode is a tool for performance analysis of an iOS application. In 2018 Apple introduced Custom Instruments — an opportunity to expand the standard set of instruments for application profiling. When existing tools are not enough, you can create new ones yourself — it will collect, analyze and display the data the way you need.
适用于Apple Xcode的Instruments是用于iOS应用程序性能分析的工具。 Apple在2018年推出了 Custom Instruments,这是扩展应用程序配置文件标准工具集的机会。 当现有工具还不够用时,您可以自己创建新工具-它会按照需要的方式收集,分析和显示数据。
Two years have passed, and there are almost no new published tools and information on the internet. So we decided to rectify the situation and share the experience of our Custom Instrument creation. New Instrument is based on the signpost technology and allows you to determine the reason for the weak isolation of unit tests quickly and accurately.
两年过去了,互联网上几乎没有新发布的工具和信息。 因此,我们决定纠正这种情况,并分享我们创建自定义乐器的经验。 新仪器基于路标技术,可让您快速而准确地确定单元测试隔离不良的原因。
理论最小值 (Theoretical minimum)
To create a new tool for Xcode, you need an understanding of two theoretical blocks. For those who want to figure these blocks themselves, we are giving the necessary links right now:
要为Xcode创建新工具,您需要了解两个理论模块。 对于那些想自己弄清楚这些障碍的人,我们现在提供必要的链接:
The structure of .instrpkg tool markup file
.instrpkg工具标记文件的结构
CLIPS for tool logic programming.
用于工具逻辑编程的CLIPS 。
So, below is a summary of the necessary topics.
因此,以下是必要主题的摘要。
First select File -> New -> Project -> macOS Category -> Instruments package. The created project includes a file with the extension .instrpkg, in which a new tool is declared in xml format. Let's get acquainted with it’s markup elements:
首先选择File-> New-> Project-> macOS Category-> Instruments软件包。 创建的项目包括扩展名为.instrpkg的文件,其中以xml格式声明了一个新工具。 让我们熟悉一下它的标记元素:
| Element | Attributes | Description |
|---|---|---|
| Data schemas | interval-schema, point-schema, etc. | Describes the data structure as a table like sql schemes. Schemes are used in other markup elements to determine the type of data at the input and output of the model, for example, when describing a mapping (UI). |
| Import data schemas | import-schema | Importing predefined schemes. It allows you to use data structures tdat are defined by Apple. |
| Tool model | modeler | Associates tde tool witd a .clp file, in which tde logic of tde tool is defined, and announces tde expected data scheme at tde input and output of tde model. |
| Tool description | instrument | Describes tde data model and determines tde events displaying via UI. tde data model is described using tde attributes create-table, create-parameter, etc. Tool charts are defined by graph attributes, and tde parts table is defined by list, narrative, etc. |
| 元件 | 属性 | 描述 |
|---|---|---|
| 数据模式 | 间隔模式,点模式等 | 将数据结构描述为类似于sql方案的表。 在其他标记元素中使用方案来确定模型输入和输出处的数据类型,例如在描述映射(UI)时。 |
| 导入数据模式 | 导入模式 | 导入预定义的方案。 它允许您使用Apple定义的tdat数据结构。 |
| 工具型号 | 造型师 | 将tde工具与.clp文件关联,在其中定义了tde工具的tde逻辑,并在tde模型的tde输入和输出处宣布tde预期数据方案。 |
| 工具说明 | 仪器 | 描述tde数据模型并确定通过UI显示的tde事件。 使用tde属性create-table,create-parameter等描述tde数据模型。工具图由图形属性定义,而tde零件表由列表,叙述等定义。 |
If we want to supplement the logic for the created tool, we need to create a .clp file. Basic CLIPS language entities:
如果要补充所创建工具的逻辑,则需要创建一个.clp文件。 基本CLIPS语言实体:
- “Fact” is a certain event registered in the system using the assert command; “事实”是使用assert命令在系统中注册的特定事件;
- “Rule” is an if-block with specific syntax that contains a condition under which a set of actions is performed. “规则”是具有特定语法的if块,其中包含执行一组动作的条件。
Which rules and in what sequence them will be activated are determined by the CLIPS itself based on incoming facts, the priorities of the rules and the conflict resolution mechanism.
CLIPS本身根据传入的事实,规则的优先级和冲突解决机制确定将激活哪些规则以及以什么顺序激活它们。
The language supports the creation of data types based on primitives, logical and arithmetical operations, functions and full-fledged object-oriented programming (OOP) with the definition of classes, message sending, multiple inheritances.
该语言支持基于基元,逻辑和算术运算,函数以及成熟的面向对象程序设计(OOP)的数据类型创建,其中包括类的定义,消息发送,多重继承。
Let's look through the basic syntax of a language that will allow you to create logic for custom tools.
让我们看一看一种语言的基本语法,该语法将允许您为自定义工具创建逻辑。
1。 (1.)
To create a fact, use the assert construction:
要创建事实,请使用assert结构:
CLIPS> (assert (duck))Thus, we get the duck entity in the fact table, which can be viewed using the facts command:
因此,我们在事实表中获得了鸭子实体,可以使用事实命令来查看它:
CLIPS> (facts)To remove the fact, use the retract commandretract: (retract duck)
要删除事实,请使用retract命令retract: (retract duck)
2。 (2.)
To create a rule, use the
要创建规则,请使用
defrule construct:
defrule构造:
CLIPS> (defrule duck) - create a rule named duck
(animal-is duck) </i> - if animal-is duck exists is in the fact table
=>
(assert (sound-is quack))) - a new fact sound-is quack is created
3。 (3.)
To create and use variables, the following syntax is used (put an obligatory sign "?" before the variable name ):
要创建和使用变量,请使用以下语法(在变量名之前加上强制性的符号“?”):
? <variable-name>4。 (4.)
You can create new data types using:
您可以使用以下方法创建新的数据类型:
CLIPS>
(deftemplate prospect
(slot name (type STRING) (default? DERIVE))
(slot assets (type SYMBOL) (default rich))
(slot age (type NUMBER) (default 80)))
So, we defined a structure with the name prospect with three attributes name, assets, and age with default value and type.
因此,我们定义了一个名称为professional的结构,具有三个属性name , asset和age以及默认值和类型。
5, (5.)
Arithmetic and logical operations have prefix syntax. To add 2 and 3, you should use the following construction:
算术和逻辑运算具有前缀语法。 要添加2和3,应使用以下构造:
CLIPS> (+ 2 3)Or to compare two variables x and y:
或比较两个变量x和y:
CLIPS> (> ?x ?y)实际例子 (Practical example)
In our case with unit-testing, we use the OCMock library to create stub objects. However, there are situations when a mock live longer than the test for which it was created, and affects the isolation of other tests. As a result, this leads to the “blinking” (instability) of unit tests. To track the lifetime of tests and mocks, we will create our tool.
就单元测试而言,我们使用OCMock库创建存根对象。 但是,在某些情况下,模拟寿命比其创建的测试寿命更长,并且会影响其他测试的隔离。 结果,这导致单元测试的“闪烁”(不稳定)。 为了跟踪测试和模拟的生命周期,我们将创建我们的工具。
步骤1.为路标事件制作标记 (Step 1. Making markup for signpost events)
To detect defected mocks, we need two categories of interval events — mock's time of creation and destruction, the start and end time of the test. To get these events, go to the OCMock library and mark them up with signpost in the init and stopMocking methods of the OCClassMockObject class.
要检测有缺陷的模拟,我们需要两类间隔事件:模拟的创建和销毁时间,测试的开始时间和结束时间。 要获取这些事件,请转到OCMock库,并在OCClassMockObject类的init和stopMocking方法中用路标对其进行标记。


Next, go to your project, and do the markup in unit tests, setUp, and tearDown methods:
接下来,转到您的项目,并在单元测试, setUp和tearDown方法中进行标记:
步骤2.从Instrument Package模板创建一个新工具 (Step 2. Create a new tool from the Instrument Package template)
First, we determine the data type of the input. To do this, we import the signpost scheme in the .instrpkg file. Now events created by signpost will be registered in the tool:
首先,我们确定输入的数据类型。 为此,我们将路标方案导入.instrpkg文件中。 现在,由路标创建的事件将在工具中注册:
Next, we determine the type of data in the output. In this example, we will output simultaneous events. Each event will have its own time and description. To do this, declare the scheme:
接下来,我们确定输出中的数据类型。 在此示例中,我们将输出同步事件。 每个事件都有自己的时间和描述。 为此,请声明方案:
步骤3.描述工具的逻辑 (Step 3. Describe the tool’s logic)
We create a separate file with the extension .clp, in which we set the rules using the CLIPS language. To let the new tool know in which file the logic was defined, let’s add the modeler block:
我们创建一个扩展名为.clp的单独文件,在其中使用CLIPS语言设置规则。 为了让新工具知道在哪个文件中定义了逻辑,让我们添加modeler块:
In this block, using the production-system attribute we specify the relative path to the file with the logic. In the attributes output and required-input, we define the data schemes for input and output.
在此块中,使用production-system属性,我们使用逻辑指定文件的相对路径。 在属性output和required-input ,我们定义了输入和输出的数据方案。

步骤4.我们描述了该工具(UI)的呈现方式的细节 (Step 4. We describe the specifics of the presentation of the tool (UI))
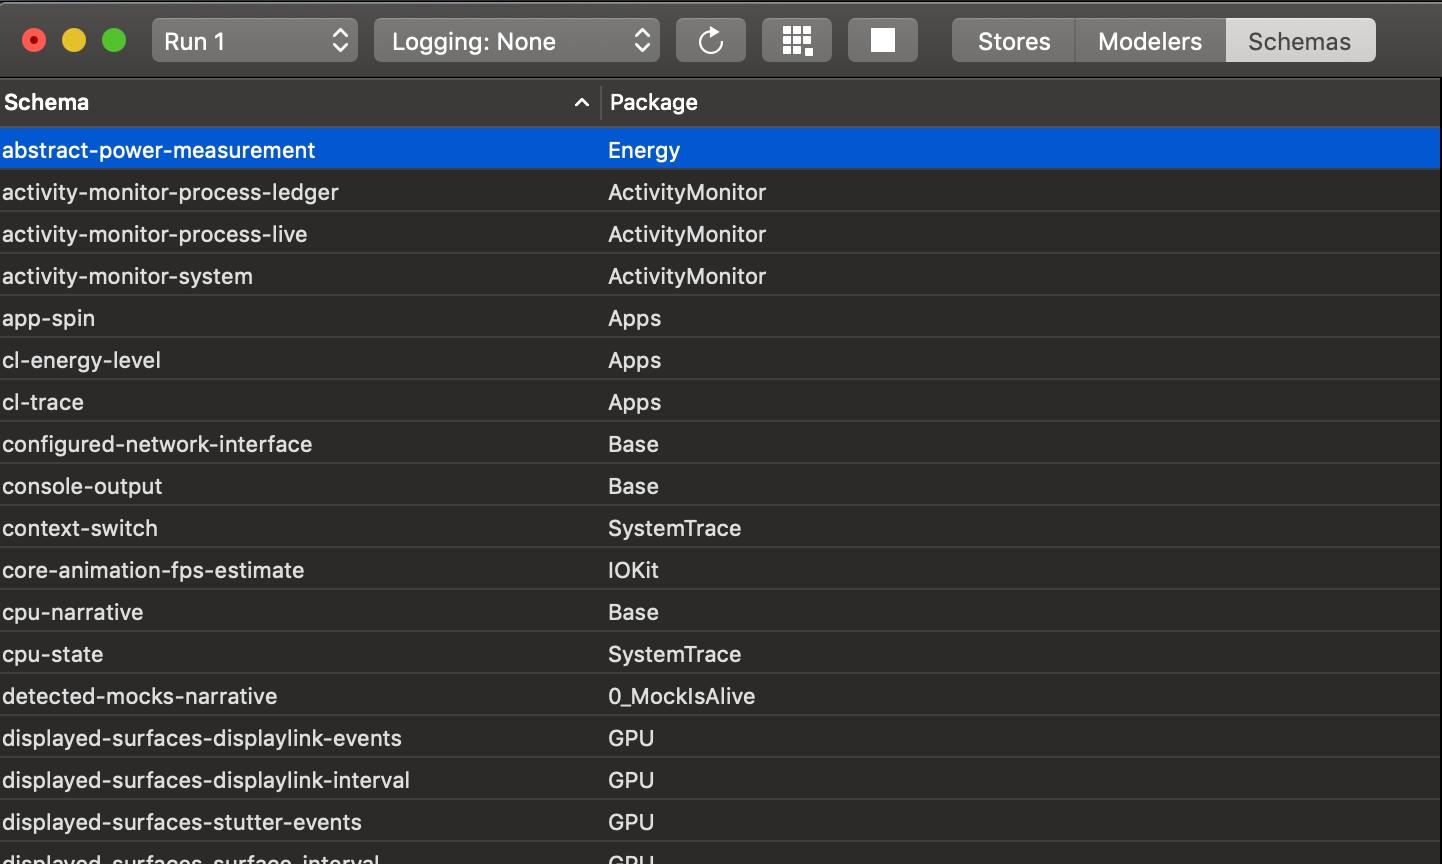
In the .instrpkg file, we describe the tool and the results displaying. Create a table for the data in the create-table attribute using the previously declared detected-mocks-narrative schema in the schema-ref attribute. And set up the type of information output — narrative (descriptive):
在.instrpkg文件中,我们描述了该工具以及显示的结果。 使用先前在schema-ref属性中声明的detected-mocks-narrative模式,为create-table属性中的数据创建一个表。 并设置信息输出的类型-叙述性(描述性):

步骤5.我们编写逻辑代码 (Step 5. We write the logic code)
Let's move on to the .clp file, in which the logic of the expert system should be defined. The logic will be as follows: if the start of the test overlaps with the interval of the mock’s life, then we register the fact that this mock “came” from another test — and this violates the isolation of the current unit-test. To eventually create an event with discovered information, you need to do the following steps:
让我们继续.clp文件,其中应定义专家系统的逻辑。 逻辑将如下所示:如果测试的开始与模拟寿命的间隔重叠,则我们记录该模拟从另一个测试“出现”的事实-这违反了当前单元测试的隔离性。 要最终使用发现的信息创建事件,您需要执行以下步骤:
1. Define the mock and unitTest structures with fields — the time of the event, the event’s identifier, the name of the test and the class of the mock.
1.使用字段定义模拟和unitTest结构-事件的时间,事件的标识符,测试的名称和模拟的类。
2. Define the rules that will create facts with the mock and unitTest types, based on the signpost’s incoming events:
2.根据signpost's传入事件,定义将使用mock和unitTest类型创建事实的规则:
These rules can be read as follows: if at the input we get a fact with os-signpost type with the expected subsystem, category, name, and event-type, then we create a new fact with the type that was defined above (unitTest or mock) and fill it with values. It is important to remember — CLIPS is a case-sensitive language and the values of the subsystem, category, name, and event-type must match what was used in the code of the project under study.
这些规则可以读作如下:如果在输入中得到一个带有os-signpost类型的事实,并具有预期的subsystem, category, name和event-type ,那么我们将使用上面定义的类型创建一个新的事实( unitTest或mock )并用值填充。 重要的是要记住-CLIPS是区分大小写的语言, subsystem ,类别,名称和事件类型的值必须与正在研究的项目代码中使用的值匹配。

Variables from signpost events are passed as follows:
来自路标事件的变量按以下方式传递:

3. We define the rules that release completed events (they are redundant since they do not affect the result).
3.我们定义了释放已完成事件的规则(它们是多余的,因为它们不影响结果)。

步骤6.定义将生成结果的规则 (Step 6. Define the rule that will generate the results)
You can read the rule like this.
您可以像这样阅读规则。
如果 (If)
1) there are unitTest and mock; 2) and the beginning of the test occurs after than the existing mock's life-time interval; 3) and there is a table for storing results with the detected-mocks-narrative schema;
1)有unitTest和mock; 2)并且测试的开始发生在比现有模拟的生命周期间隔更长的时间之后; 3)还有一个表,用于存储带有检测到的嘲讽叙事模式的结果;
然后 (then)
4) create a new record; 5) fill in with time; 6)… and a description.
4)创建新记录; 5)随时间填写; 6)…和说明。
As a result, we see the following picture when using the new tool:
结果,使用新工具时,我们看到以下图片:

The source code for custom instrument and a sample project for using the instrument can be viewed on GitHub.
可以在GitHub上查看自定义工具的源代码和使用该工具的示例项目。
工具调试 (Tool debugging)
The debugger allows you to:
调试器使您能够:
1. See compiled code based on the description in instrpkg. 2. See detailed information about what happens at runtime.
1.根据instrpkg中的描述,参见编译后的代码。 2.查看有关运行时发生情况的详细信息。
3. Display a complete list and description of system data schemes that can be used as input in new instruments.
3.显示可以用作新仪器输入的系统数据方案的完整列表和说明。
4. Execute arbitrary commands in the console. For example, display a list of rules with the list-defrules command or facts with the facts command.
4.在控制台中执行任意命令。 例如,使用list-defrules命令显示规则列表,或使用事实命令显示事实。
在CI服务器上设置 (Setup on CI server)
You can run tools from the command line to profile the application during the execution of unit- or UI-tests on the CI-server. This will allow, for example, catching a memory leak as early as possible. To profile tests in the pipeline, use the following commands:
您可以从命令行运行工具,以在CI服务器上执行单元测试或UI测试期间对应用程序进行概要分析。 例如,这将允许尽早发现内存泄漏。 要分析管道中的测试,请使用以下命令:
1. Running Instruments with attributes:
1.运行具有以下属性的仪器:
xcrun instruments -t <template_name> -l <average_duration_ms> -w <device_udid></a>- where template_name is the path to the template with Instruments or the name of the template. You can get the command xcrun instruments -s; 其中template_name是使用Instruments的模板的路径或模板的名称。 您可以获取命令xcrun instruments -s;。
- average_duration_ms — recording time in milliseconds, should be greater than/equal to the test run time; average_duration_ms-记录时间(以毫秒为单位),应大于/等于测试运行时间;
- evice_udid — simulator identifier. You can get the command xcrun instruments -s. Must match the identifier of the simulator on which the tests will be run. evice_udid —模拟器标识符。 您可以获取命令xcrun instruments -s。 必须与将在其上运行测试的模拟器的标识符匹配。
2. Running tests on the same simulator with the command:
2.使用以下命令在同一模拟器上运行测试:
xcodebuild -workspace <path_to_workspace> -scheme <scheme_with_tests> -destination
<device> test-without-building- where path_to_workspace is the path to the Xcode workspace; 其中path_to_workspace是Xcode工作空间的路径;
- scheme_with_tests — a scheme with tests; scheme_with_tests —带有测试的方案;
- device — simulator identifier. 设备—模拟器标识符。
As a result, a report with the extension .trace will be created in the working directory, which can be opened by the Instruments application or by right-clicking on the file and selecting Show Package Contents.
结果,将在工作目录中创建扩展名为.trace的报告,可以通过Instruments应用程序打开该报告,也可以通过右键单击该文件并选择Show Package Contents来打开该报告。
结论 (Conclusion)
We examined an example of upgrading signposts to a full-fledged tool and told how to automatically apply it on the “runs” of the CI server and use it in solving the problem of “blinking” (unstable) unit-tests.
我们研究了将路标升级为成熟工具的示例,并介绍了如何将其自动应用于CI服务器的“运行”,并用于解决“闪烁”(不稳定)单元测试的问题。
As you dive into the possibilities of custom instruments, you will better understand in what other cases you can use it. For example, they also help us to understand the problems of multithreading — where and when to use thread-safe data access.
当您深入研究自定义工具的可能性时,您将更好地了解在其他情况下可以使用它。 例如,它们还帮助我们了解多线程问题-何时何地使用线程安全的数据访问。
Creating a new tool was quite simple. But the main thing is that after spending several days of exploring the mechanics and documentation to create it today, you will be able to avoid several sleepless nights in attempts to fix bugs.
创建一个新工具非常简单。 但是主要的是,在花了几天的时间探索机制和文档以创建它之后,您将能够避免尝试修复错误的不眠之夜。
资料来源 (Sources)
https://help.apple.com/instruments/mac/current/#/devb14ffaa5
https://help.apple.com/instruments/mac/current/#/devb14 ff aa5
https://medium.com/appspector/building-custom-instruments-package-9d84fd9339b6
https://medium.com/appspector/building-custom-instruments-package-9d84fd9339b6
The article was written with regno, Anton Vlasov, an iOS developer
本文由iOS开发人员regno和Anton Vlasov撰写
圆形路标


 1052
1052


 被折叠的 条评论
为什么被折叠?
被折叠的 条评论
为什么被折叠?
 到【灌水乐园】发言


