


ptgui创建全景图设置
Do you enjoy making panoramas with your pictures, but want more features than tools like Live Photo Gallery offer? Here’s how you can create amazing panoramas for free with the Microsoft Image Composite Editor.
您喜欢用照片制作全景照片,但是想要比Live Photo Gallery提供的工具更多的功能吗? 这是您可以使用Microsoft Image Composite Editor免费创建惊人的全景的方法。
Yesterday we took a look at creating panoramic photos in Windows Live Photo Gallery. Today we take a look at a free tool from Microsoft that will give you more advanced features to create your own masterpiece.
昨天,我们看了在Windows Live照片库中创建全景照片的过程 。 今天,我们看一下Microsoft提供的免费工具,它将为您提供更多高级功能来创建您自己的杰作。
Getting Started
入门
Download Microsoft Image Composite Editor from Microsoft Research (link below), and install as normal. Note that there are separate version for 32 & 64-bit editions of Windows, so make sure to download the correct one for your computer.
从Microsoft Research下载Microsoft Image Composite Editor( 下面的链接 ),然后按常规安装。 请注意,Windows的32和64位版本有单独的版本,因此请确保为您的计算机下载正确的版本。
![sshot-2010-05-28-[22-08-52]](https://i-blog.csdnimg.cn/blog_migrate/fdd39b61723d4f5d6c0c38bad66706bc.png)
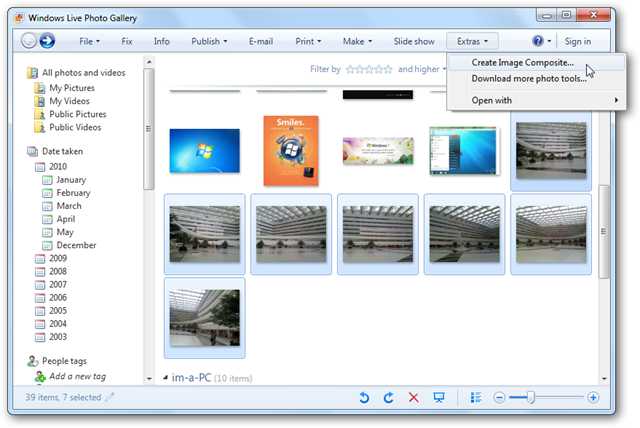
Once it’s installed, you can proceed to create awesome panoramas and extremely large image combinations with it. Microsoft Image Composite Editor integrates with Live Photo Gallery, so you can create more advanced panoramic pictures directly. Select the pictures you want to combine, click Extras in the menu bar, and select Create Image Composite.
安装完成后,您可以继续创建超赞的全景图和超大图像组合。 Microsoft Image Composite Editor与Live Photo Gallery集成在一起,因此您可以直接创建更高级的全景图片。 选择要合并的图片,在菜单栏中单击其他 ,然后选择创建图像合成 。
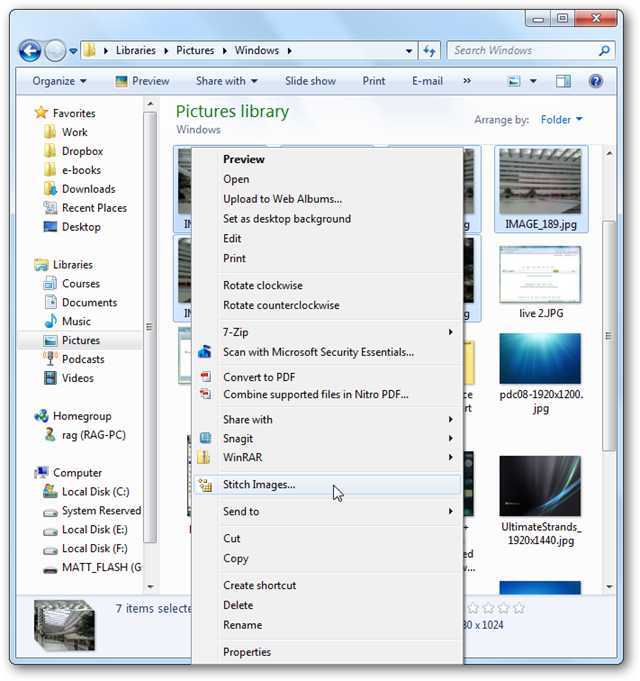
You can also create a photo stitch directly from Explorer. Select the pictures you want to combine, right-click, and select Stitch Images…
您也可以直接从资源管理器创建照片针迹。 选择要合并的图片,单击鼠标右键,然后选择“ 拼接图像”…
Or, simply launch the Image Composite Editor itself and drag your pictures into its editor. Either way you start a image composition, the program will automatically analyze and combine your images. This application is optimized for multiple cores, and we found it much faster than other panorama tools such as Live Photo Gallery.
或者,只需启动图像合成编辑器本身,然后将图片拖到其编辑器中即可。 无论采用哪种方式开始图像合成,程序都会自动分析并组合图像。 此应用程序针对多个内核进行了优化,我们发现它比其他全景工具(如Live Photo Gallery)快得多。
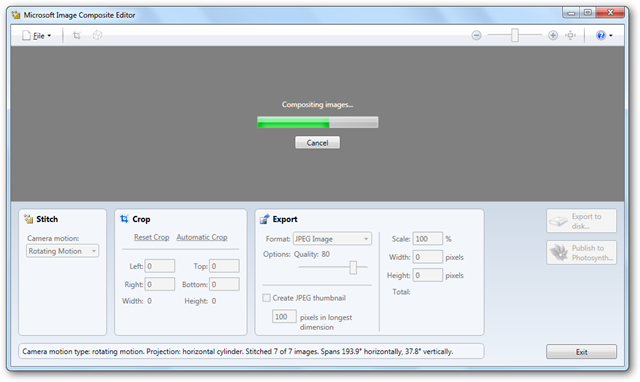
Within seconds, you’ll see your panorama in the top preview pane.
在几秒钟内,您将在顶部预览窗格中看到全景图。
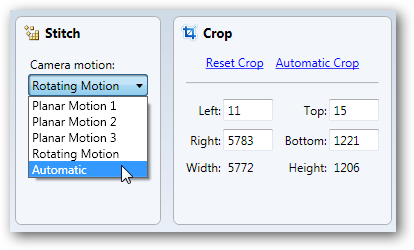
From the bottom of the window, you can choose a different camera motion which will change how the program stitches the pictures together. You can also quickly crop the picture to the size you want, or use Automatic Crop to have the program select the maximum area with a continuous picture.
从窗口底部,您可以选择其他相机动作,这将改变程序将图片拼接在一起的方式。 您也可以将图片快速裁剪为所需的尺寸,或使用自动裁剪使程序选择连续图片的最大区域。
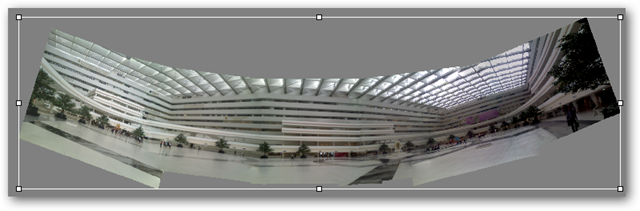
Here’s how our panorama looked when we switched the Camera Motion to Planar Motion 2.
这是当我们将Camera Motion切换为Planar Motion 2时的全景图。
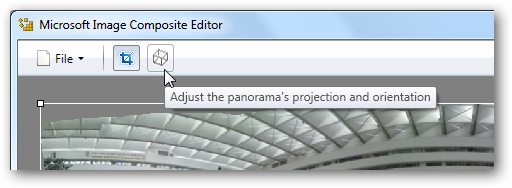
But, the real tweaking comes in when you adjust the panorama’s projection and orientation. Click the box button at the top to change these settings.
但是,真正的调整是在您调整全景的投影和方向时出现的。 单击顶部的框按钮以更改这些设置。
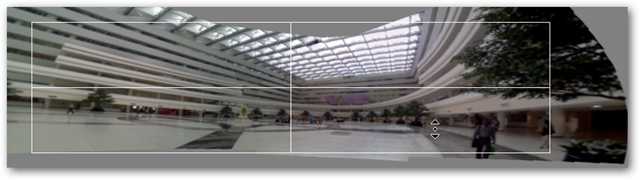
The panorama is now overlaid with a grid, and you can drag the corners and edges of the panorama to change its shape.
现在,全景图被网格覆盖,您可以拖动全景图的角和边缘以更改其形状。
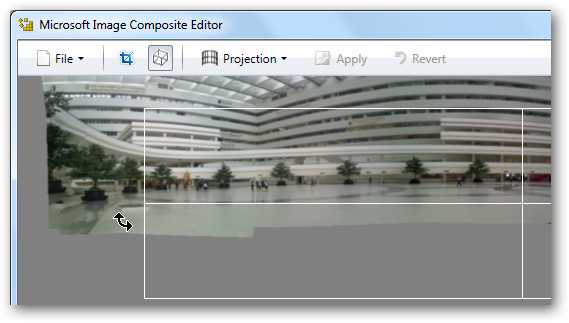
Or, from the Projection button at the top, you can choose different projection modes.
或者,从顶部的“ 投影”按钮,您可以选择不同的投影模式。
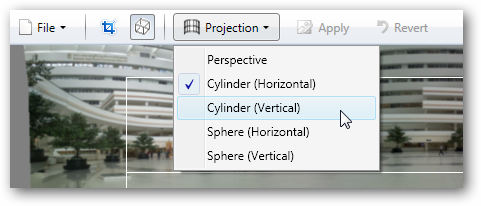
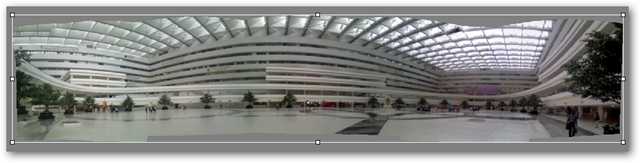
Here we’ve chosen Cylinder (Vertical), which entirely removed the warp on the walls in the image. You can pan around the image, and get the part you find most important in the center. Click the Apply button on the top when you’re finished making changes, or click Revert if you want to switch to the default view settings.
在这里,我们选择了Cylinder(Vertical) ,它完全消除了图像壁上的翘曲。 您可以平移图像,并在中央找到最重要的部分。 完成更改后,单击顶部的“ 应用”按钮,或者如果要切换到默认视图设置,请单击“ 还原” 。
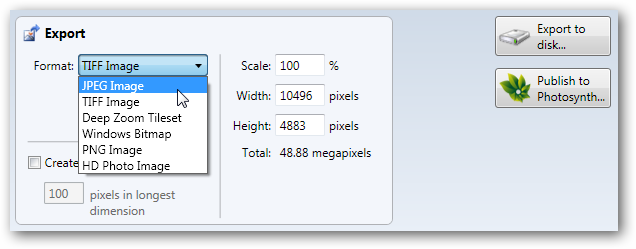
Once you’ve finished your masterpiece, you can export it easily to common photo formats from the Export panel on the bottom. You can choose to scale the image or set it to a maximum width and height as well. Click Export to disk to save the photo to your computer, or select Publish to Photosynth to post your panorama online.
完成杰作后,您可以从底部的“ 导出”面板轻松将其导出为常用的照片格式。 您可以选择缩放图像或将其设置为最大宽度和高度。 单击导出到磁盘以将照片保存到计算机,或选择发布到Photosynth以在线发布全景图。
Alternately, from the File menu you can choose to save the panorama as .spj file. This preserves all of your settings in the Image Composite Editor so you can edit it more in the future if you wish.
或者,从“ 文件”菜单中,您可以选择将全景图另存为.spj文件。 这会将您的所有设置保留在“图像合成编辑器”中,因此您以后可以根据需要进行更多编辑。
Conclusion
结论
Whether you’re trying to capture the inside of a building or a tall tree, the extra tools in Microsoft Image Composite Editor let you make nicer panoramas than you ever thought possible. We found the final results surprisingly accurate to the real buildings and objects, especially after tweaking the projection modes. This tool can be both fun and useful, so give it a try and let us know what you’ve found it useful for.
无论您要捕获建筑物的内部还是一棵高大的树木,Microsoft Image Composite Editor中的额外工具都可以使您制作出比您想象中更好的全景图。 我们发现最终结果出乎意料地精确到了真实的建筑物和物体,尤其是在调整了投影模式之后。 该工具既有趣又有用,因此请尝试一下,让我们知道您发现它有用的地方。
Works with 32 & 64-bit versions of XP, Vista, and Windows 7
适用于32位和64位版本的XP,Vista和Windows 7
Link
链接
Download Microsoft Image Composite Editor
下载Microsoft Image Composite Editor
ptgui创建全景图设置


 3025
3025

 被折叠的 条评论
为什么被折叠?
被折叠的 条评论
为什么被折叠?
 到【灌水乐园】发言


