


 Windows 10中不再支持Easy Transfer,但仍有多种方法转移用户配置文件。可以使用Microsoft账户转移部分设置,免费软件Transwiz或付费工具PCmover。Microsoft账户迁移简单但不全面,Transwiz适用于单个配置文件,而PCmover能迁移更多内容,但需付费。

Microsoft removed Easy Transfer from Windows 10, but you can still move user profiles between PCs. Microsoft accounts are easy to transfer; you can move files manually. Transwiz (free) and PCmover (paid) also do a good job.
Microsoft从Windows 10中删除了Easy Transfer,但是您仍然可以在PC之间移动用户配置文件。 Microsoft帐户易于转移; 您可以手动移动文件。 Transwiz(免费)和PCmover(收费)也做得很好。
轻松转移使事情变得容易 (Easy Transfer Used To Make Things Easy)

Microsoft introduced Windows Easy Transfer with Windows Vista and supported it in Windows 7, 8, and 8.1. It was a great free option to bring your settings and local user profiles from an old computer to a new computer. Starting with Windows 8, you could choose to sign in with a Microsoft account. Signing in with that same account on any device would transfer many of your settings.
Microsoft在Windows Vista中引入了Windows Easy Transfer ,并在Windows 7、8和8.1中对其提供了支持。 这是一个很好的免费选项,可将您的设置和本地用户配置文件从旧计算机导入新计算机。 从Windows 8开始,您可以选择使用Microsoft帐户登录。 在任何设备上使用同一帐户登录都会转移您的许多设置。
When Microsoft released Windows 10, it did not bring forward Easy Transfer. Instead, Microsoft chose to partner with Laplink and for a short period offered free access to its PCmover software. Unfortunately, that free offer is no longer available. If you want to use PCmover, you’ll need to spend at least $30 now.
当Microsoft发布Windows 10时,它没有带来Easy Transfer 。 相反,Microsoft选择与Laplink合作,并在短期内提供对其PCmover软件的免费访问。 不幸的是,该免费提供不再可用。 如果要使用PCmover,则现在至少需要花费$ 30。
移动Windows用户配置文件的最佳方法是什么? (What’s the Best Way to Move a Windows User Profile?)
We investigated several methods of manually moving Windows user profiles from one PC to another. But, in each case, we couldn’t consistently move the profile without some further troubleshooting afterward. We can’t recommend a process that requires so much manual fixing of file permissions and other complicated work.
我们研究了几种将Windows用户配置文件从一台PC手动移动到另一台PC的方法。 但是,在每种情况下,如果不随后进行一些进一步的故障排除,我们将无法始终如一地移动配置文件。 我们不能建议您需要手动修复文件权限和其他复杂工作的过程。
That leaves you with a few reliable options to move your account: Convert your Local account to a Microsoft account, use free software like Transwiz, or purchase PCmover. Each has benefits and downsides.
这为您提供了一些可靠的选项来转移您的帐户:将您的本地帐户转换为Microsoft帐户,使用Transwiz等免费软件,或购买PCmover。 每个都有好处和缺点。
- Converting your local Account to a Microsoft account is free and easy, and you won’t need to download any outside software. But it won’t move everything over. Files you have outside OneDrive, and settings for third-party apps like Photoshop won’t make the move. 将您的本地帐户转换为Microsoft帐户是免费且容易的,并且您无需下载任何外部软件。 但这并不能解决一切。 您在OneDrive之外的文件以及Photoshop等第三方应用程序的设置将不会生效。
- TransWiz is free and simple software that will transfer a single profile account from one device to another. If you have quite a few profiles, you’ll spend extra time exporting and importing since it doesn’t handle multiple accounts well. Additionally, it can’t transfer the account you’re signed into, so you’ll need at least two accounts on the source machine. You’ll also need an external drive to move your data. TransWiz是免费且简单的软件,它将单个配置文件帐户从一台设备转移到另一台设备。 如果您有很多配置文件,由于它不能很好地处理多个帐户,因此您将花费更多的时间进行导出和导入。 此外,它无法转移您登录的帐户,因此您在源计算机上至少需要两个帐户。 您还需要一个外部驱动器来移动数据。
- PCmover is the more powerful option. It can move multiple profiles at once, and you can facilitate the transfer over your network, a USB transfer cable, or an external hard drive. Additionally, it can transfer files, settings, and even some programs. However, it is the most expensive option, starting at $30 and going up from there. PCmover是更强大的选项。 它可以一次移动多个配置文件,并且可以方便地通过网络,USB传输电缆或外部硬盘驱动器进行传输。 另外,它可以传输文件,设置,甚至某些程序。 但是,这是最昂贵的选择,起价为30美元,然后再上涨。
选项1:使用Microsoft帐户并传输文件 (Option 1: Use a Microsoft Account and Transfer Files)
If you’re using Windows 8.1 or Windows 10, your Microsoft account user profile will automatically transfer with a sign-in. If you currently use a local account instead of a Microsoft account, you may want to consider converting it to a Microsoft account. Some features, like OneDrive and device encryption, won’t work without it.
如果您使用的是Windows 8.1或Windows 10,则Microsoft帐户用户个人资料将自动通过登录进行转移。 如果当前使用的是本地帐户而不是Microsoft帐户,则可能需要考虑将其转换为Microsoft帐户。 没有它,某些功能(如OneDrive和设备加密 )将无法使用。
This won’t bring everything over; you’ll still need to manually transfer any important files and reinstall programs with an external hard drive. Think of this as a quick way to bring over Windows settings and get cloud sync going.
这不会带来一切。 您仍然需要手动传输所有重要文件,然后使用外部硬盘驱动器重新安装程序。 将此视为快速获取Windows设置并使云同步进行的快速方法。
The conversion process is easy, especially if you already have a Microsoft account. If you don’t, you’ll need to make one. You’ll need to start this process on the PC with the account you want to transfer.
转换过程很容易,尤其是如果您已经拥有Microsoft帐户。 如果不这样做,则需要制造一个。 您需要使用要转移的帐户在PC上启动此过程。
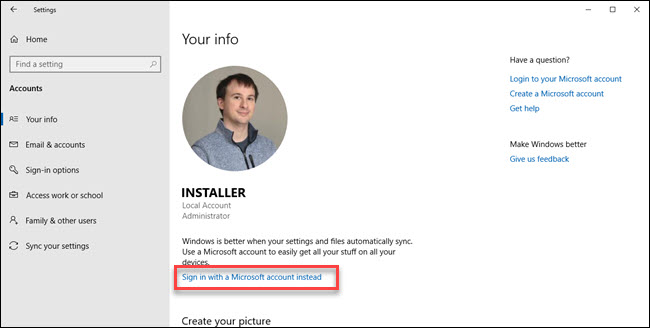
Click on the Start button then the Settings gear. Then choose Accounts, followed by “Sign in with a Microsoft account” instead. Then follow the setup wizard.
单击开始按钮,然后单击设置齿轮。 然后选择“帐户”,然后选择“使用Microsoft帐户登录”。 然后按照安装向导。
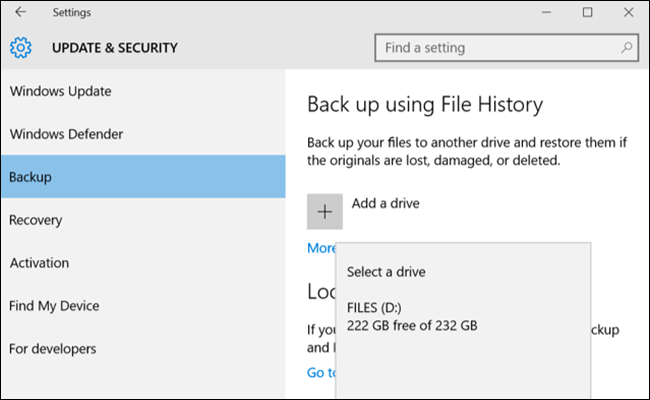
Next, we’ll manually move over data using Window 10’s File History tool. After connecting a hard drive go to Settings > Update & Security > Backup. Select add a drive, then your external hard drive.
接下来,我们将使用Window 10的“文件历史记录”工具手动移动数据。 连接硬盘驱动器后,转到“设置”>“更新和安全性”>“备份”。 选择添加驱动器,然后选择外部硬盘驱动器。
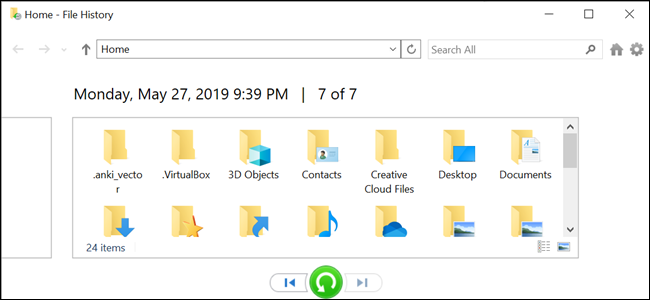
Windows will start making a backup automatically. By default, the backup includes the Desktop, Documents, Downloads, Music, Pictures, Videos folders. If you want additional folders, click on the “More options” text and choose the folders to add.
Windows将开始自动进行备份。 默认情况下,备份包括桌面,文档,下载,音乐,图片,视频文件夹。 如果需要其他文件夹,请单击“更多选项”文本,然后选择要添加的文件夹。
Take your external to your new machine and plug it in. Go back to Settings > Update & Security > Backup, and setup file history again using the external drive from before. Click more options, scroll to the bottom (past the list of folders) and click “restore files from a current backup.”
将您的外部设备连接到新计算机并将其插入。返回到“设置”>“更新和安全性”>“备份”,然后使用以前的外部驱动器再次设置文件历史记录。 单击更多选项,滚动到底部(粘贴文件夹列表),然后单击“从当前备份还原文件”。
Browse to your most recent backup, choose the folders you want to restore then click on the green button.
浏览到最新备份,选择要还原的文件夹,然后单击绿色按钮。
You will need to reinstall any programs to finish things up.
您将需要重新安装所有程序才能完成操作。
选项2:下载TransWiz(免费) (Option 2: Download TransWiz (Free))
 ()
()
Transwiz is an excellent option to consider if you need want to transfer one or two local accounts, and don’t want to convert to a Microsoft account. You’ll still need to manually move some things over, just like the Microsoft account conversion process, however. You’ll also need an external hard drive.
Transwiz是考虑是否需要转移一个或两个本地帐户,而不希望转换为Microsoft帐户的绝佳选择。 但是,您仍然需要手动移动一些内容,就像Microsoft帐户转换过程一样。 您还需要一个外部硬盘驱动器。
First, download and install Transwiz on both the old and new machine. The program is free.
首先,在新旧计算机上下载并安装Transwiz 。 该程序是免费的。
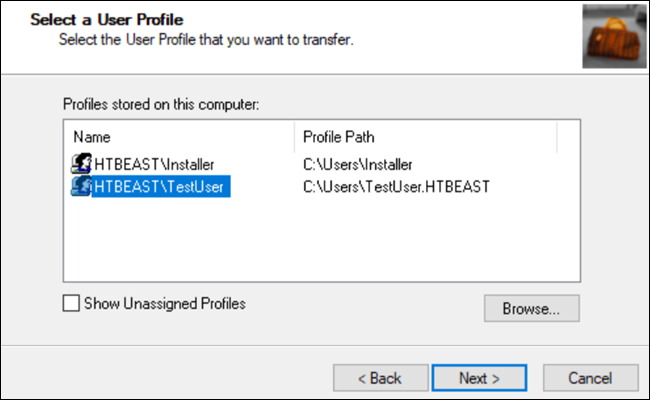
On the old machine, if you only have one profile, create a new one with admin rights. Then switch to it. If you have more than one profile, make sure at least two have admin rights and change to whichever profile you aren’t currently transferring. Transwiz can’t transfer a profile if you’re currently signed into it.
在旧计算机上,如果只有一个配置文件,请创建一个具有管理员权限的新配置文件。 然后切换到它。 如果您有多个配置文件,请确保至少有两个配置文件具有管理员权限,并更改为当前未转移的配置文件。 如果您当前已登录,则Transwiz无法传输配置文件。
Start Transwiz and select “I want to transfer data to another computer” and click Next. Then choose the profile you want to switch and click Next.
启动Transwiz,然后选择“我要将数据传输到另一台计算机”,然后单击“下一步”。 然后选择要切换的配置文件,然后单击下一步。
Choose your external drive as the location to save; click next. Then enter a password if you want one. If you don’t, leave both fields blank and click OK.
选择您的外部驱动器作为保存位置; 点击下一步。 如果需要,请输入密码。 如果不是这样,请将两个字段都保留为空白,然后单击“确定”。
Transwiz will create a zip file on your external drive. Take it to your new machine, open Transwiz there, and choose the restore data option. Point it to the zip file on the drive (no need to unzip it yourself), and Transwiz will do the rest. A machine restart is required to finish adding the profile.
Transwiz将在您的外部驱动器上创建一个zip文件。 将其带到您的新计算机上,在那里打开Transwiz,然后选择“还原数据”选项。 将其指向驱动器上的zip文件(无需自己解压缩),其余的将由Transwiz完成。 需要重新启动计算机才能完成添加配置文件。
Transwiz brings over user profiles, but not any data. If you want your files and folders, use the file history process described above. You’ll need to reinstall programs, too.
Transwiz会带来用户个人资料,但不会带来任何数据。 如果要使用文件和文件夹,请使用上述文件历史记录过程。 您还需要重新安装程序。
选项3:购买PCmover($ 30) (Option 3: Buy PCmover ($30))
The previous two options will work for moving profile data, but it’s up to you to transfer files, folders, and reinstall programs. PCmover will not only migrate your user profile, but it will move files as well. More expensive options also transfer applications.
前两个选项可用于移动配置文件数据,但传输文件,文件夹和重新安装程序取决于您。 PCmover不仅将迁移您的用户配置文件,还将移动文件。 较昂贵的选项也会转移应用程序。
You’ll need to download and pay for PCmover to get started. Several levels exist at different pricing, but if you want to move all users and applications the “Express” version for $30 will do the trick. Laplink offers ethernet and USB transfer cables you can purchase. The program will transfer data over your network, so the cables aren’t required, but they can speed up the transfer process depending on the speed of your network. However, another benefit to this method if you can skip the external drive.
您需要下载PCmover并付费才能开始。 有几个级别的价格不同,但是如果您想移动所有用户和应用程序,则只需$ 30的“ Express”版本即可解决问题。 Laplink提供您可以购买的以太网和USB传输电缆。 该程序将通过您的网络传输数据,因此不需要电缆,但是它们可以根据网络速度加快传输过程。 但是,如果您可以跳过外部驱动器,则此方法的另一个好处。
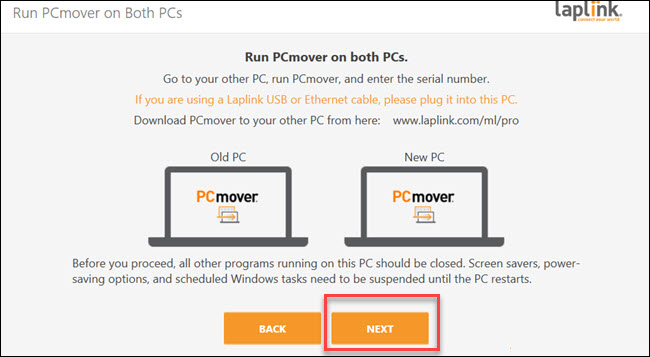
Once you’ve installed PCmover on each PC, open it and click through the Next buttons, providing the serial number when prompted. If you purchased a transfer cable, connect it to both PCs.
在每台PC上安装PCmover之后,将其打开并单击“下一步”按钮,并在出现提示时提供序列号。 如果您购买了传输电缆,请将其连接到两台PC。
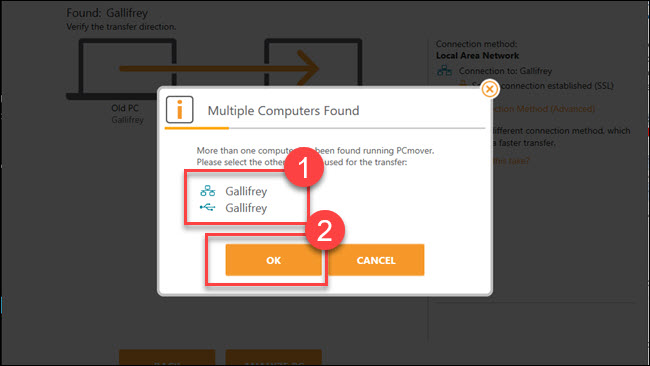
On each PC, choose the other PC to connect. If you have a transfer cable plugged in, you may see two entries for your devices, one for network connection and one for a cable connection. Select the cable connection for both. Then click “OK.”
在每台PC上,选择要连接的另一台PC。 如果插入了传输电缆,则可能会看到设备的两个条目,一个用于网络连接,一个用于电缆连接。 选择两者的电缆连接。 然后点击“确定”。
PCmover will try to guess the direction to move data. If it gets it wrong, you can click on the words “Switch transfer direction.” Then on the “new PC” (that is, the PC you’re moving data to) click “Analyze PC.”
PCmover将尝试猜测移动数据的方向。 如果发现错误,则可以单击“切换传输方向”字样。 然后在“新PC”(即要将数据移至的PC)上,单击“分析PC”。

Depending on the amount of data to look through, you may need to wait awhile while the program scans your PC. Eventually, you’ll see an amount of data to be transferred. If you’d like more granular control, click “View details.”
根据要浏览的数据量,您可能需要在程序扫描PC时等待一段时间。 最终,您将看到要传输的数据量。 如果您想进行更精细的控制,请单击“查看详细信息”。
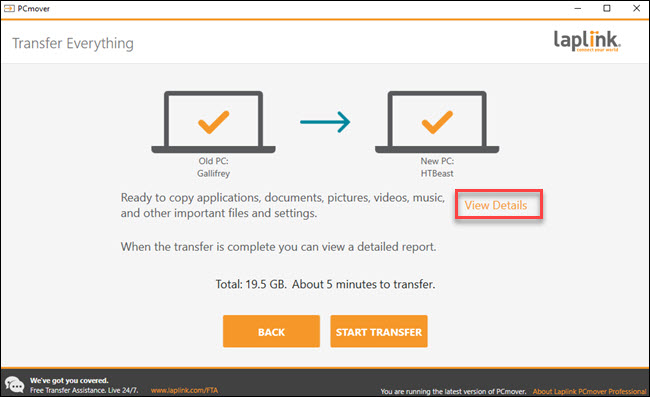
From here, you can drill down into different categories and uncheck anything you don’t want to transfer. Once you have everything to your liking, click “Start Transfer.”
在这里,您可以深入查看不同的类别,然后取消选中您不想传输的任何内容。 拥有所需的一切后,请单击“开始传输”。
In our case, it took about five minutes to transfer 20 gigs of data over a USB 3 transfer cable. If you have more to move, or you are using a network connection (or both), it may take longer. When PCmover finishes, it will prompt to restart your computer. Once you the reboot completes, you’re done.
在我们的案例中,通过USB 3传输电缆传输了20 gigs数据大约花费了五分钟。 如果您有更多移动空间,或者正在使用网络连接(或同时使用两者),则可能需要更长的时间。 PCmover完成后,将提示您重新启动计算机。 重新启动完成后,就完成了。
It’s a shame Microsoft removed EasyTransfer in Windows 10, but with Microsoft accounts and cloud options like OneDrive and Dropbox or large external drives, it is less necessary than it used to be. Transwiz can still do a decent job if you’re looking for a free solution. And, while Laplink’s PCmover does have a cost associated to it, the program works very well and is extremely easy to use.
遗憾的是,Microsoft在Windows 10中删除了EasyTransfer,但是有了Microsoft帐户和云选项(如OneDrive和Dropbox或大型外部驱动器),它的必要性就比以前少了。 如果您正在寻找免费的解决方案,Transwiz仍然可以做得不错。 而且,尽管Laplink的PCmover确实有相关的成本,但该程序运行良好,并且非常易于使用。
If you need to move everything in your PC, you should take a closer look at PCmover.
如果您需要移动PC中的所有内容,则应仔细查看PCmover。
翻译自: https://www.howtogeek.com/413193/how-to-migrate-a-windows-user-to-different-windows-10-pc/


 1568
1568

 被折叠的 条评论
为什么被折叠?
被折叠的 条评论
为什么被折叠?
 到【灌水乐园】发言


