


chromebook刷机
Android apps are a great way to expand the sometimes limited capabilities of Chromebooks, but they can be a problem if you store most of your data on an external medium—like an SD card, for example.
Android应用程序是扩展Chromebook有时有限功能的好方法,但是如果您将大多数数据存储在外部介质(例如SD卡)上,则可能会成为问题。
Fortunately, with a few commands you can actually “force” Android apps to not only see external storage, but write to it as well. I will warn you, though: this does require a few shell commands, so if you’re not comfortable with that, tread carefully. Shout out to Nolirium for this incredibly helpful blog post that that got me rolling with this. Thanks to the guidance found there, I was able to get this this working without issue.
幸运的是,实际上,您可以使用一些命令来“强制” Android应用程序不仅查看外部存储,还可以对其进行写入。 不过,我会警告您:这确实需要一些shell命令,因此,如果您对此感到不满意,请小心操作。 向Nolirium大喊,获得这篇非常有用的博客文章,这使我对此颇为关注。 多亏了那里的指导,我才能够毫无问题地完成这项工作。
那么,这如何工作? (So, How Does This Work?)
In short, we’ll be using bind mounts to basically “tether” a folder on the external medium to one that’s part of the internal file structure. Basically, this allows Android see the contents of the external folder, because it’s linked to a folder on the internal storage, which it can see without problems.
简而言之,我们将使用绑定安装将外部介质上的文件夹基本上“绑定”到内部文件结构的一部分。 基本上,这使Android可以查看外部文件夹的内容,因为它已链接到内部存储设备上的文件夹,可以毫无问题地看到该文件夹。
It’s worth noting that binding these folders will only work in Android—it won’t affect how Chrome OS sees the folders or the files within. We’re going to create a folder called “Bound” in the root of the Downloads directory in Chrome OS and bind a folder on the external medium to this folder, and while Android will see the contents of the external folder in the Bound directory, Chrome OS will not—the Bound directly will look completely empty. But since Chrome OS can natively interact with external storage, this shouldn’t be an issue.
值得注意的是,绑定这些文件夹仅在Android中有效-不会影响Chrome操作系统查看文件夹或其中的文件的方式。 我们将在Chrome操作系统的Downloads目录的根目录中创建一个名为“ Bound”的文件夹,并将外部媒体上的文件夹绑定到该文件夹,而Android会在Bound目录中看到外部文件夹的内容, Chrome操作系统不会—直接绑定的外观将完全空白。 但是由于Chrome操作系统可以与外部存储进行本地交互,所以这不是问题。
第一步:创建文件夹 (Step One: Create Your Folders)
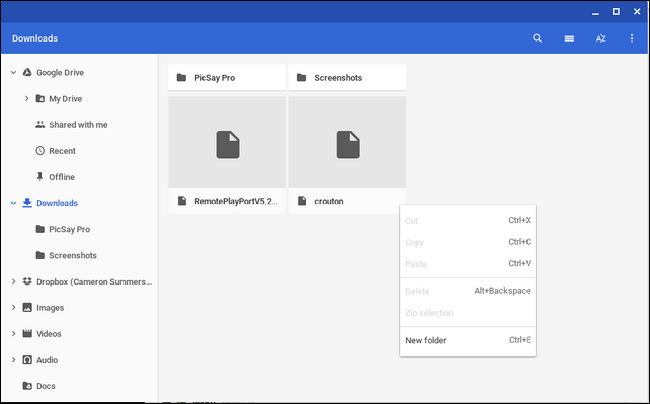
With that, we’re ready to create the directories that we’ll use for this. Like I said above, we’re going to create a folder in the Downloads directory called “Bound.” So go ahead and open the Chrome OS Files app, and navigate to the Downloads directory.
这样,我们就可以创建用于此目的的目录了。 就像我上面说的,我们将在Downloads目录中创建一个名为“ Bound”的文件夹。 因此,继续打开Chrome OS文件应用,然后导航至下载目录。
From there, right click and choose “New Folder.”
从那里,右键单击并选择“新建文件夹”。
Name this folder “Bound.”
将此文件夹命名为“ Bound”。
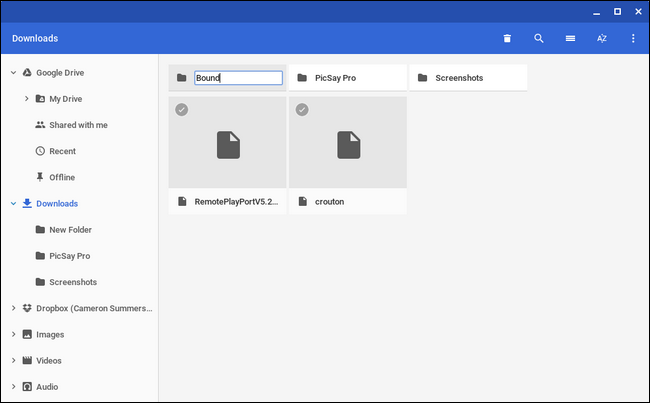
It’s worth noting that can name this whatever you like, but for the purposes of this tutorial and the commands you’ll use below, we’re using “Bound.”
值得注意的是,您可以随意命名,但是出于本教程和下面将要使用的命令的目的,我们使用的是“绑定”。
If you have a specific set of files you want Android to be able to see on your Chromebook, go ahead and navigate to your external medium and create a new folder here, too. Name it accordingly—I’m using “Screenshots” for this example, so feel free to change it if it doesn’t make sense for your application. Just remember that you’ll have to change part of the commands below to reflect your folder name.
如果您有一组特定的文件,希望Android在Chromebook上可以看到,请继续浏览到外部媒体并在此处创建一个新文件夹。 相应地命名-我在本例中使用“屏幕截图”,因此,如果对您的应用程序没有意义,请随时进行更改。 请记住,您必须更改下面的部分命令以反映您的文件夹名称。
第二步:打开一个根外壳并创建绑定 (Step Two: Open a Root Shell and Create the Bind)
First, you’re going to need to open a Crosh window by pressing Ctrl+Alt+T on your keyboard. A new, solid black window will open in your browser. Alternatively, you can install the Crosh Window app from the Chrome App Store (which also requires the Secure Shell app to be installed), but that’s not necessary if it’s something you don’t think you’ll use often.
首先,您需要通过按键盘上的Ctrl + Alt + T来打开Crosh窗口。 新的纯黑色窗口将在您的浏览器中打开。 另外,您可以从Chrome App Store安装Crosh Window应用程序(这也需要安装Secure Shell应用程序),但是如果您不经常使用它,则不需要这样做。
In the Crosh window, type the following:
在Crosh窗口中,键入以下内容:
shell
Followed by:
其次是:
sudo su
It will ask for your password—this should be the same one you sign into your Chromebook with.
它将要求您输入密码,该密码应与您用来登录Chromebook的密码相同。
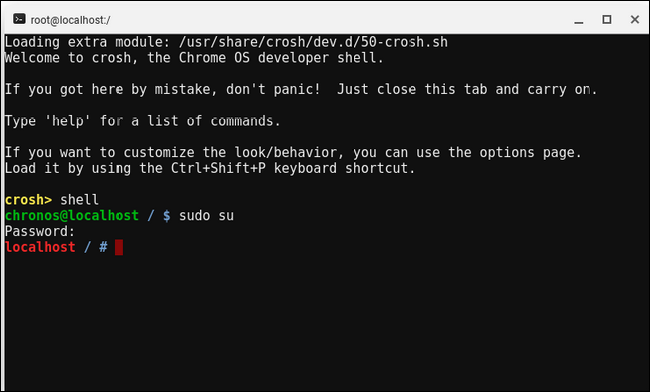
At this point, you’re in a root shell, which is what we want. The following commands should give you read/write access to the external folder directly from Android apps. For the purposes of this tutorial, I’m going to break them down one at at time, but keep in mind that you can string them together if you’d like—just separate each command with && symbols.
至此,您已经在root shell中,这就是我们想要的。 以下命令应使您可以直接从Android应用程序对外部文件夹进行读/写访问。 出于本教程的目的,我将一次将它们分解,但请记住,如果需要,可以将它们串在一起-只需用&&符号分隔每个命令。
Note: The default title for an external drive in Chrome OS is “UNTITLED.” If your drive has been named something else, use that in place of “UNTITLED” in the following commands.
注意:Chrome操作系统中外部驱动器的默认标题为“ UNTITLED”。 如果您的驱动器已被命名为其他名称,请在以下命令中使用该驱动器代替“ UNTITLED”。
With that out of the way, enter the following into the root shell window:
这样,就可以在root shell窗口中输入以下内容:
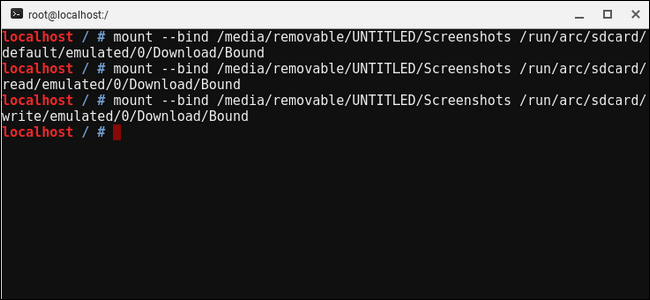
mount --bind /media/removable/UNTITLED/Screenshots /run/arc/sdcard/default/emulated/0/Download/Bound

mount --bind /media/removable/UNTITLED/Screenshots /run/arc/sdcard/read/emulated/0/Download/Bound

mount --bind /media/removable/UNTITLED/Screenshots /run/arc/sdcard/write/emulated/0/Download/Bound
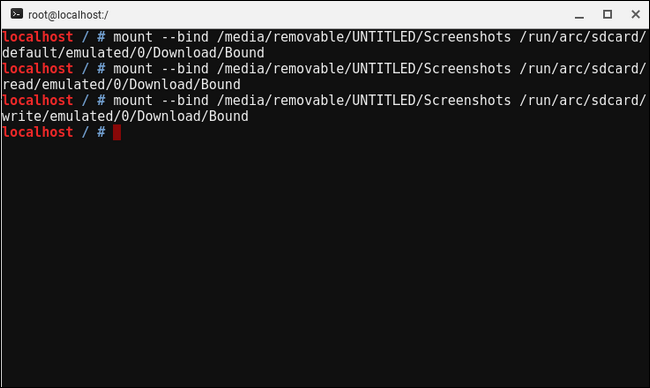
Again, change the name of the external folder to whatever you chose if it’s different than mine.
同样,如果外部文件夹的名称与我的不同,则将其更改为您选择的名称。
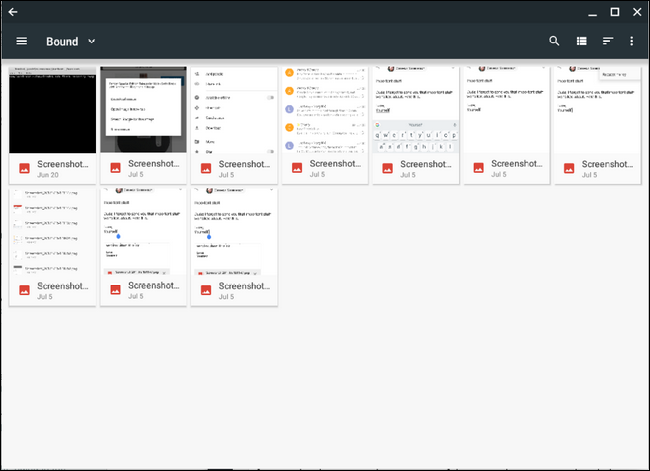
第三步:获利 (Step Three: Profit)
That’s pretty much all there is to it. Like I said earlier, this won’t affect the way Chrome OS sees your folders, only Android.
这几乎就是它的全部。 就像我之前说的,这不会影响Chrome操作系统查看文件夹的方式,仅影响Android。
Of course, it’s not a perfect system. Some Android apps may be able to see the contents of the bound folder, but not interact with them. For example, I use Skitch for annotating screenshots, and while it can see everything in the bound folder, it’s unable to open any of the files. This is probably in large part to do with the fact that Skitch is no longer in active development so it’s quite outdated, but it’s still a good example of how imperfect this system can be.
当然,这不是一个完美的系统。 某些Android应用程序可能能够查看绑定文件夹的内容,但无法与其进行交互。 例如,我使用Skitch注释屏幕截图,尽管它可以看到绑定文件夹中的所有内容,但无法打开任何文件。 这可能在很大程度上与Skitch不再处于主动开发状态,因此它已经过时了有关,但这仍然是该系统有多完美的一个很好的例子。
Also, this bind will not survive a reboot. So each time you reboot the computer, you’ll have to re-enter the above commands. I’ve also seen where some users have lost access to the bound folder after the system goes into sleep mode, but I haven’t personally had this issue. As with most workarounds like this one, your mileage may vary.
另外,此绑定将在重新启动后无法幸免。 因此,每次重新启动计算机时,都必须重新输入上述命令。 我还看到系统进入睡眠模式后,某些用户失去了对绑定文件夹的访问权限,但是我个人没有遇到这个问题。 与大多数这种解决方法一样,您的工作量可能会有所不同。
Of course, Google is actively working on enabling SD card contents to Android apps, so eventually we should get proper support. But until that point, this is the next best thing.
当然,谷歌正在积极致力于为Android应用启用SD卡内容,因此最终我们应该获得适当的支持。 但是直到那一点,这才是下一件好事。
翻译自: https://www.howtogeek.com/316056/how-to-get-android-apps-to-see-external-storage-on-chromebooks/
chromebook刷机


 903
903

 被折叠的 条评论
为什么被折叠?
被折叠的 条评论
为什么被折叠?
 到【灌水乐园】发言


