


Gmail’s IMAP support is one of the biggest things to hit the webmail world since, well, Gmail. We’ve already covered how to use imap from Outlook, and now it’s time to show everybody how to use it from the open-source Mozilla Thunderbird email client.
自从Gmail以来,Gmail的IMAP支持是影响网络邮件世界的最大因素之一。 我们已经介绍了如何在Outlook中使用imap ,现在是时候向所有人展示如何从开源Mozilla Thunderbird电子邮件客户端使用imap了。
The good news is that Thunderbird has much better support for IMAP than Outlook or most other clients, but there are still quite a few little tweaks that can be made to make it work even better.
好消息是,Thunderbird对IMAP的支持比Outlook或大多数其他客户端要好得多,但是仍然可以做一些小调整,以使其更好地工作。
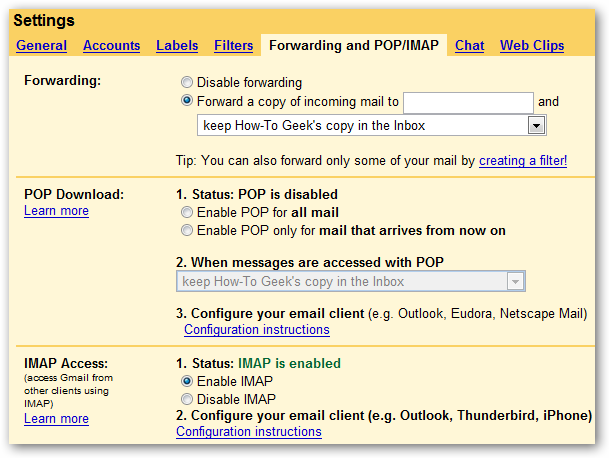
If you haven’t already enabled IMAP in Gmail, open up the settings page and choose Forwarding and POP/IMAP, and then select to Enable IMAP.
如果您尚未在Gmail中启用IMAP,请打开设置页面并选择转发和POP / IMAP,然后选择启用IMAP。
Update: These dialogs are from version 2.0 of Thunderbird, which natively supports Gmail as an option, but doesn’t work for Gmail hosted apps accounts, so you need to follow a few more steps. If you are using regular Gmail you can use that option and skip down to “Synchronize Sent / Draft messages”.
更新:这些对话框来自Thunderbird 2.0版,它本身支持Gmail,但不适用于Gmail托管的应用程序帐户,因此您需要执行一些其他步骤。 如果您使用的是常规Gmail,则可以使用该选项,然后跳到“同步已发送/草稿的邮件”。
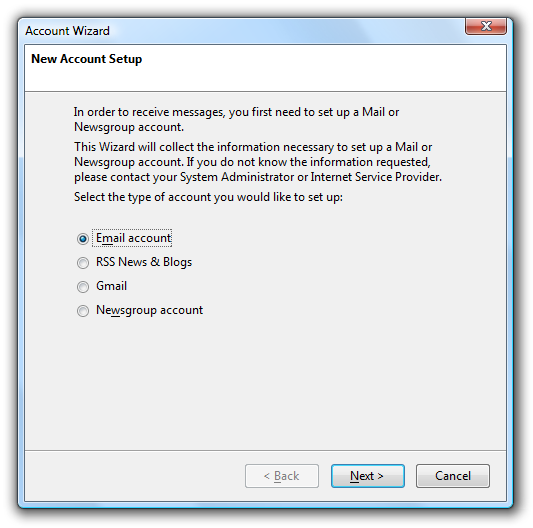
Open up Thunderbird and go to Tools \ Accounts Settings and click on the Add Account button. In the resulting wizard choose Email account.
打开Thunderbird并转到“工具\帐户设置”,然后单击“添加帐户”按钮。 在出现的向导中,选择“电子邮件帐户”。
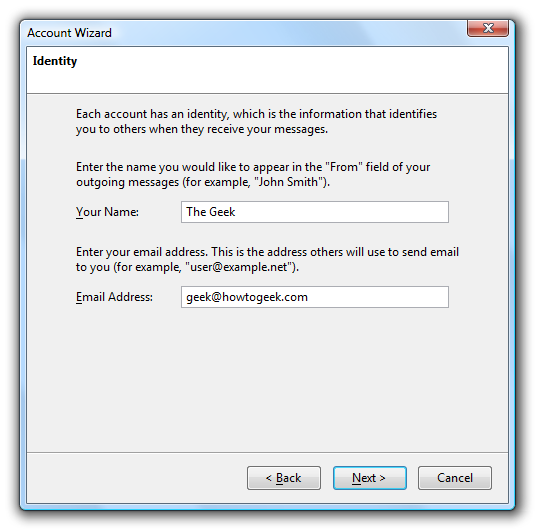
Enter in your Name and your Gmail email address. You’ll note that my email address is not @gmail.com, which is because I’m using the hosted Gmail Apps for your Domain.
输入您的姓名和Gmail电子邮件地址。 您会注意到我的电子邮件地址不是@ gmail.com,这是因为我正在为您的域使用托管的Gmail应用程序。
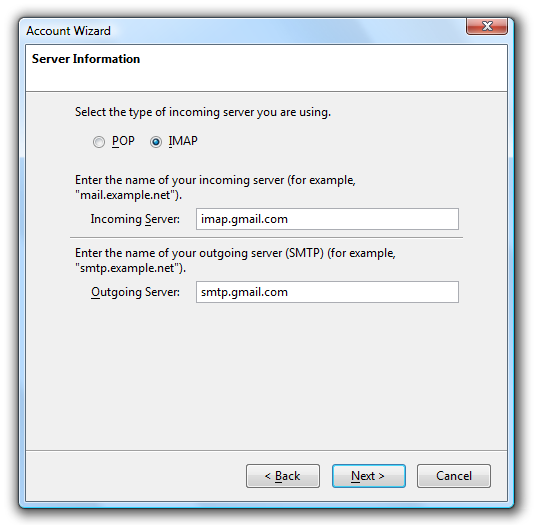
On the next screen, choose IMAP, and then enter in the following:
在下一个屏幕上,选择IMAP,然后输入以下内容:
- Incoming Server: imap.gmail.com 传入服务器:imap.gmail.com
- Outgoing Server: smtp.gmail.com 寄出伺服器:smtp.gmail.com
Note: If you are outside of the US you may need to use imap.googlemail.com and smtp.googlemail.com instead of imap.gmail.com and smtp.gmail.com.
注意:如果您不在美国,则可能需要使用imap.googlemail.com和smtp.googlemail.com而不是imap.gmail.com和smtp.gmail.com。
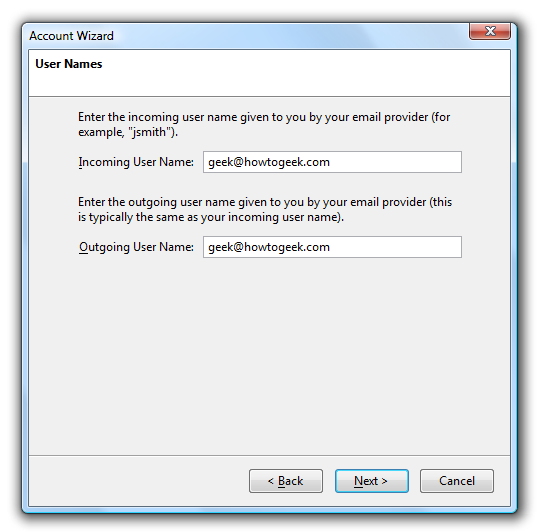
Enter in your Gmail email address here:
在此处输入您的Gmail电子邮件地址:
Click Next and then Finish, and you’ll be returned to the Account Settings window, but we aren’t done yet.
单击下一步,然后单击完成,您将返回到“帐户设置”窗口,但是我们还没有完成。
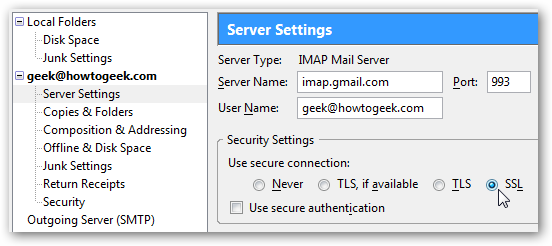
In the “Server Settings” dialog, you’ll want to choose the SSL option, which should set the Port to 993 as well.
在“服务器设置”对话框中,您将要选择SSL选项,该选项还将端口设置为993。
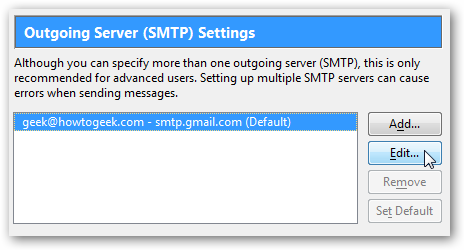
Choose “Outgoing Server” on the left hand pane, and then click the Edit button next to your Gmail account.
在左侧窗格中选择“发送服务器”,然后单击您的Gmail帐户旁边的“编辑”按钮。
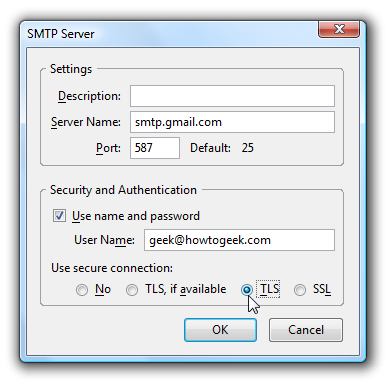
Enter in the port number of 587, and choose the TLS radio button.
输入端口号587,然后选择TLS单选按钮。
Your account should be configured now, but you should keep the Account Settings dialog open and keep reading for additional configuration options.
现在应该配置您的帐户,但是应该保持“帐户设置”对话框打开,并继续阅读其他配置选项。
Synchronize Sent / Draft messages
同步已发送/草稿邮件
To make sure that your sent mail or drafts in Thunderbird are available in Gmail, choose the “Copies & Folders” option on the left hand pane of Account Settings.
为了确保您在Thunderbird中发送的邮件或草稿在Gmail中可用,请在“帐户设置”左侧窗格中选择“副本和文件夹”选项。
Very important note: If you are NOT using the Gmail SMTP server from the settings above, then you should check the box for “Place a copy in” and pick your Gmail sent mail folder under “Other”. If you are using the default settings, the Gmail SMTP server will automatically place all sent mail into the correct folder in Gmail.
非常重要的注意事项:如果您不使用上述设置使用Gmail SMTP服务器,则应选中“放置副本”框,然后在“其他”下选择Gmail发送的邮件文件夹。 如果您使用默认设置,则Gmail SMTP服务器将自动将所有已发送的邮件放入Gmail中的正确文件夹。
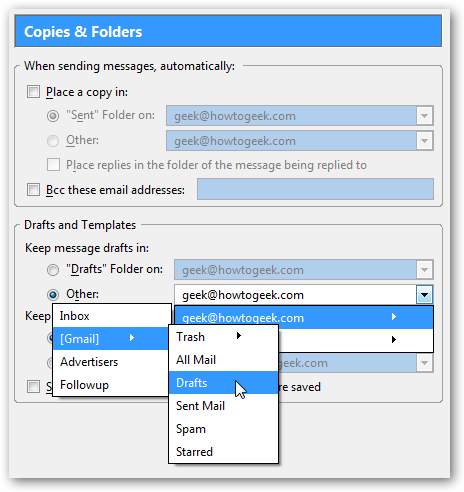
You do, however, want to keep the message drafts in the [Gmail] \ Drafts folder, which you can navigate from the popup menu as shown above.
但是,您确实希望将消息草稿保留在[Gmail] \“草稿”文件夹中,您可以从弹出菜单中进行导航,如上所示。
Send Thunderbird Junk Mail to Gmail Spam Folder
将Thunderbird垃圾邮件发送到Gmail垃圾邮件文件夹
If you want messages marked as junk in Thunderbird to get pushed to the Gmail spam folder, you’ll need to choose the “Junk Settings” item on the left hand pane, and then check the box for “Move new junk messages to”.
如果要将雷鸟中标记为垃圾的邮件发送到Gmail垃圾邮件文件夹,则需要在左侧窗格中选择“垃圾设置”项目,然后选中“将新的垃圾邮件移至”框。
You’ll want to select your Gmail account in the list, and then choose the [Gmail] \ Spam subfolder.
您需要在列表中选择您的Gmail帐户,然后选择[Gmail] \ Spam子文件夹。
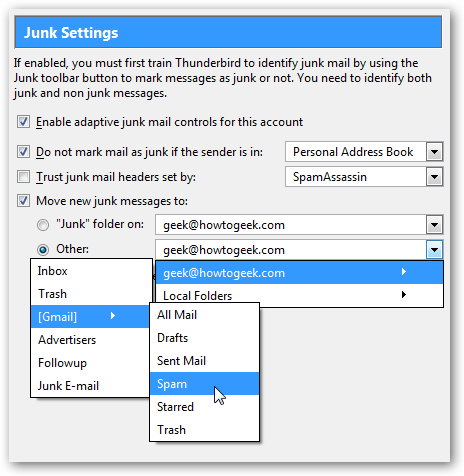
At this point you should be able to delete the “Junk E-mail” folder/label, or wait until later and delete it.
此时,您应该能够删除“垃圾邮件”文件夹/标签,或者等到以后再将其删除。
Download Messages for Offline Use
下载消息以供离线使用
If you’d like to use your account while offline, it would be wise to setup Thunderbird to download the whole message. Choose “Offline & Disk Space” in the left hand pane, and then check the box for “Make the messages in my Inbox available”.
如果您想在离线状态下使用帐户,则最好设置Thunderbird以下载整个邮件。 在左侧窗格中选择“离线和磁盘空间”,然后选中“使我的收件箱中的邮件可用”框。
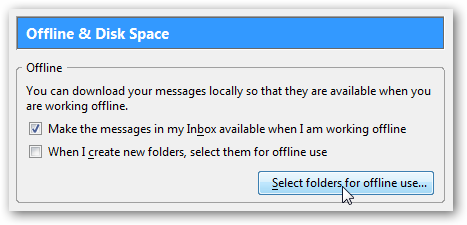
You can also select other folders / labels for offline use by clicking the box for “Select folders for offline use” and then choosing them in the dialog:
您还可以通过单击“选择供脱机使用的文件夹”框,然后在对话框中选择它们来选择其他供脱机使用的文件夹/标签:
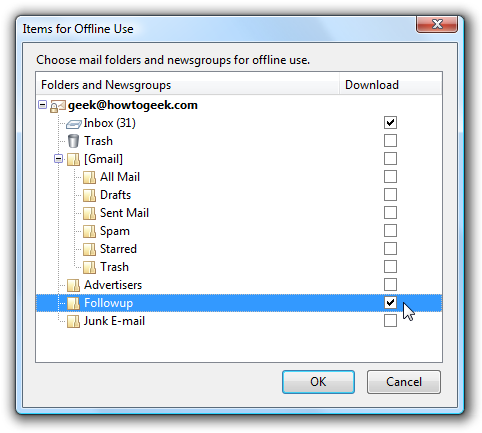
Important Note: If you’ve got 47 million emails in your Inbox, you really should think about whether you want to choose this option, because it’s going to take forever to download.
重要说明:如果您的收件箱中有4,700万封电子邮件,那么您真的应该考虑是否要选择此选项,因为它将永远需要下载。
You should be able to close the Account Settings dialog at this point. Once you click on the Gmail inbox you will be asked to login:
您现在应该能够关闭“帐户设置”对话框。 单击Gmail收件箱后,将要求您登录:
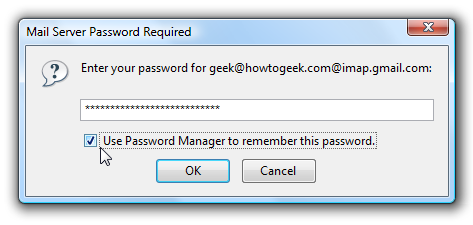
You can choose to store your password in Thunderbird’s password manager if you’d like.
如果需要,您可以选择将密码存储在Thunderbird的密码管理器中。
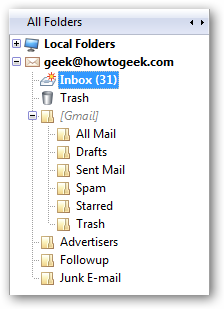
Once you’ve logged in successfully you should see all the Gmail folders:
成功登录后,您应该会看到所有Gmail文件夹:
Synchronizing the Thunderbird Trash with Gmail Trash
将Thunderbird垃圾桶与Gmail垃圾桶同步
If you want messages deleted in Thunderbird to delete in Gmail you can use this more advanced hack to get it to work.
如果您希望在Thunderbird中删除的邮件在Gmail中删除,则可以使用此更高级的技巧使其正常工作。
Important note: If you use this hack that means anytime you delete this message it will be gone completely, even if you had the message in two separate folders, because it’s only a single message on the Gmail side.
重要说明:如果您使用此技巧,则意味着无论何时删除此邮件,即使您在两个单独的文件夹中都保存了该邮件,该邮件也将完全消失,因为在Gmail端仅是一封邮件。
If you want to do it anyway, go to Tools \ Options
如果仍然要执行此操作,请转到“工具” \“选项”
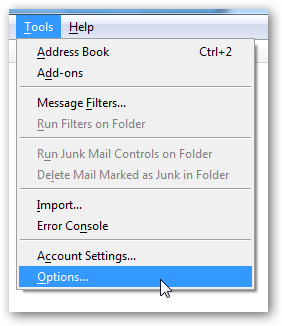
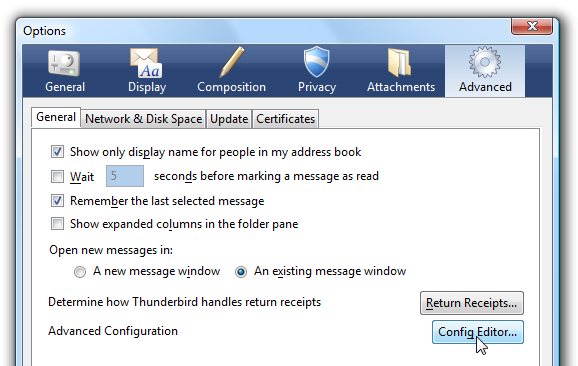
Choose the Advanced tab/button and click on Config Editor.
选择高级选项卡/按钮,然后单击配置编辑器。
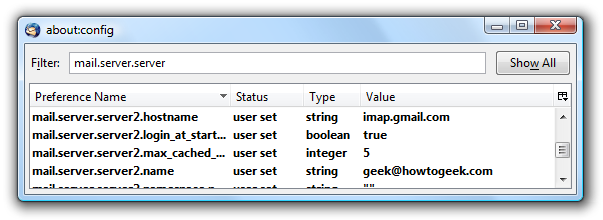
Now you’ll have to do some sleuthing to figure out what the “number” of your Gmail account is. Filter by mail.server.server and then scroll down until you see your IMAP account in the list, and then note whether the keys start with “mail.server.server2” or some other number.
现在,您必须进行一些侦查,才能确定Gmail帐户的“号码”是什么。 按mail.server.server过滤,然后向下滚动,直到在列表中看到您的IMAP帐户,然后注意键是否以“ mail.server.server2”开头或其他一些数字。
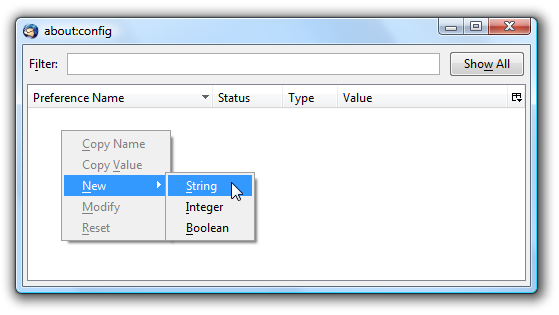
Right-click anywhere in the listbox and choose New \ String
右键单击列表框中的任意位置,然后选择“新建\字符串”
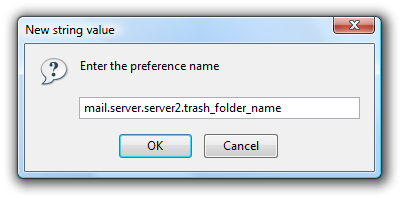
Now you’ll need to enter the following preference name, adjusting the “2” if your number is different:
现在,您需要输入以下首选项名称,如果您的数字不同,请调整“ 2”:
mail.server.server2.trash_folder_name
mail.server.server2.trash_folder_name
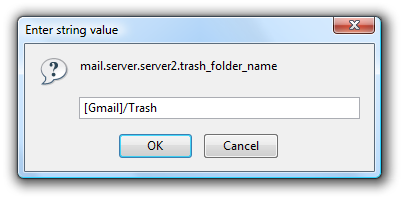
Enter in the following as the string value:
输入以下内容作为字符串值:
[Gmail]/Trash
[Gmail] /垃圾箱
Now you’ll need to restart Thunderbird for the change to take effect. You can also now go into Gmail and remove the unneeded labels by clicking the Edit Labels link:
现在,您需要重新启动Thunderbird才能使更改生效。 现在,您还可以进入Gmail并通过单击“编辑标签”链接来删除不需要的标签:
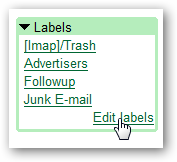
If you’ve followed everything so far, you can remove the [Imap]/Trash label as well as the Junk E-mail label.
如果您到目前为止已进行了所有操作,则可以删除[Imap] /垃圾箱标签以及垃圾邮件标签。

Note that you’ll have to restart Thunderbird yet again for that change to show up.
请注意,您必须再次重新启动Thunderbird才能显示该更改。
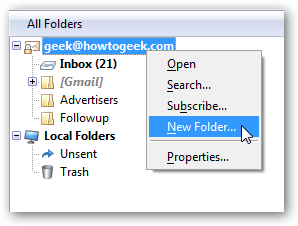
Creating New Folders / Labels
创建新的文件夹/标签
When you create labels in Gmail they will show up as folders, and creating folders in Thunderbird will show up as labels on the Gmail side:
在Gmail中创建标签时,它们将显示为文件夹,而在Thunderbird中创建文件夹将在Gmail端显示为标签:
You can even create subfolders…
您甚至可以创建子文件夹…
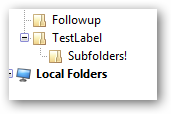
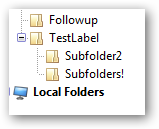
Which will show up in Gmail as ParentLabel/ChildLabel
它将在Gmail中显示为ParentLabel / ChildLabel
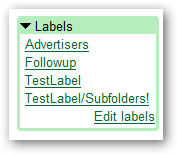
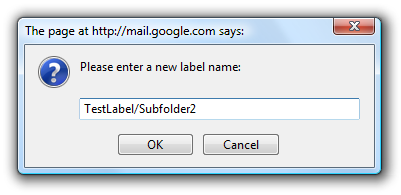
You can create a subfolder in Gmail by using the same syntax with a forward slash between parent label and child label:
您可以使用相同的语法在父标签和子标签之间使用正斜杠来在Gmail中创建子文件夹:
This will now show up in Thunderbird the next time you open the application:
现在,下次打开应用程序时,它将显示在Thunderbird中:
Deleting Folders in Thunderbird
删除Thunderbird中的文件夹
You can certainly delete them if you choose to:
如果选择以下选项,则可以删除它们:
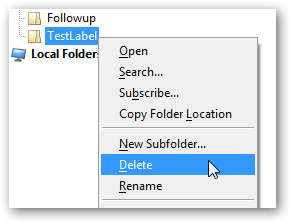
But you’ll end up with a new label with a weird name in Gmail:
但是,在Gmail中,您将得到一个新名称,并带有一个怪异的名称:

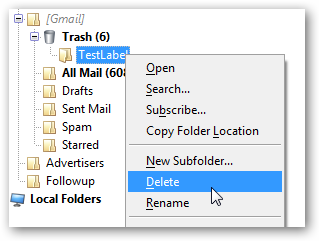
You’ll have to delete them from the [Gmail]/Trash folder in Thunderbird as well to avoid doing it in Gmail.
您还必须从Thunderbird的[Gmail] / Trash文件夹中删除它们,以避免在Gmail中进行删除。
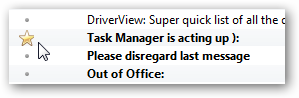
Starring Messages
主演留言
This is so simple it’s barely worth mentioning… but you star a message in either Thunderbird or Gmail and it will sync across the two:
这是如此简单,几乎不值得一提……但是您在Thunderbird或Gmail中给邮件加注星标,它将在两者之间同步:
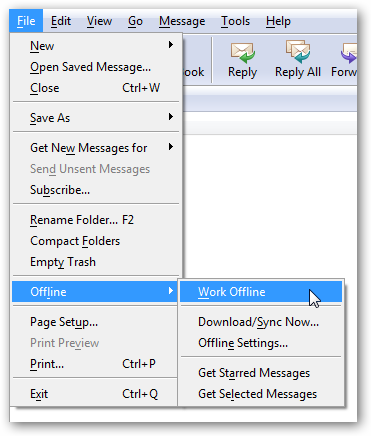
Working Offline
离线工作
To work in Offline mode, you can choose File \ Offline \ Work Offline from the menu…
要以脱机模式工作,可以从菜单中选择“文件” \“脱机” \“脱机工作”…
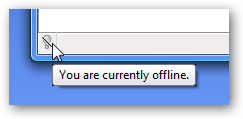
Or you can just click the little icon in the bottom left hand corner.
或者,您也可以单击左下角的小图标。
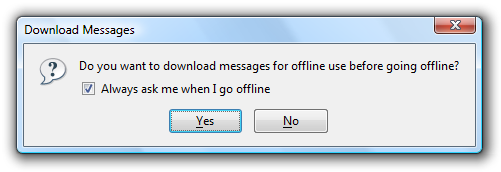
You’ll be prompted to download the messages for offline use, which will download from the folders we specified earlier in this article.
系统将提示您下载消息以供离线使用,这些消息将从我们本文前面指定的文件夹中下载。
Automatically Check for New Email in Folders Other than Inbox
自动检查收件箱以外的文件夹中的新电子邮件
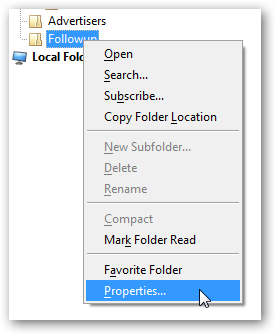
Unfortunately Thunderbird by default doesn’t check for new email in any folders other than the Inbox, so if you are using filters and labels you might want to change this by going to the properties of a Folder / Label:
不幸的是,默认情况下,Thunderbird不会检查收件箱以外的任何其他文件夹中的新电子邮件,因此,如果您使用过滤器和标签,则可能需要转到“文件夹/标签”的属性来进行更改:
Now just choose the “Check this folder for new messages” option.
现在,只需选择“检查此文件夹中是否有新消息”选项。
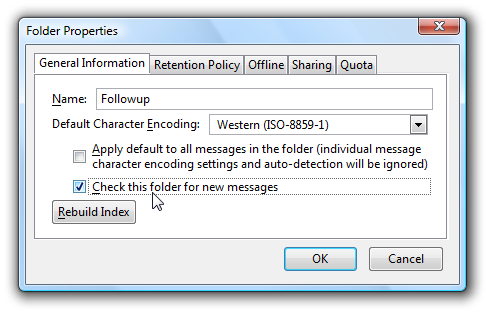
Unfortunately you’ll have to do this for all the folders/labels, but it’s good to know.
不幸的是,您必须对所有文件夹/标签都执行此操作,但是很高兴知道。
Are We Really Done?
我们真的完成了吗?
That covers most of what you need to know, so thus ends one of the longest pages I’ve written.
这涵盖了您需要了解的大部分内容,因此结束了我所写的最长的页面之一。
For more usage tips and a lot of helpful comments, you might want to check out the Lifehacker article on this subject.
有关更多使用技巧和许多有用的评论,您可能需要查看有关此主题的Lifehacker文章。
翻译自: https://www.howtogeek.com/howto/internet/setting-up-gmail-imap-support-in-thunderbird-2x/


 3054
3054


 被折叠的 条评论
为什么被折叠?
被折叠的 条评论
为什么被折叠?
 到【灌水乐园】发言


