wordpress图像大小
Do you want to add a border around your images in WordPress? Recently, one of our users asked us for an easy way to add border around an image in WordPress. While you can use CSS, it’s confusing for beginners. In this article, we will show you an easy way to add image border in WordPress without editing any HTML or CSS code.
您是否要在WordPress中的图像周围添加边框? 最近,我们的一位用户要求我们提供一种简单的方法来在WordPress中添加图像周围的边框。 虽然可以使用CSS,但对于初学者来说却很混乱。 在本文中,我们将向您展示一种无需编辑任何HTML或CSS代码即可在WordPress中添加图像边框的简便方法。

影片教学 (Video Tutorial)
If you don’t like the video or need more instructions, then continue reading.
如果您不喜欢该视频或需要更多说明,请继续阅读。
方法1:使用插件在WordPress中添加图像边框 (Method 1: Using a Plugin to Add Image Border in WordPress)
This method is for beginners who do not wish to edit any HTML or CSS. First thing you need to do is install and activate the WP Image Borders plugin. Upon activation, you need to visit Settings » WP Image Borders to configure the plugin settings.
此方法适用于不想编辑任何HTML或CSS的初学者。 您需要做的第一件事是安装并激活WP Image Borders插件。 激活后,您需要访问设置»WP图像边框以配置插件设置。

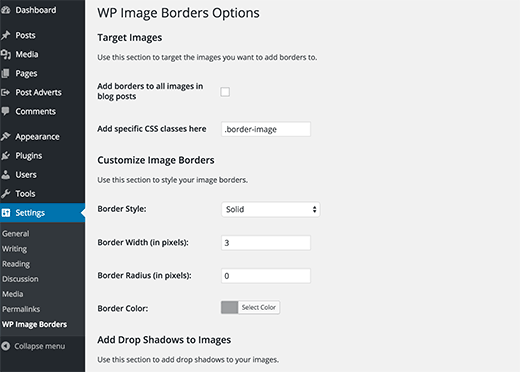
The first section in the plugin settings allows you to target images. You can add borders to all images in your WordPress posts by checking the box next to ‘Add borders to all images in blog posts’ option.
插件设置的第一部分允许您定位图像。 您可以通过选中“向博客文章中的所有图像添加边框”选项旁边的框,为WordPress文章中的所有图像添加边框 。
Alternatively, you can target specific CSS classes to have borders. We will show you how to add a CSS class to a specific image later in this article. Right now you can put anything into the CSS class like .border-image.
或者,您可以将特定CSS类定位为具有边框。 本文后面将向您展示如何向特定图像添加CSS类。 现在,您可以将任何东西放入CSS类中,例如.border-image 。
The second section in the plugin settings allows you to customize border settings. You can choose a border style, width, radius, and color.
插件设置的第二部分允许您自定义边框设置。 您可以选择边框样式,宽度,半径和颜色。
The last section on the settings page allows you to add drop shadows to your images. You can enter a horizontal and vertical distance, blur and spread radius, as well as box shadow color. If you do not want to add drop shadows to your images, then you can simply leave these fields blank.
设置页面的最后一部分允许您向图像添加阴影。 您可以输入水平和垂直距离,模糊和散布半径以及框阴影颜色。 如果您不想在图像中添加阴影,则只需将这些字段保留为空白即可。
Don’t forget to click on the Save Changes button to store your plugin settings.
不要忘记单击“保存更改”按钮来存储您的插件设置。
If you selected the first option ‘Add borders to all images in blog posts’, then you do not need to do anything else.
如果选择了第一个选项“为博客文章中的所有图像添加边框” ,则您无需执行其他任何操作。
You should see image borders on all your blog post images.
您应该在所有博客文章图像上看到图像边框。
However if you selected the second option to only show border for specific images, then you need to follow the next step.
但是,如果您选择了第二个选项以仅显示特定图像的边框,则需要执行下一步。
在WordPress中将CSS类添加到图像 (Adding CSS Class to an Image in WordPress)
If you only wish to add borders around selected images, then you will need to tell WordPress which images should have borders. You can do this by adding a CSS class to images that need borders.
如果仅希望在所选图像周围添加边框,则需要告诉WordPress哪些图像应具有边框。 您可以通过向需要边框的图像添加CSS类来实现。
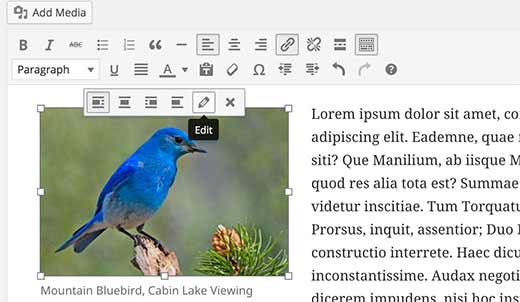
Simply upload your image and add it to your post. After adding the image click on it in the visual editor and then click on the edit button in the toolbar.
只需上传您的图片并将其添加到您的帖子中即可。 添加图像后,在视觉编辑器中单击它,然后单击工具栏中的编辑按钮。

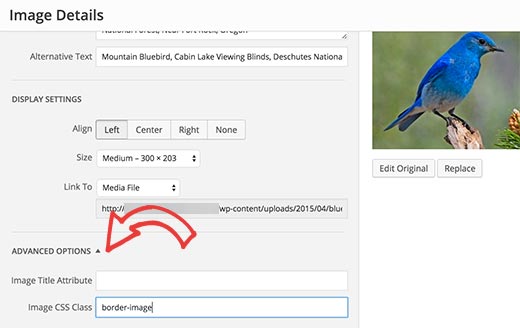
This will bring up image editing popup showing your image details. You need to click on the Advanced Options to expand it, and then enter your image’s css class.
这将弹出显示图像详细信息的图像编辑弹出窗口。 您需要单击“高级选项”将其展开,然后输入图像的css类。
Hint: this is .border-image because we selected that in our plugin settings.
提示:这是.border-image因为我们在插件设置中选择了该.border-image 。

Next, click on the update button to save and update image settings. That’s all, your image will now have an additional class. Since you are using WP Image Borders plugin, a border will show up on this image.
接下来,单击更新按钮以保存和更新图像设置。 就是这样,您的图像现在将具有一个附加类。 由于您使用的是WP Image Borders插件,因此该图像上会显示一个边框。
方法2:使用HTML和CSS在WordPress中添加图像边框 (Method 2: Using HTML & CSS to add Image Borders in WordPress)
Adding image borders using CSS/HTML is a faster and quicker way to get borders around your images in WordPress. There are many ways you can do this, and we will show you all of them. You can choose whatever works best for you.
使用CSS / HTML添加图像边框是在WordPress中获取图像周围边框的一种越来越快的方法。 您可以通过多种方式执行此操作,我们将向您展示所有方法。 您可以选择最适合自己的方法。
在WordPress中使用内嵌样式添加边框 (Adding Borders Using In-line Styles in WordPress)
After you have uploaded and inserted your image into a WordPress post, switch to the text editor. You will see HTML code for your image. It will look something like this:
上传图像并将其插入WordPress帖子后,请切换至文本编辑器 。 您将看到图像HTML代码。 它看起来像这样:
<img src="http://www.example.com/wp-content/uploads/2015/04/bluebird-300x203.jpg" alt="bluebird" width="300" height="203" class="alignnone size-medium wp-image-36" />
You can easily add CSS style in the HTML code like this:
您可以像这样在HTML代码中轻松添加CSS样式:
<img src="http://www.example.com/wp-content/uploads/2015/04/bluebird-300x203.jpg" alt="bluebird" width="300" height="203" class="alignnone size-medium wp-image-36" style="border:3px solid #eeeeee; padding:3px; margin:3px;" />
Feel free to change the border width, color, padding, and margin to your own needs.
可以根据自己的需要随意更改边框的宽度,颜色,填充和边距。
在WordPress主题或子主题中添加图像边框 (Adding Image Border in Your WordPress Theme or Child Theme)
If you want to permanently add borders to all images in your WordPress blog posts and pages, then you can add CSS directly in your WordPress theme or child theme.
如果您想为WordPress博客文章和页面中的所有图像永久添加边框,则可以直接在WordPress主题或子主题中添加CSS。
Most WordPress themes already have these style rules defined in the theme’s stylesheet which is usually style.css file. You can modify the existing CSS, or you can add your own CSS in a child theme.
大多数WordPress主题已经在主题的样式表(通常是style.css文件)中定义了这些样式规则。 您可以修改现有CSS,也可以在子主题中添加自己CSS。
WordPress adds default image classes to all images. In order to make sure that images in your posts/pages have an image border, you need to target all these classes. Here is a simple CSS snippet to get you started:
WordPress将默认图像类添加到所有图像。 为了确保帖子/页面中的图像具有图像边框,您需要定位所有这些类。 这是一个简单CSS片段,可以帮助您入门:
img.alignright {
float:right;
margin:0 0 1em 1em;
border:3px solid #EEEEEE;
}
img.alignleft {
float:left;
margin:0 1em 1em 0;
border:3px solid #EEEEEE;
}
img.aligncenter {
display: block;
margin-left: auto;
margin-right: auto;
border:3px solid #EEEEEE;
}
img.alignnone {
border:3px solid #EEE;
}
If you want to only use image borders when you need them, then you can add CSS class to your images (see above). Add styling rules for this CSS class in your theme or child theme.
如果只在需要时使用图像边框,则可以将CSS类添加到图像中(请参见上文)。 在您的主题或子主题中为此CSS类添加样式规则。
img.border-image {
border: 3px solid #eee;
padding:3px;
margin:3px;
}
We hope this article helped you add image border around your WordPress blog images. You may also want to see our guide on how to save images optimized for the web to speed up your WordPress site.
我们希望本文能帮助您在WordPress博客图像周围添加图像边框。 您可能还想查看我们的指南,以了解如何保存针对网络优化的图像以加快WordPress网站的速度。
If you liked this article, then please subscribe to our YouTube Channel for WordPress video tutorials. You can also find us on Twitter and Facebook.
如果您喜欢这篇文章,请订阅我们的YouTube频道 WordPress视频教程。 您也可以在Twitter和Facebook上找到我们。
翻译自: https://www.wpbeginner.com/beginners-guide/how-to-add-a-border-around-an-image-in-wordpress/
wordpress图像大小


 1720
1720


 被折叠的 条评论
为什么被折叠?


