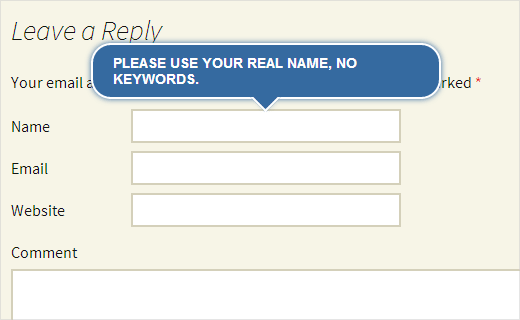
Comments allow users to engage with the content on your website. That’s why we believe that it is important to style your comments layout and comment form, so it is user-friendly as well as good looking. Recently, a user asked us how they can add jQuery tooltips to WordPress comment form. We thought others might find this useful as well. In this tutorial, we will show you how to add jQuery tooltips in WordPress comment form.
评论允许用户使用您网站上的内容。 因此,我们认为对您的评论布局和评论表单进行样式设置很重要,因此它既易于使用,又美观。 最近,一个用户问我们如何将jQuery工具提示添加到WordPress注释表单中。 我们认为其他人也可能会觉得这很有用。 在本教程中,我们将向您展示如何以WordPress注释形式添加jQuery工具提示。

为什么要添加jQuery工具提示? (Why Add jQuery Tooltips?)
Tooltips appear when a user takes their mouse to an item, usually providing them description about that particular item. In this tutorial, we will be adding jQuery tooltips to show tips like, Please use your real name in comment form fields.
当用户将鼠标移至某个项目时,会显示工具提示,通常会向他们提供有关该特定项目的描述。 在本教程中,我们将添加jQuery工具提示以显示提示,例如,请在注释表单字段中使用您的真实姓名。
By adding jQuery tooltips, you can enhance user experience, and it will look nicer.
通过添加jQuery工具提示,您可以增强用户体验,并且看起来会更好。
如何添加jQuery工具提示 (How to Add jQuery Tooltips)
First thing, you need to do is create a folder on your desktop and name it wpb-comment-tooltips. Inside this folder, you need to create these three files:
首先,您需要在桌面上创建一个文件夹,并将其命名为wpb-comment-tooltips 。 在此文件夹中,您需要创建以下三个文件:
- wpb-comment-tooltips.php wpb-comment-tooltips.php
- wpb-tooltip.css wpb-tooltip.css
- wpb-tooltip.js wpb-tooltip.js
Use a plain text editor like Notepad to create these files. Once you have created the files, you need to open wpb-comment-tooltip.php in text editor. Copy and paste this code in the file:
使用纯文本编辑器(如记事本)创建这些文件。 创建文件后,需要在文本编辑器中打开wpb-comment-tooltip.php 。 将此代码复制并粘贴到文件中:
<?php
/**
Plugin Name: WPBeginner's Comment Form Tool Tips
Description: A jQuery powered comment form tool tips plugin based on a tutorial by WPBeginner
Version: 1.0
Author: WPBeginner
Author URI: https://www.wpbeginner.com
License: GPL2
*/

// Only load our scripts and style when a comment form is displayed

add_action( 'comment_form_before', 'wpb_comment_tooltips' );

function wpb_comment_tooltips() {
wp_enqueue_script('wpb-tooltip-jquery', plugins_url('/wpb-tooltip.js', __FILE__ ), array('jquery-ui-tooltip'), '', true);
wp_enqueue_style('wpb-tooltip-css', plugins_url('/wpb-tooltip.css', __FILE__), false, null);
}

// Modify comment form fields and add title attribute to form input fields

function alter_comment_form_fields($fields){
    $fields['email'] =  '<p class="comment-form-email"><label for="email">' . __( 'Email', 'twentythirteen' ) . '</label> ' .
      ( $req ? '<span class="required">*</span>' : '' ) .
      '<input id="email" title="Your email is safe with us, see our privacy policy." name="email" type="text" value="' . esc_attr(  $commenter['comment_author_email'] ) .
      '" size="30"' . $aria_req . ' /></p>';
    $fields['url'] = '<p class="comment-form-url"><label for="url">' .
      __( 'Website', 'twentythirteen' ) . '</label>' .
      '<input id="url" name="url" title="Your website or any social media profile URL" type="text" value="' . esc_attr( $commenter['comment_author_url'] ) .
      '" size="30" /></p>';
	  $fields['author'] = '<p class="comment-form-author">' .
      '<label for="author">' . __( 'Name', 'twentythirteen' ) . '</label> ' .
      ( $req ? '<span class="required">*</span>' : '' ) .
      '<input id="author" title="Please use your real name, no keywords." name="author" type="text" value="' . esc_attr( $commenter['comment_author'] ) .
      '" size="30"' . $aria_req . ' /></p>';
    return $fields;
}
add_filter('comment_form_default_fields','alter_comment_form_fields');
?>
In the above code, we first created a plugin header, given this plugin a name and description. After that we load our JavaScript and CSS file (see our guide on how to add JavaScript and Styles in WordPress).
在上面的代码中,我们首先创建了一个插件头,并为其指定了名称和描述。 之后,我们加载JavaScript和CSS文件(请参阅有关如何在WordPress中添加JavaScript和样式的指南)。
We also make sure that these files are only loaded when a comment form is displayed. After that we modified the default comment form and added the title attribute in input fields. This title attribute contains the message we want to be displayed in the tooltip. For example, in the author field we have used:
我们还确保仅在显示注释表单时才加载这些文件。 之后,我们修改了默认评论表单,并在输入字段中添加了title属性。 此标题属性包含我们希望在工具提示中显示的消息。 例如,在作者字段中,我们使用了:
title="Please use your real name, no keywords."
title="Please use your real name, no keywords."
Now that you have created the plugin file, it is time to add a little jQuery. Open wpb-tooltip.js file and add this code inside it:
现在您已经创建了插件文件,是时候添加一些jQuery了。 打开wpb-tooltip.js文件,并在其中添加以下代码:
(function($) {
$( "#commentform" ).tooltip({ position: {
	my: "center bottom-10",
        at: "center top",
        using: function( position, feedback ) {
          $( this ).css( position );
          $( "<div>" )
            .addClass( "arrow" )
            .addClass( feedback.vertical )
            .addClass( feedback.horizontal )
            .appendTo( this );
        } } });
})(jQuery);
In this code, #commentform is the selector where jQuery will display tooltips and .tooltip is the content part where we have defined the position for tooltips.
在此代码, #commentform是选择其中jQuery将显示工具提示和.tooltip是我们已经定义工具提示的位置内容的一部分。
Now the final step is to add a little CSS in wpb-tooltip.css file. Simply copy and paste this code:
现在,最后一步是在wpb-tooltip.css文件中添加一些CSS。 只需复制并粘贴以下代码:
.ui-tooltip, .arrow:after {
    background: #356aa0;
    border: 2px solid white;
  }
  .ui-tooltip {
    padding: 10px 20px;
    color: white;
    border-radius: 20px;
    font: bold 14px "Helvetica Neue", Sans-Serif;
    text-transform: uppercase;
    box-shadow: 0 0 7px #356aa0;
	max-width:350px;
  }
  .arrow {
    width: 70px;
    height: 16px;
    overflow: hidden;
    position: absolute;
    left: 50%;
    margin-left: -35px;
    bottom: -16px;
  }
  .arrow.top {
    top: -16px;
    bottom: auto;
  }
  .arrow.left {
    left: 20%;
  }
  .arrow:after {
    content: "";
    position: absolute;
    left: 20px;
    top: -20px;
    width: 25px;
    height: 25px;
    box-shadow: 6px 5px 9px -9px #356aa0;
    -webkit-transform: rotate(45deg);
    -moz-transform: rotate(45deg);
    -ms-transform: rotate(45deg);
    -o-transform: rotate(45deg);
    tranform: rotate(45deg);
  }
  .arrow.top:after {
    bottom: -20px;
    top: auto;
  }
Feel free to modify this CSS file to meet your needs.
随意修改此CSS文件以满足您的需求。
That’s all. Now you have successfully created a plugin that adds jQuery tooltips in your WordPress comment form. All you need to do is upload wpb-comment-tooltips folder from your desktop to /wp-content/plugins/ directory on your web server using an FTP client like Filezilla. Once you have uploaded the plugin, go to Plugins page in WordPress admin area and activate the plugin.
就这样。 现在,您已经成功创建了一个插件,可以在WordPress注释表单中添加jQuery工具提示。 您需要做的就是使用FTP客户端(如Filezilla)将wpb-comment-tooltips文件夹从桌面上传到Web服务器上的/wp-content/plugins/目录。 上传插件后,转到WordPress管理区域中的“ 插件”页面并激活插件。
We hope this tutorial helped you learn how to add jQuery tooltips in the WordPress comment form. We encourage you to modify this code and try adding tooltips to other places. For example, check out how we added tooltip testimonials to our site. For feedback and questions, please leave a comment below.
我们希望本教程可以帮助您学习如何在WordPress注释表单中添加jQuery工具提示。 我们建议您修改此代码,并尝试在其他地方添加工具提示。 例如,查看我们如何将工具提示推荐添加到我们的网站。 对于反馈和问题,请在下面发表评论。
翻译自: https://www.wpbeginner.com/wp-themes/how-to-add-jquery-tooltips-in-wordpress-comment-form/


 1014
1014


 被折叠的 条评论
为什么被折叠?


