
wordpress创建
Are you looking to add a support / documentation section to your site? Want to know the best way to add a wiki knowledge base to your WordPress site? In this article, we will show you how to create a wiki knowledge base in WordPress.
您是否要在网站上添加支持/文档部分? 是否想知道将Wiki知识库添加到WordPress网站的最佳方法? 在本文中,我们将向您展示如何在WordPress中创建Wiki知识库。

There are three different ways you can build a wiki site within WordPress:
您可以通过三种不同的方法在WordPress中构建Wiki网站:
- You can use a dedicated WordPress wiki theme to build your knowledge base. 您可以使用专用的WordPress Wiki主题来建立您的知识库。
- You can use a dedicated WordPress wiki plugin to build your knowledge base. 您可以使用专用的WordPress Wiki插件来建立您的知识库。
- You can use some custom code snippets to build your knowledge base. 您可以使用一些自定义代码段来构建知识库。
Now there are pros and cons to each method. But don’t worry, we will explain each of them, so you can make the right choice.
现在每种方法都有优缺点。 但是请放心,我们将为您进行解释,以便您做出正确的选择。
影片教学 (Video Tutorial)
If you don’t like the video or need more instructions, then continue reading.
如果您不喜欢该视频或需要更多说明,请继续阅读。
WordPress Wiki和知识库主题方法 (WordPress Wiki & Knowledge Base Theme Method)
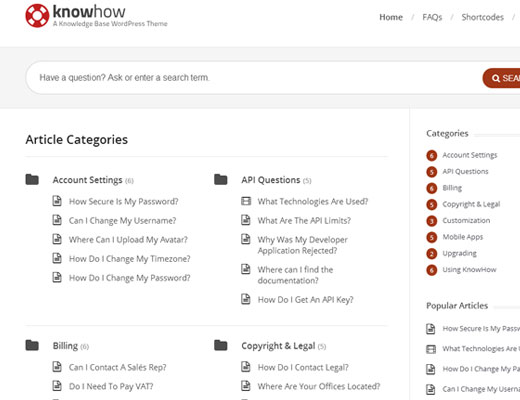
One of the easiest way to build a wiki is to use a WordPress wiki knowledge base theme. There are tons of them available, but we recommend KnowHow Theme.
构建Wiki的最简单方法之一就是使用WordPress Wiki知识库主题。 有很多可用的,但是我们建议使用KnowHow Theme 。
The best way to setup is to install WordPress on a subdomain or directory like support.yoursite.com or yoursite.com/knowledgebase/
最好的设置方法是在诸如support.yoursite.com或yoursite.com/knowledgebase/的子域或目录上安装WordPress 。
Once done, you just need to install and activate the KnowHow theme and it will work out of the box.
完成后,您只需要安装并激活KnowHow主题即可使用。
The biggest downside of using any WordPress Wiki & Knowledge Base theme is that you cannot use them on your main site. You have to do the setup on a subdomain or directory because these themes do not really match your branding, and you definitely do not want your homepage to be a wiki.
使用任何WordPress Wiki和知识库主题的最大弊端是您不能在主站点上使用它们。 您必须在子域或目录上进行设置,因为这些主题与您的品牌并不完全匹配,并且您绝对不希望您的主页成为Wiki。
However many sites have their knowledge base on a subdomain, so this is not as bad as it sounds. The decision really comes down to your preference.
但是,许多站点的知识都是基于子域的,因此,这并不像听起来那样糟糕。 决定确实取决于您的偏好。
WordPress Wiki和知识库插件方法 (WordPress Wiki & Knowledge Base Plugin Method)
If you want to add a wiki knowledge base to your existing WordPress site, then the easiest way to do it is by using a WordPress wiki knowledge base plugin. There are several plugins available, but we recommend Knowledge Base by PressApps (Live Demo available).
如果您想将Wiki知识库添加到现有的WordPress网站,那么最简单的方法是使用WordPress Wiki知识库插件。 有几个可用的插件,但我们建议您使用PressApps的知识库 (提供实时演示)。
All you have to do is install and activate the plugin. Once activated, it adds a Knowledge Base tab in your WordPress admin area.
您所要做的就是安装并激活插件。 激活后,它将在WordPress管理区域中添加“知识库”选项卡。
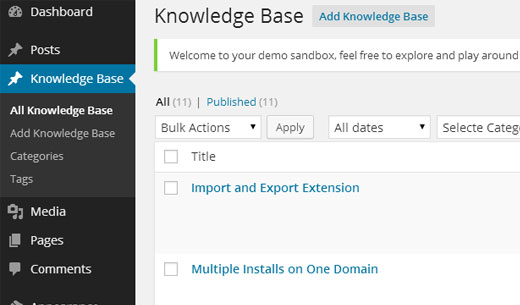
Knowledge Base is it’s own custom post type with categories and tags which allows you to organize your documentation.
知识库是它自己的带有类别和标签的自定义帖子类型,可用于组织文档。
The best part about this is that you can add it on your main site, and it will match your brand style / formatting for the most part. It also comes with public / member only voting system, custom widgets, drag-drop functionality, etc. The downside is that it costs $20.
最好的部分是您可以将其添加到您的主站点上,并且大多数情况下将与您的品牌风格/格式相匹配。 它还带有公共/会员专用投票系统,自定义小部件,拖放功能等。缺点是它的价格为20美元。
In our next method, we will show you how you can accomplish all of this for free, but it does involve code.
在我们的下一个方法中,我们将向您展示如何免费完成所有这些操作,但这确实涉及代码。
WordPress Wiki和知识库代码段方法 (WordPress Wiki & Knowledge Base Code Snippet Method)
Another way to add a wiki knowledge base to your existing WordPress site or even create a dedicated wiki site is to use the code snippet method.
将Wiki知识库添加到现有WordPress网站甚至创建专用Wiki站点的另一种方法是使用代码段方法。
The downside is that you have to copy/paste a little bit of code which can be scary for beginners. The upside is that it gives you more freedom, and it’s completely free unlike the first two options.
缺点是您必须复制/粘贴一些对初学者来说很恐怖的代码。 好处是它为您提供了更多的自由,并且与前两个选项不同,它是完全免费的。
We will do our best to give step by step instructions.
我们将尽最大努力给出逐步的指导。
Note: Before you start, please create a complete backup of your WordPress site.
注意:在开始之前,请创建WordPress网站的完整备份 。
First thing you need to do is install and activate the Knowledgebase CPT plugin. This simple plugin creates a custom post type called knowledge_base and a taxonomy called section.
您需要做的第一件事是安装并激活Knowledge CPT插件。 这个简单的插件创建了一个自定义的发布类型,称为knowledge_base和一个分类法,命名为section 。
This allows you to easily add your wiki articles and organize them into sections.
这使您可以轻松添加Wiki文章并将其组织成部分。
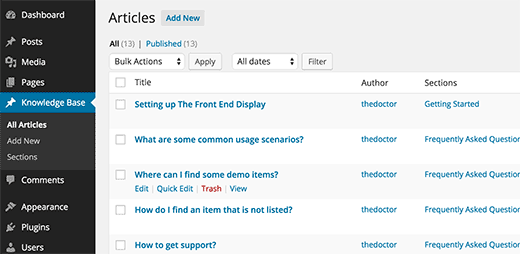
Once you have a few articles and sections, you would need to display them on your website. This is where you need to deal with a little bit of code.
一旦有了一些文章和部分,就需要在网站上显示它们。 这是您需要处理一些代码的地方。
Start by adding this code snippet into your theme’s functions.php file or a site-specific plugin.
首先,将此代码段添加到主题的functions.php文件或特定于站点的插件中 。
function wpb_knowledgebase() {
	// Get Knowledge Base Sections
	$kb_sections = get_terms('section','orderby=name&hide_empty=0');
	// For each knowledge base section
	foreach ($kb_sections as $section) :
	$return .= '<div class="kb_section">';
	// Display Section Name
	$return .= '<h4 class="kb-section-name"><a href="'. get_term_link( $section ) .'" title="'. $section->name .'" >'. $section->name .'</a></h4><ul class="kb-articles-list">';

	// Fetch posts in the section
	$kb_args = array(
		'post_type' => 'knowledge_base',
		'posts_per_page'=>-1,
		'tax_query' => array(
			array(
				'taxonomy' => 'section',
				'terms'    => $section,
			)		,
		),
	);

	$the_query = new WP_Query( $kb_args );
		if ( $the_query->have_posts() ) :
			while ( $the_query->have_posts() ) : $the_query->the_post();
				$return .=  '<li class="kb-article-name">';
				$return .=  '<a href="'. get_permalink( $the_post->ID ) .'" rel="bookmark" title="'. get_the_title( $the_post->ID ) .'">'. get_the_title( $the_post->ID ) .'</a>';
				$return .=  '</li>';
	 		endwhile;
	wp_reset_postdata();
		 else :
	 			$return .= '<p>No Articles Found</p>';
	 	endif;
	$return .=  '</ul></div>';
	endforeach;
	return $return;
}
// Create shortcode
add_shortcode('knowledgebase', 'wpb_knowledgebase');
This code lists all the knowledge base articles under the section they were filed in.
此代码在其所属部分下列出了所有知识库文章。
Next all you need to do is create a new WordPress page and add [knowledgebase] shortcode inside it. Save your page and preview it.
接下来,您需要做的就是创建一个新的WordPress页面,并在其中添加[knowledgebase]简码。 保存页面并预览。
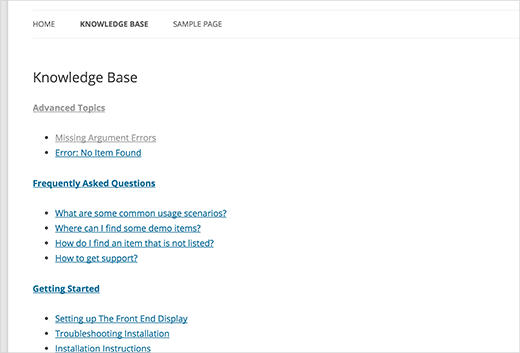
It looks very plain right now, but we can add some styling to it. You can use this CSS as starting point and then continue editing to match your own colors.
现在看起来很普通,但是我们可以为其添加一些样式。 您可以使用此CSS作为起点,然后继续编辑以匹配您自己的颜色。
Paste the following code in your theme’s style.css file.
将以下代码粘贴到主题的style.css文件中。
.kb_section {
float: left;
width: 280px;
max-width: 280px;
margin: 10px;
background-color: #f5f5f5;
border: 1px solid #eee;
}
h4.kb-section-name {
background-color: #eee;
margin: 0;
padding: 5px;
}
ul.kb-section-list {
list-style-type: none;
list-style: none;
display: inline;
}
li.kb-section-name {
list-style-type: none;
display: inline;
}
ul.kb-article-list {
list-style-type: none;
list-style: none;
}
li.kb-article-name {
list-style-type: none;
}
div.kb_section:nth-of-type(3n+1) {clear:left;}
div.kb_section:nth-of-type(3n+3) {}
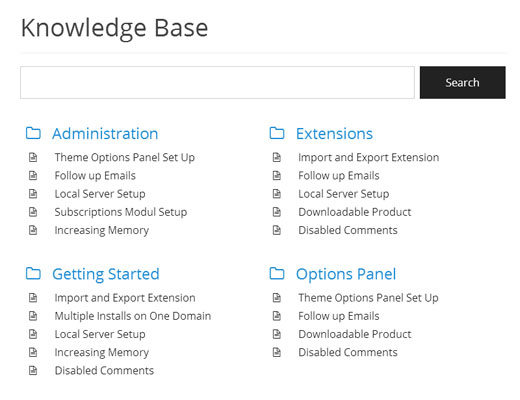
This how it looked on our demo site where we are using Twenty Twelve theme.
这是在我们使用二十二十二主题的演示站点上的外观。
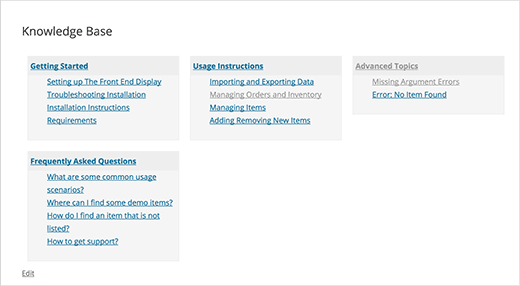
By default, your sections will be displayed in alphabetical order. However if you want to change the order of sections, then you can do that by installing Custom Taxonomy Order NE plugin. This will allow you to drag-drop your sections in the right order.
默认情况下,您的部分将以字母顺序显示。 但是,如果要更改部分的顺序,则可以通过安装“ 自定义分类顺序” NE插件来完成。 这将允许您以正确的顺序拖放各节。
That’s all, we hope this article helped you add a Wiki knowledge base section on your WordPress site. You may also want to check out our tutorial on how to add a FAQs section in WordPress.
仅此而已,我们希望本文能帮助您在WordPress网站上添加Wiki知识库部分。 您可能还需要查看有关如何在WordPress中添加常见问题解答部分的教程。
If you liked this article, then please subscribe to our YouTube Channel for WordPress video tutorials. You can also find us on Twitter and Google+.
如果您喜欢这篇文章,请订阅我们的YouTube频道 WordPress视频教程。 您也可以在Twitter和Google+上找到我们。
翻译自: https://www.wpbeginner.com/wp-tutorials/how-to-create-a-wiki-knowledge-base-using-wordpress/
wordpress创建




 643
643


 被折叠的 条评论
为什么被折叠?


