
wordpress新建列表
Do you want to add audio files to your WordPress site? As a content management system, WordPress is capable of handling audio files by default. However, many beginners are not aware of this. In this article, we will show you how to add audio files and create playlists in WordPress.
您想将音频文件添加到WordPress网站吗? 作为内容管理系统,WordPress默认情况下能够处理音频文件。 但是,许多初学者对此并不了解。 在本文中,我们将向您展示如何在WordPress中添加音频文件和创建播放列表。
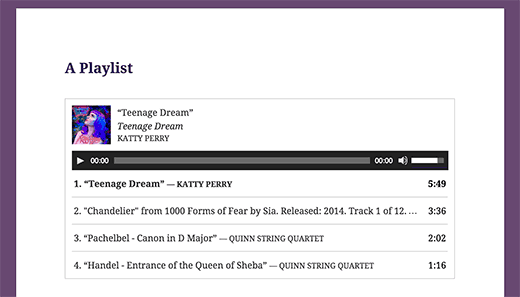
WordPress中支持的音频文件格式 (Supported Audio File Formats in WordPress)
WordPress uses HTML5 audio tag to embed audio files. It is compatible with most modern devices and works particularly well for mobile devices. HTML5 audio tag supports MP3, OGG, and WAV file formats.
WordPress使用HTML5音频标签嵌入音频文件。 它与大多数现代设备兼容,并且特别适用于移动设备。 HTML5音频标签支持MP3,OGG和WAV文件格式。
MP3 is the most commonly used and widely supported format for audio files, and we recommend you to use it whenever possible.
MP3是音频文件最常用和广泛支持的格式,我们建议您尽可能使用它。
影片教学 (Video Tutorial)
If you don’t like the video or need more instructions, then continue reading.
如果您不喜欢该视频或需要更多说明,请继续阅读。
在WordPress中添加单个音频文件 (Adding a Single Audio File in WordPress)
Adding a single audio file or music track to any WordPress post or page is very easy. Simply click on the add media button on the post edit screen.
将单个音频文件或音乐曲目添加到任何WordPress帖子或页面非常容易。 只需在帖子编辑屏幕上单击添加媒体按钮。
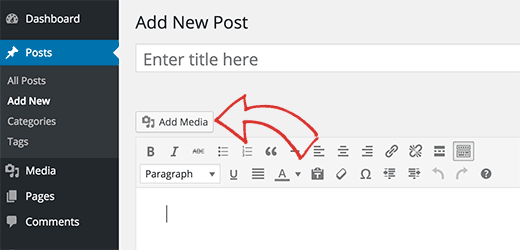
Next, a media uploader popup will appear on your screen. You need to click on the upload file button to select and upload your audio file. Once it’s uploaded, you need to click on insert into post button.
接下来,媒体上传器弹出窗口将出现在屏幕上。 您需要点击上传文件按钮以选择并上传您的音频文件。 上传完成后,您需要点击插入到帖子按钮。
WordPress will insert your audio file in the post. If you are using the visual post editor, then you will be able to see the file embedded into your post. If you are using the text editor, then you will see the audio shortcode.
WordPress将在帖子中插入您的音频文件。 如果您使用可视化的帖子编辑器 ,那么您将能够看到嵌入到帖子中的文件。 如果使用文本编辑器,则将看到音频短代码。
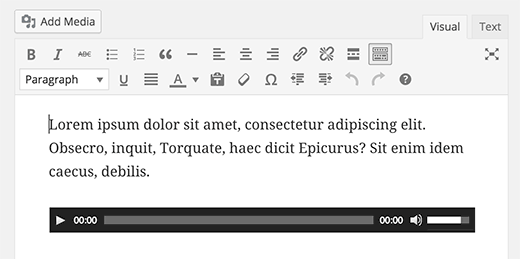
You can continue editing your post, or save and publish it. Once published, you can preview your post where you will see your audio file embedded like this.
您可以继续编辑您的帖子,或者保存并发布。 发布后,您可以预览您的帖子,您将在其中看到嵌入的音频文件,如下所示。
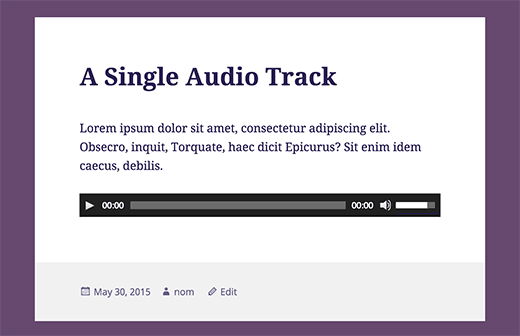
Another easier way to add a single audio file is to upload the file to the media library. After that simply copy the file URL and paste it in the visual editor.
添加单个音频文件的另一种简便方法是将文件上传到媒体库。 之后,只需复制文件URL并将其粘贴到可视编辑器中即可。
WordPress will automatically embed the URL for you. This is similar to how you embed videos in WordPress where you just paste the URL of a YouTube video and WordPress automatically embeds it.
WordPress会自动为您嵌入URL。 这类似于在WordPress中嵌入视频的方式 ,您只需粘贴YouTube视频的URL,然后WordPress自动嵌入它。
在WordPress中添加音频播放列表 (Adding Audio Playlist in WordPress)
Just like image galleries, you can also add audio playlists to your WordPress posts using the media uploader. Simply click on the add media button to upload your audio files.
就像图库一样 ,您也可以使用媒体上传器将音频播放列表添加到WordPress帖子中。 只需单击添加媒体按钮即可上传您的音频文件。
After uploading your audio files, you need to select the files you want to include in the playlist and then click on create new playlist link in the left hand column.
上载音频文件后,您需要选择要包括在播放列表中的文件,然后单击左侧列中的“创建新的播放列表”链接。
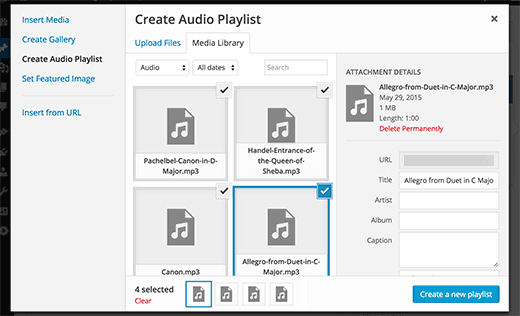
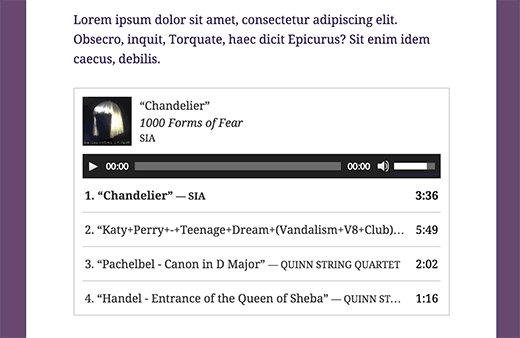
You can now drag and drop to rearrange songs in the playlist. You can also enable the display of track name, artist name, and image. This information is embedded with your MP3 file’s IDT meta tags and is automatically displayed by WordPress.
现在,您可以拖放以重新排列播放列表中的歌曲。 您还可以启用曲目名称,艺术家名称和图像的显示。 此信息嵌入您的MP3文件的IDT元标记中,并由WordPress自动显示。

Once you are done, simply click on the insert audio playlist button. Your playlist will be added to your post, and you will be able to see it in visual editor. You can now save your post and preview your playlist.
完成后,只需单击“插入音频播放列表”按钮。 您的播放列表将被添加到您的帖子中,您将能够在视觉编辑器中看到它。 现在,您可以保存帖子并预览播放列表。
在WordPress中编辑音频文件的元信息 (Editing Meta Information of Audio Files in WordPress)
WordPress can automatically get the meta information from your MP3 file. However, if your file does not have any meta information, or you would like to change it, then you can do so in the media uploader.
WordPress可以自动从您的MP3文件中获取元信息。 但是,如果您的文件没有任何元信息,或者您想更改它,则可以在媒体上载器中进行更改。
Click on the Add Media button to launch the media uploader. You can upload your audio file or if you have already uploaded the audio file, then click on it in the Media Library.
单击添加媒体按钮以启动媒体上传器。 您可以上传音频文件,或者如果您已经上传了音频文件,则在媒体库中单击它。
Once the audio file is selected, you will notice the attachment details column on the right. This is where you can provide track title, artist name, album name, caption and short description for the track. This information will be displayed in the playlists and on single attachment pages.
选择音频文件后,您会注意到右侧的附件详细信息列。 您可以在此处提供曲目标题,艺术家姓名,专辑名称,标题和简短说明。 此信息将显示在播放列表和单个附件页面上。
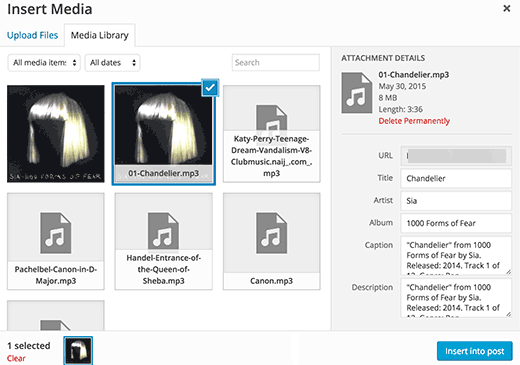
If the audio file you uploaded has an embedded image to be used as album cover, then this image will be automatically extracted by WordPress. It will be stored in your media library and will be used when this track is added to a playlist.
如果您上传的音频文件具有嵌入的图像用作专辑封面,那么WordPress将自动提取该图像。 它会存储在您的媒体库中,并在将此曲目添加到播放列表时使用。
However, if your audio file does not have a cover image, then you can edit the file in WordPress and upload an image. Simply go to Media » Library select the file you want to edit and click on the edit link below it.
但是,如果您的音频文件没有封面图像,则可以在WordPress中编辑该文件并上传图像。 只需转到媒体»库,选择要编辑的文件,然后单击其下面的编辑链接。
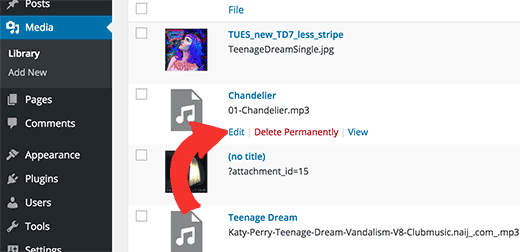
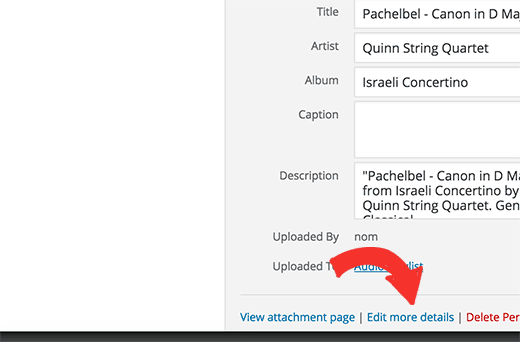
If you are viewing the media library in grid view, then clicking on the audio file will open a popup. You can click on the Edit more details link at the bottom of the popup to edit the file.
如果您正在网格视图中查看媒体库,则单击音频文件将打开一个弹出窗口。 您可以单击弹出窗口底部的“编辑更多详细信息”链接来编辑文件。
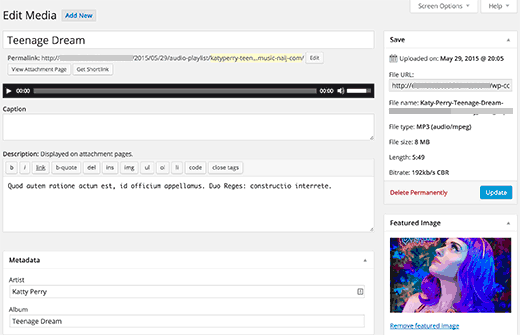
You will now reach the edit media page, where you can not only edit all the meta information for your audio file, but you can also upload a featured image. This image will then be used when the audio file is added to a playlist.
现在,您将进入“编辑媒体”页面,您不仅可以在其中编辑音频文件的所有元信息,还可以上传特色图片。 音频文件添加到播放列表后,将使用此图像。
将音频文件和播放列表添加到侧边栏小部件 (Adding Audio Files and Playlists to Sidebar Widgets)
By default WordPress does not automatically embeds audio file URLs. First we need to enable automatic embedding for text widgets, and then we need to enable shortcodes. Simply paste this code in your theme’s functions.php file or a site-specific plugin.
默认情况下,WordPress不会自动嵌入音频文件URL。 首先,我们需要为文本小部件启用自动嵌入功能,然后需要启用短代码。 只需将此代码粘贴到主题的functions.php文件或特定于站点的插件中。
add_filter( 'widget_text', array( $wp_embed, 'run_shortcode' ), 8 );
add_filter( 'widget_text', array( $wp_embed, 'autoembed'), 8 );
add_filter( 'widget_text', 'do_shortcode');
Now you can upload a file to the media library and copy its URL. Add a text widget to WordPress sidebar and paste the URL inside it.
现在,您可以将文件上传到媒体库并复制其URL。 将文本小部件添加到WordPress侧边栏,然后将URL粘贴到其中。
WordPress will automatically embed the URL into media player to play your audio file.
WordPress会自动将URL嵌入媒体播放器以播放您的音频文件。
To add a playlist, you will need to use shortcode [playlist] with the IDs of media files you want to include into the playlist.
要添加播放列表,您需要使用简码[playlist]以及要包含在播放列表中的媒体文件的ID。
First you will need to upload the audio files you want to include in the playlist by visiting Media » Add New.
首先,您需要访问媒体»添加新媒体,以上传要包含在播放列表中的音频文件。
Now you need to edit each audio file you want to add in the playlist. Simply click on the edit link below the file in media library or click on edit more details link if you are viewing media library in the grid view.
现在,您需要编辑要添加到播放列表中的每个音频文件。 只需单击媒体库中文件下方的“编辑”链接,如果要在网格视图中查看媒体库,则单击“编辑更多详细信息”链接。
On the Edit Media page, you will get the media file ID below the title field.
在“编辑媒体”页面上,您将在标题字段下方获得媒体文件ID。
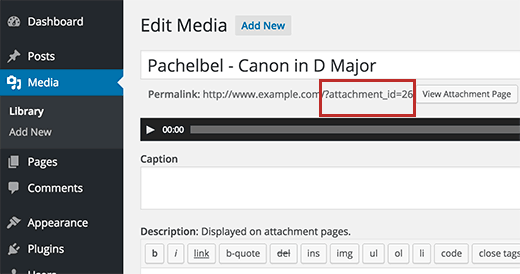
Now that you have the IDs of the file you want to add into the playlist, you can use the shortcode like this:
现在,您已经拥有要添加到播放列表中的文件的ID,您可以使用如下的简码:
[playlist ids="14,24,36"]
[播放列表ids =“ 14,24,36”]
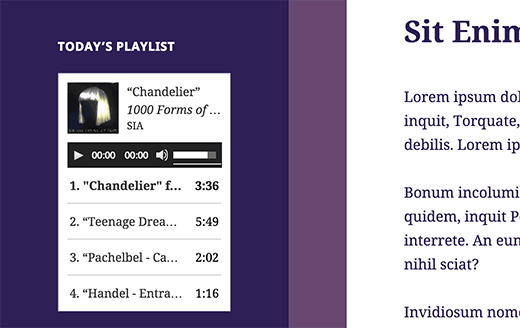
Don’t forget to replace the ids with your own file IDs. You can use this shortcode in a text widget. This is how it looked on our test site:
不要忘记用您自己的文件ID替换ID。 您可以在文本窗口小部件中使用此短代码。 这是在我们的测试站点上的外观:
We hope this article helped you learn how to add audio files and create playlists in WordPress. You may also want to take a look at our guide on how to start a podcast with WordPress.
我们希望本文能帮助您学习如何在WordPress中添加音频文件和创建播放列表。 您可能还想看看我们的指南,了解如何使用WordPress启动播客 。
If you liked this article, then please subscribe to our YouTube Channel for WordPress video tutorials. You can also find us on Twitter and Facebook.
如果您喜欢这篇文章,请订阅我们的YouTube频道 WordPress视频教程。 您也可以在Twitter和Facebook上找到我们。
翻译自: https://www.wpbeginner.com/beginners-guide/how-to-add-audio-files-and-create-playlists-in-wordpress/
wordpress新建列表


 本文介绍了如何在WordPress中添加音频文件,包括支持的格式如MP3,以及创建播放列表的方法。通过媒体上传器,可以轻松添加单个音频文件或创建播放列表。此外,还讲解了编辑音频文件元信息和在侧边栏小部件中展示音频的步骤。


 2979
2979

 被折叠的 条评论
为什么被折叠?


