windows wamp
Do you want to install WordPress on your Windows computer locally? Working with WordPress on your computer allows you to test new WordPress features, learn how to develop with WordPress, and make websites before migrating them to the live server. In this article, we will show you how to properly install WordPress on Windows using WAMP.
您要在本地Windows计算机上安装WordPress吗? 在计算机上使用WordPress可以使您测试WordPress的新功能,学习如何使用WordPress开发,以及在将网站迁移到实时服务器之前创建网站。 在本文中,我们将向您展示如何使用WAMP在Windows上正确安装WordPress。
为什么要在Windows上安装WordPress? (Why You Should Install WordPress on Windows?)
Installing WordPress locally on your computer gives you a testing environment that doesn’t affect your live website or blog. A WordPress install on your computer is also referred to as local server or localhost.
在计算机上本地安装WordPress可为您提供一个不影响您的实时网站或博客的测试环境。 您计算机上安装的WordPress也称为本地服务器或本地主机 。
Normally WordPress developers use local WordPress install to develop their plugins and themes. Beginner users can also install WordPress on their computers to learn WordPress, test new WordPress theme and plugins, and experiment without affecting a live website.
通常,WordPress开发人员使用本地WordPress安装来开发其插件和主题。 初学者也可以在计算机上安装WordPress,以学习WordPress,测试新的WordPress主题和插件以及进行实验,而不会影响实时网站。
Note: If you install WordPress locally on Windows, then the only person who can see that site is you. If you want to make a website that is available to the public, then you need to have a domain name and web hosting. We recommend that you follow this guide on how to start a WordPress blog.
注意:如果您在Windows上本地安装WordPress,那么唯一可以看到该站点的人就是您。 如果要创建一个可供公众使用的网站 ,则需要具有域名和虚拟主机 。 我们建议您按照本指南来创建WordPress博客 。
That being said, let’s take a look at how to properly install WordPress on Windows using WAMP.
话虽如此,让我们看一下如何使用WAMP在Windows上正确安装WordPress。
什么是WAMP? (What is WAMP?)
WAMP, is a compilation of Apache web server, PHP and MySQL bundled for Windows computers.
WAMP是针对Windows计算机捆绑的Apache Web服务器, PHP和MySQL的汇编。
All of them are separate open source software. However, installing them separately is not quite easy even for experienced users. Software like WAMP allow you to easily install them and have a working local environment within minutes.
它们都是独立的开源软件。 但是,即使对于有经验的用户,单独安装它们也不是一件容易的事。 诸如WAMP之类的软件使您可以轻松安装它们,并在几分钟之内建立可以正常工作的本地环境。
步骤1.在Windows计算机上安装WAMP (Step 1. Installing WAMP on Windows Computer)
First, you need to download the WAMP software and install it on your computer. Simply go to the WampServer website and click on the ‘Start Using WampServer’ button.
首先,您需要下载WAMP软件并将其安装在计算机上。 只需访问WampServer网站 ,然后单击“开始使用WampServer”按钮。

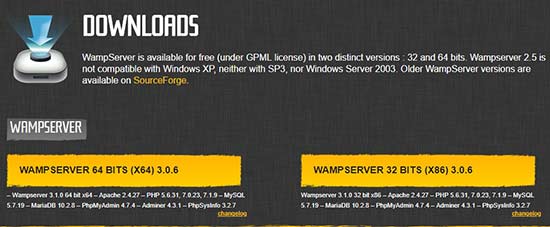
It will take you to the downloads section. You’ll see two versions here: WampServer 32 bits and WampServer 64 bits. You need to select the WampServer version that matches the operating system type of your Windows computer.
它将带您到下载部分。 您将在此处看到两个版本:WampServer 32位和WampServer 64位。 您需要选择与Windows计算机的操作系统类型匹配的WampServer版本。
To find out whether you are using 32 or 64-bit operating system, go to Control Panel » System and Security » System in your computer. There you will be able to see your operating system type.
要了解您使用的是32位还是64位操作系统,请转至计算机中的控制面板»系统和安全性»系统 。 在那里您将能够看到您的操作系统类型。

Once downloaded, you can click on the wampserver execution file to run the installation. Make sure that you carefully follow the instructions on the installation screen.
下载后,您可以单击wampserver执行文件以运行安装。 确保您仔细按照安装屏幕上的说明进行操作。
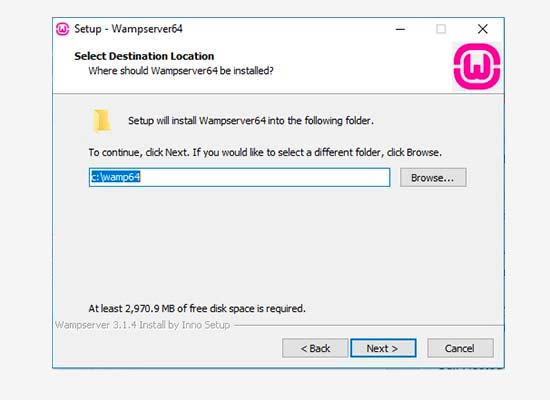
During the installation process, you need to define the location for the web browser. By default, it will be Internet Explorer. You can change that to Google Chrome or any other web browser by locating it in the Program Files of your computer.
在安装过程中,您需要定义Web浏览器的位置。 默认情况下,它将是Internet Explorer。 您可以通过在计算机的程序文件中找到它来将其更改为Google Chrome或任何其他网络浏览器。
Once installed, you can launch the WampServer to continue.
安装完成后,您可以启动WampServer继续。
步骤2.为本地WordPress设置设置数据库 (Step 2. Setting Up a Database for Local WordPress Setup)
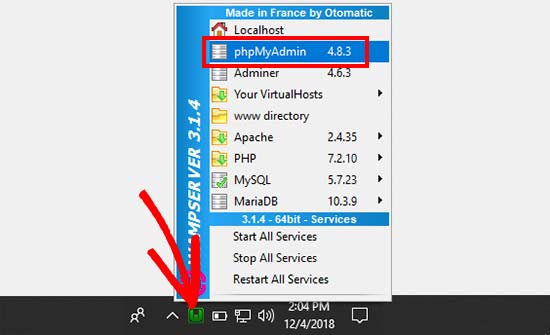
Next thing you need to do is to create a blank MySQL database. On launching WAMP, you’ll see a green WampServer icon at the bottom right corner of your screen along with other icons. Simply click on it and then click on phpMyAdmin (a web based application to manage MySQL databases).
接下来,您需要创建一个空白MySQL 数据库 。 启动WAMP时,您会在屏幕的右下角看到一个绿色的WampServer图标以及其他图标。 只需单击它,然后单击phpMyAdmin(用于管理MySQL数据库的基于Web的应用程序)。
Note: If the WampServer icon is red or yellow, then it means the services (Apache, MySQL, PHP) are not running. You need to start the services by clicking on the icon before setting up the database.
注意:如果WampServer图标为红色或黄色,则表示服务(Apache,MySQL,PHP)未运行。 在设置数据库之前,您需要通过单击图标来启动服务。
It will take you to the phpMyAdmin login screen on your web browser. Simply enter the username: root and leave the password field blank. These are the default credentials to login into your localhost phpMyAdmin.
它将带您到Web浏览器上的phpMyAdmin登录屏幕。 只需输入用户名: root ,密码字段为空即可。 这些是登录到本地phpMyAdmin的默认凭据。
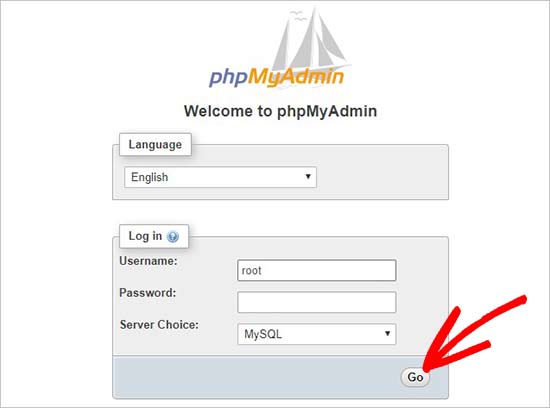
Click on the ‘Go’ button to continue.
点击“开始”按钮继续。
Once logged in, you need to click on Databases in phpmMyAdmin to create a new database for WordPress. It will ask you to choose a name for your new database (we named ours test_db). After that click on the ‘Create’ button.
登录后,您需要在phpmMyAdmin中单击Databases为WordPress创建一个新数据库。 它将要求您为新数据库选择一个名称(我们将其命名为test_db)。 之后,点击“创建”按钮。
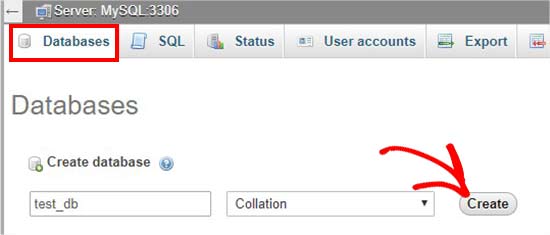
Your database is ready which means you can now install WordPress on localhost.
您的数据库已准备就绪,这意味着您现在可以在localhost上安装WordPress。
步骤3.使用WAMP在Windows上安装WordPress (Step 3. Installing WordPress on Windows Using WAMP)
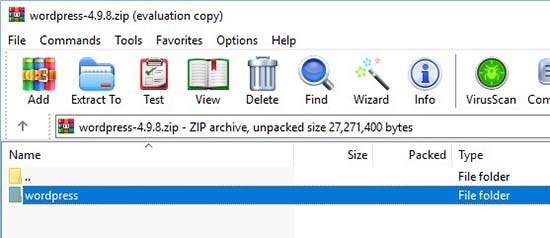
The next thing you need to do is download the latest version of WordPress from the WordPress.org website. It will download as a zip file.
接下来,您需要从WordPress.org网站下载最新版本的WordPress。 它将以zip文件下载。

You need to extract the zip file and copy the ‘wordpress’ folder.
您需要解压缩zip文件并复制“ wordpress”文件夹。
Now you need to navigate to the folder where you installed WAMP.
现在,您需要导航到安装WAMP的文件夹。
In this tutorial, we installed WAMP in C:\wamp64, so we’ll refer to that folder going forward. But keep in mind, it may be different for you depending on where you installed the program.
在本教程中,我们将WAMP安装在C:\ wamp64中,因此我们将继续参考该文件夹。 但是请记住,根据安装程序的位置,它可能对您有所不同。
Paste the ‘wordpress’ folder into the C:\wamp64\www folder.
将“ wordpress”文件夹粘贴到C:\ wamp64 \ www文件夹中。

You can rename the ‘wordpress’ folder to anything you want, such as mysite, testsite, etc. This will be the URL of your local WordPress site, so be sure to choose something you’ll remember easily.
您可以将“ wordpress”文件夹重命名为所需的任何名称,例如mysite,testsite等。这将是您本地WordPress网站的URL,因此请务必选择容易记住的名称。
For the sake of this tutorial, we renamed the folder from wordpress to mysite.
为了本教程的缘故,我们将文件夹从wordpress重命名为mysite。
Next, you can open the web browser and go to http://localhost/mysite/
接下来,您可以打开Web浏览器并转到http:// localhost / mysite /
First, it’ll ask you to select a language and then show you the database setup information. Once you have read it carefully, go ahead and click on the ‘Let’s go’ button to continue.
首先,它将要求您选择一种语言,然后向您显示数据库设置信息。 仔细阅读后,继续并单击“开始”按钮以继续。
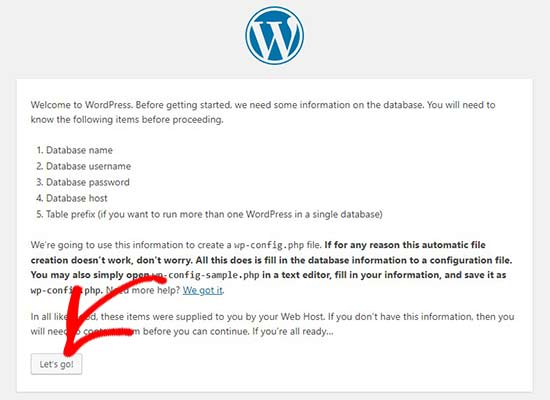
After that, you need to enter your database details like database name, username, password, host, and table prefix.
之后,您需要输入数据库详细信息,例如数据库名称,用户名,密码,主机和表前缀。
The database name will be the one that you entered in the previous step. In our case, we called it ‘test_db’. The username will be ‘root’, and you can leave the password field blank. You can also leave the database host and table prefix as-is.
数据库名称将是您在上一步中输入的名称。 在我们的例子中,我们将其称为“ test_db”。 用户名将为“ root”,您可以将密码字段保留为空白。 您也可以按原样保留数据库主机和表前缀。
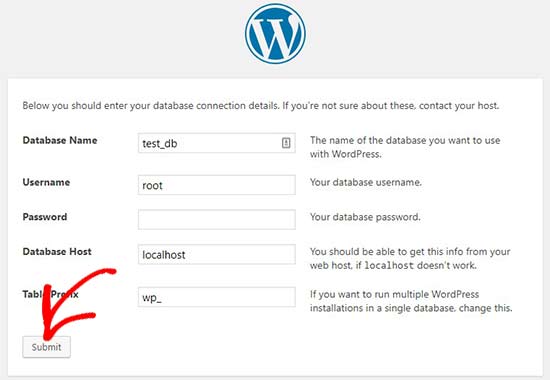
Next, click on the ‘Submit’ button and WordPress will create a configuration file for you in the backend.
接下来,单击“提交”按钮,WordPress将在后端为您创建一个配置文件。
On the next screen, you will see a success message stating that WordPress is connected to your database, and you can proceed with the installation.
在下一个屏幕上,您将看到一条成功消息,指出WordPress已连接到您的数据库,您可以继续进行安装。
Go ahead and click on the ‘Run the installation’ button to continue.
继续并单击“运行安装”按钮以继续。

It will take you to the welcome screen for WordPress. You need to add a title for your new WordPress website, choose an admin username, enter a strong password, and provide an admin email address.
它将带您进入WordPress的欢迎屏幕。 您需要为新的WordPress网站添加标题,选择管理员用户名,输入强密码并提供管理员电子邮件地址。
Once you’re ready, click on the ‘Install WordPress’ button.
准备就绪后,点击“安装WordPress”按钮。
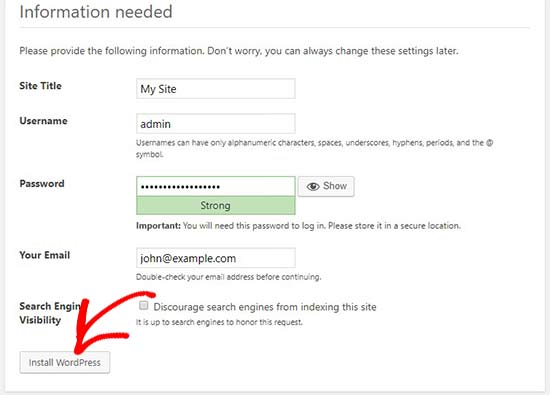
After the installation process is complete, you’ll see a success message. In the background, WordPress has created new tables in your database and it’s ready to use.
安装过程完成后,您将看到一条成功消息。 在后台,WordPress已在您的数据库中创建了新表,并且可以使用了。
You can then proceed to your WordPress dashboard by clicking on the ‘Log In’ button.
然后,您可以通过单击“登录”按钮进入WordPress仪表板。
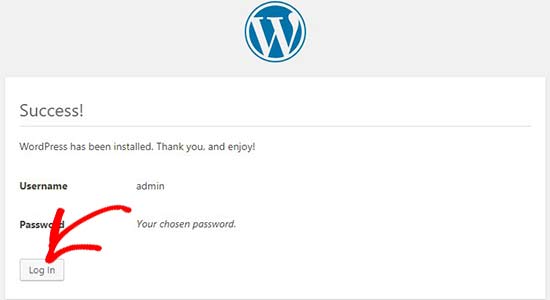
Congratulations, you have successfully installed WordPress on a Windows computer using WAMP.
恭喜,您已经使用WAMP在Windows计算机上成功安装了WordPress。
步骤4.在WAMP中启用漂亮的永久链接 (Step 4. Enabling Pretty Permalinks in WAMP)
The new version of WordPress doesn’t break your local site on changing the permalinks setting.
WordPress的新版本在更改永久链接设置时不会破坏您的本地站点。
However if you still see the ‘page not found’ error on your pages after changing the permalinks from Settings » Permalinks in WordPress, then simply follow our guide on how to enable custom permalinks in WAMP.
但是,如果从WordPress中的“设置”»“永久链接”更改了永久链接后,仍在页面上看到“找不到页面”错误,则只需按照我们的指南了解如何在WAMP中启用自定义永久链接 。
步骤5.解决WAMP问题 (Step 5. Troubleshooting WAMP Issues)
WAMP is quite easy to use even for beginners. However, if you are unable to get it running, then the following troubleshooting tips would help.
WAMP即使对于初学者也很容易使用。 但是,如果您无法使其运行,那么以下故障排除提示将有所帮助。
Fixing the WAMP Skype Conflict
解决WAMP Skype冲突
If you have Skype installed and running, then WampServer may not be able to work properly due to a conflict with Skype. The conflict is caused by both Apache and Skype using the same port 80. There is a simple fix for this problem.
如果已安装并正在运行Skype,则WampServer可能由于与Skype冲突而无法正常工作。 冲突是由Apache和Skype使用相同的端口80引起的。此问题有一个简单的解决方法。
Open Skype and go to Tools » Options. This will bring up a dialog box, from here you need to click on Advanced and then Connections.
打开Skype并转到工具»选项 。 这将弹出一个对话框,在这里您需要单击高级,然后单击连接。
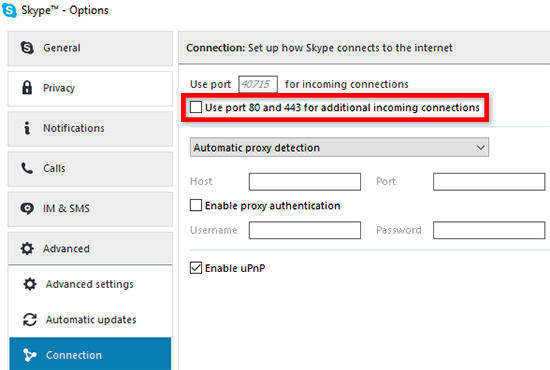
Uncheck the box that says Use port 80 and 443 as alternatives for incoming connections. Save options and restart Skype.
取消选中使用端口80和443作为传入连接的替代方法的复选框。 保存选项并重新启动Skype。
Install Visual C++ Redistributable
安装Visual C ++可再发行组件
WAMP needs Visual C++ Redistributable for Visual Studio 2012 to run. If you don’t have it installed on your computer, then you can download and install it from the Microsoft website.
WAMP需要运行Visual Studio 2012的Visual C ++ Redistributable。 如果您的计算机上尚未安装它,则可以从Microsoft网站下载并安装它。
奖励:从WAMP迁移到Live (Bonus: Migrating from WAMP to Live)
We’ve also written a separate guide on how to move WordPress from WAMP local server to a live site. Hopefully, you’ll find it helpful when you are ready to deploy your local site to production.
我们还编写了另一本指南, 介绍如何将WordPress从WAMP本地服务器移至实时站点 。 希望当您准备将本地站点部署到生产环境时,它将对您有所帮助。
Having a local server environment is great for learning and testing purposes. But remember, if you want to start a WordPress blog for other people to see, then you do not need to install WordPress on your computer. You need to install WordPress on a WordPress hosting provider.
拥有本地服务器环境非常适合学习和测试。 但是请记住,如果要启动WordPress博客以供其他人查看,则无需在计算机上安装WordPress。 您需要在WordPress托管提供商上安装WordPress。
We hope this article helped you learn how to install WordPress on Windows using WAMP. You may also want to see our guide on 18 most important things you need to do after installing WordPress.
我们希望本文能帮助您学习如何使用WAMP在Windows上安装WordPress。 您可能还想查看有关安装WordPress之后需要做的18项最重要事情的指南。
If you liked this article, then please subscribe to our YouTube Channel for WordPress video tutorials. You can also find us on Twitter and Facebook.
如果您喜欢这篇文章,请订阅我们的YouTube频道 WordPress视频教程。 您也可以在Twitter和Facebook上找到我们。
windows wamp


 1117
1117

 被折叠的 条评论
为什么被折叠?


