


 本文介绍了图像处理中的卷积矩阵概念,通过3x3矩阵进行图像卷积来实现如模糊、锐化等效果。文章提供了理论解释、示例矩阵、操作结果以及一个JavaScript实现的API,允许自定义卷积操作。

矩阵卷积的卷积核
In the previous post I talked about manipulating and changing pixels in an image (using JavaScript and canvas) one at a time. We took a single pixel and messed around with its R, G, B or A values.
在上一篇文章中,我谈到了一次处理和更改图像中的像素(使用JavaScript和canvas )。 我们只用了一个像素,就把它的R,G,B或A值弄乱了。
This time let's look into taking account not only the single pixel but the pixels around it. This allows you to do all kinds of effects, the most popular being emboss, edge detection, blur and sharpen.
这次,我们不仅要考虑单个像素,还要考虑其周围的像素。 这使您可以执行各种效果,其中最流行的是浮雕,边缘检测,模糊和锐化。
理论(Theory)
The type of manipulation we'll consider is called image convolution using a 3x3 matrix. You take 9 pixels from the image: the current pixel you're changing and the 8 immediately around it.
我们将考虑的操作类型称为使用3x3矩阵的图像卷积。 您从图像中获取了9个像素:您正在更改的当前像素以及周围的8个像素。
In other words you want to change the RGB values for the pixel in the middle based on its own value and those around it.
换句话说,您要根据中间像素的值及其周围的值更改中间像素的RGB值。
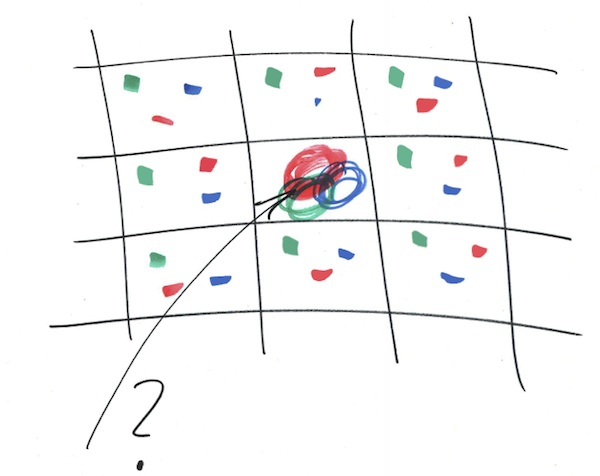
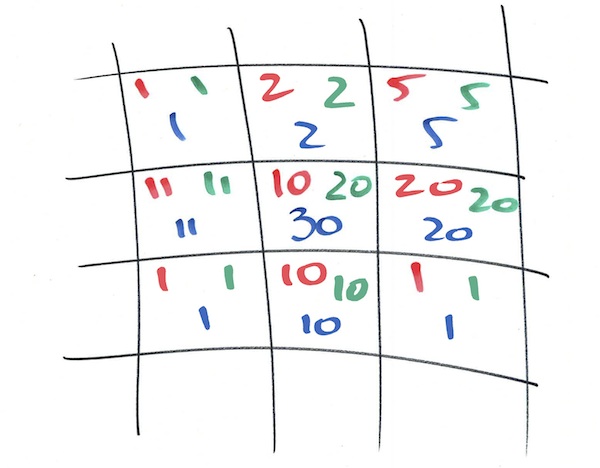
Let's say we have some sample values (given in red for R, blue for B and green for G in this figure):
假设我们有一些样本值(在此图中,R表示红色,B表示蓝色,G表示绿色):
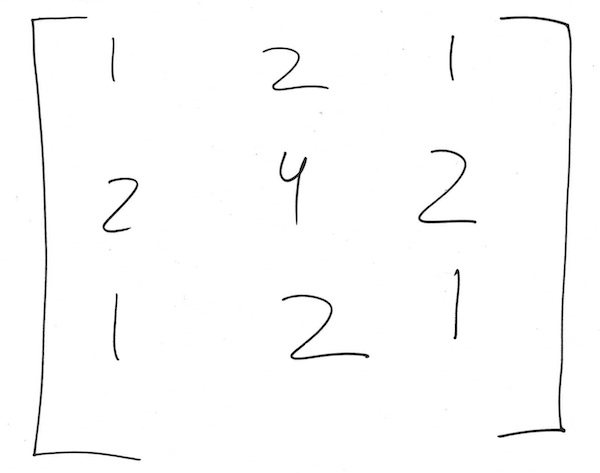
Remember this manipulation was called convolution matrix. So you need a matrix. Below is an example of one such matrix (used in the blur effect)
记住,这种操作称为卷积矩阵。 因此,您需要一个矩阵。 下面是一个这样的矩阵的示例(用于模糊效果)
Now you take one of the channels, say R for example. You take each of the 9 R values you have and multiply it by the corresponding number in the matrix. Then sum the nine numbers.
现在您选择其中一个频道,例如说R。 取9个R值中的每一个,并将其乘以矩阵中的相应数字。 然后将九个数字相加。
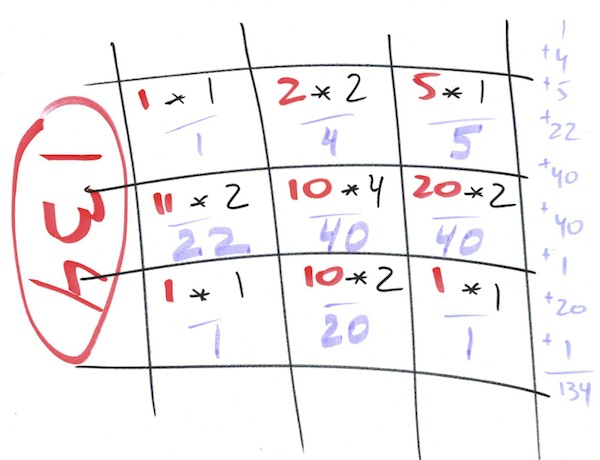
1*1 + 2*2 + 5*1 + 11*2 + 10*4 + 20*2 + 1*1 + 10*2 + 1*1 =
 1  +  4  + 5   +   22 +  40  +  40  +  1  +  20  +  1  =
                      134
In addition to the matrix we also have a divisor and an offset, both optional. If there's no divisor (meaning it's 1, not 0), the result for Red we're looking for is 134. As you can see 134 is pretty far off from the original value of 10. But the blur effect has a divisor of 16. So the new value for red is 8.375
除了矩阵,我们还有除数和偏移量,两者都是可选的。 如果没有除数(表示它是1,而不是0),则我们要查找的Red的结果是134。您可以看到134与原始值10距离很远。但是模糊效果的除数为16 。因此,红色的新值为8.375
If the convolution asked for an offset, you add it to the end result.
如果卷积要求偏移量,则将其添加到最终结果中。
Then you repeat the same for Green and Blue. You can do alpha if you want but for regular images it has constant 255 value so you'll do a lot of math and end up with 255.
然后,对绿色和蓝色重复相同的操作。 您可以根据需要进行alpha转换,但对于常规图像,它具有恒定的255值,因此您将进行大量数学运算并最终得到255。
You may have noticed that the divisor 16 is also the sum of the numbers in the matrix;
您可能已经注意到,除数16也是矩阵中数字的总和。
1 + 2 + 1 + 2 + 4 + 2 + 1 + 2 + 1 = 16
This way the result image is as bright as the original. If you have an unbalanced matrix you'll get a darker or a lighter image.
这样,结果图像与原始图像一样明亮。 如果矩阵不平衡,则会得到较暗或较亮的图像。
The offset is 0 most of the time, but not always. The emboss effect has offset 127 for example.
偏移量在大多数情况下为0,但并非总是如此。 压纹效果具有例如偏移127。
演示矩阵 (Demo matrices)
My demo uses the most popular matrices out there. You can search the web for other matrices and play with them. None of them define a divisor because it's the sum of their elements, but the API I'll show you lets you use your custom divisor.
我的演示使用了最流行的矩阵。 您可以在网上搜索其他矩阵并与它们一起玩。 它们都不定义除数,因为它是元素的总和,但是我将向您展示的API使您可以使用自定义除数。
Without further ado, here are the matrices I used defined as an array of JavaScript objects:
事不宜迟,这里是我用来定义为JavaScript对象数组的矩阵:
var matrices = [
  {
    name: 'mean removal (sharpen)',
    data:
     [[-1, -1, -1],
      [-1,  9, -1],
      [-1, -1, -1]]
  },
  {
    name: 'sharpen',
    data:
     [[ 0, -2,  0],
      [-2, 11, -2],
      [ 0, -2,  0]]
  },
  {
    name: 'blur',
    data:
     [[ 1,  2,  1],
      [ 2,  4,  2],
      [ 1,  2,  1]]
  },
  {
    name: 'emboss',
    data:
     [[ 2,  0,  0],
      [ 0, -1,  0],
      [ 0,  0, -1]],
    offset: 127,
  },
  {
    name: 'emboss subtle',
    data:
     [[ 1,  1, -1],
      [ 1,  3, -1],
      [ 1, -1, -1]],
  },
  {
    name: 'edge detect',
    data:
     [[ 1,  1,  1],
      [ 1, -7,  1],
      [ 1,  1,  1]],
  },
  {
    name: 'edge detect 2',
    data:
     [[-5,  0,  0],
      [ 0,  0,  0],
      [ 0,  0,  5]],
  }
];
结果 (Results)

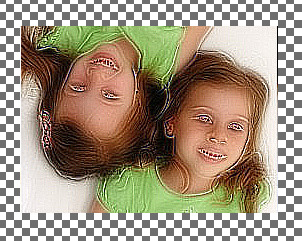
Original
原版的

Blur
模糊

Sharpen
锐化
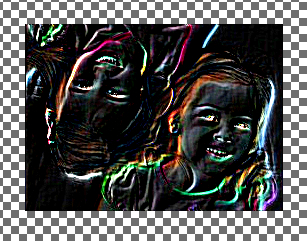
Edge detect
边缘检测
Edge 2
边缘2
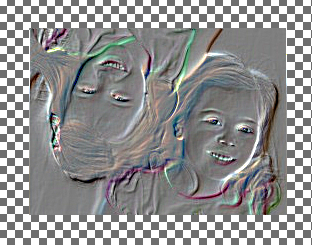
Emboss
浮雕

Emboss (subtle)
浮雕(微妙)

Mean removal (sharpen a lot)
卑鄙的去除(很多)
API (The API)
The API is the same as in the previous post, same constructor and all, just adding a new method called convolve(). This is where the magic happens.
该API与上一篇文章相同,相同的构造函数,以及所有相同的东西,只是添加了一个称为convolve()的新方法。 这就是魔术发生的地方。
You use this method like so:
您可以这样使用此方法:
transformador.convolve([
  [1,2,1],
  [2,4,2],
  [1,2,1]
], 16, 0);
Again, 16 is optional as the method will figure it out if you omit and offset is optional too. Actually you can go to the demo and play in the console to see what happens with a different divisor, e.g.
同样,16是可选的,因为如果您忽略了该方法,它将计算出来,而offset也可选。 实际上,您可以转到演示并在控制台中播放以查看使用其他除数的情况,例如
transformador.convolve([[1,2,1],[2,4,2],[1,2,1]], 10);
or
要么
transformador.convolve([[1,2,1],[2,4,2],[1,2,1]], 20);
卷积() (convolve())
Some comments on how convolve() was implemented in this demo.
关于此演示中如何实现convolve()一些评论。
The big picture:
大图:
CanvasImage.prototype.convolve = function(matrix, divisor, offset) {
  // ...
};
Handle arguments: flat matrix is easier to work with and figure out the divisor if missing. How 'bout that array reduce, eh? ES5 ftw.
处理参数:平面矩阵更易于使用,并找出除数是否丢失。 这个数组如何减少,是吗? ES5开始
  var m = [].concat(matrix[0], matrix[1], matrix[2]); // flatten
  if (!divisor) {
    divisor = m.reduce(function(a, b) {return a + b;}) || 1; // sum
  }
Some vars more or less the same as the last time in the transform() method:
一些var与transform()方法中的上一次大致相同:
  var olddata = this.original;
  var oldpx = olddata.data;
  var newdata = this.context.createImageData(olddata);
  var newpx = newdata.data
  var len = newpx.length;
  var res = 0;
  var w = this.image.width;
Then a loop through all the image data, filter out every 4th element (because we ignore Alpha channel) and write the new image data to the canvas.
然后循环遍历所有图像数据,滤出第4个元素(因为我们忽略了Alpha通道),然后将新的图像数据写入画布。
  for (var i = 0; i < len; i++) {
    if ((i + 1) % 4 === 0) {
      newpx[i] = oldpx[i];
      continue;
    }

    //
    // magic...
    //
  }
  this.setData(newdata);
Remember that canvas image data is one long array where 0 is R for pixel #1, 1 is B, 2 is G, 3 is Alpha, 4 is R for pixel #2 and so on. This is different than more other code examples you'll in different languages where there are two loops in order to touch every pixel: one from 0 to width and an inner one from 0 to height.
请记住,画布图像数据是一个长数组,其中像素#1的R为0,像素1为B,2为G,3为Alpha,像素2#的R为4,以此类推。 这与您将使用不同语言编写的更多其他代码示例不同,在其他语言中,有两个循环触摸每个像素:一个循环从0到宽度,内部循环从0到高度。
And finally, the "magic" part:
最后,“魔术”部分:
    res = 0;
    var these = [
      oldpx[i - w * 4 - 4] || oldpx[i],
      oldpx[i - w * 4]     || oldpx[i],
      oldpx[i - w * 4 + 4] || oldpx[i],
      oldpx[i - 4]         || oldpx[i],
      oldpx[i],
      oldpx[i + 4]         || oldpx[i],
      oldpx[i + w * 4 - 4] || oldpx[i],
      oldpx[i + w * 4]     || oldpx[i],
      oldpx[i + w * 4 + 4] || oldpx[i]
    ];
    for (var j = 0; j < 9; j++) {
      res += these[j] * m[j];
    }
    res /= divisor;
    if (offset) {
      res += offset;
    }
    newpx[i] = res;
these are the pixels we want to inspect. oldpx[i] is the one in the middle which we're changing to newpx[i]. Also note how we default all pixels to oldpx[i]. This is to deal with the boundary pixels: tho top and bottom rows of pixels and the left and right columns. Because the pixel in position 0x0 has no pixels above it or to the left. Then we loop through these and multiply by the corresponding value in the matrix. Finally divide and offset, if required.
these是我们要检查的像素。 oldpx[i]是中间的一个,我们要更改为newpx[i] 。 还要注意我们如何将所有像素默认为oldpx[i] 。 这是为了处理边界像素:像素的顶部和底部行以及左侧和右侧列。 因为位置0x0中的像素在其上方或左侧没有像素。 然后,我们遍历these值并乘以矩阵中的相应值。 最后,如果需要的话, divide offset 。
谢谢! (Thanks!)
Thanks for reading, and now go play with the demo in the console. An easy template to start is:
感谢您的阅读,现在在控制台中玩演示。 一个简单的模板开始是:
transformador.convolve([[1,0,0],[0,0,0],[0,0,-1]], 1, 127);
If you want to apply convolutions on top of each other, you can reset the original image data to the current.
如果要在彼此之间应用卷积,可以将原始图像数据重置为当前图像。
transformador.original = transformador.getData();
Tell your friends about this post on Facebook and Twitter
在Facebook和Twitter上告诉您的朋友有关此帖子的信息
翻译自: https://www.phpied.com/canvas-pixels-2-convolution-matrix/
矩阵卷积的卷积核


 1600
1600

 被折叠的 条评论
为什么被折叠?
被折叠的 条评论
为什么被折叠?
 到【灌水乐园】发言


