


Required Tools (assumes Windows, but there's comparable tools on any platform)
必备工具(假设使用Windows,但任何平台上都有类似的工具)
Paint.NET (or any editor that does the PNG format with transparency)
Paint.NET (或任何具有PNG格式且透明的编辑器)
WinSnap or WindowClippings (or ALT-Printscreen) to do screenshots
WinSnap或WindowClippings (或ALT-Printscreen)来做屏幕截图
Possibly Acrobat Reader
Optionally: Google SketchUp (for Part 2)
可选: Google SketchUp (第2部分)
We were screwing around last weekend looking a houses and found a big empty lot that some folks are building houses on. I was surprised that the Real Estate folks (at least these) weren't very computer savvy. Everything's pushed around on paper. There's no kiosk, no 3D renderings, nada. I wanted to understand how the neighborhood would lay out and where houses would sit, but other than pencil sketches, they couldn't help me. Seems that this kind of thing could be very useful to a prospective buyer.
上周末我们四处寻找房子,结果发现一些人正在盖房子的空地。 我很惊讶房地产经纪人(至少这些人)不是很精通计算机。 一切都推到了纸上。 纳达(Nada),没有亭,没有3D渲染。 我想了解附近的布局方式以及房屋的位置,但是除了铅笔素描外,它们无济于事。 似乎这种事情对潜在的买家可能非常有用。
So, given my lunch hour...
所以,考虑到我的午餐时间...
(This isn't a house or neighborhood I'm looking at, I've just selected it for demonstration)
(这不是我正在看的房子或街区,我只是选择它进行演示)
Most folks have used Google Maps or Virtual Earth before, but mostly just for driving directions. Few "civilians" (read: non-geek) that I've met have used Google Earth, which is a shame.
大多数人以前都使用过Google Maps或Virtual Earth,但大多数只是用于行车路线。 我遇到的很少有“平民”(阅读者:非怪胎)使用过Google Earth,这真是令人遗憾。
If you want to visualize your house lot, here's some steps to help make that possible.
如果您想可视化自己的房屋,请执行以下步骤以实现这一目标。
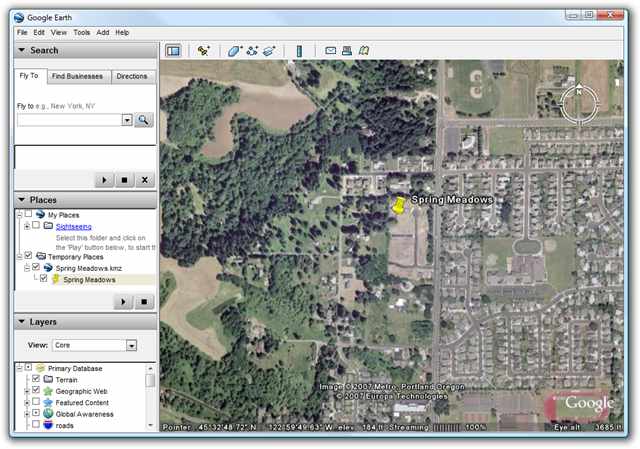
1. Download Google Earth and find the lot.
1.下载Google Earth并找到很多东西。
The imagery is usually a few years old, but if it's an empty lot anyway it shouldn't matter. Put a pushpin on the area so you can get back there quickly.
图像通常有几年的历史,但是无论如何如果是空的没关系。 将图钉放在该区域上,以便您可以快速回到那里。
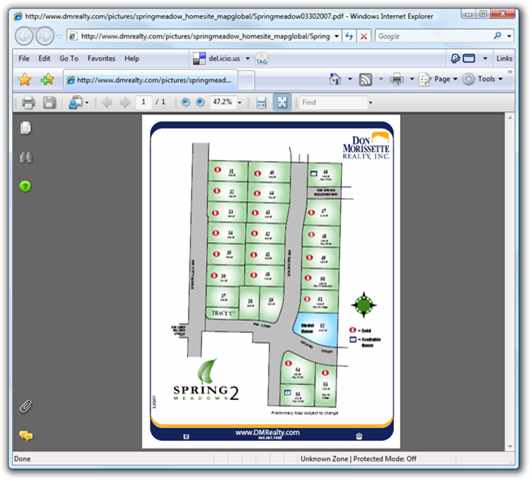
2. Go to your Builder or Realtor's site and get the neighborhood map.
2.转到您的建筑商或房地产经纪人的网站,并获取邻里地图。
Often these maps are in PDF format. Open the PDF and get it as large as you can on the screen.
这些地图通常为PDF格式。 打开PDF,使其在屏幕上尽可能大。
3. Edit the Neighborhood map and remove the non-map stuff, leaving the rest transparent.
3.编辑“邻居”地图并删除非地图内容,其余部分保持透明。
Use the screenshot tool or press Printscreen to get a screenshot in the clipboard. Open your Paint application and paste in the picture of the neighborhood.
使用屏幕截图工具或按Printscreen在剪贴板中获取屏幕截图。 打开您的Paint应用程序,然后粘贴附近的图片。
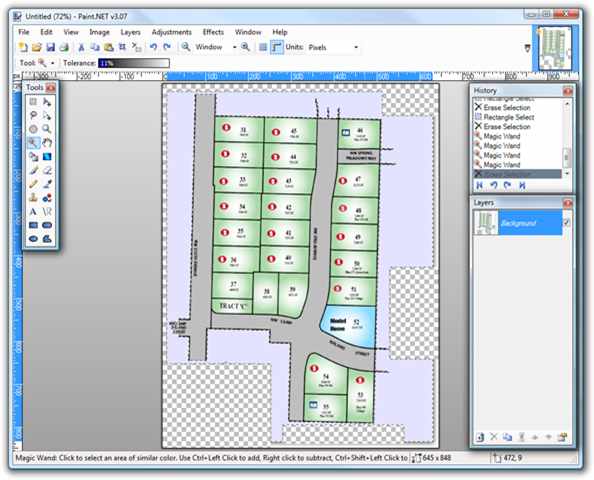
Once you've got your neighborhood picture in Paint.NET (or whatever editor) use the Eraser or Magic Wand tool set to low tolerance to select and delete all the whitespace that isn't part of the map. In this example I'm removing logos, the legend, everything. The checkerboard area underneath means "transparent" or "see-thru." This will make our map look much better once we put it into Google Earth. Now, be sure to save this file as a PNG, which is a file format that includes transparency.
在Paint.NET(或其他编辑器)中获得邻域图片后,使用设置为低公差的橡皮擦或魔术棒工具选择并删除所有不属于地图的空白。 在此示例中,我将删除徽标,图例以及所有内容。 下方的棋盘格区域表示“透明”或“透明”。 一旦将其放入Google Earth,这将使我们的地图看起来更好。 现在,请确保将此文件另存为PNG,这是一种包含透明性的文件格式。
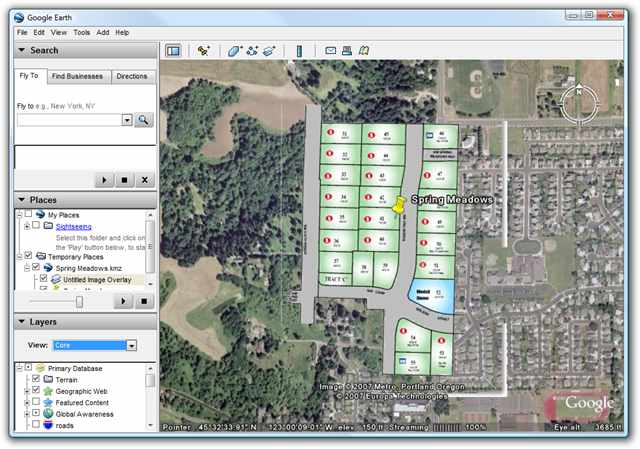
4. Import the new transparent Neighborhood Map and resize
4.导入新的透明邻居地图并调整大小
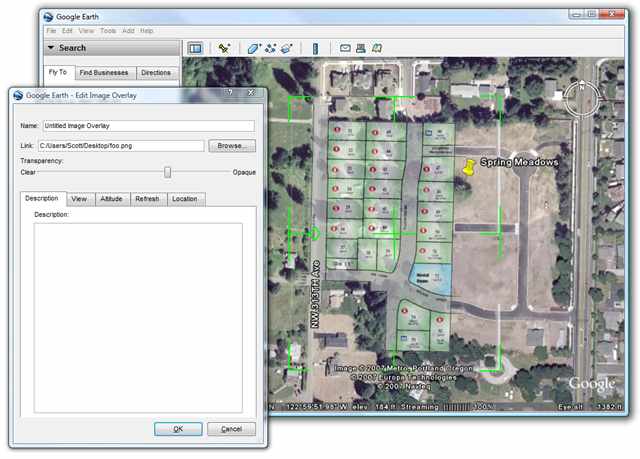
Now, go back over to Google Earth and click Add | Image Overlay and select your just-saved PNG file.
现在,返回到Google Earth并单击“添加” |“添加”。 图像叠加,然后选择刚刚保存的PNG文件。
Goof: I realize now after this is all done that I kind of screwed up this example because I left some white border in the far right and very bottom, and a tiny white line on the far left of the neighborhood map. It looks a smidge sloppy. :( Make sure you double check your transparency and get all the non-map stuff removed cleanly.
Goof:我现在意识到在完成所有步骤后,我有点搞砸了这个示例,因为我在最右端和最底部留了一些白色边框,在邻域图的最左端留了一条细小的白线。 看起来有点草率。 :(确保您仔细检查透明度,并清除所有非地图内容。
This step can be VERY confusing because Google Earth has no way of knowing what the "scale" of your image is, so it'll just fill the screen. You can't immediately resize the image and it can be very frustrating.
这一步可能会非常令人困惑,因为Google Earth无法知道图像的“比例”,因此只能填满整个屏幕。 您无法立即调整图像大小,这可能会令人沮丧。
TIP: You have to Right Click the new Image Overlay in the Places pane, usually on the left site of the Google Earth screen. In my screenshot above it's called "Untitled Image Overlay." Right-click it and select Properties. Only when the Properties Dialog is up can you resize the image. You'll know you're able to resize when Kermit-green colored lines appear all around your image. Hover your mouse over these lines to resize your image. I encourage you to make the image partially transparent to make resizing easier.
提示:您必须右键单击“位置”窗格中的新图像叠加层,通常在“ Google地球”屏幕的左侧站点上。 在上面的屏幕快照中,它称为“无标题的图像叠加层”。 右键单击它,然后选择属性。 仅当“属性”对话框打开时,才可以调整图像大小。 您将知道当图像周围都出现柯尔特绿色的彩色线条时,便可以调整大小。 将鼠标悬停在这些行上可以调整图像大小。 我鼓励您使图像部分透明,以便于调整大小。
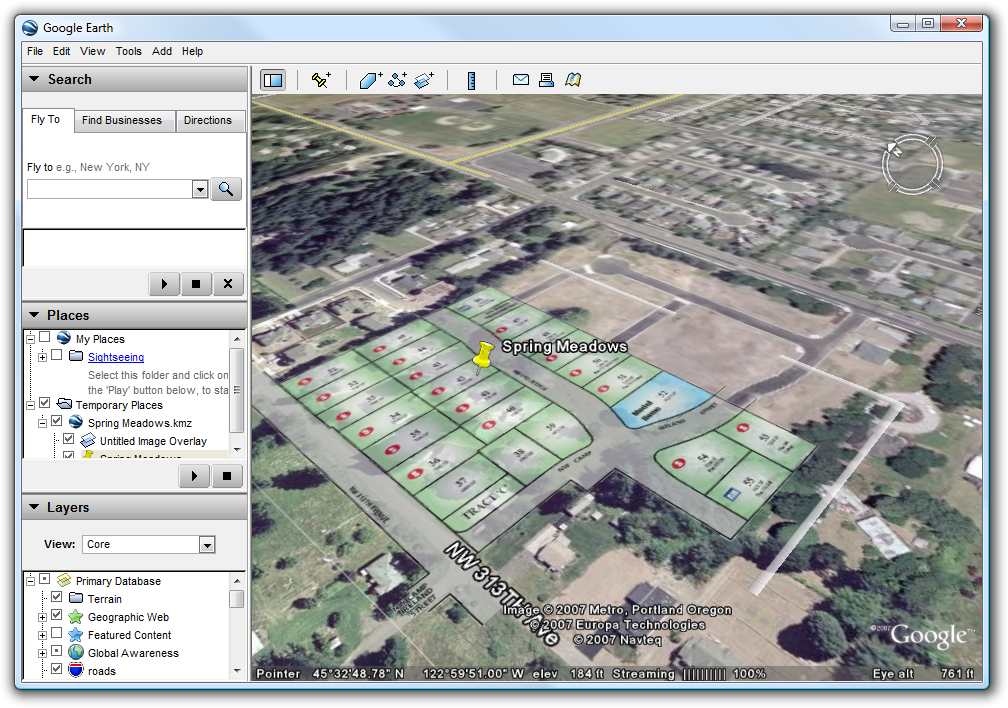
Try to use existing or soon-to-be-connecting streets to get an idea how your neighborhood and lot will fit into the scheme of things. Remember that you can use the mouse wheel and move the view around WHILE you are resizing your image. Note that the Properties Dialog is "modeless" - that means you can do stuff while it's showing, unlike many other Dialog Boxes.
尝试使用现有的或即将连接的街道,以了解您的邻里和地段将如何适应事物方案。 请记住,在调整图像大小时,可以使用鼠标滚轮并在视图周围移动。 请注意,“属性”对话框是“无模式的”-这意味着您可以在显示时做一些事情,这与许多其他对话框不同。
Be sure to press "OK" on the Properties Dialog or you'll undo all your hard work. Now that your image overlay is positioned it is a part of the Google Earth system (at least on your computer) and you can few the lot from multiple angles and elevations. You can also move your Pushpin - again, only via the Properties Dialog - and point it at your lot.
确保在“属性”对话框上按“确定”,否则您将撤消所有的辛苦工作。 现在,您的图像叠加层已放置好,它已经成为Google地球系统的一部分(至少在您的计算机上),并且可以从多个角度和多个高度进行选择。 您也可以再次移动图钉-仅通过“属性”对话框-将其指向您的位置。
4a. Get better imagery in Microsoft Virtual Earth and a Static Bird's Eye Image
4a。 在Microsoft虚拟地球和静态鸟瞰图中获得更好的图像
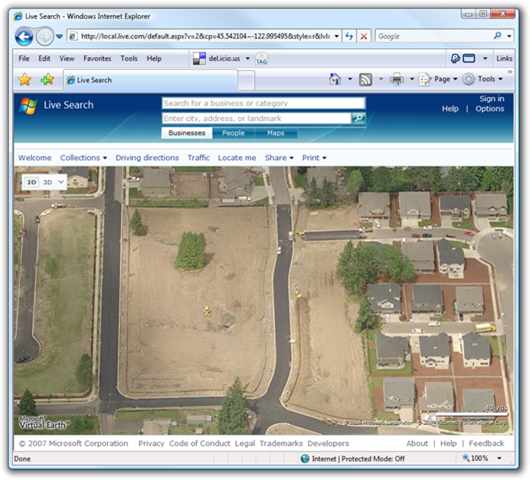
Microsoft Virtual Earth has flyover imagery from airplanes taken at an angle that are MUCH higher resolution than typical satellite photos. The pictures are also sometimes newer than those found at Google. Find your lot/plot in Virtual Earth, and click the Bird's Eye View icon under 2D imagery. Press F11 to put your browser into "Kiosk" Mode in order to get a larger image.
Microsoft Virtual Earth具有从飞机上以比典型卫星照片高得多的分辨率拍摄的立交图像。 这些图片有时也比Google上的图片新。 在“虚拟地球”中找到您的地块/地块,然后单击2D图像下的鸟瞰图图标。 按F11可使浏览器进入“信息亭”模式,以获取更大的图像。
TIP: In Virtual Earth, click Share | View Permalink and notice the latitude and longitude numbers in the URL. You can "hack" that URL (you can edit it) and plug in the exact lat/long numbers from Google Earth to quickly get to the same spot in Virtual Earth.
提示:在虚拟地球中,单击共享| 查看永久链接,并注意URL中的纬度和经度数字。 您可以“修改”该URL(可以对其进行编辑),并从Google Earth中插入确切的经/纬度数字,以快速到达Virtual Earth中的同一位置。
Take a screenshot and put it in the clipboard. Launch your Paint Program and paste it in as a fresh image.
截取屏幕截图并将其放入剪贴板。 启动您的画图程序并将其粘贴为新图像。
Add a new layer in your Paint program. In Paint.NET, click Layers | Import from File and select your PNG file of the neighborhood layout that you created earlier. Make the layer slightly transparent to help with positioning. In Paint.NET you do this by double-clicking on your new layer in the Layers Floating Toolbox and changing it's opacity.
在“画图”程序中添加一个新层。 在Paint.NET中,单击“图层” |“图形”。 从文件导入,然后选择您先前创建的邻域布局的PNG文件。 使图层稍微透明以帮助定位。 在Paint.NET中,您可以通过在“图层浮动工具箱”中双击新图层并更改其不透明度来实现此目的。
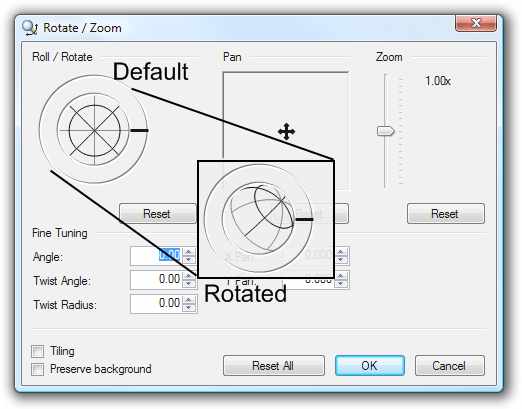
In an application like Photoshop you can use the Free Transform option to skew and warp your neighborhood map to match the angle and aspect of the Bird Eye View imagery. In Paint.NET I didn't think this would be possible, until I figured out the Rotate/Zoom tool. The tick is that you can actually click and drag that little ball to change any selection. You can also use the Pan and Zoom to affect your image. These are the tools you need to get your neighborhood map to fit. A second after you make a change - without closing the Dialog - the picture will update. By making small incremental changes you can line up the map to the photo. If you have trouble with things moving too fast, select the control you want to change and use the Arrow Keys to move things 1 number at a time.
在Photoshop之类的应用程序中,您可以使用“自由变换”选项来倾斜和扭曲邻域地图,以匹配“鸟瞰”图像的角度和纵横比。 在Paint.NET中,直到我弄清楚“旋转/缩放”工具,我才认为这不可能。 勾号是您实际上可以单击并拖动该小球来更改任何选择。 您还可以使用平移和缩放来影响图像。 这些是使邻域图适合的工具。 进行更改后一秒钟-在不关闭对话框的情况下-图片将更新。 通过进行小的增量更改,您可以将地图与照片对齐。 如果您无法快速移动物体,请选择要更改的控件,然后使用箭头键将物体一次移动1个数字。
You might even use the Lasso tool to grab a house in the neighborhood that looks just like your future home and place it on the lot as I've done in the sample below.
您甚至可以使用套索工具在附近的房子中抢购一栋看起来像您将来的房屋的房子,然后像下面在示例中所做的那样将其放置在地块上。
In a Part 2 post I'll show you how to start drawing your house (to the best of primitive ability) in 3D using the home plans and placing it into the Google Earth environment.
在第2部分中,我将向您展示如何开始使用家庭计划以3D方式(最好的原始能力)绘制房屋并将其放置到Google Earth环境中。


 2034
2034

 被折叠的 条评论
为什么被折叠?
被折叠的 条评论
为什么被折叠?
 到【灌水乐园】发言


