raspberry pi
Last year I found a company called SunFounder that makes great Raspberry Pi-related kits and stuff. I got their Raspberry Pi 10" Touchscreen LCD and enjoyed it very much. This month I picked up the SunFounder PiCar 2.0 kit and built it with the kids. The kit includes everything you need except for the Raspberry Pi itself, a mini SD Card (the Pi uses that as hard drive), and two 18650 rechargeable lithium batteries. Those batteries are enough to power both the Pi itself (so the car isn't tethered) as well as provide enough voltage to run the 3 servos AND motors to drive and steer the car around. You can also expand the car with other attachments like light sensors, line followers, and more.
去年,我找到了一家名为SunFounder的公司,该公司生产与Raspberry Pi相关的出色工具包和产品。 我得到了他们的Raspberry Pi 10“触摸屏LCD并非常喜欢它。这个月,我拿起了SunFounder PiCar 2.0套件并与孩子们一起制作了该套件。除了Raspberry Pi本身,迷你SD卡( Pi将该硬盘用作硬盘驱动器)和两节18650可充电锂电池,这些电池足以为Pi本身供电(这样就不会束缚汽车了),并提供足够的电压来驱动3个伺服器和电动机来驱动您还可以通过其他附件(例如光传感器,线路跟随器等)来扩展汽车。
The PiCar 2.0 includes the chassis, a nice USB WiFi adapter with antenna (one less thing to think about if you're using a Raspberry Pi like me), a USB webcam for computer vision scenarios. It includes a TB6612 Motor Driver, PCA9685 PWM (Pulse Width Modulation) Servo Driver with 16 channels for future expansion. The kit also helpfully includes all the tools, screwdriver, wrenches, and bolts.
PiCar 2.0包括底盘,一个带天线的漂亮USB WiFi适配器(如果您像我这样使用Raspberry Pi,则无需多想),一个用于计算机视觉场景的USB网络摄像头。 它包括TB6612电机驱动器,PCA9685 PWM(脉冲宽度调制)伺服驱动器,具有16个通道,可用于将来扩展。 该套件还有助于包括所有工具,螺丝刀,扳手和螺栓。
All the code for the SunFounder PiCar-V is on GitHub and while there can be a few hiccups with some of the English instructions, there are a bunch of YouTube videos and folks online doing the same thing so we had no trouble making the robot in a weekend.
SunFounder PiCar-V的所有代码都在GitHub上,尽管可能会有些打扰一些英语说明,但是有很多YouTube视频和在线的人都在做同样的事情,因此我们可以轻松地将机器人安装在周末。
PRO TIP - Boot your new Raspberry Pi up with ssh enabled and already joined to your wifi
专业提示-在启用ssh的情况下启动新的Raspberry Pi,并已加入wifi
You'll need to use a tool like Etcher.io to burn a copy of the Raspbian operating system on to a mini SD card. I prefer to save time and avoid having to connect a new Raspberry Pi to HDMI and a mouse and keyboard, so I get the Pi onto my wifi network and enable SSH by copying these two files to the root of the file system of the freshly burned mini SD card. This will cause the Pi to automatically join your network when it boots up for the first time. Then I used Ubuntu on Windows 10 to ssh into the Pi and follow the instructions.
您需要使用诸如Etcher.io之类的工具将Raspbian操作系统的副本刻录到迷你SD卡上。 我希望节省时间,避免将新的Raspberry Pi连接到HDMI和鼠标和键盘,因此我将Pi插入到wifi网络中,并通过将这两个文件复制到新刻录文件系统的根目录来启用SSH迷你SD卡。 这将导致Pi在首次启动时自动加入您的网络。 然后,我在Windows 10上使用Ubuntu SSH进入Pi并按照说明进行操作。
- Make a 0 byte file called "ssh" and copy it to the root of the new PI disk 制作一个名为“ ssh”的0字节文件,并将其复制到新PI磁盘的根目录中
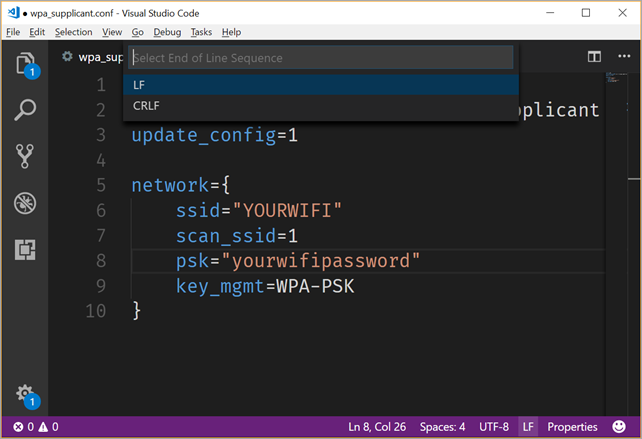
- Make a file called "wpa_supplicant.conf" with just linefeeds at the end and make it look like this. Copy it to the root of the new PI disk. 制作一个名为“ wpa_supplicant.conf”的文件,仅在末尾添加换行符,使其看起来像这样。 将其复制到新PI磁盘的根目录。
country=US
ctrl_interface=DIR=/var/run/wpa_supplicant GROUP=netdev
update_config=1

network={
    ssid="YOURWIFI"
    scan_ssid=1
    psk="yourwifipassword"
    key_mgmt=WPA-PSK
}
I like to use Notepad2 or Visual Studio Code to change the line endings of a file. You can see the CRLF or the LF in the status car and click it. Unix/Raspbian/Raspberry Pi likes just an LF (line feed) for the lineending, while Windows defaults to using CRLF (Carriage Return/Line Feed, or 0x13 0x10) for text files.
我喜欢使用Notepad2或Visual Studio Code来更改文件的行尾。 您可以在状态车中看到CRLF或LF,然后单击它。 Unix / Raspbian / Raspberry Pi只喜欢使用LF(换行)作为换行符,而Windows默认使用文本文件使用CRLF(回车/换行或0x13 0x10)。
The default Raspberry username is pi and the default password is raspberry. You may want to change that. SunFounder has a decent "install_dependencies" script that you'll run on the Pi:
默认的Raspberry用户名是pi,默认密码是raspberry。 您可能要更改它。 SunFounder有一个不错的“ install_dependencies”脚本,您可以在Pi上运行它:
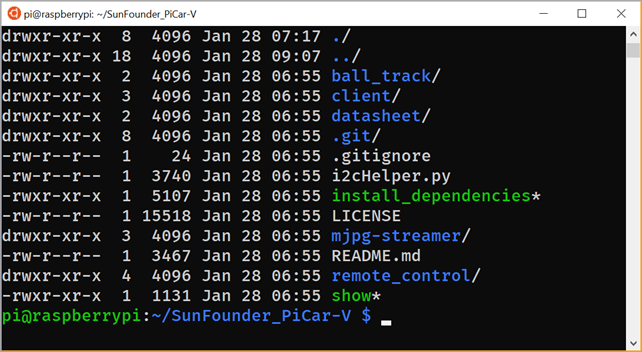
Once you've built the PiCar you can ssh in and run their development server that gives you a little WebAPI to control the car. The SunFounder folks are pretty good at web development (less so with mobile apps) and have a nice Django app to control the PiCar.
构造好PiCar之后,您就可以插入并运行其开发服务器,该服务器将为您提供一些WebAPI来控制汽车。 SunFounder的人员非常擅长Web开发(移动应用程序则很少),并且拥有一个不错的Django应用程序来控制PiCar。
Here's the view from the front camera of the PiCar as viewed through local website on port 8000. It's looking at my computer looking at itself. ;)
这是通过本地网站8000在端口上查看的PiCar前置摄像头的视图。它是看着我的计算机在查看自己。 ;)
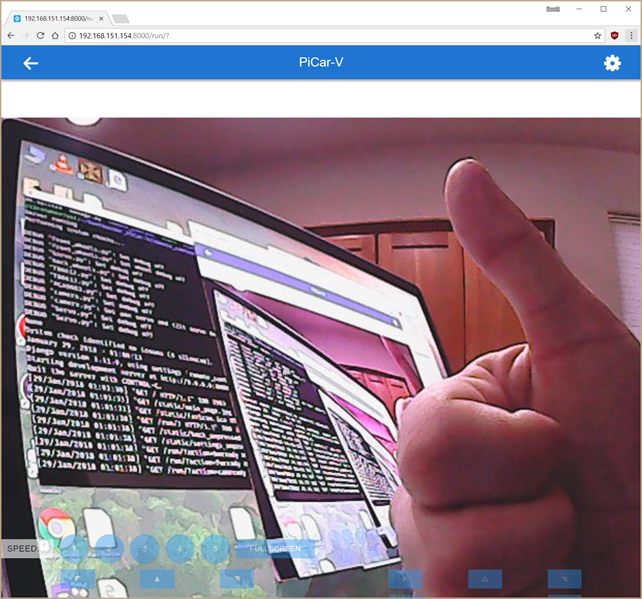
You're able to control the PiCar from this web interface with the keyboard. You can move the car and steer with WASD, as well as move the head/camera independently. You will need to enter the settings area (upper right corner) and calibrate the back wheels direction. By default, one wheel may go the opposite direction because they can't be sure how you mounted them, so you'll need to reverse one wheel to ensure they both go in the same direction.
您可以使用键盘从此Web界面控制PiCar。 您可以使用WASD移动汽车和转向,也可以独立移动头部/摄像机。 您将需要进入设置区域(右上角)并校准后轮方向。 默认情况下,一个轮子可能会朝相反的方向移动,因为他们不确定如何安装它们,因此您需要反转一个轮子以确保它们都朝相同的方向移动。
They also included a client application, also written in Python. On Windows you'll need to install Python, and when you run client.py you may get an error:
它们还包括一个用Python编写的客户端应用程序。 在Windows上,您需要安装Python,并且在运行client.py时可能会收到错误消息:
ImportError: No module named requestsYou'll need to run "pip3 install requests" as that module isn't installed by default.
您需要运行“ pip3安装请求”,因为默认情况下未安装该模块。
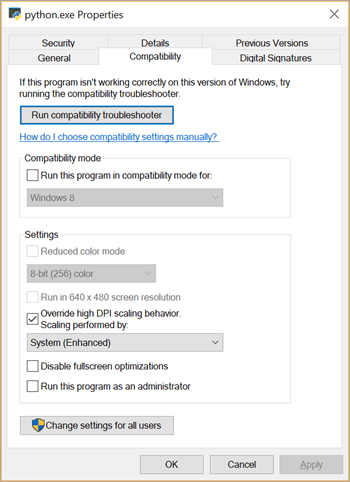
Additionally, Python apps aren't smart about High-DPI displays, so I went to C:\Users\scott\appdata\local\Programs\Python\Python36 and right click'ed the Python.exe and set the DPI setting to "System (Enhanced)" like this.
此外,Python应用程序对高DPI显示并不明智,因此我转到C:\ Users \ scott \ appdata \ local \ Programs \ Python \ Python36,然后右键单击Python.exe并将DPI设置设置为“系统(增强型)”。
The client app is best for "Zeroing out" the camera and wheels, in case they are favoring one side or the other.
客户端应用程序最适合“缩小”相机和轮子,以防它们偏向一侧或另一侧。
All in all, building the SunFounder "Raspberry Pi Video Car Kit 2.0" with the kids was a great experience. The next step is to see what else we can do with it!
总而言之,与孩子们一起创建SunFounder“ Raspberry Pi视频车载套件2.0”是一个很棒的经历。 下一步是看看我们还能用它做什么!
- Add a speaker so it talks? 添加发言人以使其说话?
Add Alexa support so you can talk to it?
添加Alexa支持,以便您可以与之交谈吗?
Make the car drive around and take pictures, then use Azure cognitive services to announce what it sees?
让汽车四处行驶并拍照,然后使用Azure认知服务宣布看到的东西?
- Or, as my little boys say, "add weapons and make another bot for it to fight!" 或者,就像我的小男孩所说的那样,“添加武器并制造另一个机器人使其战斗!”
What do you think?
你怎么看?
* I use Amazon affiliate links and appreciate it when you use them! It supports this blog and sometimes gives me enough money to buy gadgets like this!
*我使用亚马逊会员链接,并在您使用它们时表示赞赏! 它支持此博客,有时还给我足够的钱来购买这样的小工具!
Sponsor: Unleash a faster Python! Supercharge your applications performance on future forward Intel® platforms with The Intel® Distribution for Python. Available for Windows, Linux, and macOS. Get the Intel® Distribution for Python Now!
赞助者:释放更快的Python ! 借助适用于Python的英特尔®发行版,在未来的未来英特尔®平台上增强应用程序性能。 适用于Windows,Linux和macOS。 立即获取适用于Python的英特尔®发行版!
翻译自: https://www.hanselman.com/blog/building-a-raspberry-pi-car-robot-with-wifi-and-video
raspberry pi


 674
674

 被折叠的 条评论
为什么被折叠?


